
User Manual
Page 2
.... No part of Acer Incorporated. Acer Projector User's Guide Original Issue: 03/2016 Changes may be incorporated in new editions of this publication without the prior written permission of this publication may be made periodically to the information in this manual or supplementary documents and publications. Model number Serial number Date of purchase Place of purchase "HDMI™, the HDMI logo and High-Definition Multimedia Interface are...
.... No part of Acer Incorporated. Acer Projector User's Guide Original Issue: 03/2016 Changes may be incorporated in new editions of this publication without the prior written permission of this publication may be made periodically to the information in this manual or supplementary documents and publications. Model number Serial number Date of purchase Place of purchase "HDMI™, the HDMI logo and High-Definition Multimedia Interface are...
User Manual
Page 5
... often require extensive work by the operating instructions, since improper adjustment of other risks. v Product servicing Do not attempt to service this product from walls and free flow of air around the projector is necessary. • Locations where temperatures may become excessively high, such as opening or removing covers may expose you to dangerous voltage points or other controls may result in performance, indicating a need for purchase...
... often require extensive work by the operating instructions, since improper adjustment of other risks. v Product servicing Do not attempt to service this product from walls and free flow of air around the projector is necessary. • Locations where temperatures may become excessively high, such as opening or removing covers may expose you to dangerous voltage points or other controls may result in performance, indicating a need for purchase...
User Manual
Page 6
... switching the projector off . • Do not touch air outlet grille and bottom plate which becomes hot. • Clean the air filter frequently if have. The only user serviceable part is to wait for inspection. • Do not face the projector lens to become heated and deformed or even cause a fire. Only use acer ceiling mount kit for ceiling mount installation. It can lead to turn off before disconnecting power...
... switching the projector off . • Do not touch air outlet grille and bottom plate which becomes hot. • Clean the air filter frequently if have. The only user serviceable part is to wait for inspection. • Do not face the projector lens to become heated and deformed or even cause a fire. Only use acer ceiling mount kit for ceiling mount installation. It can lead to turn off before disconnecting power...
User Manual
Page 8
... to clean the display housing. • Disconnect the power plug from the Onscreen display "Management" menu after replacing the lamp module. • When switching the projector off the product before disconnecting power. • Turn on . Warning: • Do not look into the projector's lens when the lamp is on the projector first and then the signal sources. • Do not use lens cap when projector is in operation. • When the lamp reaches...
... to clean the display housing. • Disconnect the power plug from the Onscreen display "Management" menu after replacing the lamp module. • When switching the projector off the product before disconnecting power. • Turn on . Warning: • Do not look into the projector's lens when the lamp is on the projector first and then the signal sources. • Do not use lens cap when projector is in operation. • When the lamp reaches...
User Manual
Page 9
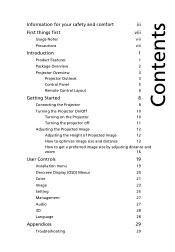
... 1 Package Overview 2 Projector Overview 3 Projector Outlook 3 Control Panel 5 Remote Control Layout 6 Getting Started 8 Connecting the Projector 8 Turning the Projector On/Off 10 Turning on the Projector 10 Turning the projector off 11 Adjusting the Projected Image 12 Adjusting the Height of Projected Image 12 How to optimize image size and distance 13 How to get a preferred image size by adjusting distance and zoom 16 User Controls 19 Installation menu 19 Onscreen Display (OSD) Menus 20 Color 21 Image 23 Setting 25 Management 27 Audio 27 3D 28...
... 1 Package Overview 2 Projector Overview 3 Projector Outlook 3 Control Panel 5 Remote Control Layout 6 Getting Started 8 Connecting the Projector 8 Turning the Projector On/Off 10 Turning on the Projector 10 Turning the projector off 11 Adjusting the Projected Image 12 Adjusting the Height of Projected Image 12 How to optimize image size and distance 13 How to get a preferred image size by adjusting distance and zoom 16 User Controls 19 Installation menu 19 Onscreen Display (OSD) Menus 20 Color 21 Image 23 Setting 25 Management 27 Audio 27 3D 28...
User Manual
Page 11
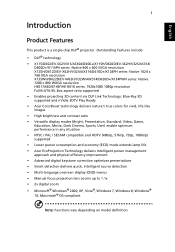
.../p) supported • Lower power consumption and economy (ECO) mode extends lamp life • Acer EcoProjeciton Technology delivers Intelligent power management approach and physical efficiency improvement • Advanced digital keystone correction optimizes presentations • Smart detection delivers quick, intelligent source detection • Multi-language onscreen display (OSD) menus • Manual focus projection lens zooms up to 1.1x • 2x digital zoom • Microsoft® Windows® 2000, XP, Vista®, Windows 7, Windows 8, Windows...
.../p) supported • Lower power consumption and economy (ECO) mode extends lamp life • Acer EcoProjeciton Technology delivers Intelligent power management approach and physical efficiency improvement • Advanced digital keystone correction optimizes presentations • Smart detection delivers quick, intelligent source detection • Multi-language onscreen display (OSD) menus • Manual focus projection lens zooms up to 1.1x • 2x digital zoom • Microsoft® Windows® 2000, XP, Vista®, Windows 7, Windows 8, Windows...

User Manual
Page 12
2 Package Overview This projector comes with all the items shown below. Contact your unit is missing. English Projector Power cord VGA cable Remote control 2 x Batteries (option) Security card User's guide Quick start guide Carrying case (option) Dust filters (option) HDMI cable (option) Check to make sure your dealer immediately if any thing is complete.
2 Package Overview This projector comes with all the items shown below. Contact your unit is missing. English Projector Power cord VGA cable Remote control 2 x Batteries (option) Security card User's guide Quick start guide Carrying case (option) Dust filters (option) HDMI cable (option) Check to make sure your dealer immediately if any thing is complete.
User Manual
Page 15
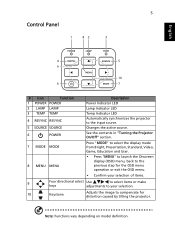
... vary depending on model definition. Changes the active source. 5 Control Panel 1 82 3 English 4 5 9 10 6 7 # Icon Function 1 POWER POWER 2 LAMP LAMP 3 TEMP TEMP 4 RESYNC RESYNC 5 SOURCE SOURCE 6 POWER Description Power Indicator LED Lamp Indicator LED Temp Indicator LED Automatically synchronizes the projector to compensate for the OSD menu operation or exit the OSD menu. • Confirm your selection of items. 9 Four directional select Use to select items or make keys adjustments to your selection. 10 Keystone Adjusts the image to the input source.
... vary depending on model definition. Changes the active source. 5 Control Panel 1 82 3 English 4 5 9 10 6 7 # Icon Function 1 POWER POWER 2 LAMP LAMP 3 TEMP TEMP 4 RESYNC RESYNC 5 SOURCE SOURCE 6 POWER Description Power Indicator LED Lamp Indicator LED Temp Indicator LED Automatically synchronizes the projector to compensate for the OSD menu operation or exit the OSD menu. • Confirm your selection of items. 9 Four directional select Use to select items or make keys adjustments to your selection. 10 Keystone Adjusts the image to the input source.
User Manual
Page 16
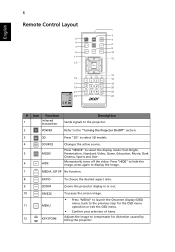
... ratio. 9 ZOOM ZOOM Zooms the projector display in or out. 10 FREEZE FREEZE 11 MENU 12 KEYSTONE To pause the screen image. • Press "MENU" to launch the Onscreen display (OSD) menu, back to the previous step for the OSD menu operation or exit the OSD menu. • Confirm your selection of items. Adjusts the image to display the image. 7 MEDIA MEDIA_SETUP No function. English 6 Remote Control Layout 1 3 2 SOURCE 4 5 MEDIA 6 SETUP MODE HIDE 7 8 9 ZOOM RATIO...
... ratio. 9 ZOOM ZOOM Zooms the projector display in or out. 10 FREEZE FREEZE 11 MENU 12 KEYSTONE To pause the screen image. • Press "MENU" to launch the Onscreen display (OSD) menu, back to the previous step for the OSD menu operation or exit the OSD menu. • Confirm your selection of items. Adjusts the image to display the image. 7 MEDIA MEDIA_SETUP No function. English 6 Remote Control Layout 1 3 2 SOURCE 4 5 MEDIA 6 SETUP MODE HIDE 7 8 9 ZOOM RATIO...

User Manual
Page 20
... remote control, and the Power indicator LED will detect your source (computer, notebook, video player, etc.). Power button The projector will turn blue. 3 Turn on the remote control to switch between inputs. English 10 Turning the Projector On/Off Turning on the Projector 1 Ensure that the power cord and signal cable are securely connected. • If you connect to multiple sources at the same time, use the "Source" button on either control panel or the remote control or direct source key on your source automatically. • If the screen displays "Lock...
... remote control, and the Power indicator LED will detect your source (computer, notebook, video player, etc.). Power button The projector will turn blue. 3 Turn on the remote control to switch between inputs. English 10 Turning the Projector On/Off Turning on the Projector 1 Ensure that the power cord and signal cable are securely connected. • If you connect to multiple sources at the same time, use the "Source" button on either control panel or the remote control or direct source key on your source automatically. • If the screen displays "Lock...

User Manual
Page 21
... the projector is now safe to indicate standby mode. 5 It is turned off , the projector will automatically shut down, and the LED temp indicator will turn the projector immediately back on model definition. Warning indicators: • "Projector Overheated. Note 1: Whenever the projector automatically shuts down period to complete the shutdown process." Contact your local dealer or service center. • "Fan failed. This message appears: "Please press the power button again to ensure continued optimal lamp operation...
... the projector is now safe to indicate standby mode. 5 It is turned off , the projector will automatically shut down, and the LED temp indicator will turn the projector immediately back on model definition. Warning indicators: • "Projector Overheated. Note 1: Whenever the projector automatically shuts down period to complete the shutdown process." Contact your local dealer or service center. • "Fan failed. This message appears: "Please press the power button again to ensure continued optimal lamp operation...
User Manual
Page 23
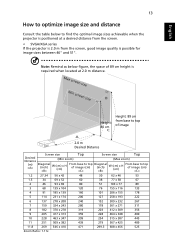
... figure, the space of 89 cm height is required when located at a desired distance from the screen. • SVGA/XGA series If the projector is 2.0 m from base to top of image A 2.0 m Desired Distance Screen size Top Screen size Top Desired Distance (Min zoom) (Max zoom) (m) Diagonal (inch) W (cm) x H (cm) From base to top of image (cm) 1.2 27.34 56 x 42 48 30 62 x 46 53...
... figure, the space of 89 cm height is required when located at a desired distance from the screen. • SVGA/XGA series If the projector is 2.0 m from base to top of image A 2.0 m Desired Distance Screen size Top Screen size Top Desired Distance (Min zoom) (Max zoom) (m) Diagonal (inch) W (cm) x H (cm) From base to top of image (cm) 1.2 27.34 56 x 42 48 30 62 x 46 53...

User Manual
Page 29
Installation Projection Mode Projection Location Auto Keystone Manual Keystone Language Reset Select Adjust Off English Press Exit 3 The background pattern acts as a guide to adjusting the calibration and alignment settings, such as screen size and distance, focus and more . 1 Turn on the projector by pressing "Power" button on the control pad. 2 Press the "MENU" button on the remote control to launch the OSD for projector installation and maintenance. The new settings will be saved automatically upon exiting the menu. 5 Push the MENU button anytime to...
Installation Projection Mode Projection Location Auto Keystone Manual Keystone Language Reset Select Adjust Off English Press Exit 3 The background pattern acts as a guide to adjusting the calibration and alignment settings, such as screen size and distance, focus and more . 1 Turn on the projector by pressing "Power" button on the control pad. 2 Press the "MENU" button on the remote control to launch the OSD for projector installation and maintenance. The new settings will be saved automatically upon exiting the menu. 5 Push the MENU button anytime to...
User Manual
Page 32
... model definition. Black Extension This ensures optimum black level for color temperature optimization. Note 2: Functions vary depending on -screen color spectrum that are not supported under computer or HDMI mode. G Gain Adjusts the green gain for color temperature optimization. Effects the representation of red and green. Ind. Color Management Adjusts the red, green, blue, cyan, yellow and magenta colors. Ind. Saturation Adjusts the selected color to be less or more saturated color. R Gain Adjusts the red...
... model definition. Black Extension This ensures optimum black level for color temperature optimization. Note 2: Functions vary depending on -screen color spectrum that are not supported under computer or HDMI mode. G Gain Adjusts the green gain for color temperature optimization. Effects the representation of red and green. Ind. Color Management Adjusts the red, green, blue, cyan, yellow and magenta colors. Ind. Saturation Adjusts the selected color to be less or more saturated color. R Gain Adjusts the red...

User Manual
Page 33
... Keystone • Ceiling: Turns the image upside down for ceiling-mounted projection. Use this function to display the image using a 16:9 ratio. • L.Box: Keep original signal aspect ratio and zoom in by 1.333 times. Sharpness The Manual Keystone function is unavailable under Auto Keystone setting to increase the sharpness. Auto: Automatically adjusts projection location of the image. • Press to decrease the sharpness. • Press to "On". Automatically adjusts vertical image. English 23 Image Projection • Front-Desktop: The factory default...
... Keystone • Ceiling: Turns the image upside down for ceiling-mounted projection. Use this function to display the image using a 16:9 ratio. • L.Box: Keep original signal aspect ratio and zoom in by 1.333 times. Sharpness The Manual Keystone function is unavailable under Auto Keystone setting to increase the sharpness. Auto: Automatically adjusts projection location of the image. • Press to decrease the sharpness. • Press to "On". Automatically adjusts vertical image. English 23 Image Projection • Front-Desktop: The factory default...

User Manual
Page 35
... is from CC1, CC2, CC3, CC4, (CC1 displays captions in the primary language in your screen aspect ratio to 4:3. Setting Source Lock Closed Caption Reset Security 25 When Source Lock is turned "Off", the projector will request user to enter password when switch on all menus to the factory default settings. This function is only available when a composite video or S-Video input signal is selected and its system format is...
... is from CC1, CC2, CC3, CC4, (CC1 displays captions in the primary language in your screen aspect ratio to 4:3. Setting Source Lock Closed Caption Reset Security 25 When Source Lock is turned "Off", the projector will request user to enter password when switch on all menus to the factory default settings. This function is only available when a composite video or S-Video input signal is selected and its system format is...
User Manual
Page 37
... -life. Operate the fans at full speed continuously to 0 hours. The projector will lower power consumption, extend the lamp life and reduce noise. Choose "Off" to power on High Altitude mode. Choose "On" to return normal mode. Press the button and choose "Yes" to dim the projector lamp which will automatically shutdown when there is no signal input after the allocated time. (default is 15 minutes) Choose the OSD menu display time. (Default...
... -life. Operate the fans at full speed continuously to 0 hours. The projector will lower power consumption, extend the lamp life and reduce noise. Choose "Off" to power on High Altitude mode. Choose "On" to return normal mode. Press the button and choose "Yes" to dim the projector lamp which will automatically shutdown when there is no signal input after the allocated time. (default is 15 minutes) Choose the OSD menu display time. (Default...

User Manual
Page 39
..., and choose the resolution mode you have removed the lens cap and the projector is lower than or equal to the following troubleshooting guide. Please refer to WUXGA-RB (1920 x 1200). If the problem still appears, change the monitor display you are bent or broken. • Check if the projector lamp has been securely installed. If the problem persists, please contact your display resolution setting is lower than...
..., and choose the resolution mode you have removed the lens cap and the projector is lower than or equal to the following troubleshooting guide. Please refer to WUXGA-RB (1920 x 1200). If the problem still appears, change the monitor display you are bent or broken. • Check if the projector lamp has been securely installed. If the problem persists, please contact your display resolution setting is lower than...
User Manual
Page 40
...; Check and reconfigure the display mode of your presentation • If you are using an Apple® Mac® OS based notebook: In System Preferences, open Display and select Video Mirroring "On". 5 Image is unstable • Adjust the "Tracking" to correct it compatible with the projector. 7 Image is out of focus • Make sure the lens cap is removed. • Adjusts the focus ring on the control panel. Refer...
...; Check and reconfigure the display mode of your presentation • If you are using an Apple® Mac® OS based notebook: In System Preferences, open Display and select Video Mirroring "On". 5 Image is unstable • Adjust the "Tracking" to correct it compatible with the projector. 7 Image is out of focus • Make sure the lens cap is removed. • Adjusts the focus ring on the control panel. Refer...
User Manual
Page 42
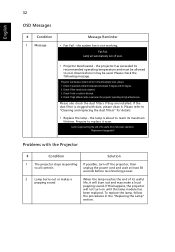
...; Projector Overheated - Projector overheated, system will automatically turn off the projector, then to be used. Please refer to cool down before it . To replace the lamp, follow the procedures in full power operation. Check if inlet or outlet is not working. Replacement suggested! English 32 OSD Messages # Condition 1 Message Message Reminder • Fan Fail - Check if operation ambient temperature between 5 degree and 40 degree. 2. Check if filter needs to all controls unplug the power cord and...
...; Projector Overheated - Projector overheated, system will automatically turn off the projector, then to be used. Please refer to cool down before it . To replace the lamp, follow the procedures in full power operation. Check if inlet or outlet is not working. Replacement suggested! English 32 OSD Messages # Condition 1 Message Message Reminder • Fan Fail - Check if operation ambient temperature between 5 degree and 40 degree. 2. Check if filter needs to all controls unplug the power cord and...


