User Manual
Page 6
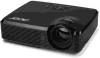
...lamps beyond the rated lamp life. • Never replace the lamp assembly or any object when the projector is securely installed. Only use an Acer ceiling mount kit and ensure it is under operation as opening or removing covers may expose you can lead to fire. • Do not frequently turn ...higher than 10,000 feet. • Do not operate if smoke, a strange noise, or an odor are coming out of displaying inverted images for ceiling-mounted installation. It may hurt your dealer for inspection. • Do not face the projector lens to the sun. It can hear clearly and comfortably. ...
...lamps beyond the rated lamp life. • Never replace the lamp assembly or any object when the projector is securely installed. Only use an Acer ceiling mount kit and ensure it is under operation as opening or removing covers may expose you can lead to fire. • Do not frequently turn ...higher than 10,000 feet. • Do not operate if smoke, a strange noise, or an odor are coming out of displaying inverted images for ceiling-mounted installation. It may hurt your dealer for inspection. • Do not face the projector lens to the sun. It can hear clearly and comfortably. ...
User Manual
Page 9
Using the stereoscopic player 36 Using 3D glasses (optional) 37 Watching 3D DVD content 37 Appendices 39 Troubleshooting 39 LED and alarm definitions 42 Replacing and cleaning the dust filter 43 Replacing the lamp 44 Ceiling mount installation 45 Specifications 48 Compatibility modes 50 Regulations and safety notices 54
Using the stereoscopic player 36 Using 3D glasses (optional) 37 Watching 3D DVD content 37 Appendices 39 Troubleshooting 39 LED and alarm definitions 42 Replacing and cleaning the dust filter 43 Replacing the lamp 44 Ceiling mount installation 45 Specifications 48 Compatibility modes 50 Regulations and safety notices 54
User Manual
Page 33
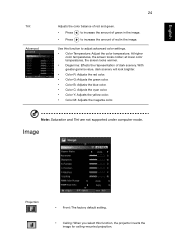
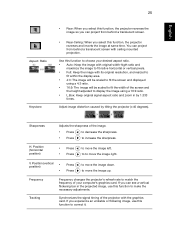
Use this function, the projector inverts the image for ceiling-mounted projection. Note: Saturation and Tint are not supported under computer mode. With greater gamma value, dark scenery will look brighter. • Color R: Adjusts the red ...: Effects the representation of red in the image. At higher color temperatures, the screen looks colder; Image Projection • Front: The factory default setting. • Ceiling: When you select this function to increase the amount of dark scenery.
Use this function, the projector inverts the image for ceiling-mounted projection. Note: Saturation and Tint are not supported under computer mode. With greater gamma value, dark scenery will look brighter. • Color R: Adjusts the red ...: Effects the representation of red in the image. At higher color temperatures, the screen looks colder; Image Projection • Front: The factory default setting. • Ceiling: When you select this function to increase the amount of dark scenery.
User Manual
Page 34
...to decrease the sharpness. • Press to move the image down. to to increase the sharpness. You can project from behind a translucent screen with ceiling mounted projection. Position (vertical position) • • Press Press to make the necessary adjustments. If you experience an unstable or flickering image, use this...; Rear: When you select this function, the projector reverses the image so you can project from behind a translucent screen. • Rear-Ceiling: When you select this function, the projector reverses and inverts the image at same time.
...to decrease the sharpness. • Press to move the image down. to to increase the sharpness. You can project from behind a translucent screen with ceiling mounted projection. Position (vertical position) • • Press Press to make the necessary adjustments. If you experience an unstable or flickering image, use this...; Rear: When you select this function, the projector reverses the image so you can project from behind a translucent screen. • Rear-Ceiling: When you select this function, the projector reverses and inverts the image at same time.
User Manual
Page 54
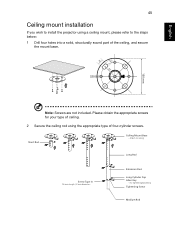
...the appropriate screws for your type of ceiling. 2 Secure the ceiling rod using a ceiling mount, please refer to the steps below: 1 Drill four holes into a solid, structurally sound part of four-cylinder screws. Extension Rod Long Cylinder Cap Allen Key - Attach to ceiling Long Rod Screw Type A 50 ...mm length / 8 mm diameter - For tightening/loosening Tightening Screw Medium Rod 8.4 mm English English 45 Ceiling mount installation If you wish to install the projector using the appropriate...
...the appropriate screws for your type of ceiling. 2 Secure the ceiling rod using a ceiling mount, please refer to the steps below: 1 Drill four holes into a solid, structurally sound part of four-cylinder screws. Extension Rod Long Cylinder Cap Allen Key - Attach to ceiling Long Rod Screw Type A 50 ...mm length / 8 mm diameter - For tightening/loosening Tightening Screw Medium Rod 8.4 mm English English 45 Ceiling mount installation If you wish to install the projector using the appropriate...
User Manual
Page 55
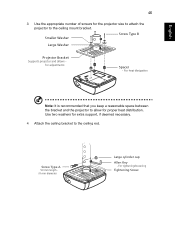
... for adjustments Spacer - Smaller Washer Screw Type B Large Washer Projector Bracket Supports projector and allows - for the projector size to attach the projector to the ceiling rod. Use two washers for proper heat distribution. For tightening/loosening Tightening Screw Screw Type A 50 mm length 08 mm diameter Large cylinder cap Allen... Note: It is recommended that you keep a reasonable space between the bracket and the projector to allow for extra support, if deemed necessary. 4 Attach the ceiling bracket to the ceiling mount bracket.
... for adjustments Spacer - Smaller Washer Screw Type B Large Washer Projector Bracket Supports projector and allows - for the projector size to attach the projector to the ceiling rod. Use two washers for proper heat distribution. For tightening/loosening Tightening Screw Screw Type A 50 mm length 08 mm diameter Large cylinder cap Allen... Note: It is recommended that you keep a reasonable space between the bracket and the projector to allow for extra support, if deemed necessary. 4 Attach the ceiling bracket to the ceiling mount bracket.


