
User Manual
Page 2
... obligation to their respective companies. Acer Projector X1110/X1110A/X1210/X1210A/X1210K/X1210S/X1213/X1216 Series Model number Serial number Date of purchase Place of purchase Acer and the Acer logo are trademarks or registered trademarks of purchase information in new editions of Acer Incorporated. Acer Projector X1110/X1110A/X1210/X1210A/X1210K/X1210S/X1213/X1216 Series User's Guide Original...
... obligation to their respective companies. Acer Projector X1110/X1110A/X1210/X1210A/X1210K/X1210S/X1213/X1216 Series Model number Serial number Date of purchase Place of purchase Acer and the Acer logo are trademarks or registered trademarks of purchase information in new editions of Acer Incorporated. Acer Projector X1110/X1110A/X1210/X1210A/X1210K/X1210S/X1213/X1216 Series User's Guide Original...
User Manual
Page 3
.... Caution for Accessibility Be sure that could be seriously damaged. • Slots and openings are provided for ventilation to unplug the power cord from the projector. • If the system has multiple sources of any kind into the product. Warnings! • Do not use liquid cleaners or aerosol cleaners. The openings...
.... Caution for Accessibility Be sure that could be seriously damaged. • Slots and openings are provided for ventilation to unplug the power cord from the projector. • If the system has multiple sources of any kind into the product. Warnings! • Do not use liquid cleaners or aerosol cleaners. The openings...
User Manual
Page 5
... adjustment of small children. Additional safety information • Do not look into the product • the product was spilled into the projector's lens when the lamp is poorly ventilated or confined. Warning! The bright light may contaminate optical components, shorten the life span and... service • the product does not operate normally after following the operating instructions Note: Adjust only those controls that is on the projector first and then signal sources. • Do not place the product in performance, indicating a need for purchase options. At least ...
... adjustment of small children. Additional safety information • Do not look into the product • the product was spilled into the projector's lens when the lamp is poorly ventilated or confined. Warning! The bright light may contaminate optical components, shorten the life span and... service • the product does not operate normally after following the operating instructions Note: Adjust only those controls that is on the projector first and then signal sources. • Do not place the product in performance, indicating a need for purchase options. At least ...

User Manual
Page 6
...wait for the fan to stop before disconnecting power. • Do not turn off the main power abruptly or unplug the projector during operation. Only use acer ceiling mount kit for ceiling mount installation. It can lead to disassemble this case, unplug immediately and contact your dealer for ...the rated lamp life. Please be sure to change the lamp when warning messages display. • When changing the lamp, please allow the projector to cool down, and follow all changing instructions. • Reset the "Lamp Hour Reset" function from the Onscreen Display "Management" menu after...
...wait for the fan to stop before disconnecting power. • Do not turn off the main power abruptly or unplug the projector during operation. Only use acer ceiling mount kit for ceiling mount installation. It can lead to disassemble this case, unplug immediately and contact your dealer for ...the rated lamp life. Please be sure to change the lamp when warning messages display. • When changing the lamp, please allow the projector to cool down, and follow all changing instructions. • Reset the "Lamp Hour Reset" function from the Onscreen Display "Management" menu after...
User Manual
Page 7
... music at www.eiae.org. For more information on the Waste from Electrical and Electronics Equipment (WEEE) regulations, visit http://www.acer-group.com/public/ Sustainability/sustainability01.htm Mercury advisory For projectors or electronic products containing an LCD/CRT monitor or display: "Lamp(s) contain Mercury, Dispose Properly." For lamp-specific disposal information...
... music at www.eiae.org. For more information on the Waste from Electrical and Electronics Equipment (WEEE) regulations, visit http://www.acer-group.com/public/ Sustainability/sustainability01.htm Mercury advisory For projectors or electronic products containing an LCD/CRT monitor or display: "Lamp(s) contain Mercury, Dispose Properly." For lamp-specific disposal information...

User Manual
Page 8
... on until the lamp module has been replaced. To replace the lamp, follow all warnings, precautions and maintenance as this happens, the projector will detect the life of your unit. Please be sure to cool down, and follow the procedures listed under the following conditions: &#... • When the lamp reaches the end of time. Precautions Follow all changing instructions. • This product will not turn back on the projector provided for a long period of its cooling cycle before cleaning. • Use a soft cloth moistened with mild detergent to excessive dust and dirt....
... on until the lamp module has been replaced. To replace the lamp, follow all warnings, precautions and maintenance as this happens, the projector will detect the life of your unit. Please be sure to cool down, and follow the procedures listed under the following conditions: &#... • When the lamp reaches the end of time. Precautions Follow all changing instructions. • This product will not turn back on the projector provided for a long period of its cooling cycle before cleaning. • Use a soft cloth moistened with mild detergent to excessive dust and dirt....
User Manual
Page 9
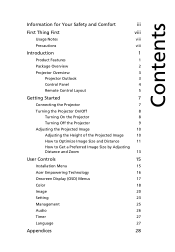
... Product Features 1 Package Overview 2 Projector Overview 3 Projector Outlook 3 Control Panel 4 Remote Control Layout 5 Getting Started 7 Connecting the Projector 7 Turning the Projector On/Off 8 Turning On the Projector 8 Turning Off the Projector 9 Adjusting the Projected Image 10 ...Adjusting the Height of the Projected Image 10 How to Optimize Image Size and Distance 11 How to Get a Preferred Image Size by Adjusting Distance and Zoom 13 User Controls 15 Installation Menu 15 Acer...
... Product Features 1 Package Overview 2 Projector Overview 3 Projector Outlook 3 Control Panel 4 Remote Control Layout 5 Getting Started 7 Connecting the Projector 7 Turning the Projector On/Off 8 Turning On the Projector 8 Turning Off the Projector 9 Adjusting the Projected Image 10 ...Adjusting the Height of the Projected Image 10 How to Optimize Image Size and Distance 11 How to Get a Preferred Image Size by Adjusting Distance and Zoom 13 User Controls 15 Installation Menu 15 Acer...

User Manual
Page 11
...174; projector, including the following outstanding features: • DLP® technology • X1110/X1110A: Native 800 x 600 SVGA resolution X1210/X1210A/X1210K/X1210S/X1213/X1216: Native 1024 x 768 XGA resolution 4:3 / 16:9 aspect ratio supported • Acer ColorBoost technology...consumption and economy (ECO) mode extends lamp life • Acer EcoProjeciton Technology delivers Intelligent power management approach and physical efficiency improvement • Empowering Key reveals Acer Empowering Technology functions (Acer eView, eTimer, ePower Management) for easy adjustment of settings...
...174; projector, including the following outstanding features: • DLP® technology • X1110/X1110A: Native 800 x 600 SVGA resolution X1210/X1210A/X1210K/X1210S/X1213/X1216: Native 1024 x 768 XGA resolution 4:3 / 16:9 aspect ratio supported • Acer ColorBoost technology...consumption and economy (ECO) mode extends lamp life • Acer EcoProjeciton Technology delivers Intelligent power management approach and physical efficiency improvement • Empowering Key reveals Acer Empowering Technology functions (Acer eView, eTimer, ePower Management) for easy adjustment of settings...

User Manual
Page 12
English 2 Package Overview This projector comes with lens cap Power cord VGA cable Composite video cable (Optional) 123 PgUp 456 PgDn 7890 Remote control Security card Acer Projector Quick Start Guide Quick start guide User's guide (CD-ROM) Battery x 2 Carrying case (Optional) Projector with all . Contact your dealer immediately if any thing is missing. Check to make sure you have them all the items shown below.
English 2 Package Overview This projector comes with lens cap Power cord VGA cable Composite video cable (Optional) 123 PgUp 456 PgDn 7890 Remote control Security card Acer Projector Quick Start Guide Quick start guide User's guide (CD-ROM) Battery x 2 Carrying case (Optional) Projector with all . Contact your dealer immediately if any thing is missing. Check to make sure you have them all the items shown below.

User Manual
Page 13
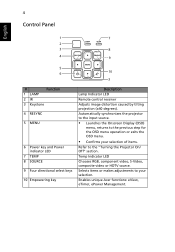
English Projector Overview Projector Outlook Front / upper side 1 3 5 6 7 2 3 8 4 # Description 1 Control panel 2 Projection lens 3 Elevator button 4 Lens cap Rear side # Description 5 Power key and Power indicator LED 6 Zoom ring 7 Focus ring 8 Remote control receiver (X1110A/X1210/X1210A/X1213/X1216) (X1210K/X1210S) 1 2 3 45 6 12 3 4 56 USB B RS232 VGA OUT VGA IN 1 VGA IN 2 S-VIDEO VIDEO AUDIO...
English Projector Overview Projector Outlook Front / upper side 1 3 5 6 7 2 3 8 4 # Description 1 Control panel 2 Projection lens 3 Elevator button 4 Lens cap Rear side # Description 5 Power key and Power indicator LED 6 Zoom ring 7 Focus ring 8 Remote control receiver (X1110A/X1210/X1210A/X1213/X1216) (X1210K/X1210S) 1 2 3 45 6 12 3 4 56 USB B RS232 VGA OUT VGA IN 1 VGA IN 2 S-VIDEO VIDEO AUDIO...
User Manual
Page 14
... directional select keys 10 Empowering key Description Lamp Indicator LED Remote control receiver Adjusts image distortion caused by tilting projection (±40 degrees). Enables unique Acer functions: eView, eTimer, ePower Management. Automatically synchronizes the projector to the input source. • Launches the Onscreen Display (OSD) menu, returns to the "Turning the...
... directional select keys 10 Empowering key Description Lamp Indicator LED Remote control receiver Adjusts image distortion caused by tilting projection (±40 degrees). Enables unique Acer functions: eView, eTimer, ePower Management. Automatically synchronizes the projector to the input source. • Launches the Onscreen Display (OSD) menu, returns to the "Turning the...
User Manual
Page 15
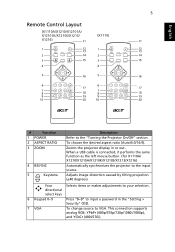
...USB cable is connected, it performs the same function as the left mouse button. (for X1110A/ X1210/X1210A/X1210K/X1210S/X1213/X1216) Automatically synchronizes the projector to VGA. This connection supports analog RGB, YPbPr (480p/576p/720p/1080i/1080p), and YCbCr (480i/576i). English ...5 Remote Control Layout (X1110A/X1210/X12101A/ X12101K/X1210S/X1213/ X1216) (X1110) 123 PgUp 456 PgDn 7890 123 PgUp 456 PgDn 7890 # Function 1 ...
...USB cable is connected, it performs the same function as the left mouse button. (for X1110A/ X1210/X1210A/X1210K/X1210S/X1213/X1216) Automatically synchronizes the projector to VGA. This connection supports analog RGB, YPbPr (480p/576p/720p/1080i/1080p), and YCbCr (480i/576i). English ...5 Remote Control Layout (X1110A/X1210/X12101A/ X12101K/X1210S/X1213/ X1216) (X1110) 123 PgUp 456 PgDn 7890 123 PgUp 456 PgDn 7890 # Function 1 ...

User Manual
Page 16
To change source to the projector. Sends signals to HDMI™(for wireless models) (X1110A/X1210/X12101A/ X12101K/X1210S/X1213/X1216) (X1110) Press "HIDE" to select the next or previous page. Use this button to hide screen image; This connection supports YPbPr...source. This function is only available when connected to a computer via a USB cable. (for X1110A/X1210/X1210A/X1210K/X1210S/X1213/X1216) To change source to the projector via the "Acer eProjection Management" utility. (for the model with HDMITM connector). Displays the image which is connected, it performs the same ...
To change source to the projector. Sends signals to HDMI™(for wireless models) (X1110A/X1210/X12101A/ X12101K/X1210S/X1213/X1216) (X1110) Press "HIDE" to select the next or previous page. Use this button to hide screen image; This connection supports YPbPr...source. This function is only available when connected to a computer via a USB cable. (for X1110A/X1210/X1210A/X1210K/X1210S/X1213/X1216) To change source to the projector via the "Acer eProjection Management" utility. (for the model with HDMITM connector). Displays the image which is connected, it performs the same ...

User Manual
Page 17
English USB 7 Getting Started Connecting the Projector VGA RS232 RS232 8 7 USB Display 5 Video/S-Video DVD player, D-Sub Set-top box, Output HDTV receiver R WY D-Sub 2 2 RBG 9 RBG 3 6 5 4 Speakers 1 D-Sub HDTV adapter Y D-Sub 5 ... 3 VGA to component video/HDTV adapter 4 Composite video cable 5 Audio cable # Description 6 S-Video cable 7 RS232 cable 8 USB cable 9 3 RCA component cable Note: To ensure the projector works well with your computer, please make sure the timing of the display mode is compatible with the...
English USB 7 Getting Started Connecting the Projector VGA RS232 RS232 8 7 USB Display 5 Video/S-Video DVD player, D-Sub Set-top box, Output HDTV receiver R WY D-Sub 2 2 RBG 9 RBG 3 6 5 4 Speakers 1 D-Sub HDTV adapter Y D-Sub 5 ... 3 VGA to component video/HDTV adapter 4 Composite video cable 5 Audio cable # Description 6 S-Video cable 7 RS232 cable 8 USB cable 9 3 RCA component cable Note: To ensure the projector works well with your computer, please make sure the timing of the display mode is compatible with the...

User Manual
Page 18
... panel or remote control, and the Power indicator LED will detect your source (computer, notebook, video player, etc.). English 8 Turning the Projector On/Off Turning On the Projector 1 Remove the lens cap. 2 Ensure that the power cord and signal cable are securely connected. • If you connect to multiple ...panel or remote control, or the direct source key on the remote control to switch between inputs. LAMP TEMP IR 2&3 1 Lens cap The projector will turn blue. 4 Turn on your source automatically. • If the screen displays "Lock" & "Source" icons, it means the...
... panel or remote control, and the Power indicator LED will detect your source (computer, notebook, video player, etc.). English 8 Turning the Projector On/Off Turning On the Projector 1 Remove the lens cap. 2 Ensure that the power cord and signal cable are securely connected. • If you connect to multiple ...panel or remote control, or the direct source key on the remote control to switch between inputs. LAMP TEMP IR 2&3 1 Lens cap The projector will turn blue. 4 Turn on your source automatically. • If the screen displays "Lock" & "Source" icons, it means the...

User Manual
Page 19
...that the system cools properly. 3 As long as the power cord remains plugged in, you can press the power button to turn the projector immediately back on anytime during the 2-minute shutdown process. 4 Once the system has finished cooling, the LED power indicator will blink. Note: Whenever... shut down and the LED lamp indicator turns solid red, contact your local dealer or service center. • "Fan failed. English 9 Turning Off the Projector 1 To turn solid red to indicate standby mode. 5 It is turned off, and the fan(s) will automatically turn solid red. This message appears: ...
...that the system cools properly. 3 As long as the power cord remains plugged in, you can press the power button to turn the projector immediately back on anytime during the 2-minute shutdown process. 4 Once the system has finished cooling, the LED power indicator will blink. Note: Whenever... shut down and the LED lamp indicator turns solid red, contact your local dealer or service center. • "Fan failed. English 9 Turning Off the Projector 1 To turn solid red to indicate standby mode. 5 It is turned off, and the fan(s) will automatically turn solid red. This message appears: ...
User Manual
Page 20
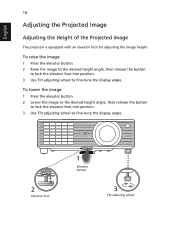
... position. 3 Use Tilt adjusting wheel to fine-tune the display angle. English 10 Adjusting the Projected Image Adjusting the Height of the Projected Image The projector is equipped with an elevator foot for adjusting the image height.
... position. 3 Use Tilt adjusting wheel to fine-tune the display angle. English 10 Adjusting the Projected Image Adjusting the Height of the Projected Image The projector is equipped with an elevator foot for adjusting the image height.

User Manual
Page 21
...W (cm) x H (cm) < B > From base to top of 126 cm height is required when the projector is located at a desired distance from the screen. • X1110/X1110A/X1210/X1210A/X1210K/X1213/X1216 If the projector is 3 m from the screen, good image quality is positioned at 3 m distance. Note: Remind as below to... find the optimal image sizes achievable when the projector is possible for image sizes between 72" and 79...
...W (cm) x H (cm) < B > From base to top of 126 cm height is required when the projector is located at a desired distance from the screen. • X1110/X1110A/X1210/X1210A/X1210K/X1213/X1216 If the projector is 3 m from the screen, good image quality is positioned at 3 m distance. Note: Remind as below to... find the optimal image sizes achievable when the projector is possible for image sizes between 72" and 79...
User Manual
Page 22
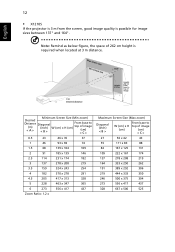
... 389 x 292 306 219 444 x 333 350 246 500 x 375 394 273 556 x 417 437 328 667 x 500 525 English 12 • X1210S If the projector is 3 m from the screen, good image quality is required when located at 3 m distance.
... 389 x 292 306 219 444 x 333 350 246 500 x 375 394 273 556 x 417 437 328 667 x 500 525 English 12 • X1210S If the projector is 3 m from the screen, good image quality is required when located at 3 m distance.

User Manual
Page 23
... to achieve a desired image size by adjusting either the position or the zoom ring. • X1110/X1110A/X1210/X1210A/X1210K/X1213/X1216 To obtain an image size of 50" set the projector at a distance between 1.9 m and 2.1 m from the screen and adjust the zoom level accordingly. 2.1 m 1.9 m Desired distance 50" Desired image size Height...
... to achieve a desired image size by adjusting either the position or the zoom ring. • X1110/X1110A/X1210/X1210A/X1210K/X1213/X1216 To obtain an image size of 50" set the projector at a distance between 1.9 m and 2.1 m from the screen and adjust the zoom level accordingly. 2.1 m 1.9 m Desired distance 50" Desired image size Height...


