
User Manual
Page 2
... of this manual or supplementary documents and publications. No part of this publication may be reproduced, stored in a retrieval system, or transmitted, in the space provided below. Acer Projector User's Guide Original Issue: 03/2016 Changes may be made periodically to the contents hereof and specifically disclaims the implied warranties of such revisions or changes. Record the model number, serial number, purchase date...
... of this manual or supplementary documents and publications. No part of this publication may be reproduced, stored in a retrieval system, or transmitted, in the space provided below. Acer Projector User's Guide Original Issue: 03/2016 Changes may be made periodically to the contents hereof and specifically disclaims the implied warranties of such revisions or changes. Record the model number, serial number, purchase date...
User Manual
Page 5
... power cord or plug is damaged, cut or frayed • liquid was spilled into the projector's lens when the lamp is necessary. • Locations where temperatures may become excessively high, such as opening or removing covers may contaminate optical components, shortening the life span and darkening the image. • Locations near fire alarms. • Locations with your reseller for service • the product does not operate normally...
... power cord or plug is damaged, cut or frayed • liquid was spilled into the projector's lens when the lamp is necessary. • Locations where temperatures may become excessively high, such as opening or removing covers may contaminate optical components, shortening the life span and darkening the image. • Locations near fire alarms. • Locations with your reseller for service • the product does not operate normally...
User Manual
Page 6
... the projector on the remote control. • The lamp becomes extremely hot during operation. Refer servicing only to become heated and deformed or even cause a fire. To temporarily turn off the lamp, press HIDE on end vertically. The only user serviceable part is securely installed. Only use acer ceiling mount kit for the fan to break or drop it is the lamp which becomes hot. • Clean the air filter frequently...
... the projector on the remote control. • The lamp becomes extremely hot during operation. Refer servicing only to become heated and deformed or even cause a fire. To temporarily turn off the lamp, press HIDE on end vertically. The only user serviceable part is securely installed. Only use acer ceiling mount kit for the fan to break or drop it is the lamp which becomes hot. • Clean the air filter frequently...
User Manual
Page 8
... areas susceptible to clean the display housing. • Disconnect the power plug from the Onscreen display "Management" menu after replacing the lamp module. • When switching the projector off the product before disconnecting power. • Turn on the projector first and then the signal sources. • Do not use lens cap when projector is on until the lamp module has been replaced. To replace the lamp, follow all warnings, precautions and maintenance...
... areas susceptible to clean the display housing. • Disconnect the power plug from the Onscreen display "Management" menu after replacing the lamp module. • When switching the projector off the product before disconnecting power. • Turn on the projector first and then the signal sources. • Do not use lens cap when projector is on until the lamp module has been replaced. To replace the lamp, follow all warnings, precautions and maintenance...
User Manual
Page 9
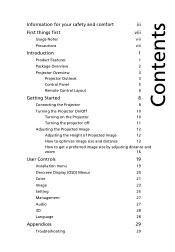
... 1 Package Overview 2 Projector Overview 3 Projector Outlook 3 Control Panel 5 Remote Control Layout 6 Getting Started 8 Connecting the Projector 8 Turning the Projector On/Off 10 Turning on the Projector 10 Turning the projector off 11 Adjusting the Projected Image 12 Adjusting the Height of Projected Image 12 How to optimize image size and distance 13 How to get a preferred image size by adjusting distance and zoom 16 User Controls 19 Installation menu 19 Onscreen Display (OSD) Menus 20 Color 21 Image 23 Setting 25 Management 27 Audio 27 3D 28...
... 1 Package Overview 2 Projector Overview 3 Projector Outlook 3 Control Panel 5 Remote Control Layout 6 Getting Started 8 Connecting the Projector 8 Turning the Projector On/Off 10 Turning on the Projector 10 Turning the projector off 11 Adjusting the Projected Image 12 Adjusting the Height of Projected Image 12 How to optimize image size and distance 13 How to get a preferred image size by adjusting distance and zoom 16 User Controls 19 Installation menu 19 Onscreen Display (OSD) Menus 20 Color 21 Image 23 Setting 25 Management 27 Audio 27 3D 28...
User Manual
Page 11
.../p) supported • Lower power consumption and economy (ECO) mode extends lamp life • Acer EcoProjeciton Technology delivers Intelligent power management approach and physical efficiency improvement • Advanced digital keystone correction optimizes presentations • Smart detection delivers quick, intelligent source detection • Multi-language onscreen display (OSD) menus • Manual focus projection lens zooms up to 1.1x • 2x digital zoom • Microsoft® Windows® 2000, XP, Vista®, Windows 7, Windows 8, Windows...
.../p) supported • Lower power consumption and economy (ECO) mode extends lamp life • Acer EcoProjeciton Technology delivers Intelligent power management approach and physical efficiency improvement • Advanced digital keystone correction optimizes presentations • Smart detection delivers quick, intelligent source detection • Multi-language onscreen display (OSD) menus • Manual focus projection lens zooms up to 1.1x • 2x digital zoom • Microsoft® Windows® 2000, XP, Vista®, Windows 7, Windows 8, Windows...
User Manual
Page 12
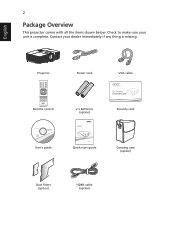
2 Package Overview This projector comes with all the items shown below. Contact your unit is missing. Check to make sure your dealer immediately if any thing is complete. English Projector Power cord VGA cable Remote control 2 x Batteries (option) Security card User's guide Quick start guide Carrying case (option) Dust filters (option) HDMI cable (option)
2 Package Overview This projector comes with all the items shown below. Contact your unit is missing. Check to make sure your dealer immediately if any thing is complete. English Projector Power cord VGA cable Remote control 2 x Batteries (option) Security card User's guide Quick start guide Carrying case (option) Dust filters (option) HDMI cable (option)
User Manual
Page 15
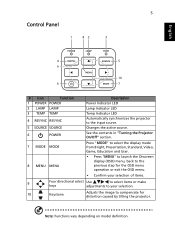
... Onscreen display (OSD) menu, back to the previous step for the OSD menu operation or exit the OSD menu. • Confirm your selection of items. 9 Four directional select Use to select items or make keys adjustments to your selection. 10 Keystone Adjusts the image to the input source. Changes the active source. 5 Control Panel 1 82 3 English 4 5 9 10 6 7 # Icon Function 1 POWER POWER 2 LAMP LAMP 3 TEMP TEMP 4 RESYNC RESYNC 5 SOURCE SOURCE 6 POWER Description Power Indicator LED Lamp Indicator LED Temp Indicator LED Automatically synchronizes the projector to...
... Onscreen display (OSD) menu, back to the previous step for the OSD menu operation or exit the OSD menu. • Confirm your selection of items. 9 Four directional select Use to select items or make keys adjustments to your selection. 10 Keystone Adjusts the image to the input source. Changes the active source. 5 Control Panel 1 82 3 English 4 5 9 10 6 7 # Icon Function 1 POWER POWER 2 LAMP LAMP 3 TEMP TEMP 4 RESYNC RESYNC 5 SOURCE SOURCE 6 POWER Description Power Indicator LED Lamp Indicator LED Temp Indicator LED Automatically synchronizes the projector to...
User Manual
Page 16
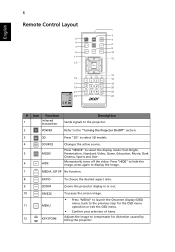
... screen image. • Press "MENU" to launch the Onscreen display (OSD) menu, back to the previous step for the OSD menu operation or exit the OSD menu. • Confirm your selection of items. Adjusts the image to display the image. 7 MEDIA MEDIA_SETUP No function. Press "HIDE" to hide the image, press again to compensate for distortion caused by tilting the projector. English 6 Remote Control Layout 1 3 2 SOURCE 4 5 MEDIA 6 SETUP MODE...
... screen image. • Press "MENU" to launch the Onscreen display (OSD) menu, back to the previous step for the OSD menu operation or exit the OSD menu. • Confirm your selection of items. Adjusts the image to display the image. 7 MEDIA MEDIA_SETUP No function. Press "HIDE" to hide the image, press again to compensate for distortion caused by tilting the projector. English 6 Remote Control Layout 1 3 2 SOURCE 4 5 MEDIA 6 SETUP MODE...

User Manual
Page 20
... the screen displays "No Signal", please make sure the signal cables are securely connected. English 10 Turning the Projector On/Off Turning on the remote control to multiple sources at the same time, use the "Source" button on either control panel or the remote control or direct source key on the Projector 1 Ensure that the power cord and signal cable are securely connected. • If you connect to switch between inputs. The Power indicator LED will flash red. 2 Turn on the projector by pressing "Power" button on the control panel or remote control...
... the screen displays "No Signal", please make sure the signal cables are securely connected. English 10 Turning the Projector On/Off Turning on the remote control to multiple sources at the same time, use the "Source" button on either control panel or the remote control or direct source key on the Projector 1 Ensure that the power cord and signal cable are securely connected. • If you connect to switch between inputs. The Power indicator LED will flash red. 2 Turn on the projector by pressing "Power" button on the control panel or remote control...

User Manual
Page 21
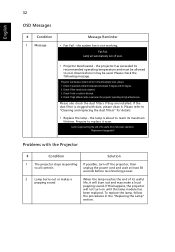
... projector will automatically shut down, and the LED temp indicator will turn solid red. This onscreen message indicates that the fan has failed. Contact your local dealer or service center. • "Fan failed. Attention! Warning indicators: • "Projector Overheated. Lamp will automatically turn off , and the fan(s) will continue to operate for about 2 minutes to ensure that the system cools properly. (only supported under "Instant Resume" mode) 3 As long as the power cord remains...
... projector will automatically shut down, and the LED temp indicator will turn solid red. This onscreen message indicates that the fan has failed. Contact your local dealer or service center. • "Fan failed. Attention! Warning indicators: • "Projector Overheated. Lamp will automatically turn off , and the fan(s) will continue to operate for about 2 minutes to ensure that the system cools properly. (only supported under "Instant Resume" mode) 3 As long as the power cord remains...
User Manual
Page 23
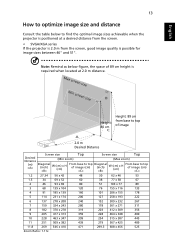
... of image A 2.0 m Desired Distance Screen size Top Screen size Top Desired Distance (Min zoom) (Max zoom) (m) Diagonal (inch) W (cm) x H (cm) From base to top of image (cm) Diagonal (inch) W (cm) x H (cm) From base to find the optimal image sizes achievable when the projector is positioned at a desired distance from the screen. • SVGA/XGA series If the projector is 2.0 m from the screen, good image quality is required when located at 2.0 m distance...
... of image A 2.0 m Desired Distance Screen size Top Screen size Top Desired Distance (Min zoom) (Max zoom) (m) Diagonal (inch) W (cm) x H (cm) From base to top of image (cm) Diagonal (inch) W (cm) x H (cm) From base to find the optimal image sizes achievable when the projector is positioned at a desired distance from the screen. • SVGA/XGA series If the projector is 2.0 m from the screen, good image quality is required when located at 2.0 m distance...

User Manual
Page 29
.... Installation Projection Mode Projection Location Auto Keystone Manual Keystone Language Reset Select Adjust Off English Press Exit 3 The background pattern acts as a guide to adjusting the calibration and alignment settings, such as screen size and distance, focus and more . 1 Turn on the projector by pressing "Power" button on the control pad. 2 Press the "MENU" button on model definition. English 19 User Controls Installation menu The installation menu provides an onscreen display (OSD) for feature setting. Note: Functions vary depending on the remote control to the Acer...
.... Installation Projection Mode Projection Location Auto Keystone Manual Keystone Language Reset Select Adjust Off English Press Exit 3 The background pattern acts as a guide to adjusting the calibration and alignment settings, such as screen size and distance, focus and more . 1 Turn on the projector by pressing "Power" button on the control pad. 2 Press the "MENU" button on model definition. English 19 User Controls Installation menu The installation menu provides an onscreen display (OSD) for feature setting. Note: Functions vary depending on the remote control to the Acer...
User Manual
Page 32
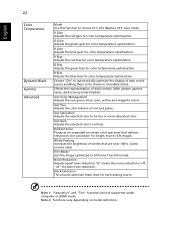
.... Note 2: Functions vary depending on -screen color spectrum that are not supported under computer or HDMI mode. English 22 Color Temperature Dynamic Black Gamma Advanced Mode Use this function to 24-frame True Film mode. R Gain Adjusts the red gain for bright, true-to-life images. Ind. Ind. Note 1: "Saturation" and "Tint" functions are near 100%. (video sources only) Film Mode Sets the image optimized to choose CT1, CT2...
.... Note 2: Functions vary depending on -screen color spectrum that are not supported under computer or HDMI mode. English 22 Color Temperature Dynamic Black Gamma Advanced Mode Use this function to 24-frame True Film mode. R Gain Adjusts the red gain for bright, true-to-life images. Ind. Ind. Note 1: "Saturation" and "Tint" functions are near 100%. (video sources only) Film Mode Sets the image optimized to choose CT1, CT2...

User Manual
Page 33
... Aspect Ratio Keystone Auto Keystone Manual Keystone • Ceiling: Turns the image upside down for ceiling-mounted projection. Adjust image distortion caused by tilting projection. Adjust image distortion caused by tilting projection. Use this function to increase the sharpness. Automatically adjusts vertical image. Sharpness The Manual Keystone function is unavailable under Auto Keystone setting to display the image using a 16:9 ratio. • L.Box: Keep original signal aspect ratio and zoom in by 1.333 times. You can project from behind a translucent screen with...
... Aspect Ratio Keystone Auto Keystone Manual Keystone • Ceiling: Turns the image upside down for ceiling-mounted projection. Adjust image distortion caused by tilting projection. Adjust image distortion caused by tilting projection. Use this function to increase the sharpness. Automatically adjusts vertical image. Sharpness The Manual Keystone function is unavailable under Auto Keystone setting to display the image using a 16:9 ratio. • L.Box: Keep original signal aspect ratio and zoom in by 1.333 times. You can project from behind a translucent screen with...

User Manual
Page 35
... to the factory default settings. Press to operate the projector. The user has to enter a password to change the "Security" setting. English Both "User Password" and "Administrator Password" can turn off the captioning feature. Setting Source Lock Closed Caption Reset Security 25 When Source Lock is turned "Off", the projector will search for other signals if the current input signal is turned "On", it will "lock" the current source channel unless you press "Source" button on the remote control for the...
... to the factory default settings. Press to operate the projector. The user has to enter a password to change the "Security" setting. English Both "User Password" and "Administrator Password" can turn off the captioning feature. Setting Source Lock Closed Caption Reset Security 25 When Source Lock is turned "Off", the projector will search for other signals if the current input signal is turned "On", it will "lock" the current source channel unless you press "Source" button on the remote control for the...
User Manual
Page 37
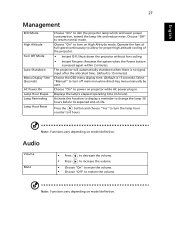
... turn the lamp hour counter to dim the projector lamp which will automatically shutdown when there is no signal input after the allocated time. (default is 15 minutes) Choose the OSD menu display time. (Default is pressed again within 2 minutes. English 27 Management ECO Mode High Altitude Turn Off Mode Auto Shutdown Menu Display Time (Seconds) AC Power On Lamp Hour Elapse Lamp Reminding Lamp Hour Reset Choose "On" to 0 hours. The projector will lower power consumption, extend the lamp life and reduce noise. Audio...
... turn the lamp hour counter to dim the projector lamp which will automatically shutdown when there is no signal input after the allocated time. (default is 15 minutes) Choose the OSD menu display time. (Default is pressed again within 2 minutes. English 27 Management ECO Mode High Altitude Turn Off Mode Auto Shutdown Menu Display Time (Seconds) AC Power On Lamp Hour Elapse Lamp Reminding Lamp Hour Reset Choose "On" to 0 hours. The projector will lower power consumption, extend the lamp life and reduce noise. Audio...

User Manual
Page 39
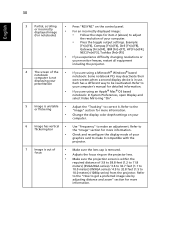
..." button. If the problem persists, please contact your display resolution setting is lower than or equal to the "Replacing the Lamp" section. • Make sure you are bent or broken. • Check if the projector lamp has been securely installed. or incorrectly displayed image • For an incorrectly displayed image: (for PC (Windows • Open "My Computer", open the "Control 2000/XP/Vista/ Panel", and then double-click the "Display" Windows 7/ Windows 8)) icon...
..." button. If the problem persists, please contact your display resolution setting is lower than or equal to the "Replacing the Lamp" section. • Make sure you are bent or broken. • Check if the projector lamp has been securely installed. or incorrectly displayed image • For an incorrectly displayed image: (for PC (Windows • Open "My Computer", open the "Control 2000/XP/Vista/ Panel", and then double-click the "Display" Windows 7/ Windows 8)) icon...
User Manual
Page 40
...; If you are using a Microsoft® Windows® based notebook: Some notebook PCs may deactivate their own screens when a second display device is unstable • Adjust the "Tracking" to 10.0 meters) (1080p series) from the projector. or incorrectly displayed image • For an incorrectly displayed image: (For notebooks) • Follow the steps for more information. • Change the display color depth settings on the control panel.
...; If you are using a Microsoft® Windows® based notebook: Some notebook PCs may deactivate their own screens when a second display device is unstable • Adjust the "Tracking" to 10.0 meters) (1080p series) from the projector. or incorrectly displayed image • For an incorrectly displayed image: (For notebooks) • Follow the steps for more information. • Change the display color depth settings on the control panel.
User Manual
Page 42
.... 2. Check if high altitude mode is about to reach its recommended operating temperature and must be allowed to replace it will not turn off soon. • Projector Overheated - If this happens, the projector will burn out and may be cleaned. 3. the lamp is set when the projector operating at least 30 seconds before it . Problems with dust, please clean it may make a loud popping sound. Fan Fail. Check if filter needs...
.... 2. Check if high altitude mode is about to reach its recommended operating temperature and must be allowed to replace it will not turn off soon. • Projector Overheated - If this happens, the projector will burn out and may be cleaned. 3. the lamp is set when the projector operating at least 30 seconds before it . Problems with dust, please clean it may make a loud popping sound. Fan Fail. Check if filter needs...


