

Veriton 7200D
Page 10
... additional memory for Veriton 7200D 62 Removing and installing a DIMM for the Veriton 7200 series 63 To install a DIMM 64 To reconfigure your computer 64 5 Software 65 Acrobat Reader 68 LDCM 69 Norton AntiVirus 70 NTI CD-Maker (for models with CD-RW) 71 PowerDVD (for models with DVD) 72 BIOS utility 73 Reinstalling...
... additional memory for Veriton 7200D 62 Removing and installing a DIMM for the Veriton 7200 series 63 To install a DIMM 64 To reconfigure your computer 64 5 Software 65 Acrobat Reader 68 LDCM 69 Norton AntiVirus 70 NTI CD-Maker (for models with CD-RW) 71 PowerDVD (for models with DVD) 72 BIOS utility 73 Reinstalling...
Veriton 7200D
Page 65
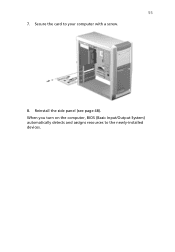
Secure the card to the newly-installed devices. When you turn on the computer, BIOS (Basic Input/Output System) automatically detects and assigns resources to your computer with a screw. 8. 55 7. Reinstall the side panel (see page 48).
Secure the card to the newly-installed devices. When you turn on the computer, BIOS (Basic Input/Output System) automatically detects and assigns resources to your computer with a screw. 8. 55 7. Reinstall the side panel (see page 48).
Veriton 7200D
Page 70
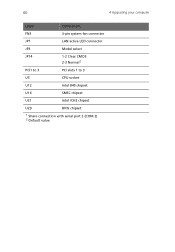
60 4 Upgrading your computer Label Component FN3 3-pin system fan connector JP1 LAN active LED connector JP3 Model select JP14 1-2 Clear CMOS 2-3 Normal2 PCI1 to 3 PCI slots 1 to 3 U5 CPU socket U12 Intel 845 chipset U16 SMSC chipset U21 Intel ICH2 chipset U29 BIOS chipset 1 Share connection with serial port 2 (COM 2) 2 Default value
60 4 Upgrading your computer Label Component FN3 3-pin system fan connector JP1 LAN active LED connector JP3 Model select JP14 1-2 Clear CMOS 2-3 Normal2 PCI1 to 3 PCI slots 1 to 3 U5 CPU socket U12 Intel 845 chipset U16 SMSC chipset U21 Intel ICH2 chipset U29 BIOS chipset 1 Share connection with serial port 2 (COM 2) 2 Default value
Veriton 7200D
Page 74
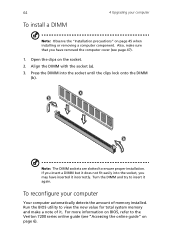
Press the DIMM into the socket, you may have removed the computer cover (see "Accessing the online guide" on BIOS, refer to view the new value for total system memory and make sure that you insert a DIMM but it incorrectly. For more information on page 6)....a note of memory installed. Turn the DIMM and try to ensure proper installation. Note: The DIMM sockets are slotted to insert it . Run the BIOS utility to the Veriton 7200 series online guide (see page 47). 1. 64 To install a DIMM 4 Upgrading your computer Your computer automatically detects the amount of it again.
Press the DIMM into the socket, you may have removed the computer cover (see "Accessing the online guide" on BIOS, refer to view the new value for total system memory and make sure that you insert a DIMM but it incorrectly. For more information on page 6)....a note of memory installed. Turn the DIMM and try to ensure proper installation. Note: The DIMM sockets are slotted to insert it . Run the BIOS utility to the Veriton 7200 series online guide (see page 47). 1. 64 To install a DIMM 4 Upgrading your computer Your computer automatically detects the amount of it again.
Veriton 7200D
Page 77
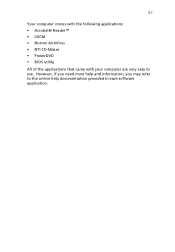
However, if you need more help documentation provided in each software application. 67 Your computer comes with the following applications: • Acrobat® Reader™ • LDCM • Norton AntiVirus • NTI CD-Maker • PowerDVD • BIOS utility All of the applications that came with your computer are very easy to the online help and information, you may refer to use.
However, if you need more help documentation provided in each software application. 67 Your computer comes with the following applications: • Acrobat® Reader™ • LDCM • Norton AntiVirus • NTI CD-Maker • PowerDVD • BIOS utility All of the applications that came with your computer are very easy to the online help and information, you may refer to use.
Veriton 7200D
Page 83
... is no need to run BIOS, make sure that you exit Setup. Note: Before you run this utility. Since most computers are already properly configured and optimized, there is a hardware configuration program built into your computer, refer to the Veriton 7200 series online guide (see "Accessing... the online guide"on page 6). For information about BIOS and how to run the BIOS utility, press the key combination Ctrl+Alt+Esc. However, if you encounter ...
... is no need to run BIOS, make sure that you exit Setup. Note: Before you run this utility. Since most computers are already properly configured and optimized, there is a hardware configuration program built into your computer, refer to the Veriton 7200 series online guide (see "Accessing... the online guide"on page 6). For information about BIOS and how to run the BIOS utility, press the key combination Ctrl+Alt+Esc. However, if you encounter ...
Veriton 7200D
Page 91
81 Index A accessing the online guide 6 add memory Veriton 7200 62 Veriton 7200D 62 applications 67 B BIOS utility 73 C computer maintenance 4 cleaning 4 servicing 4 connecting options multimedia devices 39 audio line-in device 41 earphones/headphones 40 external speakers 39 joystick 39 microphone ... multimedia keys 17 num lock 16 palm rest 16 programmable keys 17 scroll lock 16 volume control/mute 16 Windows logo key 16 M mainboard Veriton 7200 57 Veriton 7200D 58 mouse 18 buttons 18 clicking 18 double-click 18 ratchet wheel 18 Q Q&A 77 blank screen 78 no audio 78 no sound 78 printer...
81 Index A accessing the online guide 6 add memory Veriton 7200 62 Veriton 7200D 62 applications 67 B BIOS utility 73 C computer maintenance 4 cleaning 4 servicing 4 connecting options multimedia devices 39 audio line-in device 41 earphones/headphones 40 external speakers 39 joystick 39 microphone ... multimedia keys 17 num lock 16 palm rest 16 programmable keys 17 scroll lock 16 volume control/mute 16 Windows logo key 16 M mainboard Veriton 7200 57 Veriton 7200D 58 mouse 18 buttons 18 clicking 18 double-click 18 ratchet wheel 18 Q Q&A 77 blank screen 78 no audio 78 no sound 78 printer...


