
Veriton 7200D
Page 2
Veriton 7200 series (Veriton 7200/Veriton 7200D) User's guide Changes may be reproduced, stored in a retrieval system, or transmitted, in new editions of this publication without the prior written permission of such revision or changes. Record the model number, serial number, purchase date, and place of purchase information in this manual or supplementary documents and publications. No part of this publication may be incorporated in any form...
Veriton 7200 series (Veriton 7200/Veriton 7200D) User's guide Changes may be reproduced, stored in a retrieval system, or transmitted, in new editions of this publication without the prior written permission of such revision or changes. Record the model number, serial number, purchase date, and place of purchase information in this manual or supplementary documents and publications. No part of this publication may be incorporated in any form...
Veriton 7200D
Page 3
... FCC notice This device has been tested and found to comply with the instructions, may be attached to this computer. These limits are designed to radio and TV reception. This device generates, uses, and can be determined by turning the device off and on a circuit different from that interference will not occur in a residential installation. Operation with noncertified peripherals...
... FCC notice This device has been tested and found to comply with the instructions, may be attached to this computer. These limits are designed to radio and TV reception. This device generates, uses, and can be determined by turning the device off and on a circuit different from that interference will not occur in a residential installation. Operation with noncertified peripherals...
Veriton 7200D
Page 5
... cord is used batteries promptly. 14. Also, make sure that are followed. Never push objects of power supply cord set (provided in performance, indicating a need for this product yourself, as opening or removing covers may result in damage and will often require extensive work by a qualified technician to restore the product to a qualified serviceman. 13. Never spill liquid of all servicing to dangerous...
... cord is used batteries promptly. 14. Also, make sure that are followed. Never push objects of power supply cord set (provided in performance, indicating a need for this product yourself, as opening or removing covers may result in damage and will often require extensive work by a qualified technician to restore the product to a qualified serviceman. 13. Never spill liquid of all servicing to dangerous...
Veriton 7200D
Page 9
... Rear panel 13 Keyboard 15 Mouse 18 Disk drives 19 Floppy drive 19 CD-ROM/DVD-ROM/CD-RW drive 20 Hard disk 21 3 Setting up your computer 23 Arranging a comfortable work area 25 Adjusting your chair 25 Positioning your Veriton PC 25 Positioning your monitor 26 Positioning your keyboard 26 Positioning your mouse 26 Connecting peripherals 27 USB Keyboard 27 USB Mouse 28 Monitor 29 Power cable 30 Turning on your computer 31 Turning off your computer 33 Connecting options...
... Rear panel 13 Keyboard 15 Mouse 18 Disk drives 19 Floppy drive 19 CD-ROM/DVD-ROM/CD-RW drive 20 Hard disk 21 3 Setting up your computer 23 Arranging a comfortable work area 25 Adjusting your chair 25 Positioning your Veriton PC 25 Positioning your monitor 26 Positioning your keyboard 26 Positioning your mouse 26 Connecting peripherals 27 USB Keyboard 27 USB Mouse 28 Monitor 29 Power cable 30 Turning on your computer 31 Turning off your computer 33 Connecting options...

Veriton 7200D
Page 10
x Network 36 USB devices 37 Multimedia devices 39 4 Upgrading your computer 43 Installation precautions 45 ESD precautions 45 Preinstallation instructions 45 Post-installation instructions 46 Opening your computer 47 To remove the side panel 47 To reinstall the side panel 48 Internal components 50 Replacing the hard disk 51 Installing an expansion card 54 System boards 56 Mainboard layout 56 Veriton 7200 mainboard layout 57 Veriton 7200D mainboard layout 58 Audio board 61 Upgrading the memory 62 Installing additional memory for Veriton 7200 62...
x Network 36 USB devices 37 Multimedia devices 39 4 Upgrading your computer 43 Installation precautions 45 ESD precautions 45 Preinstallation instructions 45 Post-installation instructions 46 Opening your computer 47 To remove the side panel 47 To reinstall the side panel 48 Internal components 50 Replacing the hard disk 51 Installing an expansion card 54 System boards 56 Mainboard layout 56 Veriton 7200 mainboard layout 57 Veriton 7200D mainboard layout 58 Audio board 61 Upgrading the memory 62 Installing additional memory for Veriton 7200 62...
Veriton 7200D
Page 19
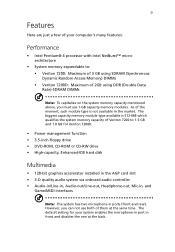
The default setting for Veriton 7200D. • Power management function • 3.5-inch floppy drive • DVD-ROM, CD-ROM or CD-RW drive • High-capacity, Enhanced-IDE hard disk Multimedia • 128-bit graphics accelerator installed in the AGP card slot • 3-D quality audio system via onboard audio controller • Audio-in/Line-in, Audio-out/Line-out, Headphone-out, Mic-in, and Game/MIDI interfaces Note: The system has two microphone...
The default setting for Veriton 7200D. • Power management function • 3.5-inch floppy drive • DVD-ROM, CD-ROM or CD-RW drive • High-capacity, Enhanced-IDE hard disk Multimedia • 128-bit graphics accelerator installed in the AGP card slot • 3-D quality audio system via onboard audio controller • Audio-in/Line-in, Audio-out/Line-out, Headphone-out, Mic-in, and Game/MIDI interfaces Note: The system has two microphone...

Veriton 7200D
Page 20
10 2 System tour Connectivity • PS/2 mouse and keyboard interfaces • Two serial and one parallel interfaces • Universal Serial Bus (USB) ports (two on the front and two on the rear panel) • High-speed fax/data PCI modem (optional) • 10Base-T/100Base-TX network support with remote wake-up function
10 2 System tour Connectivity • PS/2 mouse and keyboard interfaces • Two serial and one parallel interfaces • Universal Serial Bus (USB) ports (two on the front and two on the rear panel) • High-speed fax/data PCI modem (optional) • 10Base-T/100Base-TX network support with remote wake-up function
Veriton 7200D
Page 26
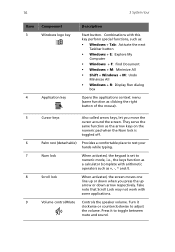
... Minimize All • Windows + R: Display Run dialog box Opens the applications context menu (same function as the arrow keys on the numeric pad when the Num lock is toggled off. 6 Palm rest (detachable) Provides a comfortable place to rest your hands while typing. 7 Num lock When activated, the keypad is set to toggle between mute and sound. They serve the...
... Minimize All • Windows + R: Display Run dialog box Opens the applications context menu (same function as the arrow keys on the numeric pad when the Num lock is toggled off. 6 Palm rest (detachable) Provides a comfortable place to rest your hands while typing. 7 Num lock When activated, the keypad is set to toggle between mute and sound. They serve the...
Veriton 7200D
Page 37
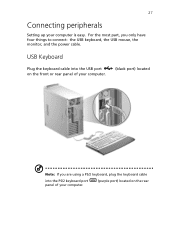
For the most part, you are using a PS/2 keyboard, plug the keyboard cable into the USB port on the rear USB Keyboard Plug the keyboard cable into the PS/2 keyboard port panel of your computer. (purple port) located on the front or rear panel of your computer is easy. 27 Connecting peripherals Setting up your computer. (black port) located Note: If you only have four things to connect: the USB keyboard, the USB mouse, the monitor, and the power cable.
For the most part, you are using a PS/2 keyboard, plug the keyboard cable into the USB port on the rear USB Keyboard Plug the keyboard cable into the PS/2 keyboard port panel of your computer. (purple port) located on the front or rear panel of your computer is easy. 27 Connecting peripherals Setting up your computer. (black port) located Note: If you only have four things to connect: the USB keyboard, the USB mouse, the monitor, and the power cable.
Veriton 7200D
Page 46
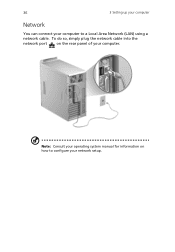
Note: Consult your operating system manual for information on the rear panel of your computer. 36 3 Setting up your computer Network You can connect your network setup. To do so, simply plug the network cable into the network port on how to configure your computer to a Local Area Network (LAN) using a network cable.
Note: Consult your operating system manual for information on the rear panel of your computer. 36 3 Setting up your computer Network You can connect your network setup. To do so, simply plug the network cable into the network port on how to configure your computer to a Local Area Network (LAN) using a network cable.
Veriton 7200D
Page 49
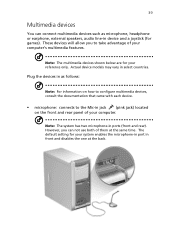
... are for your system enables the microphone-in port in jack (pink jack) located on how to configure multimedia devices, consult the documentation that came with each device. • microphone: connects to take advantage of your reference only. Plug the devices in as microphone, headphone or earphone, external speakers, audio line-in ports (front and rear). The default setting for your computer. Actual device models may vary in...
... are for your system enables the microphone-in port in jack (pink jack) located on how to configure multimedia devices, consult the documentation that came with each device. • microphone: connects to take advantage of your reference only. Plug the devices in as microphone, headphone or earphone, external speakers, audio line-in ports (front and rear). The default setting for your computer. Actual device models may vary in...
Veriton 7200D
Page 51
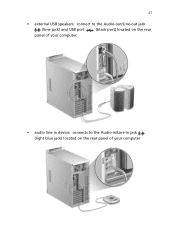
41 • external USB speakers: connect to the Audio-out/Line-out jack (lime jack) and USB port (black port) located on the rear panel of your computer. • audio line-in device: connects to the Audio-in/Line-in jack (light blue jack) located on the rear panel of your computer
41 • external USB speakers: connect to the Audio-out/Line-out jack (lime jack) and USB port (black port) located on the rear panel of your computer. • audio line-in device: connects to the Audio-in/Line-in jack (light blue jack) located on the rear panel of your computer
Veriton 7200D
Page 55
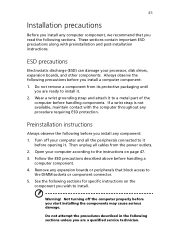
... turning off your computer and all cables from its protective packaging until you are a qualified service technician. Preinstallation instructions Always observe the following precautions before opening it. Remove any computer component, we recommend that block access to the DIMM sockets or component connector. 5. Follow the ESD precautions described above before you start installing the components may cause serious damage. Open your processor, disk drives...
... turning off your computer and all cables from its protective packaging until you are a qualified service technician. Preinstallation instructions Always observe the following precautions before opening it. Remove any computer component, we recommend that block access to the DIMM sockets or component connector. 5. Follow the ESD precautions described above before you start installing the components may cause serious damage. Open your processor, disk drives...
Veriton 7200D
Page 69
... Veriton 7200D) FN1 FN2 Component AGP slot Battery PS/2 mouse (upper) and keyboard (lower) ports Power connector Network (upper) and USB (lower) ports Serial port (lower right and left) and parallel port (upper) IDE 2 connector IDE 1 connector MIDI/game (upper), line-out (left), line-in (middle), and rear mic-in (right) ports Power connector (12 V power) CD-in connector FDD Connector Intrusion connector HDD LED connector Power button Front USB connector Power/Suspend LED connector SmartCard (COM 2) connector (optional) 1 Audio FPIO connector DIMM sockets 1-3 DIMM sockets 1-2 3-pin system fan...
... Veriton 7200D) FN1 FN2 Component AGP slot Battery PS/2 mouse (upper) and keyboard (lower) ports Power connector Network (upper) and USB (lower) ports Serial port (lower right and left) and parallel port (upper) IDE 2 connector IDE 1 connector MIDI/game (upper), line-out (left), line-in (middle), and rear mic-in (right) ports Power connector (12 V power) CD-in connector FDD Connector Intrusion connector HDD LED connector Power button Front USB connector Power/Suspend LED connector SmartCard (COM 2) connector (optional) 1 Audio FPIO connector DIMM sockets 1-3 DIMM sockets 1-2 3-pin system fan...
Veriton 7200D
Page 70
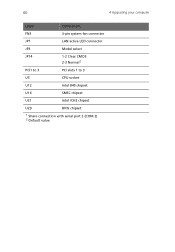
60 4 Upgrading your computer Label Component FN3 3-pin system fan connector JP1 LAN active LED connector JP3 Model select JP14 1-2 Clear CMOS 2-3 Normal2 PCI1 to 3 PCI slots 1 to 3 U5 CPU socket U12 Intel 845 chipset U16 SMSC chipset U21 Intel ICH2 chipset U29 BIOS chipset 1 Share connection with serial port 2 (COM 2) 2 Default value
60 4 Upgrading your computer Label Component FN3 3-pin system fan connector JP1 LAN active LED connector JP3 Model select JP14 1-2 Clear CMOS 2-3 Normal2 PCI1 to 3 PCI slots 1 to 3 U5 CPU socket U12 Intel 845 chipset U16 SMSC chipset U21 Intel ICH2 chipset U29 BIOS chipset 1 Share connection with serial port 2 (COM 2) 2 Default value
Veriton 7200D
Page 74
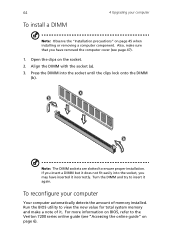
... detects the amount of it. Open the clips on page 45 when installing or removing a computer component. Turn the DIMM and try to view the new value for total system memory and make sure that you may have removed the computer cover (see "Accessing the online guide" on page 6). Align the DIMM with the socket (a). 3. Run the BIOS utility to insert it incorrectly. Press...
... detects the amount of it. Open the clips on page 45 when installing or removing a computer component. Turn the DIMM and try to view the new value for total system memory and make sure that you may have removed the computer cover (see "Accessing the online guide" on page 6). Align the DIMM with the socket (a). 3. Run the BIOS utility to insert it incorrectly. Press...
Veriton 7200D
Page 84
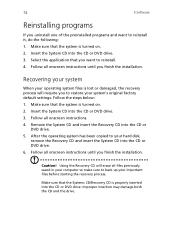
... properly inserted into the CD or DVD drive. After the operating system has been copied to reinstall it, do the following: 1. 74 5 Software Reinstalling programs If you to restore your system's original factory default settings. Make sure that you want to your hard disk, remove the Recovery CD and insert the System CD into the CD or DVD drive. 3. Select the application that the Systems...
... properly inserted into the CD or DVD drive. After the operating system has been copied to reinstall it, do the following: 1. 74 5 Software Reinstalling programs If you to restore your system's original factory default settings. Make sure that you want to your hard disk, remove the Recovery CD and insert the System CD into the CD or DVD drive. 3. Select the application that the Systems...
Veriton 7200D
Page 87
... being applied to the system. If yes, remove or replace it is plugged in the floppy drive? However, if the diagnostic utility still reports a problem, then you created during the use of the computer is turned ON (1). Q: I pressed the power switch but the system did not boot up. If the LED is not lit, no power is followed by easy answers and solutions to...
... being applied to the system. If yes, remove or replace it is plugged in the floppy drive? However, if the diagnostic utility still reports a problem, then you created during the use of the computer is turned ON (1). Q: I pressed the power switch but the system did not boot up. If the LED is not lit, no power is followed by easy answers and solutions to...
Veriton 7200D
Page 91
... A accessing the online guide 6 add memory Veriton 7200 62 Veriton 7200D 62 applications 67 B BIOS utility 73 C computer maintenance 4 cleaning 4 servicing 4 connecting options multimedia devices 39 audio line-in device 41 earphones/headphones 40 external speakers 39 joystick 39 microphone 39 network 34, 36 printer 34 serial mouse 35 D disk drives 19 CD-ROM/DVD-ROM/CD-RW drive inserting CDs/DVDs 20 taking care CDs/DVDs 21 floppy drive 19 not write-protect 19 write-protect 19 hard disk 21 F features 9 connectivity...
... A accessing the online guide 6 add memory Veriton 7200 62 Veriton 7200D 62 applications 67 B BIOS utility 73 C computer maintenance 4 cleaning 4 servicing 4 connecting options multimedia devices 39 audio line-in device 41 earphones/headphones 40 external speakers 39 joystick 39 microphone 39 network 34, 36 printer 34 serial mouse 35 D disk drives 19 CD-ROM/DVD-ROM/CD-RW drive inserting CDs/DVDs 20 taking care CDs/DVDs 21 floppy drive 19 not write-protect 19 write-protect 19 hard disk 21 F features 9 connectivity...
Veriton 7200D
Page 92
82 USB mouse 28 keyboard 26 monitor 26 mouse 26 software 67 73 Acrobat Reader 68 LDCM 69 Norton AntiVirus 70 NTI CD-Maker 71 PowerDVD 72 reinstalling programs 74 system boards 56 audio board 61 mainboard 56, 57, 58 T turning off computer 33 software shutdown 33 Index suspend mode 33 turning on computer 31 power button 31 U upgrade add memory 62 install DIMM 64 reconfigure computer 64 computer 56, 62 installation precautions 45 ESD 45 post-installation 46 preinstallation 45 open computer reinstall side panel 48 remove side panel 47 replace components 56, 62 USB devices 37
82 USB mouse 28 keyboard 26 monitor 26 mouse 26 software 67 73 Acrobat Reader 68 LDCM 69 Norton AntiVirus 70 NTI CD-Maker 71 PowerDVD 72 reinstalling programs 74 system boards 56 audio board 61 mainboard 56, 57, 58 T turning off computer 33 software shutdown 33 Index suspend mode 33 turning on computer 31 power button 31 U upgrade add memory 62 install DIMM 64 reconfigure computer 64 computer 56, 62 installation precautions 45 ESD 45 post-installation 46 preinstallation 45 open computer reinstall side panel 48 remove side panel 47 replace components 56, 62 USB devices 37


