User Manual
Page 2
...transmitted, in this publication may be made periodically to the information in any form or by any person of Acer Incorporated. All Rights Reserved. Acer Incorporated. This company makes no representations or warranties, either expressed or implied, with respect to notify any means,... mechanically, by photocopy, recording or otherwise, without obligation to the contents hereof and specifically disclaims the implied warranties of Acer Incorporated. No part of this publication without the prior written permission of merchantability or fitness for identification purposes only and...
...transmitted, in this publication may be made periodically to the information in any form or by any person of Acer Incorporated. All Rights Reserved. Acer Incorporated. This company makes no representations or warranties, either expressed or implied, with respect to notify any means,... mechanically, by photocopy, recording or otherwise, without obligation to the contents hereof and specifically disclaims the implied warranties of Acer Incorporated. No part of this publication without the prior written permission of merchantability or fitness for identification purposes only and...
User Manual
Page 3
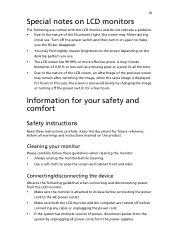
Cleaning your safety and comfort Safety instructions Read these guidelines when cleaning the monitor: • Always unplug the monitor before connecting any cable or unplugging the power cord. • If the system has multiple sources of power, disconnect power from the system by changing the image or turning off the power switch for hours. Connecting/disconnecting the device Observe the following are turned off the power switch and then turn it on again to make sure the flicker disappears. • You may find slightly uneven brightness on the screen depending on the desktop...
Cleaning your safety and comfort Safety instructions Read these guidelines when cleaning the monitor: • Always unplug the monitor before connecting any cable or unplugging the power cord. • If the system has multiple sources of power, disconnect power from the system by changing the image or turning off the power switch for hours. Connecting/disconnecting the device Observe the following are turned off the power switch and then turn it on again to make sure the flicker disappears. • You may find slightly uneven brightness on the screen depending on the desktop...

User Manual
Page 4
iv Accessibility Be sure that the power outlet you plug the power cord into is used with this product, make sure that could be seriously damaged. • Slots and openings are not sure of the type of the product and to protect it from overheating. If you can hear it clearly and comfortably and without distortion. • After setting the volume level, do not place the product on a vibrating surface. • Never use this product where people will probably cause unexpected short current or damage internal devices. Do not locate this product near or over a radiator or heat ...
iv Accessibility Be sure that the power outlet you plug the power cord into is used with this product, make sure that could be seriously damaged. • Slots and openings are not sure of the type of the product and to protect it from overheating. If you can hear it clearly and comfortably and without distortion. • After setting the volume level, do not place the product on a vibrating surface. • Never use this product where people will probably cause unexpected short current or damage internal devices. Do not locate this product near or over a radiator or heat ...
User Manual
Page 5
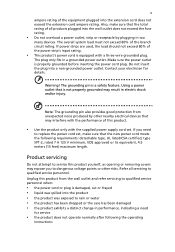
If you to qualified service personnel when: • the power cord or plug is not properly grounded may result in performance, indicating a need to service this product from unexpected noise produced by plugging in a grounded power outlet. Contact your electrician for service • the product does not operate normally after following requirements: detachable type, UL listed/CSA certified, type SPT-2, rated 7 A 125 V minimum, VDE approved or its equivalent, 4.5 meters (15 feet) maximum length. Product servicing Do not attempt to replace the power cord set . If ...
If you to qualified service personnel when: • the power cord or plug is not properly grounded may result in performance, indicating a need to service this product from unexpected noise produced by plugging in a grounded power outlet. Contact your electrician for service • the product does not operate normally after following requirements: detachable type, UL listed/CSA certified, type SPT-2, rated 7 A 125 V minimum, VDE approved or its equivalent, 4.5 meters (15 feet) maximum length. Product servicing Do not attempt to replace the power cord set . If ...

User Manual
Page 6
... operations are often, but not always, marked. Switch off your device in bodily injury or even death. IT Equipment Recycling Information Acer is strongly committed to normal condition. Potentially explosive atmospheres include areas where you would normally be advised to turn off the device near... gas pumps at Acer are very conscious of the environmental effects of our business and strive to identify and provide the best working procedures to this ...
... operations are often, but not always, marked. Switch off your device in bodily injury or even death. IT Equipment Recycling Information Acer is strongly committed to normal condition. Potentially explosive atmospheres include areas where you would normally be advised to turn off the device near... gas pumps at Acer are very conscious of the environmental effects of our business and strive to identify and provide the best working procedures to this ...

User Manual
Page 7
This has no effect on the Waste from Electrical and Electronics Equipment (WEEE) regulations, visit http://www.acer‐group.com/public/Sustainability/ LCD pixel statement The LCD unit is produced with high-precision manufacturing techniques. For more information on the recorded image ...
This has no effect on the Waste from Electrical and Electronics Equipment (WEEE) regulations, visit http://www.acer‐group.com/public/Sustainability/ LCD pixel statement The LCD unit is produced with high-precision manufacturing techniques. For more information on the recorded image ...
User Manual
Page 8
viii This product has been shipped enabled for power management: • Activate display's Sleep mode within 15 minutes of user inactivity. • Activate computer's Sleep mode within 30 minutes of physical injury. Long work periods, bad posture, poor work habits, stress, inadequate working in one fixed posture • avoid slouching forward and/or leaning backward • stand up and walk around regularly to remove the strain on your comfort zone by pushing the power button. The following section provides tips for comfortable use Computer users may complain of eyestrain and ...
viii This product has been shipped enabled for power management: • Activate display's Sleep mode within 15 minutes of user inactivity. • Activate computer's Sleep mode within 30 minutes of physical injury. Long work periods, bad posture, poor work habits, stress, inadequate working in one fixed posture • avoid slouching forward and/or leaning backward • stand up and walk around regularly to remove the strain on your comfort zone by pushing the power button. The following section provides tips for comfortable use Computer users may complain of eyestrain and ...
User Manual
Page 9
The following work habits Develop the following sections provide suggestions on a distant point. • Blink frequently to keep your eyes from drying out. Eyes • Rest your eyes frequently. • Give your eyes regular breaks by using drapes, shades or blinds • using a task light • changing the display's viewing angle • using a glare-reduction filter • using a display visor, such as a piece of your vision Long viewing hours, wearing incorrect glasses or contact lenses, glare, excessive room lighting, poorly focused screens, very small typefaces and low-...
The following work habits Develop the following sections provide suggestions on a distant point. • Blink frequently to keep your eyes from drying out. Eyes • Rest your eyes frequently. • Give your eyes regular breaks by using drapes, shades or blinds • using a task light • changing the display's viewing angle • using a glare-reduction filter • using a display visor, such as a piece of your vision Long viewing hours, wearing incorrect glasses or contact lenses, glare, excessive room lighting, poorly focused screens, very small typefaces and low-...
User Manual
Page 10
...Taiwan Declaration of ecodesign requirements for the setting of Conformity We, Acer Incorporated 8F, 88, Sec. 1, Xintai 5th Rd., Xizhi, New Taipei City 221, Taiwan Contact Person: Mr. RU Jan, e-mail:ru.jan@acer.com And, Acer Italy s.r.l Via Lepetit, 40, 20020 Lainate (MI) Italy Tel...: +39-02-939-921 ,Fax: +39-02 9399-2913 www.acer.it Declare under our own responsibility that the product: Product: LCD Monitor Trade Name: Acer Model Number: V206HQL SKU Number: V206HQL xxxxxx; ("x" = 0~9, a ~ z, A ~ Z, or blank) To which this declaration refers conforms ...
...Taiwan Declaration of ecodesign requirements for the setting of Conformity We, Acer Incorporated 8F, 88, Sec. 1, Xintai 5th Rd., Xizhi, New Taipei City 221, Taiwan Contact Person: Mr. RU Jan, e-mail:ru.jan@acer.com And, Acer Italy s.r.l Via Lepetit, 40, 20020 Lainate (MI) Italy Tel...: +39-02-939-921 ,Fax: +39-02 9399-2913 www.acer.it Declare under our own responsibility that the product: Product: LCD Monitor Trade Name: Acer Model Number: V206HQL SKU Number: V206HQL xxxxxx; ("x" = 0~9, a ~ z, A ~ Z, or blank) To which this declaration refers conforms ...
User Manual
Page 11
... V 206HQL xxxxxx ("x" = 0~9, a ~ z, A ~ Z or Blank) Name of Responsible Party: Acer America Corporation Address of the FCC Rules. S. A. Acer America Corporation 333 West San Carlos St., Suite 1500 San Jose, CA 95110, U. Contact Person: Acer Representative Phone No.: 254-298-4000 Fax No.: 254-298-4147 Tel : 254-298...-4000 Fax : 254-298-4147 www.acer.com Federal Communications Commission Declaration of Conformity This device complies with Part ...
... V 206HQL xxxxxx ("x" = 0~9, a ~ z, A ~ Z or Blank) Name of Responsible Party: Acer America Corporation Address of the FCC Rules. S. A. Acer America Corporation 333 West San Carlos St., Suite 1500 San Jose, CA 95110, U. Contact Person: Acer Representative Phone No.: 254-298-4000 Fax No.: 254-298-4147 Tel : 254-298...-4000 Fax : 254-298-4147 www.acer.com Federal Communications Commission Declaration of Conformity This device complies with Part ...
User Manual
Page 12
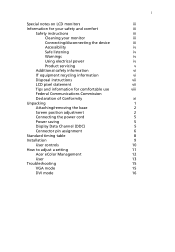
... position adjustment Connecting the power cord Power saving Display Data Channel (DDC) Connector pin assignment Standard timing table Installation User controls How to adjust a setting Acer eColor Management User Troubleshooting VGA mode DVI mode 1 iii iii iii iii iii iv iv iv iv v vi vi vii vii viii xi 1 2 2 5 5 5 6 8 9 10 11...
... position adjustment Connecting the power cord Power saving Display Data Channel (DDC) Connector pin assignment Standard timing table Installation User controls How to adjust a setting Acer eColor Management User Troubleshooting VGA mode DVI mode 1 iii iii iii iii iii iv iv iv iv v vi vi vii vii viii xi 1 2 2 5 5 5 6 8 9 10 11...
User Manual
Page 13
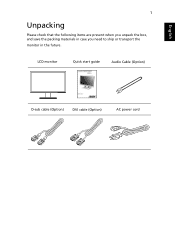
English 1 Unpacking Please check that the following items are present when you unpack the box, and save the packing materials in case you need to ship or transport the monitor in the future. LCD monitor Quick start guide Audio Cable (Option) D-sub cable (Option) DVI cable (Option) AC power cord
English 1 Unpacking Please check that the following items are present when you unpack the box, and save the packing materials in case you need to ship or transport the monitor in the future. LCD monitor Quick start guide Audio Cable (Option) D-sub cable (Option) DVI cable (Option) AC power cord
User Manual
Page 14
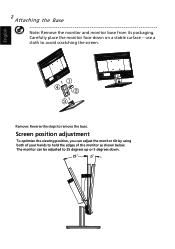
use a cloth to avoid scratching the screen. ① ④② ③ Remove: Reverse the steps to hold the edges of your hands to remove the base. English 2 Attaching the Base Note: Remove the monitor and monitor base from its packaging. Screen position adjustment To optimize the viewing position, you can be adjusted to 25 degrees up or 5 degrees down on a stable surface -- Carefully place the monitor face-down . 25 The monitor can adjust the monitor tilt by using both of the monitor as shown below.
use a cloth to avoid scratching the screen. ① ④② ③ Remove: Reverse the steps to hold the edges of your hands to remove the base. English 2 Attaching the Base Note: Remove the monitor and monitor base from its packaging. Screen position adjustment To optimize the viewing position, you can be adjusted to 25 degrees up or 5 degrees down on a stable surface -- Carefully place the monitor face-down . 25 The monitor can adjust the monitor tilt by using both of the monitor as shown below.
User Manual
Page 15
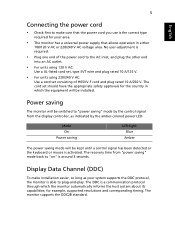
The recovery time from the display controller, as your area. • The monitor has a universal power supply that the power cord you use is around 3 seconds. The monitor supports the DDC2B standard. for your system supports the DDC protocol, the monitor is a communication protocol through which the equipment will be installed. No user-adjustment is activated. The DDC is able to plug-and-play. Mode On Power saving LED light Blue Amber The power saving mode will be kept until a control signal has been detected or the keyboard or mouse is required. • Plug ...
The recovery time from the display controller, as your area. • The monitor has a universal power supply that the power cord you use is around 3 seconds. The monitor supports the DDC2B standard. for your system supports the DDC protocol, the monitor is a communication protocol through which the equipment will be installed. No user-adjustment is activated. The DDC is able to plug-and-play. Mode On Power saving LED light Blue Amber The power saving mode will be kept until a control signal has been detected or the keyboard or mouse is required. • Plug ...
User Manual
Page 17
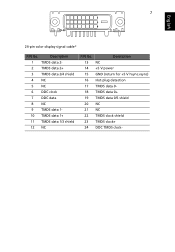
7 English 24-pin color display signal cable* PIN No. Description 1 TMDS data 2- 2 TMDS data 2+ 3 TMDS data 2/4 shield 4 NC 5 NC 6 DDC clock 7 DDC data 8 NC 9 TMDS data 1- 10 TMDS data 1+ 11 TMDS data 1/3 shield 12 NC PIN No. Description 13 NC 14 +5 V power 15 GND (return for +5 V hsync.vsync) 16 Hot-plug detection 17 TMDS data 0- 18 TMDS data 0+ 19 TMDS data 0/5 shield 20 NC 21 NC 22 TMDS clock shield 23 TMDS clock+ 24 DDC TMDS clock-
7 English 24-pin color display signal cable* PIN No. Description 1 TMDS data 2- 2 TMDS data 2+ 3 TMDS data 2/4 shield 4 NC 5 NC 6 DDC clock 7 DDC data 8 NC 9 TMDS data 1- 10 TMDS data 1+ 11 TMDS data 1/3 shield 12 NC PIN No. Description 13 NC 14 +5 V power 15 GND (return for +5 V hsync.vsync) 16 Hot-plug detection 17 TMDS data 0- 18 TMDS data 0+ 19 TMDS data 0/5 shield 20 NC 21 NC 22 TMDS clock shield 23 TMDS clock+ 24 DDC TMDS clock-
User Manual
Page 19
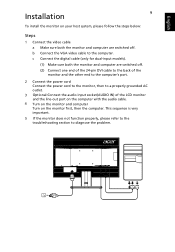
c Connect the digital cable (only for dual-input models). (1) Make sure both the monitor and computer are switched off. (2) Connect one end of the 24-pin DVI cable to the back of the monitor and the other end to the computer's port. 2 Connect the power cord Connect the power cord to the monitor, then to a properly grounded AC outlet. 3 Optional:Connect the audio input socket(AUDIO IN) of the LCD monitor and the line-out port on the computer with the audio cable. 4 Turn on the monitor and computer Turn on your host system, please follow the steps below: Steps 1 Connect the video cable a ...
c Connect the digital cable (only for dual-input models). (1) Make sure both the monitor and computer are switched off. (2) Connect one end of the 24-pin DVI cable to the back of the monitor and the other end to the computer's port. 2 Connect the power cord Connect the power cord to the monitor, then to a properly grounded AC outlet. 3 Optional:Connect the audio input socket(AUDIO IN) of the LCD monitor and the line-out port on the computer with the audio cable. 4 Turn on the monitor and computer Turn on your host system, please follow the steps below: Steps 1 Connect the video cable a ...
User Manual
Page 20
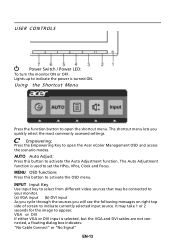
... DVI input is used to open the shortcut menu. Lights up to activate the OSD menu. MENU OSD functions Press this button to open the Acer eColor Management OSD and access the scenario modes. Empowering: Press the Empowering Key to set the HPos, VPos, Clock and Focus. Using the Shortcut Menu...
... DVI input is used to open the shortcut menu. Lights up to activate the OSD menu. MENU OSD functions Press this button to open the Acer eColor Management OSD and access the scenario modes. Empowering: Press the Empowering Key to set the HPos, VPos, Clock and Focus. Using the Shortcut Menu...

User Manual
Page 21
... item Description N/A User mode User defined. R eflects n a tive d isp lay mode capability N/A Grahpic mode Enhances colors and emphasize fine detail. Acer eColor Management Operation instructions Step 1: Press " " Key to open the Acer eColor Management OSD and access the scenario modes Step 2: Press " " or " " to select the mode Step 3: Press " AUTO " Key to...
... item Description N/A User mode User defined. R eflects n a tive d isp lay mode capability N/A Grahpic mode Enhances colors and emphasize fine detail. Acer eColor Management Operation instructions Step 1: Press " " Key to open the Acer eColor Management OSD and access the scenario modes Step 2: Press " " or " " to select the mode Step 3: Press " AUTO " Key to...

User Manual
Page 22
You can use the OSD to open the OSD. For advanced settings, please refer to following content is for adjusting the settings of your LCD Monitor. EN-15 Press the MENU key to adjust the picture quality, OSD position and general settings. The OSD can be used to adjust the current Brightness, Contrast, Colour Temp, Auto Config and other image-related qualities. Adjusting the OSD settings Note: The following page: Adjusting the picture quality 1 Press the MENU key to bring up the OSD. 2 Using the / keys, select Picture from the OSD. Then navigate to the picture element you ...
You can use the OSD to open the OSD. For advanced settings, please refer to following content is for adjusting the settings of your LCD Monitor. EN-15 Press the MENU key to adjust the picture quality, OSD position and general settings. The OSD can be used to adjust the current Brightness, Contrast, Colour Temp, Auto Config and other image-related qualities. Adjusting the OSD settings Note: The following page: Adjusting the picture quality 1 Press the MENU key to bring up the OSD. 2 Using the / keys, select Picture from the OSD. Then navigate to the picture element you ...

User Manual
Page 23
EN-16 Adjusting the OSD position 1 Press the MENU key to adjust. Then navigate to the feature you wish to bring up the OSD. 2 Using the directional keys, select OSD from the on screen display.
EN-16 Adjusting the OSD position 1 Press the MENU key to adjust. Then navigate to the feature you wish to bring up the OSD. 2 Using the directional keys, select OSD from the on screen display.
