
User Manual
Page 2
... their respective companies. Acer LCD Monitor User's Guide Model number Serial number Date of purchase Place of Acer Incorporated. All correspondence concerning your computer. No part of Acer Incorporated. Other companies' product names or trademarks are registered trademarks of this publication may be made periodically to the contents hereof and specifically disclaims the implied warranties of purchase information in this manual or supplementary documents...
... their respective companies. Acer LCD Monitor User's Guide Model number Serial number Date of purchase Place of Acer Incorporated. All correspondence concerning your computer. No part of Acer Incorporated. Other companies' product names or trademarks are registered trademarks of this publication may be made periodically to the contents hereof and specifically disclaims the implied warranties of purchase information in this manual or supplementary documents...

User Manual
Page 3
... turning off the power switch and then turn it on again to make sure the flicker disappears. • You may find slightly uneven brightness on the screen depending on the desktop pattern you use . In this document for your monitor Please carefully follow these instructions carefully. Information for future reference. Keep this case, the screen is recovered slowly by unplugging all power cords from the power supplies. Cleaning...
... turning off the power switch and then turn it on again to make sure the flicker disappears. • You may find slightly uneven brightness on the screen depending on the desktop pattern you use . In this document for your monitor Please carefully follow these instructions carefully. Information for future reference. Keep this case, the screen is recovered slowly by unplugging all power cords from the power supplies. Cleaning...
User Manual
Page 4
... these instructions. • Gradually increase the volume until you need to disconnect power from the equipment, be blocked or covered. Do not locate this product on the power cord. If the product falls, it could result in installation unless proper ventilation is provided. • Never push objects of the product and to block out noisy surroundings. • Turn the volume...
... these instructions. • Gradually increase the volume until you need to disconnect power from the equipment, be blocked or covered. Do not locate this product on the power cord. If the product falls, it could result in installation unless proper ventilation is provided. • Never push objects of the product and to block out noisy surroundings. • Turn the volume...
User Manual
Page 5
... instructions The overall system load must not exceed 80% of the branch circuit rating. If power strips are used, the load should not exceed 80% of the power strip's input rating. • This product's power cord is equipped with the supplied power supply cord set , make sure that may interfere with the performance of this product. • Use the product only with a three-wire grounded plug. The plug...
... instructions The overall system load must not exceed 80% of the branch circuit rating. If power strips are used, the load should not exceed 80% of the power strip's input rating. • This product's power cord is equipped with the supplied power supply cord set , make sure that may interfere with the performance of this product. • Use the product only with a three-wire grounded plug. The plug...

User Manual
Page 6
... turn off your vehicle engine. Keep them out of the reach of radio equipment in any area with a potentially explosive atmosphere are often, but not always, marked. For more information and help when recycling, please go to normal condition. We at service stations. vi Note: Adjust only those controls that are covered by the operating instructions, since improper adjustment...
... turn off your vehicle engine. Keep them out of the reach of radio equipment in any area with a potentially explosive atmosphere are often, but not always, marked. For more information and help when recycling, please go to normal condition. We at service stations. vi Note: Adjust only those controls that are covered by the operating instructions, since improper adjustment...
User Manual
Page 7
... red dots. ENERGY STAR (for selected models) is produced with high-precision manufacturing techniques. For lamp-specific disposal information, check www.lamprecycle.org. This has no effect on the Waste from Electrical and Electronics Equipment (WEEE) regulations, visit http://global.acer.com/about/sustainability.htm Mercury advisory For projectors or electronic products containing an LCD/CRT monitor or display...
... red dots. ENERGY STAR (for selected models) is produced with high-precision manufacturing techniques. For lamp-specific disposal information, check www.lamprecycle.org. This has no effect on the Waste from Electrical and Electronics Equipment (WEEE) regulations, visit http://global.acer.com/about/sustainability.htm Mercury advisory For projectors or electronic products containing an LCD/CRT monitor or display...
User Manual
Page 8
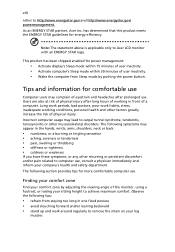
... tips for comfortable use Computer users may lead to remove the strain on your company's health and safety department. The following tips: • refrain from Sleep mode by adjusting the viewing angle of a computer. Long work periods, bad posture, poor work habits, stress, inadequate working in one fixed posture • avoid slouching forward and/or leaning backward • stand up and walk...
... tips for comfortable use Computer users may lead to remove the strain on your company's health and safety department. The following tips: • refrain from Sleep mode by adjusting the viewing angle of a computer. Long work periods, bad posture, poor work habits, stress, inadequate working in one fixed posture • avoid slouching forward and/or leaning backward • stand up and walk...
User Manual
Page 11
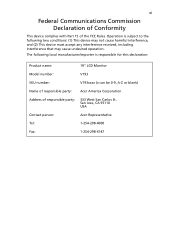
xi Federal Communications Commission Declaration of Conformity This device complies with Part 15 of responsible party: 333 West San Carlos St. The following local manufacturer/importer is subject to the following two ... must accept any interference received, including interference that may cause undesired operation. Operation is responsible for this declaration: Product name: 19" LCD Monitor Model number: V193 SKU number: V193xxxx (x can be 0-9, A-Z or blank) Name of responsible party: Acer America Corporation Address of the FCC Rules. San Jose, CA 95110 USA Contact person...
xi Federal Communications Commission Declaration of Conformity This device complies with Part 15 of responsible party: 333 West San Carlos St. The following local manufacturer/importer is subject to the following two ... must accept any interference received, including interference that may cause undesired operation. Operation is responsible for this declaration: Product name: 19" LCD Monitor Model number: V193 SKU number: V193xxxx (x can be 0-9, A-Z or blank) Name of responsible party: Acer America Corporation Address of the FCC Rules. San Jose, CA 95110 USA Contact person...
User Manual
Page 13
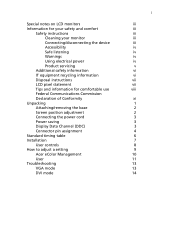
... Accessibility Safe listening Warnings Using electrical power Product servicing Additional safety information IT equipment recycling information Disposal instructions LCD pixel statement Tips and information for comfortable use Federal Communications Commission Declaration of Conformity Unpacking Attaching/removing the base Screen position adjustment Connecting the power cord Power saving Display Data Channel (DDC) Connector pin assignment Standard timing table Installation User controls How to adjust a setting Acer eColor Management User Troubleshooting VGA mode DVI mode 1 iii iii iii iii...
... Accessibility Safe listening Warnings Using electrical power Product servicing Additional safety information IT equipment recycling information Disposal instructions LCD pixel statement Tips and information for comfortable use Federal Communications Commission Declaration of Conformity Unpacking Attaching/removing the base Screen position adjustment Connecting the power cord Power saving Display Data Channel (DDC) Connector pin assignment Standard timing table Installation User controls How to adjust a setting Acer eColor Management User Troubleshooting VGA mode DVI mode 1 iii iii iii iii...
User Manual
Page 15
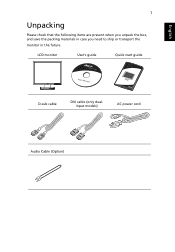
English 1 Unpacking Please check that the following items are present when you unpack the box, and save the packing materials in case you need to ship or transport the monitor in the future. LCD monitor User's guide Quick start guide D-sub cable DVI cable (only dualinput models) AC power cord Audio Cable (Option)
English 1 Unpacking Please check that the following items are present when you unpack the box, and save the packing materials in case you need to ship or transport the monitor in the future. LCD monitor User's guide Quick start guide D-sub cable DVI cable (only dualinput models) AC power cord Audio Cable (Option)
User Manual
Page 17
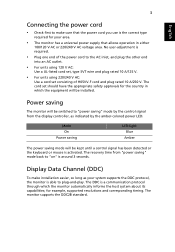
3 English Connecting the power cord • Check first to make installation easier, so long as indicated by the control signal from "power saving" mode back to "on" is required. • Plug one end of the power cord to "power saving" mode by the amber-colored power LED. for the country in either 100/120 V AC or 220/240 V AC voltage area. The cord set consisting of H05VV-F cord and plug rated 10 A/250 V. The monitor supports the DDC2B standard...
3 English Connecting the power cord • Check first to make installation easier, so long as indicated by the control signal from "power saving" mode back to "on" is required. • Plug one end of the power cord to "power saving" mode by the amber-colored power LED. for the country in either 100/120 V AC or 220/240 V AC voltage area. The cord set consisting of H05VV-F cord and plug rated 10 A/250 V. The monitor supports the DDC2B standard...
User Manual
Page 20
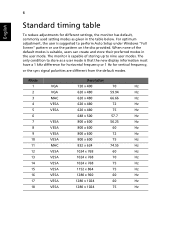
... table To reduce adjustments for vertical frequency, or the sync signal polarities are different from the default modes. The monitor is capable of the default modes is that the new display information must have a 1 kHz difference for horizontal frequency or 1 Hz for different settings, the monitor has default, commonly used setting modes as given in the user mode. Mode 1 2 3 4 5 6 7 8 9 10 11 12 13 14 15 16 17 18 VGA VGA MAC VESA VESA VESA VESA VESA VESA MAC VESA VESA VESA VESA VESA VESA VESA Resolution 720 x 400 70 Hz...
... table To reduce adjustments for vertical frequency, or the sync signal polarities are different from the default modes. The monitor is capable of the default modes is that the new display information must have a 1 kHz difference for horizontal frequency or 1 Hz for different settings, the monitor has default, commonly used setting modes as given in the user mode. Mode 1 2 3 4 5 6 7 8 9 10 11 12 13 14 15 16 17 18 VGA VGA MAC VESA VESA VESA VESA VESA VESA MAC VESA VESA VESA VESA VESA VESA VESA Resolution 720 x 400 70 Hz...
User Manual
Page 21
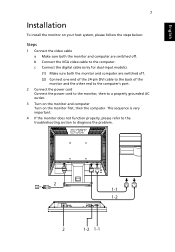
DVI D-Sub 2 1-1 1-2 2 1-2 1-1 b Connect the VGA video cable to diagnose the problem. c Connect the digital cable (only for dual-input models). (1) Make sure both the monitor and computer are switched off . (2) Connect one end of the 24-pin DVI cable to the back of the monitor and the other end to the computer's port. 2 Connect the power cord Connect the power cord to the monitor, then to a properly grounded AC outlet. 3 Turn on the monitor and computer Turn on your host...
DVI D-Sub 2 1-1 1-2 2 1-2 1-1 b Connect the VGA video cable to diagnose the problem. c Connect the digital cable (only for dual-input models). (1) Make sure both the monitor and computer are switched off . (2) Connect one end of the 24-pin DVI cable to the back of the monitor and the other end to the computer's port. 2 Connect the power cord Connect the power cord to the monitor, then to a properly grounded AC outlet. 3 Turn on the monitor and computer Turn on your host...

User Manual
Page 22
... the OSD menu is active, this button to set the HPos, VPos, Clock and Focus. 7 Empowering Key/Exit: a. When the OSD menu is active, this button for two seconds to activate the Auto Adjustment function. English 8 User controls Front panel controls 1 Power LED: Lights up to indicate the power is turned on. 2 Power Switch: Turn the power on or off or activate / deactivate the adjustment function when the OSD is on. 6 Auto adjust button/Exit: a. When the OSD menu is...
... the OSD menu is active, this button to set the HPos, VPos, Clock and Focus. 7 Empowering Key/Exit: a. When the OSD menu is active, this button for two seconds to activate the Auto Adjustment function. English 8 User controls Front panel controls 1 Power LED: Lights up to indicate the power is turned on. 2 Power Switch: Turn the power on or off or activate / deactivate the adjustment function when the OSD is on. 6 Auto adjust button/Exit: a. When the OSD menu is...
User Manual
Page 23
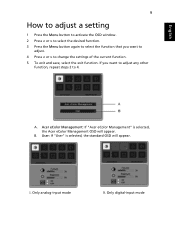
... you want to adjust. 4 Press < or > to 4. If you want to adjust any other function, repeat steps 2 to change the settings of the current function. 5 To exit and save, select the exit function. User: If "User" is selected, the Acer eColor Management OSD will appear. I. A. Acer eColor Management: If "Acer eColor Management" is selected, the standard OSD will appear. Only analog-input mode II. Only digital-input mode
... you want to adjust. 4 Press < or > to 4. If you want to adjust any other function, repeat steps 2 to change the settings of the current function. 5 To exit and save, select the exit function. User: If "User" is selected, the Acer eColor Management OSD will appear. I. A. Acer eColor Management: If "Acer eColor Management" is selected, the standard OSD will appear. Only analog-input mode II. Only digital-input mode

User Manual
Page 24
.... Default settings. English 10 Acer eColor Management • Operation instructions 1 Press the Empowering Key to open the Acer eColor Management OSD and access the scenario modes. 2 Press "" to select the mode. 3 Press the Auto-adjust button to prevent eyestrain. Optimal balance of brightness and contrast to confirm the mode and run Auto Adjust. • Features and benefits Main menu icon Sub menu item User mode Text mode Standard mode Graphic mode Movie mode Description User-defined. Enhances colors and...
.... Default settings. English 10 Acer eColor Management • Operation instructions 1 Press the Empowering Key to open the Acer eColor Management OSD and access the scenario modes. 2 Press "" to select the mode. 3 Press the Auto-adjust button to prevent eyestrain. Optimal balance of brightness and contrast to confirm the mode and run Auto Adjust. • Features and benefits Main menu icon Sub menu item User mode Text mode Standard mode Graphic mode Movie mode Description User-defined. Enhances colors and...

User Manual
Page 25
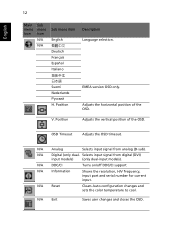
... to warm white. User/blue Adjusts blue intensity. H. N/A Warm N/A Cool User/red Sets the color temperature to cool white. Focus Adjusts picture focus (available in analog mode only). Position Adjusts the vertical position (available in analog mode only). User/green Adjusts green intensity. Adjusts the background brightness of the screen image. ACM ACM (Adaptive Contrast Management) ACM On/Off switch, default Off. Adjusts red intensity. Position Adjusts the horizontal position (available in analog mode only). V. English 11 User Main Sub menu menu icon...
... to warm white. User/blue Adjusts blue intensity. H. N/A Warm N/A Cool User/red Sets the color temperature to cool white. Focus Adjusts picture focus (available in analog mode only). Position Adjusts the vertical position (available in analog mode only). User/green Adjusts green intensity. Adjusts the background brightness of the screen image. ACM ACM (Adaptive Contrast Management) ACM On/Off switch, default Off. Adjusts red intensity. Position Adjusts the horizontal position (available in analog mode only). V. English 11 User Main Sub menu menu icon...
User Manual
Page 26
... menu icon N/A N/A Sub menu item English Deutsch Français Español Italiano Suomi Nederlands H. Adjusts the horizontal position of the OSD. Selects input signal from analog (D-sub). OSD Timeout Adjusts the OSD timeout. EMEA version OSD only. Position Adjusts the vertical position of the OSD. N/A Digital (only dual- V. N/A DDC/CI Turns on/off DDC/CI support N/A Information Shows the resolution, H/V frequency, input port and serial number for current input. N/A Reset Clears Auto-configuration changes and sets the color temperature to cool. Position...
... menu icon N/A N/A Sub menu item English Deutsch Français Español Italiano Suomi Nederlands H. Adjusts the horizontal position of the OSD. Selects input signal from analog (D-sub). OSD Timeout Adjusts the OSD timeout. EMEA version OSD only. Position Adjusts the vertical position of the OSD. N/A Digital (only dual- V. N/A DDC/CI Turns on/off DDC/CI support N/A Information Shows the resolution, H/V frequency, input port and serial number for current input. N/A Reset Clears Auto-configuration changes and sets the color temperature to cool. Position...
User Manual
Page 27
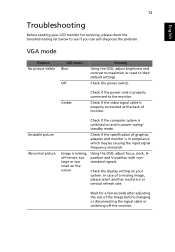
.... Check if the video signal cable is properly connected at the back of a missing image, please select another resolution or vertical refresh rate. Using the OSD, adjust focus, clock, Hposition and V-position with nonstandard signals. Image is in power saving/ standby mode. Check the display setting on the screen. In case of monitor. VGA mode Problem No picture visible LED status Blue Off Remedy Using the OSD, adjust brightness and contrast to maximum or reset to the monitor. Check the power switch. Wait for servicing, please check the troubleshooting list...
.... Check if the video signal cable is properly connected at the back of a missing image, please select another resolution or vertical refresh rate. Using the OSD, adjust focus, clock, Hposition and V-position with nonstandard signals. Image is in power saving/ standby mode. Check the display setting on the screen. In case of monitor. VGA mode Problem No picture visible LED status Blue Off Remedy Using the OSD, adjust brightness and contrast to maximum or reset to the monitor. Check the power switch. Wait for servicing, please check the troubleshooting list...

User Manual
Page 28
Check that the computer system is properly connected to their default settings. Check the power switch. Amber Check if the AC power cord is switched on and in power saving/ standby mode. English 14 DVI mode Problem No picture visible LED status Blue Off Remedy Using the OSD, adjust brightness and contrast to maximum or reset to the monitor. Check if the video signal cable is properly connected at the back of monitor.
Check that the computer system is properly connected to their default settings. Check the power switch. Amber Check if the AC power cord is switched on and in power saving/ standby mode. English 14 DVI mode Problem No picture visible LED status Blue Off Remedy Using the OSD, adjust brightness and contrast to maximum or reset to the monitor. Check if the video signal cable is properly connected at the back of monitor.


