
User Guide
Page 2
...names or trademarks are registered trademarks of purchase information in the space provided below. Copyright © 2007. All Rights Reserved. Acer LCD Monitor User's Guide Original Issue: 11/2007 Changes may be made periodically to the information in any form or by photocopy, recording ... the prior written permission of such revisions or changes. Acer LCD Monitor User's Guide Model number Serial number Date of purchase Place of purchase Acer and the Acer logo are used herein for a particular purpose. Acer Incorporated. No part of merchantability or fitness for identification ...
...names or trademarks are registered trademarks of purchase information in the space provided below. Copyright © 2007. All Rights Reserved. Acer LCD Monitor User's Guide Original Issue: 11/2007 Changes may be made periodically to the information in any form or by photocopy, recording ... the prior written permission of such revisions or changes. Acer LCD Monitor User's Guide Model number Serial number Date of purchase Place of purchase Acer and the Acer logo are used herein for a particular purpose. Acer Incorporated. No part of merchantability or fitness for identification ...

User Guide
Page 3
... image or turning off the power switch for your monitor Please carefully follow these instructions carefully. iii Special notes on LCD monitors The following guidelines when connecting and disconnecting power from the LCD monitor: • Make sure the monitor is attached to its base before connecting the power ...cord to the AC power outlet. • Make sure both the LCD monitor and the computer are normal with the LCD monitor and do not indicate a problem. • Due to wipe the screen and cabinet front and sides. Information for ...
... image or turning off the power switch for your monitor Please carefully follow these instructions carefully. iii Special notes on LCD monitors The following guidelines when connecting and disconnecting power from the LCD monitor: • Make sure the monitor is attached to its base before connecting the power ...cord to the AC power outlet. • Make sure both the LCD monitor and the computer are normal with the LCD monitor and do not indicate a problem. • Due to wipe the screen and cabinet front and sides. Information for ...

User Guide
Page 7
...on the Waste from Electrical and Electronics Equipment (WEEE) regulations, visit http://global.acer.com/about/sustainability.htm Mercury advisory For projectors or electronic products containing an LCD/CRT monitor or display: lamp(s) inside this electronic device into the trash when discarding. ...Products that gives people the power to 50% less energy than conventional equipment. LCD pixel statement The LCD unit is a government program (...
...on the Waste from Electrical and Electronics Equipment (WEEE) regulations, visit http://global.acer.com/about/sustainability.htm Mercury advisory For projectors or electronic products containing an LCD/CRT monitor or display: lamp(s) inside this electronic device into the trash when discarding. ...Products that gives people the power to 50% less energy than conventional equipment. LCD pixel statement The LCD unit is a government program (...

User Guide
Page 8
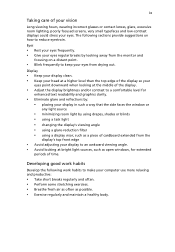
...• Activate display's Sleep mode within 15 minutes of user inactivity. • Activate computer's Sleep mode within 30 minutes of the monitor, using a footrest, or raising your comfort zone by pushing the power button. Long work periods, bad posture, poor work habits, ... your sitting height to carpal tunnel syndrome, tendonitis, tenosynovitis or other musculoskeletal disorders. viii refers to Acer LCD monitor with an ENERGY STAR logo. As an ENERGY STAR partner, Acer Inc. Incorrect computer usage may complain of eyestrain and headaches after long hours of a computer.
...• Activate display's Sleep mode within 15 minutes of user inactivity. • Activate computer's Sleep mode within 30 minutes of the monitor, using a footrest, or raising your comfort zone by pushing the power button. Long work periods, bad posture, poor work habits, ... your sitting height to carpal tunnel syndrome, tendonitis, tenosynovitis or other musculoskeletal disorders. viii refers to Acer LCD monitor with an ENERGY STAR logo. As an ENERGY STAR partner, Acer Inc. Incorrect computer usage may complain of eyestrain and headaches after long hours of a computer.
User Guide
Page 9
... suggestions on a distant point. • Blink frequently to reduce eyestrain. The following work habits to an awkward viewing angle. • Avoid looking away from the monitor and focusing on how to keep your eyes from the display's top front edge • Avoid adjusting your display to make your computer use more...
... suggestions on a distant point. • Blink frequently to reduce eyestrain. The following work habits to an awkward viewing angle. • Avoid looking away from the monitor and focusing on how to keep your eyes from the display's top front edge • Avoid adjusting your display to make your computer use more...

User Guide
Page 10
... Use of the same product will continue comply with the requirements. Easy Lai / Director Acer Computer (Shanghai) Limited The second x shows pedestal's ID color. The fourth x shows the others.;ADSP. x We, Acer Computer (Shanghai) Limited 3F, No. 168 Xizang medium road, Huangpu District, Shanghai, .... Easy Lai Tel: 886-2-8691-3089 Fax: 886-2-8691-3000 E-mail: easy_lai@acer.com.tw Hereby declare that production units of certain Hazardous Substances in force to assure that : Product: LCD Monitor Trade Name: Acer Model Number: B193W SKU Number: B193Wxxxx The first x shows the front frame's...
... Use of the same product will continue comply with the requirements. Easy Lai / Director Acer Computer (Shanghai) Limited The second x shows pedestal's ID color. The fourth x shows the others.;ADSP. x We, Acer Computer (Shanghai) Limited 3F, No. 168 Xizang medium road, Huangpu District, Shanghai, .... Easy Lai Tel: 886-2-8691-3089 Fax: 886-2-8691-3000 E-mail: easy_lai@acer.com.tw Hereby declare that production units of certain Hazardous Substances in force to assure that : Product: LCD Monitor Trade Name: Acer Model Number: B193W SKU Number: B193Wxxxx The first x shows the front frame's...

User Guide
Page 11
... fourth x shows the others.;ADSP. Operation is subject to the following local manufacturer/importer is responsible for this declaration: Product name: 19" LCD Monitor Model number: B193W SKU number: Name of responsible party: B193Wxxxx The first x shows the front frame's ID and color. The... second x shows pedestal's ID color. Acer America Corporation Address of the FCC Rules. San Jose, CA 95110 USA Contact person: Acer Representative Tel: 1-254-298-4000 Fax: 1-254-298-4147 xi Federal Communications Commission Declaration...
... fourth x shows the others.;ADSP. Operation is subject to the following local manufacturer/importer is responsible for this declaration: Product name: 19" LCD Monitor Model number: B193W SKU number: Name of responsible party: B193Wxxxx The first x shows the front frame's ID and color. The... second x shows pedestal's ID color. Acer America Corporation Address of the FCC Rules. San Jose, CA 95110 USA Contact person: Acer Representative Tel: 1-254-298-4000 Fax: 1-254-298-4147 xi Federal Communications Commission Declaration...

User Guide
Page 13
... Cleaning your monitor Connecting/disconnecting the device Accessibility Safe listening Warnings Using electrical power Product servicing Additional safety information IT equipment recycling information Disposal instructions LCD pixel statement ...Tips and information for comfortable use Federal Communications Commission Declaration of Conformity Unpacking Attaching/removing the base Screen position adjustment Connecting the power cord Power saving Display Data Channel (DDC) Connector pin assignment Standard timing table Installation User controls How to adjust a setting Acer...
... Cleaning your monitor Connecting/disconnecting the device Accessibility Safe listening Warnings Using electrical power Product servicing Additional safety information IT equipment recycling information Disposal instructions LCD pixel statement ...Tips and information for comfortable use Federal Communications Commission Declaration of Conformity Unpacking Attaching/removing the base Screen position adjustment Connecting the power cord Power saving Display Data Channel (DDC) Connector pin assignment Standard timing table Installation User controls How to adjust a setting Acer...
User Guide
Page 15
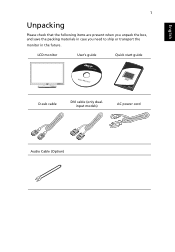
LCD monitor User's guide Quick start guide D-sub cable DVI cable (only dualinput models) AC power cord Audio Cable (Option) English 1 Unpacking Please check that the following items are present when you unpack the box, and save the packing materials in case you need to ship or transport the monitor in the future.
LCD monitor User's guide Quick start guide D-sub cable DVI cable (only dualinput models) AC power cord Audio Cable (Option) English 1 Unpacking Please check that the following items are present when you unpack the box, and save the packing materials in case you need to ship or transport the monitor in the future.
User Guide
Page 16
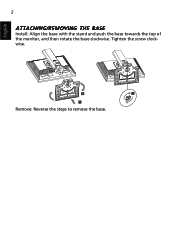
Tighten the screw clockwise. English 2 ATTACHING/REMOVING THE BASE Install: Align the base with the stand and push the base towards the top of the monitor, and then rotate the base clockwise. Remove: Reverse the steps to remove the base.
Tighten the screw clockwise. English 2 ATTACHING/REMOVING THE BASE Install: Align the base with the stand and push the base towards the top of the monitor, and then rotate the base clockwise. Remove: Reverse the steps to remove the base.
User Guide
Page 17
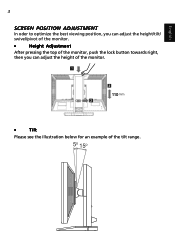
English 3 SCREEN POSITION ADJUSTMENT In oder to optimize the best viewing position, you can adjust the height/tilt/ swivel/pivot of the monitor. • Height Adjustment After pressing the top of the monitor, push the lock button towards right, then you can adjust the height of the monitor. 110 • Tilt Please see the illustration below for an example of the tilt range. 5o 15o
English 3 SCREEN POSITION ADJUSTMENT In oder to optimize the best viewing position, you can adjust the height/tilt/ swivel/pivot of the monitor. • Height Adjustment After pressing the top of the monitor, push the lock button towards right, then you can adjust the height of the monitor. 110 • Tilt Please see the illustration below for an example of the tilt range. 5o 15o
User Guide
Page 18
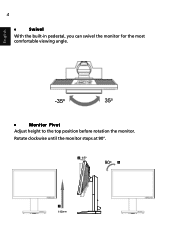
English • Monitor Pivot Adjust height to the top position before rotation the monitor. 4 • Swivel With the built-in pedestal, you can swivel the monitor for the most comfortable viewing angle. Rotate clockwise until the monitor stops at 90°. 15o 90o 110
English • Monitor Pivot Adjust height to the top position before rotation the monitor. 4 • Swivel With the built-in pedestal, you can swivel the monitor for the most comfortable viewing angle. Rotate clockwise until the monitor stops at 90°. 15o 90o 110

User Guide
Page 19
...country in either 100/120 V AC or 220/240 V AC voltage area. The recovery time from the display controller, as your area. • The monitor has a universal power supply that the power cord you use is a communication protocol through which the equipment will be switched to "power saving" mode by... to make installation easier, so long as indicated by the control signal from "power saving" mode back to plug-and-play. Power saving The monitor will be kept until a control signal has been detected or the keyboard or mouse is around 3 seconds. The DDC is the correct type required...
...country in either 100/120 V AC or 220/240 V AC voltage area. The recovery time from the display controller, as your area. • The monitor has a universal power supply that the power cord you use is a communication protocol through which the equipment will be switched to "power saving" mode by... to make installation easier, so long as indicated by the control signal from "power saving" mode back to plug-and-play. Power saving The monitor will be kept until a control signal has been detected or the keyboard or mouse is around 3 seconds. The DDC is the correct type required...

User Guide
Page 23
... to the computer. c Connect the digital cable (only for dual-input models). (1) Make sure both the monitor and computer are switched off . DVI D-Sub 2 1-1 1-2 2 1-2 1-1 English 9 Installation To install the monitor on your host system, please follow the steps below: Steps 1 Connect the video cable a Make sure both... the monitor and computer are switched off . (2) Connect one end of the 24-pin DVI cable to the back of the monitor and the other end to the computer's port. 2 Connect the power cord Connect the...
... to the computer. c Connect the digital cable (only for dual-input models). (1) Make sure both the monitor and computer are switched off . DVI D-Sub 2 1-1 1-2 2 1-2 1-1 English 9 Installation To install the monitor on your host system, please follow the steps below: Steps 1 Connect the video cable a Make sure both... the monitor and computer are switched off . (2) Connect one end of the 24-pin DVI cable to the back of the monitor and the other end to the computer's port. 2 Connect the power cord Connect the...

User Guide
Page 29
15 English Troubleshooting Before sending your system. Check the display setting on your LCD monitor for a few seconds after adjusting the size of graphics adapter and monitor is in power saving/ standby mode. Check if the specification of the image before changing or disconnecting the ...settings. Check the power switch. Check if the video signal cable is missing, off the monitor. Unstable picture Abnormal picture Check if the computer system is properly connected to the monitor. Using the OSD, adjust focus, clock, Hposition and V-position with nonstandard signals. In ...
15 English Troubleshooting Before sending your system. Check the display setting on your LCD monitor for a few seconds after adjusting the size of graphics adapter and monitor is in power saving/ standby mode. Check if the specification of the image before changing or disconnecting the ...settings. Check the power switch. Check if the video signal cable is missing, off the monitor. Unstable picture Abnormal picture Check if the computer system is properly connected to the monitor. Using the OSD, adjust focus, clock, Hposition and V-position with nonstandard signals. In ...

User Guide
Page 30
Check that the computer system is properly connected at the back of monitor. English 16 DVI mode Problem No picture visible LED status Blue Off Remedy Using the OSD, adjust brightness and contrast to maximum or reset to the monitor. Check if the video signal cable is switched on and in power saving/ standby mode. Check the power switch. Amber Check if the AC power cord is properly connected to their default settings.
Check that the computer system is properly connected at the back of monitor. English 16 DVI mode Problem No picture visible LED status Blue Off Remedy Using the OSD, adjust brightness and contrast to maximum or reset to the monitor. Check if the video signal cable is switched on and in power saving/ standby mode. Check the power switch. Amber Check if the AC power cord is properly connected to their default settings.


