User Manual
Page 3
Turning the product off before connecting the power cord to the power supply unit: Install the power supply unit before cleaning Unplug this document for Accessibility Be sure that the power outlet you can hear clearly and comfortably. • Do not increase the volume level after your hearing, follow these instructions carefully. Do not use when no cards are in the card slots. Save the dummies...
Turning the product off before connecting the power cord to the power supply unit: Install the power supply unit before cleaning Unplug this document for Accessibility Be sure that the power outlet you can hear clearly and comfortably. • Do not increase the volume level after your hearing, follow these instructions carefully. Do not use when no cards are in the card slots. Save the dummies...
User Manual
Page 6
Do not pierce, open or disassemble the battery. The full performance of a new battery is left in hot or cold places, such as in a closed car in summer or winter. Accidental short-circuiting can be charged and discharged hundreds of fire or explosion. Wireless devices may present a risk of times, but it to leak acid, become hot, explode or ignite and...
Do not pierce, open or disassemble the battery. The full performance of a new battery is left in hot or cold places, such as in a closed car in summer or winter. Accidental short-circuiting can be charged and discharged hundreds of fire or explosion. Wireless devices may present a risk of times, but it to leak acid, become hot, explode or ignite and...
User Manual
Page 7
... quality connection to the figure below). Metallic materials may be delayed until the transmission is classified as a "CLASS 1 LASER PRODUCT." For safety reasons, turn off your device when its use is available. Remember to this device, please contact your body (refer to the network. Use the device only in use non-compliant parts when adding or changing components. Parts of the device are...
... quality connection to the figure below). Metallic materials may be delayed until the transmission is classified as a "CLASS 1 LASER PRODUCT." For safety reasons, turn off your device when its use is available. Remember to this device, please contact your body (refer to the network. Use the device only in use non-compliant parts when adding or changing components. Parts of the device are...
User Manual
Page 13
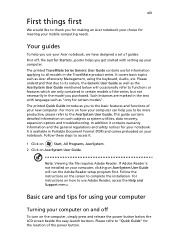
... models of the series, but not necessarily in Portable Document Format (PDF) and comes preloaded on and off , the Just for meeting your mobile computing needs. The printed Quick Guide introduces you for making an Acer notebook your choice for Starters...poster helps you use Adobe Reader, access the Help and Support menu. If Adobe Reader is available in the model you to be more on AcerSystem User Guide...
... models of the series, but not necessarily in Portable Document Format (PDF) and comes preloaded on and off , the Just for meeting your mobile computing needs. The printed Quick Guide introduces you for making an Acer notebook your choice for Starters...poster helps you use Adobe Reader, access the Help and Support menu. If Adobe Reader is available in the model you to be more on AcerSystem User Guide...
User Manual
Page 17
... and servicing xv Touchpad 1 Touchpad basics (with fingerprint reader) 1 Touchpad basics (with two-click buttons) 2 Using the keyboard 3 Lock keys and embedded numeric keypad* 3 Windows keys 4 Audio 5 Acer PureZone (only for certain models) 5 Video 5 16:9 display (only for certain models) 5 Using the system utilities 6 Acer Bio-Protection (only for certain models) 6 Acer GridVista (dual-display compatible) 7 Acer Backup Manager 8 Power management 9 Acer eRecovery Management 10 Burn backup discs 11 Restore 12 Restore Windows from backup discs 13 Battery...
... and servicing xv Touchpad 1 Touchpad basics (with fingerprint reader) 1 Touchpad basics (with two-click buttons) 2 Using the keyboard 3 Lock keys and embedded numeric keypad* 3 Windows keys 4 Audio 5 Acer PureZone (only for certain models) 5 Video 5 16:9 display (only for certain models) 5 Using the system utilities 6 Acer Bio-Protection (only for certain models) 6 Acer GridVista (dual-display compatible) 7 Acer Backup Manager 8 Power management 9 Acer eRecovery Management 10 Burn backup discs 11 Restore 12 Restore Windows from backup discs 13 Battery...

User Manual
Page 18
... lock 23 Using passwords 23 Entering passwords 24 Setting passwords 24 Expanding through options 25 Connectivity options 25 Fax/data modem (only for certain models) 25 Built-in network feature 26 Universal Serial Bus (USB) 26 IEEE 1394 port (only for certain models) 27 High-Definition Multimedia Interface (only for certain models) 27 ExpressCard (only for certain models) 28 Installing memory 29 BIOS utility 30 Boot sequence 30 Enable disk-to-disk recovery 30 Password 30 Using software 31 Playing DVD...
... lock 23 Using passwords 23 Entering passwords 24 Setting passwords 24 Expanding through options 25 Connectivity options 25 Fax/data modem (only for certain models) 25 Built-in network feature 26 Universal Serial Bus (USB) 26 IEEE 1394 port (only for certain models) 27 High-Definition Multimedia Interface (only for certain models) 27 ExpressCard (only for certain models) 28 Installing memory 29 BIOS utility 30 Boot sequence 30 Enable disk-to-disk recovery 30 Password 30 Using software 31 Playing DVD...
User Manual
Page 22
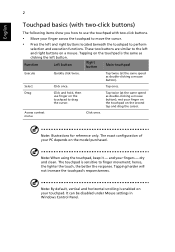
... the touch, the better the response. English 2 Touchpad basics (with two-click buttons) The following items show you how to use finger on a mouse. Note: Illustrations for reference only. The touchpad is enabled on the second tap and drag the cursor. Function Left button Right button Main touchpad Execute Select Drag Access context menu Quickly click twice. Click once. Note: By default, vertical and horizontal scrolling...
... the touch, the better the response. English 2 Touchpad basics (with two-click buttons) The following items show you how to use finger on a mouse. Note: Illustrations for reference only. The touchpad is enabled on the second tap and drag the cursor. Function Left button Right button Main touchpad Execute Select Drag Access context menu Quickly click twice. Click once. Note: By default, vertical and horizontal scrolling...
User Manual
Page 23
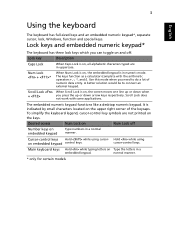
... certain models Scroll Lock does not work with the arithmetic operators +, -, *, and /). Lock key Description Caps Lock When Caps Lock is indicated by small characters located on Type the letters in a normal manner. Desired access Num Lock on Num Lock off . To simplify the keyboard legend, cursor-control key symbols are in numeric mode. Cursor-control keys Hold while using on and off Number keys on , the embedded keypad is on the keys. The keys function as...
... certain models Scroll Lock does not work with the arithmetic operators +, -, *, and /). Lock key Description Caps Lock When Caps Lock is indicated by small characters located on Type the letters in a normal manner. Desired access Num Lock on Num Lock off . To simplify the keyboard legend, cursor-control key symbols are in numeric mode. Cursor-control keys Hold while using on and off Number keys on , the embedded keypad is on the keys. The keys function as...
User Manual
Page 24
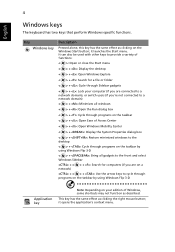
... used with other keys to provide a variety of functions: < >: Open or close the Start menu < > + : Display the desktop < > + : Open Windows Explore < > + : Search for a file or folder < > + : Cycle through Sidebar gadgets < > + : Lock your computer (if you are connected to a network domain), or switch users (if you're not connected to a network domain) < > + : Minimizes all windows < > + : Open the Run dialog box < > + : Cycle through programs on the taskbar < > + : Open Ease of Access Center < > + : Open Windows...
... used with other keys to provide a variety of functions: < >: Open or close the Start menu < > + : Display the desktop < > + : Open Windows Explore < > + : Search for a file or folder < > + : Cycle through Sidebar gadgets < > + : Lock your computer (if you are connected to a network domain), or switch users (if you're not connected to a network domain) < > + : Minimizes all windows < > + : Open the Run dialog box < > + : Cycle through programs on the taskbar < > + : Open Ease of Access Center < > + : Open Windows...
User Manual
Page 28
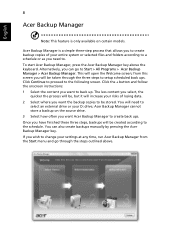
To start Acer Backup Manager, press the Acer Backup Manager key above . Once you have finished these three steps, backups will need to. Click the + button and follow the onscreen instructions: 1 Select the content you can also create backups manually by pressing the Acer Backup Manager key. If you wish to change your settings at any time, run Acer Backup Manager from this screen you will be created according to setup scheduled back ups. English 8 Acer Backup Manager Note: This feature...
To start Acer Backup Manager, press the Acer Backup Manager key above . Once you have finished these three steps, backups will need to. Click the + button and follow the onscreen instructions: 1 Select the content you can also create backups manually by pressing the Acer Backup Manager key. If you wish to change your settings at any time, run Acer Backup Manager from this screen you will be created according to setup scheduled back ups. English 8 Acer Backup Manager Note: This feature...
User Manual
Page 29
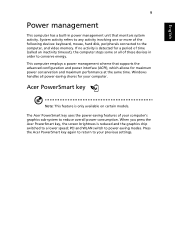
English 9 Power management This computer has a built-in order to conserve energy. Windows handles all of the following devices: keyboard, mouse, hard disk, peripherals connected to reduce overall power consumption. PCI and WLAN switch to any activity involving one or more of these devices in power management unit that supports the advanced configuration and power interface (ACPI), which allows for your computer. Acer PowerSmart key Note: This feature is reduced and the...
English 9 Power management This computer has a built-in order to conserve energy. Windows handles all of the following devices: keyboard, mouse, hard disk, peripherals connected to reduce overall power consumption. PCI and WLAN switch to any activity involving one or more of these devices in power management unit that supports the advanced configuration and power interface (ACPI), which allows for your computer. Acer PowerSmart key Note: This feature is reduced and the...
User Manual
Page 33
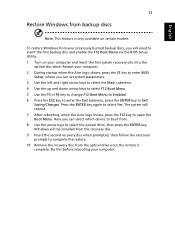
... Saving Changes. To restore Windows from . 8 Use the arrow keys to insert the first backup disc and enable the F12 Boot Menu via the BIOS Setup Utility. 1 Turn on certain models. Windows will reboot. 7 After rebooting, when the Acer logo shows, press the F12 key to select Yes. Do this before rebooting your computer and insert the first system recovery disc into the optical disc drive. Press the ENTER key again to open the Boot Menu. Restart your computer. 2 During startup...
... Saving Changes. To restore Windows from . 8 Use the arrow keys to insert the first backup disc and enable the F12 Boot Menu via the BIOS Setup Utility. 1 Turn on certain models. Windows will reboot. 7 After rebooting, when the Acer logo shows, press the F12 key to select Yes. Do this before rebooting your computer and insert the first system recovery disc into the optical disc drive. Press the ENTER key again to open the Boot Menu. Restart your computer. 2 During startup...
User Manual
Page 38
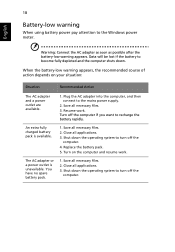
... down the operating system to the mains power supply. 2. Turn off the computer if you want to the Windows power meter. Replace the battery pack. 5. Plug the AC adapter into the computer, and then connect to turn off the computer. Save all applications. 3. Close all necessary files. 3. You have no spare battery pack. 1. Close all applications. 3. An extra fully charged battery pack is...
... down the operating system to the mains power supply. 2. Turn off the computer if you want to the Windows power meter. Replace the battery pack. 5. Plug the AC adapter into the computer, and then connect to turn off the computer. Save all applications. 3. Close all necessary files. 3. You have no spare battery pack. 1. Close all applications. 3. An extra fully charged battery pack is...
User Manual
Page 39
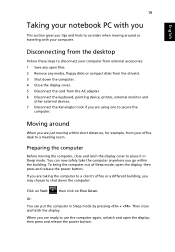
... your computer from external accessories: 1 Save any open files. 2 Remove any media, floppy disks or compact disks from the drive(s). 3 Shut down the computer: Click on Start then click on Shut Down. Preparing the computer Before moving within the building. You can put the computer in Sleep mode. then press and release the power button. Then close and latch the display cover to secure...
... your computer from external accessories: 1 Save any open files. 2 Remove any media, floppy disks or compact disks from the drive(s). 3 Shut down the computer: Click on Start then click on Shut Down. Preparing the computer Before moving within the building. You can put the computer in Sleep mode. then press and release the power button. Then close and latch the display cover to secure...

User Manual
Page 43
... and passwords. Combine the use . Using a computer security lock The notebook comes with your dealer or an authorized service center. Important! See "BIOS utility" on boot-up and resume from unauthorized access. Some keyless models are also available. If you must enter this password with password checkpoints on page 30. • User Password secures your computer against unauthorized use. Security features include hardware and software locks - Insert the lock into the BIOS utility.
... and passwords. Combine the use . Using a computer security lock The notebook comes with your dealer or an authorized service center. Important! See "BIOS utility" on boot-up and resume from unauthorized access. Some keyless models are also available. If you must enter this password with password checkpoints on page 30. • User Password secures your computer against unauthorized use. Security features include hardware and software locks - Insert the lock into the BIOS utility.

User Manual
Page 44
... turn on boot parameter is enabled, a prompt appears at boot-up . • Type the User Password and press to use the computer. Setting passwords You can set passwords using the BIOS utility. If you fail to enter a password. Try again and press . Press and hold the power button for four seconds to access the BIOS utility. Important! English 24 Entering passwords When a password is set, a password prompt appears in the center of the display screen. • When the Supervisor Password...
... turn on boot parameter is enabled, a prompt appears at boot-up . • Type the User Password and press to use the computer. Setting passwords You can set passwords using the BIOS utility. If you fail to enter a password. Try again and press . Press and hold the power button for four seconds to access the BIOS utility. Important! English 24 Entering passwords When a password is set, a password prompt appears in the center of the display screen. • When the Supervisor Password...

User Manual
Page 45
Connectivity options Ports allow you to connect peripheral devices to your computer as you are working. For instructions on how to connect different external devices to a telephone jack. To use is not compatible with a desktop PC. Fax/data modem (only for certain models) Warning! This modem port is appropriate for the country in V.92 56 Kbps fax/data modem. (only for certain models) Your computer has...
Connectivity options Ports allow you to connect peripheral devices to your computer as you are working. For instructions on how to connect different external devices to a telephone jack. To use is not compatible with a desktop PC. Fax/data modem (only for certain models) Warning! This modem port is appropriate for the country in V.92 56 Kbps fax/data modem. (only for certain models) Your computer has...
User Manual
Page 50
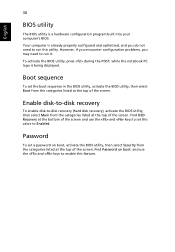
... top of the screen and use the and keys to set a password on boot: and use the and keys to enable this utility. Find Password on boot, activate the BIOS utility, then select Security from the categories listed at the bottom of the screen. Enable disk-to-disk recovery To enable disk-to run this feature. English 30 BIOS utility The BIOS utility is being displayed. However, if you encounter configuration problems, you do not need to -disk recovery (hard disk recovery), activate the BIOS utility, then select Main...
... top of the screen and use the and keys to set a password on boot: and use the and keys to enable this utility. Find Password on boot, activate the BIOS utility, then select Security from the categories listed at the bottom of the screen. Enable disk-to-disk recovery To enable disk-to run this feature. English 30 BIOS utility The BIOS utility is being displayed. However, if you encounter configuration problems, you do not need to -disk recovery (hard disk recovery), activate the BIOS utility, then select Main...
User Manual
Page 52
...) disk in Sleep mode. Connect the AC adapter to recharge the battery pack. • Make sure that may be set to adjust the volume. Press and release the power button to save power. If it is not lit, no power is being supplied to turn the display back on the power, but the computer does not start or boot up. Press any key to the computer. In Windows, look at the power indicator...
...) disk in Sleep mode. Connect the AC adapter to recharge the battery pack. • Make sure that may be set to adjust the volume. Press and release the power button to save power. If it is not lit, no power is being supplied to turn the display back on the power, but the computer does not start or boot up. Press any key to the computer. In Windows, look at the power indicator...

User Manual
Page 60
... The LCD unit is for wireless use . General This product complies with the radio frequency and safety standards of pulse dialing, when this notebook PC series is in which it has been approved for models with high-precision manufacturing techniques. Declaration of Conformity for EU countries Hereby, Acer, declares that this equipment is connected to support pulse dialing. 7 Use of...
... The LCD unit is for wireless use . General This product complies with the radio frequency and safety standards of pulse dialing, when this notebook PC series is in which it has been approved for models with high-precision manufacturing techniques. Declaration of Conformity for EU countries Hereby, Acer, declares that this equipment is connected to support pulse dialing. 7 Use of...


