
User Manual
Page 13
LCD monitor Quick start guide Audio cable (Optional) D-sub cable HDMI cable (Optional) AC Power cord DVI cable (Optional) AC Adapter 1 English Unpacking Please check that the following items are present when you unpack the box, and save the packing materials in case you need to ship or transport the monitor in the future.
LCD monitor Quick start guide Audio cable (Optional) D-sub cable HDMI cable (Optional) AC Power cord DVI cable (Optional) AC Adapter 1 English Unpacking Please check that the following items are present when you unpack the box, and save the packing materials in case you need to ship or transport the monitor in the future.

User Manual
Page 19
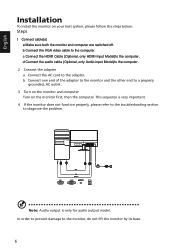
..., please follow the steps below: Steps 1 Connect cable(s) a Make sure both the monitor and computer are switched off. This sequence is only for audio output model. d Connect the HDMI Cable (Optional, only HDMI-Input Model)to the computer. b Connect the VGA video cable to the computer. Note...: Audio output is very important. 4 If the monitor does not function properly, please refer to the troubleshooting section to the monitor, do not lift the...
..., please follow the steps below: Steps 1 Connect cable(s) a Make sure both the monitor and computer are switched off. This sequence is only for audio output model. d Connect the HDMI Cable (Optional, only HDMI-Input Model)to the computer. b Connect the VGA video cable to the computer. Note...: Audio output is very important. 4 If the monitor does not function properly, please refer to the troubleshooting section to the monitor, do not lift the...
User Manual
Page 21
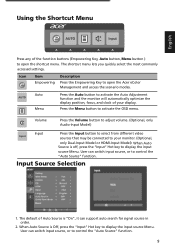
... Press any of the function buttons (Empowering Key, Auto button, Menu button ) to activate the OSD menu. Press the Menu button to open the Acer eColor Management and access the scenario modes. Input Source Selection Input Auto Source On VG A DVI HDMI 1. When Auto Source is "On", it can... switch input source, or to control the "Auto Source" function. Volume Press the Volume button to adjust volume. (Optional, only Audio-Input Model) Input Input Press the Input button to select from different video sources that may be connected to your display. User can switch input...
... Press any of the function buttons (Empowering Key, Auto button, Menu button ) to activate the OSD menu. Press the Menu button to open the Acer eColor Management and access the scenario modes. Input Source Selection Input Auto Source On VG A DVI HDMI 1. When Auto Source is "On", it can... switch input source, or to control the "Auto Source" function. Volume Press the Volume button to adjust volume. (Optional, only Audio-Input Model) Input Input Press the Input button to select from different video sources that may be connected to your display. User can switch input...
User Manual SA220Q A
Page 11
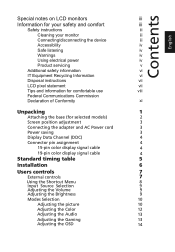
... the Shortcut Menu 8 Input Source Selection 9 Adjusting the Volume 9 Adjusting the B rightness 9 Modes Selection 10 Adjusting the picture 10 Adjusting the Color 12 Adjusting the Audio 13 Adjusting the Gaming 13 Adjusting the OSD 174
... the Shortcut Menu 8 Input Source Selection 9 Adjusting the Volume 9 Adjusting the B rightness 9 Modes Selection 10 Adjusting the picture 10 Adjusting the Color 12 Adjusting the Audio 13 Adjusting the Gaming 13 Adjusting the OSD 174
User Manual SA220Q A
Page 13
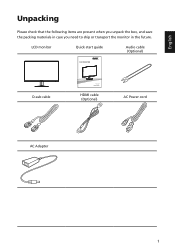
LCD monitor Quick start guide Audio cable (Optional) D-sub cable HDMI cable (Optional) AC Power cord AC Adapter 1 English Unpacking Please check that the following items are present when you unpack the box, and save the packing materials in case you need to ship or transport the monitor in the future.
LCD monitor Quick start guide Audio cable (Optional) D-sub cable HDMI cable (Optional) AC Power cord AC Adapter 1 English Unpacking Please check that the following items are present when you unpack the box, and save the packing materials in case you need to ship or transport the monitor in the future.
User Manual SA220Q A
Page 18
...order to prevent damage to diagnose the problem. b Connect one end of the adapter to the monitor and the other end to the computer. Note: Audio output is very important. 4 If the monitor does not function properly, please refer to the troubleshooting section to the monitor, do not lift the monitor... off. English Installation To install the monitor on the monitor first, then the computer. b Connect the VGA video cable to the adapter. d Connect the audio cable (Optional, only Audio-input Model)to the computer. 2 Connect the adapter a Connect the AC cord to the computer.
...order to prevent damage to diagnose the problem. b Connect one end of the adapter to the monitor and the other end to the computer. Note: Audio output is very important. 4 If the monitor does not function properly, please refer to the troubleshooting section to the monitor, do not lift the monitor... off. English Installation To install the monitor on the monitor first, then the computer. b Connect the VGA video cable to the adapter. d Connect the audio cable (Optional, only Audio-input Model)to the computer. 2 Connect the adapter a Connect the AC cord to the computer.


