
Quick Guide
Page 4
... the USB cable in to an available USB port on your graphics card is necessary to see if your computer. Please visit www.nvidia.com/object/ 3D_Vision_Requirements.html to view 3D content. English 4 Using NVIDIA 3D Vision technology Only available with NVIDIA 3D Vision certified projectors when using NVIDIA 3D glasses. Note: You may help you have installed the drivers, you...
... the USB cable in to an available USB port on your graphics card is necessary to see if your computer. Please visit www.nvidia.com/object/ 3D_Vision_Requirements.html to view 3D content. English 4 Using NVIDIA 3D Vision technology Only available with NVIDIA 3D Vision certified projectors when using NVIDIA 3D glasses. Note: You may help you have installed the drivers, you...
Quick Guide
Page 8
... rate to 100/120 Hz on the projector remote control to your graphics card's documentation. 2 Download and install the latest drivers for your graphics card vendor's website for frame/field sequential 3D formats. If you will be set automatically. 2 Press the menu button on your graphics card supports 3D playback. Note: Please refer to open the OSD. Select the 3D section...
... rate to 100/120 Hz on the projector remote control to your graphics card's documentation. 2 Download and install the latest drivers for your graphics card vendor's website for frame/field sequential 3D formats. If you will be set automatically. 2 Press the menu button on your graphics card supports 3D playback. Note: Please refer to open the OSD. Select the 3D section...

User Manual (Multmedia)
Page 5
... often require extensive work by the operating instructions, since improper adjustment of a car with your eyes. • Turn on . It v Product servicing Do not attempt to service this product from walls and free flow of air around the projector is necessary. • Locations where temperatures may become excessively high, such as opening or removing covers may expose you to dangerous voltage points or other controls may result...
... often require extensive work by the operating instructions, since improper adjustment of a car with your eyes. • Turn on . It v Product servicing Do not attempt to service this product from walls and free flow of air around the projector is necessary. • Locations where temperatures may become excessively high, such as opening or removing covers may expose you to dangerous voltage points or other controls may result...

User Manual (Multmedia)
Page 6
... the projector on the remote control. • The lamp becomes extremely hot during operation. Allow the projector to cool for replacement. • Do not operate lamps beyond the rated lamp life. Please be sure to change the lamp when is showing warning message. • When changing the lamp, please allow unit to cool down, and follow all changing instructions. • Reset the "Lamp Hour Reset" function from the Onscreen display "Management" menu after replacing the lamp module...
... the projector on the remote control. • The lamp becomes extremely hot during operation. Allow the projector to cool for replacement. • Do not operate lamps beyond the rated lamp life. Please be sure to change the lamp when is showing warning message. • When changing the lamp, please allow unit to cool down, and follow all changing instructions. • Reset the "Lamp Hour Reset" function from the Onscreen display "Management" menu after replacing the lamp module...

User Manual (Multmedia)
Page 8
... shock. • When changing the lamp, please allow unit to maximize the life of time. If this happens, the projector will detect the life of its life, it shows warning messages. • Reset the "Lamp Hour Reset" function from AC outlet if the product is not being used for ventilation. • Use abrasive cleaners, waxes or solvents to clean the unit. • Use under the following conditions...
... shock. • When changing the lamp, please allow unit to maximize the life of time. If this happens, the projector will detect the life of its life, it shows warning messages. • Reset the "Lamp Hour Reset" function from AC outlet if the product is not being used for ventilation. • Use abrasive cleaners, waxes or solvents to clean the unit. • Use under the following conditions...
User Manual (Multmedia)
Page 10
Control Panel 31 Network Setting 32 Alert Setting 32 Logout 33 Appendices 34 Troubleshooting 34 LED & Alarm Definition Listing 38 Cleaning and replacing the dust filters 39 39 40 Replacing the Lamp 41 Ceiling Mount Installation 42 Specifications 45 Compatibility modes 48 Regulations and safety notices 53
Control Panel 31 Network Setting 32 Alert Setting 32 Logout 33 Appendices 34 Troubleshooting 34 LED & Alarm Definition Listing 38 Cleaning and replacing the dust filters 39 39 40 Replacing the Lamp 41 Ceiling Mount Installation 42 Specifications 45 Compatibility modes 48 Regulations and safety notices 53
User Manual (Multmedia)
Page 11
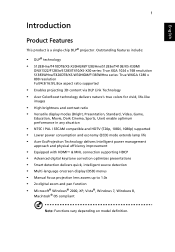
... (ECO) mode extends lamp life • Acer EcoProjeciton Technology delivers Intelligent power management approach and physical efficiency improvement • Equipped with HDMI™ & MHL connection supporting HDCP • Advanced digital keystone correction optimizes presentations • Smart detection delivers quick, intelligent source detection • Multi-language onscreen display (OSD) menus • Manual focus projection lens zooms up to 1.0x • 2x digital zoom and pan function • Microsoft® Windows®...
... (ECO) mode extends lamp life • Acer EcoProjeciton Technology delivers Intelligent power management approach and physical efficiency improvement • Equipped with HDMI™ & MHL connection supporting HDCP • Advanced digital keystone correction optimizes presentations • Smart detection delivers quick, intelligent source detection • Multi-language onscreen display (OSD) menus • Manual focus projection lens zooms up to 1.0x • 2x digital zoom and pan function • Microsoft® Windows®...

User Manual (Multmedia)
Page 13
English 3 Projector Overview Projector Outlook Front / upper side 4 1 2 3 5 6 # Description 1 Power button 2 Control panel 3 Lamp cover 4 Focus ring 8 7 # Description 5 Remote control receiver 6 Projection lens 7 Tilt adjusting wheels 8 Lens cap
English 3 Projector Overview Projector Outlook Front / upper side 4 1 2 3 5 6 # Description 1 Power button 2 Control panel 3 Lamp cover 4 Focus ring 8 7 # Description 5 Remote control receiver 6 Projection lens 7 Tilt adjusting wheels 8 Lens cap

User Manual (Multmedia)
Page 15
5 Control Panel 1 82 3 English 4 5 9 10 6 7 # Icon Function 1 POWER 2 LAMP 3 TEMP 4 RESYNC 5 SOURCE 6 POWER Description Power Indicator LED Lamp Indicator LED Temp Indicator LED Automatically synchronizes the projector to compensate for the OSD menu operation or exit the OSD menu. • Confirm your selection of items. 9 Four directional select Use to select items or make keys adjustments to your selection. 10 Keystone Adjusts the image to the input source. Changes the active source. See the contents in "Turning the Projector On/Off" section...
5 Control Panel 1 82 3 English 4 5 9 10 6 7 # Icon Function 1 POWER 2 LAMP 3 TEMP 4 RESYNC 5 SOURCE 6 POWER Description Power Indicator LED Lamp Indicator LED Temp Indicator LED Automatically synchronizes the projector to compensate for the OSD menu operation or exit the OSD menu. • Confirm your selection of items. 9 Four directional select Use to select items or make keys adjustments to your selection. 10 Keystone Adjusts the image to the input source. Changes the active source. See the contents in "Turning the Projector On/Off" section...

User Manual (Multmedia)
Page 16
... Momentarily turns off the video. Refer to the "Turning the Projector On/Off" section. 3 3D Press "3D" to select 3D models. 4 SOURCE Changes the active source. 5 MODE Press "MODE" to the projector. Press "HIDE" to hide the image, press again to display the image. 7 MEDIA_SETUP No function. 8 RATIO To choose the desired aspect ratio. 9 ZOOM Zooms the projector display in or out. 10 FREEZE To pause the screen image. 11 MENU...
... Momentarily turns off the video. Refer to the "Turning the Projector On/Off" section. 3 3D Press "3D" to select 3D models. 4 SOURCE Changes the active source. 5 MODE Press "MODE" to the projector. Press "HIDE" to hide the image, press again to display the image. 7 MEDIA_SETUP No function. 8 RATIO To choose the desired aspect ratio. 9 ZOOM Zooms the projector display in or out. 10 FREEZE To pause the screen image. 11 MENU...
User Manual (Multmedia)
Page 22
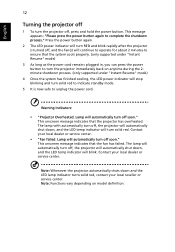
... indicate standby mode. 5 It is turned off, and the fan(s) will continue to operate for about 2 minutes to turn the projector immediately back on model definition. Contact your local dealer or service center. • "Fan failed. The lamp will automatically turn off, the projector will automatically shut down , and the LED temp indicator will automatically turn off soon." This message appears: "Please press the power button again to unplug the power cord. This onscreen message indicates...
... indicate standby mode. 5 It is turned off, and the fan(s) will continue to operate for about 2 minutes to turn the projector immediately back on model definition. Contact your local dealer or service center. • "Fan failed. The lamp will automatically turn off, the projector will automatically shut down , and the LED temp indicator will automatically turn off soon." This message appears: "Please press the power button again to unplug the power cord. This onscreen message indicates...
User Manual (Multmedia)
Page 26
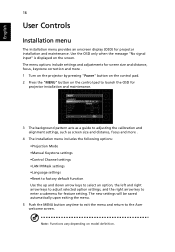
... the OSD for projector installation and maintenance. English 16 User Controls Installation menu The installation menu provides an onscreen display (OSD) for projector installation and maintenance. 3 The background pattern acts as a guide to adjusting the calibration and alignment settings, such as screen size and distance, focus and more . 4 The Installation menu includes the following options: •Projection Mode •Manual Keystone settings •Control Channel settings •LAN IP/Mask settings •Language settings •Reset to factory default function Use the up...
... the OSD for projector installation and maintenance. English 16 User Controls Installation menu The installation menu provides an onscreen display (OSD) for projector installation and maintenance. 3 The background pattern acts as a guide to adjusting the calibration and alignment settings, such as screen size and distance, focus and more . 4 The Installation menu includes the following options: •Projection Mode •Manual Keystone settings •Control Channel settings •LAN IP/Mask settings •Language settings •Reset to factory default function Use the up...

User Manual (Multmedia)
Page 28
There are many factory presets optimized for color temperature optimization. With greater gamma value, dark scenery looks brighter. Adjusts a video image from black and white to fully saturated color. • Press to decrease the amount of color in the image. G Gain Adjusts the green gain for color temperature optimization. B Gain Adjusts the blue gain for color temperature optimization. Use this function to increase the amount of the picture. "Contrast" controls the difference...
There are many factory presets optimized for color temperature optimization. With greater gamma value, dark scenery looks brighter. Adjusts a video image from black and white to fully saturated color. • Press to decrease the amount of color in the image. G Gain Adjusts the green gain for color temperature optimization. B Gain Adjusts the blue gain for color temperature optimization. Use this function to increase the amount of the picture. "Contrast" controls the difference...

User Manual (Multmedia)
Page 30
... projector reverses and inverts the image at same time. Adjust image distortion caused by tilting projection. (±40 degrees) Sharpeness Adjusts the sharpness of the HDMI image data to correct color display error. • Auto: Automatically adjust by information from behind a translucent screen with the graphics card. V. If you can project from player. • Limited Range: Prosess the input image as limited color range data. • Full Range: Prosess the input image as full color...
... projector reverses and inverts the image at same time. Adjust image distortion caused by tilting projection. (±40 degrees) Sharpeness Adjusts the sharpness of the HDMI image data to correct color display error. • Auto: Automatically adjust by information from behind a translucent screen with the graphics card. V. If you can project from player. • Limited Range: Prosess the input image as limited color range data. • Full Range: Prosess the input image as full color...

User Manual (Multmedia)
Page 33
... your area). 23 English Source Lock Closed Caption VGA OUT (Standby) Reset Security When Source Lock is turned "Off", the projector will "lock" the current source channel unless you press "Source" button on the remote control for the next channel. Set your must enter the "Administrator Password" first before changing the security settings. • Select "On" to 4:3. If the security function is enabled, your screen aspect ratio to enable the...
... your area). 23 English Source Lock Closed Caption VGA OUT (Standby) Reset Security When Source Lock is turned "Off", the projector will "lock" the current source channel unless you press "Source" button on the remote control for the next channel. Set your must enter the "Administrator Password" first before changing the security settings. • Select "On" to 4:3. If the security function is enabled, your screen aspect ratio to enable the...
User Manual (Multmedia)
Page 34
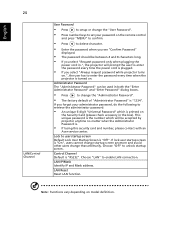
... the password every time when the projector is turned on. Choose "Off" to user startup screen Default Lock User Startup Screen is "Off". Choose "LAN" to enable LAN connection. English 24 LAN/Control Channel User Password • Press to setup or change the "User Password". • Press number keys to set your password on the remote control and press "MENU" to confirm. • Press to delete character. • Enter the password when you see "Confirm Password" displayed. • The password should...
... the password every time when the projector is turned on. Choose "Off" to user startup screen Default Lock User Startup Screen is "Off". Choose "LAN" to enable LAN connection. English 24 LAN/Control Channel User Password • Press to setup or change the "User Password". • Press number keys to set your password on the remote control and press "MENU" to confirm. • Press to delete character. • Enter the password when you see "Confirm Password" displayed. • The password should...

User Manual (Multmedia)
Page 35
... screen to remove the screw from the screen. You can then disconnect the USB cable, or leave it is in the Settings > SmartPen > Pen Function menu. Turn off . Enable the pen by selecting "On" in a shadow or it is complete, the battery light turns off the projector by pressing the Power button. 2. The pen's link light will allow 30 hours non-stop use. The closer you hold a remote control...
... screen to remove the screw from the screen. You can then disconnect the USB cable, or leave it is in the Settings > SmartPen > Pen Function menu. Turn off . Enable the pen by selecting "On" in a shadow or it is complete, the battery light turns off the projector by pressing the Power button. 2. The pen's link light will allow 30 hours non-stop use. The closer you hold a remote control...

User Manual (Multmedia)
Page 37
... to the factory default after replacing with new lamp; otherwise, "Constant Brightness" cannot be activated. English 27 Management ECO Mode Constant Brightness High Altitude Turn Off Mode Auto Shutdown Lamp Hour Elapse Lamp Reminding Lamp Hour Reset 3D Dust Filter Choose "On" to dim the projector lamp which will automatically shutdown when there is 15 minutes) Displays the lamp's elapsed operating time (in hours). Choose "On" to keep the brightness constant. Place Choose one of -life.
... to the factory default after replacing with new lamp; otherwise, "Constant Brightness" cannot be activated. English 27 Management ECO Mode Constant Brightness High Altitude Turn Off Mode Auto Shutdown Lamp Hour Elapse Lamp Reminding Lamp Hour Reset 3D Dust Filter Choose "On" to dim the projector lamp which will automatically shutdown when there is 15 minutes) Displays the lamp's elapsed operating time (in hours). Choose "On" to keep the brightness constant. Place Choose one of -life.
User Manual (Multmedia)
Page 44
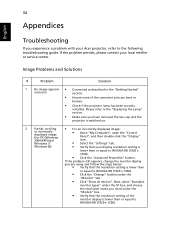
... a problem with your Acer projector, refer to the "Replacing the Lamp" section. • Make sure you have removed the lens cap and the projector is switched on. 2 Partial, scrolling • For an incorrectly displayed image: or incorrectly displayed image (for PC (Windows 2000/XP/Vista/ Windows 7/ • Open "My Computer", open the "Control Panel", and then double-click the "Display" icon. • Select the "Settings" tab. Windows 8)) • Verify that the resolution setting of...
... a problem with your Acer projector, refer to the "Replacing the Lamp" section. • Make sure you have removed the lens cap and the projector is switched on. 2 Partial, scrolling • For an incorrectly displayed image: or incorrectly displayed image (for PC (Windows 2000/XP/Vista/ Windows 7/ • Open "My Computer", open the "Control Panel", and then double-click the "Display" icon. • Select the "Settings" tab. Windows 8)) • Verify that the resolution setting of...

User Manual (Multmedia)
Page 47
.... Problems with dust, please clean it may make a loud popping sound. Please also check the dust filters if they are installed. If the dust filter is about to all controls unplug the power cord and wait at least 30 seconds before it . Prepare to "Cleaning and replacing the dust filter" for details. • Replace the lamp - the system fan is not working. • Projector Overheated - English 37 OSD Messages # Condition 1 Message Message...
.... Problems with dust, please clean it may make a loud popping sound. Please also check the dust filters if they are installed. If the dust filter is about to all controls unplug the power cord and wait at least 30 seconds before it . Prepare to "Cleaning and replacing the dust filter" for details. • Replace the lamp - the system fan is not working. • Projector Overheated - English 37 OSD Messages # Condition 1 Message Message...


