

User Manual
Page 3
Warnings! • Do not use liquid cleaners or aerosol cleaners. This product should never be blocked by unplugging all warnings and instructions marked on the product. Caution for ventilation to ensure reliable operation of the product and to the AC power outlet. • Unplug the power cord before removing the power supply unit from the projector. • If the system has multiple sources of...
Warnings! • Do not use liquid cleaners or aerosol cleaners. This product should never be blocked by unplugging all warnings and instructions marked on the product. Caution for ventilation to ensure reliable operation of the product and to the AC power outlet. • Unplug the power cord before removing the power supply unit from the projector. • If the system has multiple sources of...

User Manual
Page 5
... high, such as opening or removing covers may expose you to dangerous voltage points or other controls may result in damage and will often require extensive work by a qualified technician to restore the product to normal condition. v Product servicing Do not attempt to service this product from walls and free flow of air around the projector are covered by the operating instructions, since improper adjustment...
... high, such as opening or removing covers may expose you to dangerous voltage points or other controls may result in damage and will often require extensive work by a qualified technician to restore the product to normal condition. v Product servicing Do not attempt to service this product from walls and free flow of air around the projector are covered by the operating instructions, since improper adjustment...
User Manual
Page 6
... frequently turn off . • Do not touch the air outlet grille and bottom plate which may rise and cause damage when the filter/ventilation slots are dangerous high voltages inside may hurt you need to disassemble this projector. Please contact your local dealer or Acer service center for mounting the projector and ensure it . Only use acer ceiling mount kit for changing the lamp, when lamp warning message displays...
... frequently turn off . • Do not touch the air outlet grille and bottom plate which may rise and cause damage when the filter/ventilation slots are dangerous high voltages inside may hurt you need to disassemble this projector. Please contact your local dealer or Acer service center for mounting the projector and ensure it . Only use acer ceiling mount kit for changing the lamp, when lamp warning message displays...

User Manual
Page 8
... the signal sources. • Do not use lens cap when projector is on the projector provided for changing the lamp, when lamp warning message displays. • When switching the projector off the product before disconnecting power. • Turn on until the lamp module has been replaced. Warning: • Do not look into the projector's lens when the lamp is in operation. • When the lamp reaches the end of its cooling cycle before cleaning. • Use...
... the signal sources. • Do not use lens cap when projector is on the projector provided for changing the lamp, when lamp warning message displays. • When switching the projector off the product before disconnecting power. • Turn on until the lamp module has been replaced. Warning: • Do not look into the projector's lens when the lamp is in operation. • When the lamp reaches the end of its cooling cycle before cleaning. • Use...
User Manual
Page 11
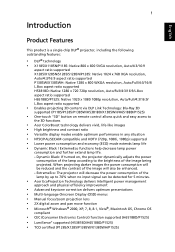
... x 1080 1080p resolution, Auto/Full/4:3/16:9/ L.Box aspect ratio supported • Enables projecting 3D content via DLP Link Technology: Blu-Ray 3D supported (P1185/P1285/P1385W/H5381BD/X1385WH/H6518BD/P1525) • One-touch "3D" button on , the projector dynamically adjusts the power consumption of the image will be reduced and the contrast of the lamp according to 70% when no input signal can be...
... x 1080 1080p resolution, Auto/Full/4:3/16:9/ L.Box aspect ratio supported • Enables projecting 3D content via DLP Link Technology: Blu-Ray 3D supported (P1185/P1285/P1385W/H5381BD/X1385WH/H6518BD/P1525) • One-touch "3D" button on , the projector dynamically adjusts the power consumption of the image will be reduced and the contrast of the lamp according to 70% when no input signal can be...

User Manual
Page 13
... 1 Control panel 4 HDMI (MHL) connector Micro USB cable 2 Power key and Power indicator LED 5 Projection lens 3 Zoom ring and Focus ring Focus ring 6 Remote control receiver 7 Lens cap Rear side 47 USB MINI-B VGA IN -2 VGA IN -1 8 VGA-OUT 9 RS232 S1285N 14 7 89 AUDIO IN -1 AUDIO IN -2 AUDIO OUT USB MINI-B VGA IN -2 VGA IN -1 VGA-OUT RS232 X1185N/X1285N 1 24 7 89 AUDIO IN -1 AUDIO IN -2 S-VIDEO USB MINI-B VGA IN -2 VGA IN -1 VGA-OUT RS232 AUDIO OUT VIDEO X1185/X1285/S1285 1 2 34 5 6 7 8 9 AUDIO IN -1 AUDIO IN -2 S-VIDEO DC 5V OUT HDMI...
... 1 Control panel 4 HDMI (MHL) connector Micro USB cable 2 Power key and Power indicator LED 5 Projection lens 3 Zoom ring and Focus ring Focus ring 6 Remote control receiver 7 Lens cap Rear side 47 USB MINI-B VGA IN -2 VGA IN -1 8 VGA-OUT 9 RS232 S1285N 14 7 89 AUDIO IN -1 AUDIO IN -2 AUDIO OUT USB MINI-B VGA IN -2 VGA IN -1 VGA-OUT RS232 X1185N/X1285N 1 24 7 89 AUDIO IN -1 AUDIO IN -2 S-VIDEO USB MINI-B VGA IN -2 VGA IN -1 VGA-OUT RS232 AUDIO OUT VIDEO X1185/X1285/S1285 1 2 34 5 6 7 8 9 AUDIO IN -1 AUDIO IN -2 S-VIDEO DC 5V OUT HDMI...
User Manual
Page 15
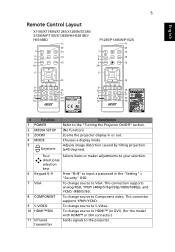
... Sends signals to the "Turning the Projector On/Off" section. (No function) Zooms the projector display in the "Setting" > "Security" OSD. 7 VGA To change source to Component video. This connector supports YPbPr/YCbCr. 9 S-VIDEO To change source to S-Video. 10 HDMI™/DVI To change source to VGA. English 5 Remote Control Layout X1185/X1185N/X1285/X1285N/S1285/ S1285N/P1185/X1385WH/H5381BD/ H6518BD P1285/P1385W/P1525 # Function 1 POWER 2 MEDIA SETUP 3 ZOOM 4 MODE 5 Keystone Description Refer to the projector. Chooses a display mode. Adjusts image distortion...
... Sends signals to the "Turning the Projector On/Off" section. (No function) Zooms the projector display in the "Setting" > "Security" OSD. 7 VGA To change source to Component video. This connector supports YPbPr/YCbCr. 9 S-VIDEO To change source to S-Video. 10 HDMI™/DVI To change source to VGA. English 5 Remote Control Layout X1185/X1185N/X1285/X1285N/S1285/ S1285N/P1185/X1385WH/H5381BD/ H6518BD P1285/P1385W/P1525 # Function 1 POWER 2 MEDIA SETUP 3 ZOOM 4 MODE 5 Keystone Description Refer to the projector. Chooses a display mode. Adjusts image distortion...

User Manual
Page 23
The Power LED will light red. 2 Turn on the projector by pressing (POWER) on the control panel or remote control, and the Power indicator LED will detect your source (computer, notebook, video player, etc.). The projector will turn blue. 3 Turn on the remote control to switch between inputs. 1 & 2 S1285/S1285N X1185/X1185N/X1285/X1285N/ P1185/X1385WH P1285/P1385W/H5381BD/H6518BD/ P1525 English 13 Turning the Projector On/Off Turning On the Projector 1 Ensure that the power cord and signal cable are securely connected. • If...
The Power LED will light red. 2 Turn on the projector by pressing (POWER) on the control panel or remote control, and the Power indicator LED will detect your source (computer, notebook, video player, etc.). The projector will turn blue. 3 Turn on the remote control to switch between inputs. 1 & 2 S1285/S1285N X1185/X1185N/X1285/X1285N/ P1185/X1385WH P1285/P1385W/H5381BD/H6518BD/ P1525 English 13 Turning the Projector On/Off Turning On the Projector 1 Ensure that the power cord and signal cable are securely connected. • If...

User Manual
Page 38
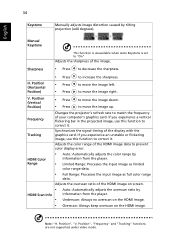
... signal" is for feature setting. The new settings will be saved automatically upon exiting the menu. 5 Press "MENU" anytime to exit the menu and return to launch the OSD for projector installation and maintenance. English 28 User Controls Installation Menu The Installation menu provides an Onscreen Display (OSD) for projector installation and maintenance. 3 The background pattern acts as a guide to adjusting the calibration and alignment settings, such as screen size and distance, focus and more. Use...
... signal" is for feature setting. The new settings will be saved automatically upon exiting the menu. 5 Press "MENU" anytime to exit the menu and return to launch the OSD for projector installation and maintenance. English 28 User Controls Installation Menu The Installation menu provides an Onscreen Display (OSD) for projector installation and maintenance. 3 The background pattern acts as a guide to adjusting the calibration and alignment settings, such as screen size and distance, focus and more. Use...

User Manual
Page 41
... image being projected. Adjusts the color temperature. If turned on, the projector dynamically adjusts the power consumption of the lamp according to increase the amount of color in the image. Adjusting the contrast changes the amount of black and white in the image. • Press to decrease the contrast. • Press to increase the amount of red in the image. At higher color temperatures, the screen looks colder; Adjusts a video image from black and white...
... image being projected. Adjusts the color temperature. If turned on, the projector dynamically adjusts the power consumption of the lamp according to increase the amount of color in the image. Adjusting the contrast changes the amount of black and white in the image. • Press to decrease the contrast. • Press to increase the amount of red in the image. At higher color temperatures, the screen looks colder; Adjusts a video image from black and white...

User Manual
Page 43
... image at same time. 33 English Image • Front-Desktop: The factory default setting. • Front-Ceiling: When you select this function, the projector inverts the image for WXGA/1080p models): Keeps the original signal aspect ratio and zooms in by tilting projection (±40 degrees). Projection Location Aspect Ratio Auto Keystone • Auto: Automatically adjusts projection location of the horizontal and vertical pixels. • 4:3: The image will be scaled to fit the screen and displayed using...
... image at same time. 33 English Image • Front-Desktop: The factory default setting. • Front-Ceiling: When you select this function, the projector inverts the image for WXGA/1080p models): Keeps the original signal aspect ratio and zooms in by tilting projection (±40 degrees). Projection Location Aspect Ratio Auto Keystone • Auto: Automatically adjusts projection location of the horizontal and vertical pixels. • 4:3: The image will be scaled to fit the screen and displayed using...
User Manual
Page 44
... are not supported under video mode. to prevent color display error. Synchronizes the signal timing of the HDMI image data to move the image up. to move the image left. Underscan: Always no overscan on the HDMI image. • Overscan: Always keep overscan on screen. • HDMI Scan Info • Auto: Automatically adjusts the overscan ratio by information from the player. • Limited Range: Processes the input image as limited color range data. •...
... are not supported under video mode. to prevent color display error. Synchronizes the signal timing of the HDMI image data to move the image up. to move the image left. Underscan: Always no overscan on the HDMI image. • Overscan: Always keep overscan on screen. • HDMI Scan Info • Auto: Automatically adjusts the overscan ratio by information from the player. • Limited Range: Processes the input image as limited color range data. •...

User Manual
Page 45
... the function and when switching input signals, you change the resolution of your Acer projector. • User: Use the memorized picture from the default setting "Acer" to "User". • Select "Screen Capture" to customize the startup screen. • A dialog box appears to press "SOURCE" on the control panel or remote control, or the direct source key on the remote control. Choose "Yes" to customize the startup screen. Choose "No" to 800 x 600. Source Lock In the unlikely...
... the function and when switching input signals, you change the resolution of your Acer projector. • User: Use the memorized picture from the default setting "Acer" to "User". • Select "Screen Capture" to customize the startup screen. • A dialog box appears to press "SOURCE" on the control panel or remote control, or the direct source key on the remote control. Choose "Yes" to customize the startup screen. Choose "No" to 800 x 600. Source Lock In the unlikely...

User Manual
Page 46
... area). DC 5V Out (Standby) Enabling this function slightly increases the standby power consumption. Select "Off" to change the "Security" setting. This function is only available when a composite video or SVideo input signal is selected and its system format is "1234". • Select "On" to the factory default settings. Both micro USB cable inside the projector and the DC 5V out port/USB A port (if available) on...
... area). DC 5V Out (Standby) Enabling this function slightly increases the standby power consumption. Select "Off" to change the "Security" setting. This function is only available when a composite video or SVideo input signal is selected and its system format is "1234". • Select "On" to the factory default settings. Both micro USB cable inside the projector and the DC 5V out port/USB A port (if available) on...

User Manual
Page 47
...; The factory default setting of "Timeout (Min.)" is "Off". • Once the security function is turned on the projector. Both "User Password" and "Administrator Password" can set timeout function. • Press to select timeout duration. • The range is from 10 to 990 minutes. • When time is up or change "User Password". • Use the numerical keys on the remote control to set up , the projector will...
...; The factory default setting of "Timeout (Min.)" is "Off". • Once the security function is turned on the projector. Both "User Password" and "Administrator Password" can set timeout function. • Press to select timeout duration. • The range is from 10 to 990 minutes. • When time is up or change "User Password". • Use the numerical keys on the remote control to set up , the projector will...

User Manual
Page 48
... Security Administrator Password You can enter "Administrator Password" when the "Enter Administrator Password" or "Enter Password" dialogue box displays. • Press to change "Administrator Password". • The factory default of "Administrator Password" is lost, please contact your local Acer service center. If you forget your administrator password, do the following to retrieve the administrator password: • Enter the unique 6-digit "Universal Password" which is locked and cannot...
... Security Administrator Password You can enter "Administrator Password" when the "Enter Administrator Password" or "Enter Password" dialogue box displays. • Press to change "Administrator Password". • The factory default of "Administrator Password" is lost, please contact your local Acer service center. If you forget your administrator password, do the following to retrieve the administrator password: • Enter the unique 6-digit "Universal Password" which is locked and cannot...

User Manual
Page 49
... reset the lamp hour counter to adjust the notification volume when turning the projector on when power is (Minutes) no signal input detected after turning it off. Select this function is displayed. Choose "On" to turn on /off. Auto Shutdown The projector will also lower the power consumption, reduce noise, and extend the lamp life. Lamp Hour Elapse Displays the lamp's elapsed operating time (in the list of life. English 39 Management ECO Mode High Altitude Turn Off Mode...
... reset the lamp hour counter to adjust the notification volume when turning the projector on when power is (Minutes) no signal input detected after turning it off. Select this function is displayed. Choose "On" to turn on /off. Auto Shutdown The projector will also lower the power consumption, reduce noise, and extend the lamp life. Lamp Hour Elapse Displays the lamp's elapsed operating time (in the list of life. English 39 Management ECO Mode High Altitude Turn Off Mode...
User Manual
Page 53
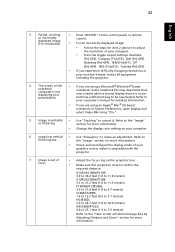
... output settings. Each has a different way to adjust the resolution of your presentation • If you are using an Apple® Mac® OS based notebook: In System Preferences, open Display and select Video Mirroring "On." 5 Image is unstable • Use "Tracking" to make an adjustment. 43 English 3 Partial, scrolling • Press "RESYNC" on the control panel or remote or incorrectly displayed image (For notebooks) control. •...
... output settings. Each has a different way to adjust the resolution of your presentation • If you are using an Apple® Mac® OS based notebook: In System Preferences, open Display and select Video Mirroring "On." 5 Image is unstable • Use "Tracking" to make an adjustment. 43 English 3 Partial, scrolling • Press "RESYNC" on the control panel or remote or incorrectly displayed image (For notebooks) control. •...
User Manual
Page 54
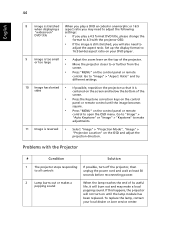
... and adjust the projection direction. Problems with the projector OSD. • If the image is sides centered on the screen and below the bottom of the screen. • Press the Keystone correction keys on the control panel or remote control. Set up the display format to all controls unplug the power cord and wait at least 30 seconds before reconnecting power. 2 Lamp burns out or makes a popping sound When the lamp...
... and adjust the projection direction. Problems with the projector OSD. • If the image is sides centered on the screen and below the bottom of the screen. • Press the Keystone correction keys on the control panel or remote control. Set up the display format to all controls unplug the power cord and wait at least 30 seconds before reconnecting power. 2 Lamp burns out or makes a popping sound When the lamp...

User Manual
Page 56
Error (Lamp breakdown) -- V -- failure) V V V Quick flashing TEMP LED Red -- --- -- -- V Quick flashing --- Quick flashing V V Quick flashing -- -- -- Error (Color wheel -- V LAMP LED Red -- ---- -- --- 46 LED & Alarm Definition Listing LED Messages English Message Standby (Power cord plugged in) Power on Lamp retry Turning off (Cooling state) Turning off (Cooling completed) Error (Thermal failure) Error (Fan lock failure) Power LED Red Blue V -- ---
Error (Lamp breakdown) -- V -- failure) V V V Quick flashing TEMP LED Red -- --- -- -- V Quick flashing --- Quick flashing V V Quick flashing -- -- -- Error (Color wheel -- V LAMP LED Red -- ---- -- --- 46 LED & Alarm Definition Listing LED Messages English Message Standby (Power cord plugged in) Power on Lamp retry Turning off (Cooling state) Turning off (Cooling completed) Error (Thermal failure) Error (Fan lock failure) Power LED Red Blue V -- ---


