User Manual
Page 3
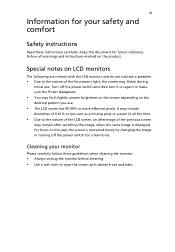
... switching the image, when the same image is recovered slowly by changing the image or turning off the power switch and then turn it on the product. Cleaning your safety and comfort Safety instructions Read these guidelines when cleaning the monitor: • Always unplug the monitor before cleaning. • Use a soft cloth to make sure the flicker disappears. • You may find slightly uneven brightness on the screen depending on LCD monitors...
... switching the image, when the same image is recovered slowly by changing the image or turning off the power switch and then turn it on the product. Cleaning your safety and comfort Safety instructions Read these guidelines when cleaning the monitor: • Always unplug the monitor before cleaning. • Use a soft cloth to make sure the flicker disappears. • You may find slightly uneven brightness on the screen depending on LCD monitors...
User Manual
Page 4
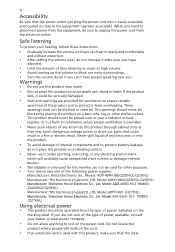
... or covered. The openings should be seriously damaged. • Slots and openings are not sure of the type of power available, consult your ears have adjusted. • Limit the amount of time listening to music at high volume. • Avoid turning up the volume to the equipment operator as they may touch dangerous voltage points or short-out parts that...
... or covered. The openings should be seriously damaged. • Slots and openings are not sure of the type of power available, consult your ears have adjusted. • Limit the amount of time listening to music at high volume. • Avoid turning up the volume to the equipment operator as they may touch dangerous voltage points or short-out parts that...
User Manual
Page 5
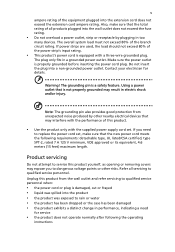
... from the wall outlet and refer servicing to rain or water • the product has been dropped or the case has been damaged • the product exhibits a distinct change in too many devices. Do not insert the plug into the extension cord does not exceed the extension cord ampere rating. Using a power outlet that may interfere with the supplied power supply cord set , make sure...
... from the wall outlet and refer servicing to rain or water • the product has been dropped or the case has been damaged • the product exhibits a distinct change in too many devices. Do not insert the plug into the extension cord does not exceed the extension cord ampere rating. Using a power outlet that may interfere with the supplied power supply cord set , make sure...
User Manual
Page 6
... you would normally be advised to turn off the device near gas pumps at Acer are often, but not always, marked. Switch off your device in progress. Observe restrictions on the use only and gaming purposes in damage and will often require extensive work by the operating instructions, since improper adjustment of other products. IT Equipment Recycling...
... you would normally be advised to turn off the device near gas pumps at Acer are often, but not always, marked. Switch off your device in progress. Observe restrictions on the use only and gaming purposes in damage and will often require extensive work by the operating instructions, since improper adjustment of other products. IT Equipment Recycling...

User Manual
Page 7
... pushing the power button. This product has been shipped enabled for more comfortable computer use. Observe the following tips: • refrain from Sleep mode by adjusting the viewing angle of physical injury. Incorrect computer usage may occasionally misfire or appear as black or red dots. The following section provides tips for power management: • Activate display's Sleep mode within 15 minutes of user inactivity...
... pushing the power button. This product has been shipped enabled for more comfortable computer use. Observe the following tips: • refrain from Sleep mode by adjusting the viewing angle of physical injury. Incorrect computer usage may occasionally misfire or appear as black or red dots. The following section provides tips for power management: • Activate display's Sleep mode within 15 minutes of user inactivity...
User Manual
Page 8
... away from the display's top front edge • Avoid adjusting your display to an awkward viewing angle. • Avoid looking at bright light sources, such as open windows, for extended periods of your vision Long viewing hours, wearing incorrect glasses or contact lenses, glare, excessive room lighting, poorly focused screens, very small typefaces and low-contrast displays could stress your computer use more relaxing and...
... away from the display's top front edge • Avoid adjusting your display to an awkward viewing angle. • Avoid looking at bright light sources, such as open windows, for extended periods of your vision Long viewing hours, wearing incorrect glasses or contact lenses, glare, excessive room lighting, poorly focused screens, very small typefaces and low-contrast displays could stress your computer use more relaxing and...

User Manual
Page 9
TABLE OF CONTENTS UNPACKING 1 ATTACHING / REMOVING THE BASE 2 SCREEN POSITION ADJUSTMENT 2 CONNECTING THE POWER CORD 3 SAFETY PRECAUTION 3 CLEANING YOUR MONITOR 3 POWER SAVING 4 DDC...4 CONNECTOR PIN ASSIGNMENT 5 STANDARD TIMING TABLE 7 INSTALLATION 8 USER CONTROLS 10 TROUBLESHOOTING 16
TABLE OF CONTENTS UNPACKING 1 ATTACHING / REMOVING THE BASE 2 SCREEN POSITION ADJUSTMENT 2 CONNECTING THE POWER CORD 3 SAFETY PRECAUTION 3 CLEANING YOUR MONITOR 3 POWER SAVING 4 DDC...4 CONNECTOR PIN ASSIGNMENT 5 STANDARD TIMING TABLE 7 INSTALLATION 8 USER CONTROLS 10 TROUBLESHOOTING 16
User Manual
Page 11
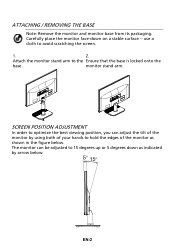
... the monitor by using both of the monitor as indicated by arrow below . ATTACHING / REMOVING THE BASE Note: Remove the monitor and monitor base from its packaging. Attach the monitor stand arm to avoid scratching the screen. 1. 2. use a cloth to the Ensure that the base is locked onto the base. Carefully place the monitor face-down as shown in the figure below . EN-2 SCREEN POSITION ADJUSTMENT In order to optimize the best viewing position...
... the monitor by using both of the monitor as indicated by arrow below . ATTACHING / REMOVING THE BASE Note: Remove the monitor and monitor base from its packaging. Attach the monitor stand arm to avoid scratching the screen. 1. 2. use a cloth to the Ensure that the base is locked onto the base. Carefully place the monitor face-down as shown in the figure below . EN-2 SCREEN POSITION ADJUSTMENT In order to optimize the best viewing position...

User Manual
Page 12
... be installed. z This monitor has a universal power supply that the power cord you use is fragile. z For unit using at 220/240 V AC (outside of U.S.): Use a Cord Set consisting of the AC power cord to the adapter, and plug the other light sources may reflect on the power cord to avoid damage to the cable. z Do not cover the ventilation slots or openings of the monitor. z For unit using at 120 V AC: Use a UL Listed Cord Set...
... be installed. z This monitor has a universal power supply that the power cord you use is fragile. z For unit using at 220/240 V AC (outside of U.S.): Use a Cord Set consisting of the AC power cord to the adapter, and plug the other light sources may reflect on the power cord to avoid damage to the cable. z Do not cover the ventilation slots or openings of the monitor. z For unit using at 120 V AC: Use a UL Listed Cord Set...
User Manual
Page 13
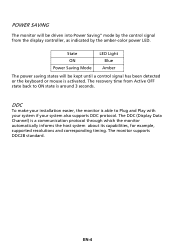
... amber-color power LED. The DDC (Display Data Channel) is a communication protocol through which the monitor automatically informs the host system about its capabilities, for example, supported resolutions and corresponding timing. EN-4 DDC To make your installation easier, the monitor is able to ON state is around 3 seconds. The monitor supports DDC2B standard. State ON Power Saving Mode LED Light Blue Amber The power saving states will be kept until a control signal...
... amber-color power LED. The DDC (Display Data Channel) is a communication protocol through which the monitor automatically informs the host system about its capabilities, for example, supported resolutions and corresponding timing. EN-4 DDC To make your installation easier, the monitor is able to ON state is around 3 seconds. The monitor supports DDC2B standard. State ON Power Saving Mode LED Light Blue Amber The power saving states will be kept until a control signal...
User Manual
Page 14
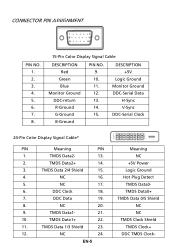
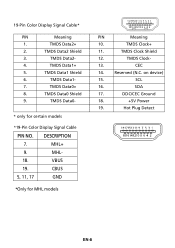
.... 10. TMDS Data 1/3 Shield 23. 12. NC 24. CONNECTOR PIN ASSIGNMENT PIN NO. 1. 2. 3. 4. 5. 6. 7. 8. 15-Pin Color Display Signal Cable DESCRIPTION Red Green Blue Monitor Ground DDC-return R-Ground G-Ground B-Ground PIN NO. 9. 10. 11. 12. 13. 14. 15. TMDS Data2- 13. 2. NC 16. 5. EN-5 Meaning NC +5V Power Logic Ground Hot Plug Detect TMDS Data0TMDS Data0+ TMDS Data 0/5 Shield NC NC...
.... 10. TMDS Data 1/3 Shield 23. 12. NC 24. CONNECTOR PIN ASSIGNMENT PIN NO. 1. 2. 3. 4. 5. 6. 7. 8. 15-Pin Color Display Signal Cable DESCRIPTION Red Green Blue Monitor Ground DDC-return R-Ground G-Ground B-Ground PIN NO. 9. 10. 11. 12. 13. 14. 15. TMDS Data2- 13. 2. NC 16. 5. EN-5 Meaning NC +5V Power Logic Ground Hot Plug Detect TMDS Data0TMDS Data0+ TMDS Data 0/5 Shield NC NC...
User Manual
Page 15
... Data0+ 8. TMDS Clock Shield 12. Hot Plug Detect EN-6 19-Pin Color Display Signal Cable* PIN Meaning 1. TMDS Data1- 7. DESCRIPTION 7. MHL- 18. TMDS Data2+ 2. TMDS Data0 Shield 9. Reserved (N.C. SCL 16. SDA 17. TMDS Clock- 13. TMDS Data0- * only for MHL models PIN Meaning 10. DDC/CEC Ground 18. +5V Power 19. TMDS Data2 Shield 3. TMDS Data2- 4. TMDS...
... Data0+ 8. TMDS Clock Shield 12. Hot Plug Detect EN-6 19-Pin Color Display Signal Cable* PIN Meaning 1. TMDS Data1- 7. DESCRIPTION 7. MHL- 18. TMDS Data2+ 2. TMDS Data0 Shield 9. Reserved (N.C. SCL 16. SDA 17. TMDS Clock- 13. TMDS Data0- * only for MHL models PIN Meaning 10. DDC/CEC Ground 18. +5V Power 19. TMDS Data2 Shield 3. TMDS Data2- 4. TMDS...
User Manual
Page 17
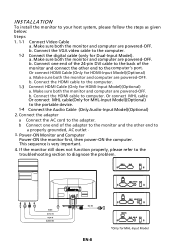
... . 3. Connect the HDMI cable to the computer. Connect the HDMI cable to the portable device. 1-4 Connect the Audio Cable (Only Audio-Input Model)(Optional) 2. Power-ON Monitor and Computer Power-ON the monitor first, then power-ON the computer. HDMI DVI-D IN VGA IN AUDIO IN DC-IN VGA EN-8 *Only for HDMI-Input Model)(Optional) a. Or connect HDMI Cable (Only for MHL-Input Model Or connect MHL cable Or connect MHL cable(Only for HDMI-Input Model)(Optional) a. Connect the adapter a Connect the AC cord to diagnose the problem. b. If the monitor...
... . 3. Connect the HDMI cable to the computer. Connect the HDMI cable to the portable device. 1-4 Connect the Audio Cable (Only Audio-Input Model)(Optional) 2. Power-ON Monitor and Computer Power-ON the monitor first, then power-ON the computer. HDMI DVI-D IN VGA IN AUDIO IN DC-IN VGA EN-8 *Only for HDMI-Input Model)(Optional) a. Or connect HDMI Cable (Only for MHL-Input Model Or connect MHL cable Or connect MHL cable(Only for HDMI-Input Model)(Optional) a. Connect the adapter a Connect the AC cord to diagnose the problem. b. If the monitor...
User Manual
Page 18
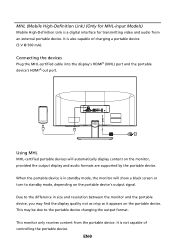
...-input Models) Mobile High-Definition Link is not capable of charging a portable device (5 V @ 500 mA). It is in size and resolution between the monitor and the portable device, you may find the display quality not as crisp as it appears on the portable device's output signal. MHL Using MHL MHL-certified portable devices will show a black screen or turn to standby mode...
...-input Models) Mobile High-Definition Link is not capable of charging a portable device (5 V @ 500 mA). It is in size and resolution between the monitor and the portable device, you may find the display quality not as crisp as it appears on the portable device's output signal. MHL Using MHL MHL-certified portable devices will show a black screen or turn to standby mode...
User Manual
Page 19
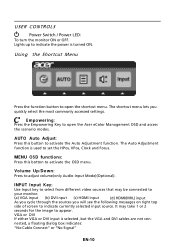
... connected to activate the OSD menu. USER CONTROLS Power Switch / Power LED: To turn the monitor ON or OFF. nected, a floating dialog box indicates: "No Cable Connect" or "No Signal" EN-10 Using the Shortcut Menu Press the function button to appear. The Auto Adjustment function is selected ,but the VGA and DVI cables are not con- INPUT Input Key: Use Input key to select from different video sources that may take 1 or 2 seconds for the image to open the Acer...
... connected to activate the OSD menu. USER CONTROLS Power Switch / Power LED: To turn the monitor ON or OFF. nected, a floating dialog box indicates: "No Cable Connect" or "No Signal" EN-10 Using the Shortcut Menu Press the function button to appear. The Auto Adjustment function is selected ,but the VGA and DVI cables are not con- INPUT Input Key: Use Input key to select from different video sources that may take 1 or 2 seconds for the image to open the Acer...
User Manual
Page 20
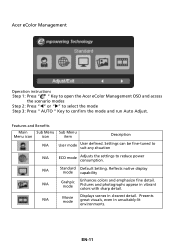
... Description N/A User mode User defined. Reflects native display mode capability N/A Grahpic mode Enhances colors and emphasize fine detail. Presents great visuals, even in clearest detail. N/A Movie mode Displays scenes in unsuitably-lit environments. Acer eColor Management Operation instructions Step 1: Press " " Key to open the Acer eColor Management OSD and access the scenario modes Step 2: Press "W" or "X" to select the mode Step 3: Press " AUTO " Key to reduce power consumption. Pictures and...
... Description N/A User mode User defined. Reflects native display mode capability N/A Grahpic mode Enhances colors and emphasize fine detail. Presents great visuals, even in clearest detail. N/A Movie mode Displays scenes in unsuitably-lit environments. Acer eColor Management Operation instructions Step 1: Press " " Key to open the Acer eColor Management OSD and access the scenario modes Step 2: Press "W" or "X" to select the mode Step 3: Press " AUTO " Key to reduce power consumption. Pictures and...
User Manual
Page 21
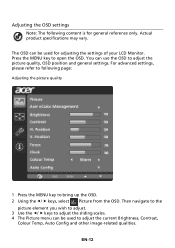
... specifications may vary. Press the MENU key to adjust the picture quality, OSD position and general settings. EN-12 You can use the OSD to open the OSD. Then navigate to the picture element you wish to adjust. 3 Use the e/ f keys to adjust the sliding scales. 4 The Picture menu can be used for general reference only. For advanced settings, please refer to adjust the current Brightness, Contrast, Colour Temp, Auto Config and other image...
... specifications may vary. Press the MENU key to adjust the picture quality, OSD position and general settings. EN-12 You can use the OSD to open the OSD. Then navigate to the picture element you wish to adjust. 3 Use the e/ f keys to adjust the sliding scales. 4 The Picture menu can be used for general reference only. For advanced settings, please refer to adjust the current Brightness, Contrast, Colour Temp, Auto Config and other image...
User Manual
Page 23
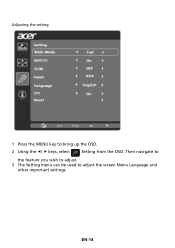
Then navigate to the feature you wish to adjust. 3 The Setting menu can be used to bring up the OSD. 2 Using the e/ f keys, select Setting from the OSD. Adjusting the setting 1 Press the MENU key to adjust the screen Menu Language and other important settings. EN-14
Then navigate to the feature you wish to adjust. 3 The Setting menu can be used to bring up the OSD. 2 Using the e/ f keys, select Setting from the OSD. Adjusting the setting 1 Press the MENU key to adjust the screen Menu Language and other important settings. EN-14
User Manual
Page 25
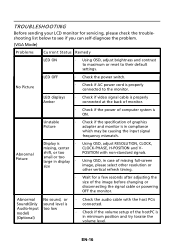
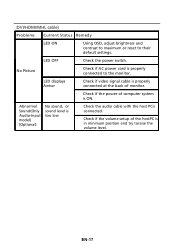
... the monitor. Abnormal Sound(Only Audio-Input model) (Optional) No sound, or sound level is too low · Check the audio cable with non-standard signals. Abnormal Picture Display is properly connected to their default settings. No Picture · Check if AC power cord is · Using OSD, adjust RESOLUTION, CLOCK, missing, center CLOCK-PHASE, H-POSITION and V- Unstable Picture · Check if the specification of the hostPC is in case of missing full-screen size image, please select other resolution or other vertical refresh...
... the monitor. Abnormal Sound(Only Audio-Input model) (Optional) No sound, or sound level is too low · Check the audio cable with non-standard signals. Abnormal Picture Display is properly connected to their default settings. No Picture · Check if AC power cord is · Using OSD, adjust RESOLUTION, CLOCK, missing, center CLOCK-PHASE, H-POSITION and V- Unstable Picture · Check if the specification of the hostPC is in case of missing full-screen size image, please select other resolution or other vertical refresh...
User Manual
Page 26
... · Check the audio cable with the host PCis connected. · Check if the volume setup of computer system is in minimum position and try toraise the volume level. No Picture LED OFF LED displays Amber · Check the power switch. · Check if AC power cord is properly connected to their default settings. (DVI/HDMI/MHL cable) Problems Current Status Remedy LED ON · Using OSD, adjust brightness and contrast to maximum or reset to the monitor. · Check if video signal cable is properly connected at the...
... · Check the audio cable with the host PCis connected. · Check if the volume setup of computer system is in minimum position and try toraise the volume level. No Picture LED OFF LED displays Amber · Check the power switch. · Check if AC power cord is properly connected to their default settings. (DVI/HDMI/MHL cable) Problems Current Status Remedy LED ON · Using OSD, adjust brightness and contrast to maximum or reset to the monitor. · Check if video signal cable is properly connected at the...

