
PD525 Service Guide
Page 12
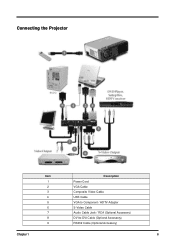
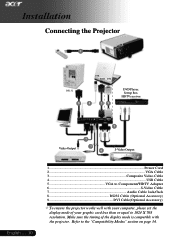
Connecting the Projector Item 1 2 3 4 5 6 7 8 9 Description Power Cord VGA Cable Composite Video Cable USB Cable VGA to Component / HDTV Adapter S-Video Cable Audio Cable Jack / RCA (Optional Accessory) DVI to DVI Cable (Optional Accessory) RS232 Cable (Optional Accessory) Chapter 1 6
Connecting the Projector Item 1 2 3 4 5 6 7 8 9 Description Power Cord VGA Cable Composite Video Cable USB Cable VGA to Component / HDTV Adapter S-Video Cable Audio Cable Jack / RCA (Optional Accessory) DVI to DVI Cable (Optional Accessory) RS232 Cable (Optional Accessory) Chapter 1 6

PD525 Service Guide
Page 14
Connect USB of PC and USB port of PD525 projector. Equipment Needed Item Software Hardware Description DLP Composer PD525 Firmware Power Cord USB Cable (P/N : 42.86006.001) PC or Laptop PD525 Projector Setup Procedure 1. USB Cable Chapter 2 USB Port 8 Chapter 2 Firmware Upgrade This chapter provides the equipment needed, setup and upgrading procedure for Firmware upgrade.
Connect USB of PC and USB port of PD525 projector. Equipment Needed Item Software Hardware Description DLP Composer PD525 Firmware Power Cord USB Cable (P/N : 42.86006.001) PC or Laptop PD525 Projector Setup Procedure 1. USB Cable Chapter 2 USB Port 8 Chapter 2 Firmware Upgrade This chapter provides the equipment needed, setup and upgrading procedure for Firmware upgrade.

PD525 Service Guide
Page 18
Then wait about a minute. Installation Procedure B. After linking the PC and PD525 projector with a USB cable, press and hold the menu button, then push the power button to continue. Type any key to turn on . 2. Chapter 2 12 USB Driver Upgrade Procedure 1. Note : The "DLP Composer" program must be full on the projector. Execute the C:\Program files\DLP Composer\usbupdata.cmd. Note : The "Temp" LED and "Lamp" LED should be closed first. 2 1 3.
Then wait about a minute. Installation Procedure B. After linking the PC and PD525 projector with a USB cable, press and hold the menu button, then push the power button to continue. Type any key to turn on . 2. Chapter 2 12 USB Driver Upgrade Procedure 1. Note : The "DLP Composer" program must be full on the projector. Execute the C:\Program files\DLP Composer\usbupdata.cmd. Note : The "Temp" LED and "Lamp" LED should be closed first. 2 1 3.

PD525 Service Guide
Page 25
Equipment Needed Item Hardware Description EDID Fixture (P/N : 80.00001.001) DFP to DVI Cable (P/N : 42.81702.001) RS-232 Cable (P/N : 42.55708.001) VGA Cable (P/N : 42.53001.051) Power Adapter (P/N : 47.53402.001) PC Power Cord PD525 Projector DDC Driver 19 Chapter 2 EDID Upgrade This chapter provides the equipment needed, setup and upgrading procedure for EDID upgrade.
Equipment Needed Item Hardware Description EDID Fixture (P/N : 80.00001.001) DFP to DVI Cable (P/N : 42.81702.001) RS-232 Cable (P/N : 42.55708.001) VGA Cable (P/N : 42.53001.051) Power Adapter (P/N : 47.53402.001) PC Power Cord PD525 Projector DDC Driver 19 Chapter 2 EDID Upgrade This chapter provides the equipment needed, setup and upgrading procedure for EDID upgrade.

PD525 Service Guide
Page 30
...make sure that you do the following precedures: 1. Turn off the power, computer system, and other attached devices; Before you disassemble the projector, be sure to their category. Anti-static wrist strap. 25 Chapter 3 Tool Needed Item PHOTO Long Nose Nipper (Left) Angle Cutting ... Unplug the AC adapter and all the peripherals. 2. Chapter 3 Machine Disassembly and Replacement This section provides disassembly procedures for PD525 Micro Portable XGA DMD Projector. Moreover, when you begin any of these procedures, be sure to put the screws in a safe place and separate ...
...make sure that you do the following precedures: 1. Turn off the power, computer system, and other attached devices; Before you disassemble the projector, be sure to their category. Anti-static wrist strap. 25 Chapter 3 Tool Needed Item PHOTO Long Nose Nipper (Left) Angle Cutting ... Unplug the AC adapter and all the peripherals. 2. Chapter 3 Machine Disassembly and Replacement This section provides disassembly procedures for PD525 Micro Portable XGA DMD Projector. Moreover, when you begin any of these procedures, be sure to put the screws in a safe place and separate ...

PD525 Service Guide
Page 50
Performance Troubleshooting (Computer Signal) 3. Remote Control Troubleshooting Equipment Needed Item PD525 Projector VESA VGA Cable/VESA DVI to solve some complicated problems of component repairing and professional problems. The Troubleshooting section focus on the following precedures: 1. Power ... can get the appropriate operation to DVI Cable PC (Personal Computer) with analog and digital signal output DVD Player for Video Signal and Audio Signal PD525 Remote Control 45 Chapter 4 Function Troubleshooting 5.
Performance Troubleshooting (Computer Signal) 3. Remote Control Troubleshooting Equipment Needed Item PD525 Projector VESA VGA Cable/VESA DVI to solve some complicated problems of component repairing and professional problems. The Troubleshooting section focus on the following precedures: 1. Power ... can get the appropriate operation to DVI Cable PC (Personal Computer) with analog and digital signal output DVD Player for Video Signal and Audio Signal PD525 Remote Control 45 Chapter 4 Function Troubleshooting 5.
PD525 User's Guide
Page 1
... Ports ...8 Remote Control with Laser Pointer 9 Installation 10 Connecting the Projector 10 Powering On/Off the Projector 11 Powering On the Projector 11 Powering Off the projector 12 Warning Indicator ...12 Adjusting the Projected Image 13 Adjusting the Projector Image Height 13 Adjusting the Projector Zoom / Focus 14 Adjusting Projected Image Size 14 User Controls 15...
... Ports ...8 Remote Control with Laser Pointer 9 Installation 10 Connecting the Projector 10 Powering On/Off the Projector 11 Powering On the Projector 11 Powering Off the projector 12 Warning Indicator ...12 Adjusting the Projected Image 13 Adjusting the Projector Image Height 13 Adjusting the Projector Zoom / Focus 14 Adjusting Projected Image Size 14 User Controls 15...

PD525 User's Guide
Page 2
.... To reduce the risk of fire or electric shock, do not open or disassemble the product as recommended in operation. When switching the projector off, please ensure the projector completes its life, it shows warning messages. Warning- Warning- When the lamp reaches the end of the lamp itself. If this product to... (refer to change the lamp when it will detect the life of its cooling cycle before disconnecting power. Please do not expose this happens, the projector will not turn back on until the lamp module has been replaced. Warning- Warning- Do not look into the...
.... To reduce the risk of fire or electric shock, do not open or disassemble the product as recommended in operation. When switching the projector off, please ensure the projector completes its life, it shows warning messages. Warning- Warning- When the lamp reaches the end of the lamp itself. If this product to... (refer to change the lamp when it will detect the life of its cooling cycle before disconnecting power. Please do not expose this happens, the projector will not turn back on until the lamp module has been replaced. Warning- Warning- Do not look into the...

PD525 User's Guide
Page 4
... panel ‹ SXGA+, SXGA compression and VGA, SVGA re-sizing ‹ Mac compatible English ... 4 Introduction Product Features This product is an XGA single chip 0.7" DLPTM projector. Outstanding features include: ‹ True XGA, 1024 x 768 addressable pixels ‹ Single chip DLPTM technology ‹ NTSC 3.58/NTSC 4.43/PAL/SECAM and HDTV compat...
... panel ‹ SXGA+, SXGA compression and VGA, SVGA re-sizing ‹ Mac compatible English ... 4 Introduction Product Features This product is an XGA single chip 0.7" DLPTM projector. Outstanding features include: ‹ True XGA, 1024 x 768 addressable pixels ‹ Single chip DLPTM technology ‹ NTSC 3.58/NTSC 4.43/PAL/SECAM and HDTV compat...

PD525 User's Guide
Page 5
Check to Component/ 1.8m HDTV Adapter Remote Control with Laser Pointer 2 x Battery Carrying Case User's Guide Quick Start Card 5 ... Introduction Package Overview This projector comes with lens cap Power Cord 1.8m VGA Cable 1.8m Composite Video Cable 2.0m USB Cable 1.8m S-Video Cable 1.8m Audio Cable Jack /Jack VGA to make sure your dealer immediately if anything is complete. Projector with all the items shown below. Contact your unit is missing. English
Check to Component/ 1.8m HDTV Adapter Remote Control with Laser Pointer 2 x Battery Carrying Case User's Guide Quick Start Card 5 ... Introduction Package Overview This projector comes with lens cap Power Cord 1.8m VGA Cable 1.8m Composite Video Cable 2.0m USB Cable 1.8m S-Video Cable 1.8m Audio Cable Jack /Jack VGA to make sure your dealer immediately if anything is complete. Projector with all the items shown below. Contact your unit is missing. English
PD525 User's Guide
Page 10
... timing of your graphic card less than or equal to the "Compatibility Modes" section on page 34. Refer to 1024 X 768 resolution. Installation Connecting the Projector 1 RS232 USB RGB DVI 8 4 29 DVD Player, Settop Box, HDTV receiver 7 Video Output 3 6 5 S-Video Output English ... 10 1...Power Cord 2...VGA Cable ...to Component/HDTV Adapter 6...S-Video Cable 7 Audio Cable Jack/Jack 8 RS232 Cable (Optional Accessory) 9 DVI Cable(Optional Accessory) ™ To ensure the projector works well with your computer, please set the display mode of the display mode is compatible with the...
... timing of your graphic card less than or equal to the "Compatibility Modes" section on page 34. Refer to 1024 X 768 resolution. Installation Connecting the Projector 1 RS232 USB RGB DVI 8 4 29 DVD Player, Settop Box, HDTV receiver 7 Video Output 3 6 5 S-Video Output English ... 10 1...Power Cord 2...VGA Cable ...to Component/HDTV Adapter 6...S-Video Cable 7 Audio Cable Jack/Jack 8 RS232 Cable (Optional Accessory) 9 DVI Cable(Optional Accessory) ™ To ensure the projector works well with your computer, please set the display mode of the display mode is compatible with the...

PD525 User's Guide
Page 11
... detect your source (computer, notebook, video player ,etc.). Installation Powering On/Off the Projector Powering On the Projector 1. Ensure that the power cord and signal cable are securely connected. ™ If you connect multiple sources at the same time, using the "Source" button ...on the remote control or control panel to switch. ™Turn on the projector first and then the signal sources. 1 Power/Standby 11 ... Remove the lens cap. 2. The Power LED will turn green. 4. Turn on the lamp by pressing...
... detect your source (computer, notebook, video player ,etc.). Installation Powering On/Off the Projector Powering On the Projector 1. Ensure that the power cord and signal cable are securely connected. ™ If you connect multiple sources at the same time, using the "Source" button ...on the remote control or control panel to switch. ™Turn on the projector first and then the signal sources. 1 Power/Standby 11 ... Remove the lens cap. 2. The Power LED will turn green. 4. Turn on the lamp by pressing...
PD525 User's Guide
Page 12
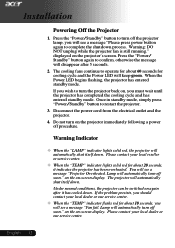
.... English ... 12 Disconnect the power cord from the electrical outlet and the projector. 4. on the on the projector's screen. Lamp will automatically turn on , you wish to restart the projector. 3. The projector will keep green. Press the "Power/ Standby" button again to confirm, otherwise... down . displayed on -screen display. Warning Indicator ™ When the "LAMP" indicator lights solid red, the projector will disappear after it indicates the projector has been overheated. Do not turn off soon." If the problem persists, you should contact your local dealer or ...
.... English ... 12 Disconnect the power cord from the electrical outlet and the projector. 4. on the on the projector's screen. Lamp will automatically turn on , you wish to restart the projector. 3. The projector will keep green. Press the "Power/ Standby" button again to confirm, otherwise... down . displayed on -screen display. Warning Indicator ™ When the "LAMP" indicator lights solid red, the projector will disappear after it indicates the projector has been overheated. Do not turn off soon." If the problem persists, you should contact your local dealer or ...

PD525 User's Guide
Page 13
..., then release the button to fine-tune the display angle. 1 Elevator Button 2 Elevator Foot 3 Tilt Adjusting Wheel 13 ... Installation Adjusting the Projected Image Adjusting the Projector Image Height The projector is equipped with an elevator foot for adjusting the image height.
..., then release the button to fine-tune the display angle. 1 Elevator Button 2 Elevator Foot 3 Tilt Adjusting Wheel 13 ... Installation Adjusting the Projected Image Adjusting the Projector Image Height The projector is equipped with an elevator foot for adjusting the image height.

PD525 User's Guide
Page 14
The projector will focus at distances from 3.9 to 32.8 feet (1.2 to zoom in or out. To focus the image, rotate the focus ring until the image is ... ... 14 3.94'(1.2m) 9.84'(3.0m) 16.40'(5.0m) 22.97'(7.0m) 26.25'(8.0m) 32.81'(10.0m) Screen Max. (Diagonal) Min. Installation Adjusting the Projector Zoom / Focus You may turn the zoom ring to 10.0 meters).
The projector will focus at distances from 3.9 to 32.8 feet (1.2 to zoom in or out. To focus the image, rotate the focus ring until the image is ... ... 14 3.94'(1.2m) 9.84'(3.0m) 16.40'(5.0m) 22.97'(7.0m) 26.25'(8.0m) 32.81'(10.0m) Screen Max. (Diagonal) Min. Installation Adjusting the Projector Zoom / Focus You may turn the zoom ring to 10.0 meters).

PD525 User's Guide
Page 15
User Controls Control Panel & Remote Control There are two ways for you to the "Power On/Off the Projector" section on screen display (OSD) menu. Control Panel Remote Control Using the Control Panel Power/Standby 4 Refer to control the functions: Remote Control and Control ...
User Controls Control Panel & Remote Control There are two ways for you to the "Power On/Off the Projector" section on screen display (OSD) menu. Control Panel Remote Control Using the Control Panel Power/Standby 4 Refer to control the functions: Remote Control and Control ...

PD525 User's Guide
Page 16
...PC, Video, Theatre and User directly. User Controls English ... 16 Using the Remote Control Power 4 Refer to the "Power On/Off the Projector" section on screen display menu. Empowering Key 4 Display the "Display Mode" submenu of the image. Menu 4 Press "Menu" to page ... and HDTV sources. Source 4 Press "Source" to page up. This function is only available when the projector is connected to activate the laser pointer. Re-Sync 4 Automatically synchronizes the projector to pause the screen image. Freeze 4 Press "Freeze" to the input source. Hide 4 Momentarily turns ...
...PC, Video, Theatre and User directly. User Controls English ... 16 Using the Remote Control Power 4 Refer to the "Power On/Off the Projector" section on screen display menu. Empowering Key 4 Display the "Display Mode" submenu of the image. Menu 4 Press "Menu" to page ... and HDTV sources. Source 4 Press "Source" to page up. This function is only available when the projector is connected to activate the laser pointer. Re-Sync 4 Automatically synchronizes the projector to pause the screen image. Freeze 4 Press "Freeze" to the input source. Hide 4 Momentarily turns ...

PD525 User's Guide
Page 17
... automatically save the new settings. Select the next item to be adjusted in the main menu. User Controls On Screen Display Menus The Projector has multilingual On Screen Display menus that allow you to operate 1. How to make image adjustments and change a variety of settings. After selecting the...desired item and adjust the settings by key. 4. Use keys to enter sub menu for feature setting. 3. The OSD menu will close and the projector will automatically detect the source. To open the OSD menu, press "Menu" on the Remote Control or press "Menu/Enter"on the Control Panel again...
... automatically save the new settings. Select the next item to be adjusted in the main menu. User Controls On Screen Display Menus The Projector has multilingual On Screen Display menus that allow you to operate 1. How to make image adjustments and change a variety of settings. After selecting the...desired item and adjust the settings by key. 4. Use keys to enter sub menu for feature setting. 3. The OSD menu will close and the projector will automatically detect the source. To open the OSD menu, press "Menu" on the Remote Control or press "Menu/Enter"on the Control Panel again...
PD525 User's Guide
Page 25
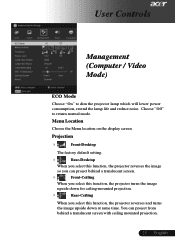
... display screen. You can project behind a translucent screen with ceiling mounted projection. 25 ... English Choose "Off" to dim the projector lamp which will lower power consumption, extend the lamp life and reduce noise. Projection 4 Front-Desktop The factory default setting. 4...behind a translucent screen. 4 Front-Ceiling When you select this function, the projector turns the image upside down for ceiling-mounted projection. 4 Rear-Ceiling When you select this function, the projector reverses and turns the image upside down at same time. User Controls Management ...
... display screen. You can project behind a translucent screen with ceiling mounted projection. 25 ... English Choose "Off" to dim the projector lamp which will lower power consumption, extend the lamp life and reduce noise. Projection 4 Front-Desktop The factory default setting. 4...behind a translucent screen. 4 Front-Ceiling When you select this function, the projector turns the image upside down for ceiling-mounted projection. 4 Rear-Ceiling When you select this function, the projector reverses and turns the image upside down at same time. User Controls Management ...

PD525 User's Guide
Page 26
.... OSD Transparency Adjusts the OSD's transparency. Lamp Hour Elapse Displays the lamp's elapsed operating time (in hours). If you change the setting from PC to projector via the USB cable and My Start-up Screen Use this function to hide warning message when the changing lamp message is down loaded from... will "Lock" the current source channel before you exit the OSD menu, the new setting will take effect. 4Acer : The default start-up screen of Acer projector. 4User : The user customized start -up 30 hours before end of below section). When source lock is lost.
.... OSD Transparency Adjusts the OSD's transparency. Lamp Hour Elapse Displays the lamp's elapsed operating time (in hours). If you change the setting from PC to projector via the USB cable and My Start-up Screen Use this function to hide warning message when the changing lamp message is down loaded from... will "Lock" the current source channel before you exit the OSD menu, the new setting will take effect. 4Acer : The default start-up screen of Acer projector. 4User : The user customized start -up 30 hours before end of below section). When source lock is lost.


