
PD311 Service Guide
Page 6
... Lighting Message 38 Main Procedure 39 Function Test and Alignment Procedure 41 Product / Test Equipment / Test Condition 41 Guide to Entering Service Mode and Factory Reset 41 Inspection Procecdure 42 Chapter 5 Exploded Overview 45 Exploded Overview 45 Appendix Serial Number Definition System 72 I. Serial Number System Definition...
... Lighting Message 38 Main Procedure 39 Function Test and Alignment Procedure 41 Product / Test Equipment / Test Condition 41 Guide to Entering Service Mode and Factory Reset 41 Inspection Procecdure 42 Chapter 5 Exploded Overview 45 Exploded Overview 45 Appendix Serial Number Definition System 72 I. Serial Number System Definition...
PD311 Service Guide
Page 12
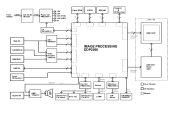
Ballast Control Ballast Lamp Control CW Driver PMD1000-3 Motor Control CW Index LAMP CW Motor CW INDEX SENSOR DMD CHIP 23 DAD1000 Reset ASIC IC or Chipset I/O Interface Module From +385V DC To DC +13V Power Ctrl. Ballast Module PMD1000-1 1.5V 2.5V 3.3V (SYS) 3.3V (ADC) 5V Flash ...
Ballast Control Ballast Lamp Control CW Driver PMD1000-3 Motor Control CW Index LAMP CW Motor CW INDEX SENSOR DMD CHIP 23 DAD1000 Reset ASIC IC or Chipset I/O Interface Module From +385V DC To DC +13V Power Ctrl. Ballast Module PMD1000-1 1.5V 2.5V 3.3V (SYS) 3.3V (ADC) 5V Flash ...
PD311 Service Guide
Page 19
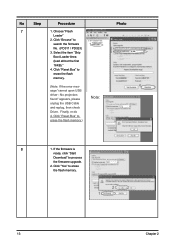
...: Photo 2 3 16 KB 4 16 KB 8 1. No projectors found" appears, please unplug the USB Cable and replug, then check Driver. Click "Reset Bus" to erase the flash memory. (Note: If the error message "cannot open USB driver - Click "Browse" to erase the flash...2 Select the item "Skip Boot Loader Area (load all but the first 16KB)." 4. Click "Yes" to search the firmware 1 file. (PD311 / PD323) 3. If the firmware is ready, click "Start Download" to process the firmware upgrade. 2. Finally, re-do 4. No Step Procedure ...
...: Photo 2 3 16 KB 4 16 KB 8 1. No projectors found" appears, please unplug the USB Cable and replug, then check Driver. Click "Reset Bus" to erase the flash memory. (Note: If the error message "cannot open USB driver - Click "Browse" to erase the flash...2 Select the item "Skip Boot Loader Area (load all but the first 16KB)." 4. Click "Yes" to search the firmware 1 file. (PD311 / PD323) 3. If the firmware is ready, click "Start Download" to process the firmware upgrade. 2. Finally, re-do 4. No Step Procedure ...
PD311 Service Guide
Page 24
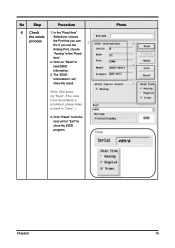
The "EDID Informations" will show the result. (Note: After pressing "Read", if the code in the Serial Blank is scrambled, please make a check in the "Read Item". 2. No Step Procedure 6 Check 1. Click "Reset" to do the next unit or "Exit" to read EDID information. 3. Click on "Read" to close the EDID program. In the "Read Item" the whole Selections, choose process the Port that you use. 3 Ex: If you use the Analog Port, choose "Analog" in "Trans".) 4. Note Photo 2 4 1 Chapter2 18
The "EDID Informations" will show the result. (Note: After pressing "Read", if the code in the Serial Blank is scrambled, please make a check in the "Read Item". 2. No Step Procedure 6 Check 1. Click "Reset" to do the next unit or "Exit" to read EDID information. 3. Click on "Read" to close the EDID program. In the "Read Item" the whole Selections, choose process the Port that you use. 3 Ex: If you use the Analog Port, choose "Analog" in "Trans".) 4. Note Photo 2 4 1 Chapter2 18
PD311 Service Guide
Page 46
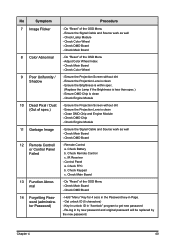
... Lamp if the Brightness is clean - Clean DMD Chip and Engine Module - Check Main Board - Check Remote Control c. Check FPC b. Do "Reset" of the OSD Menu - Ensure the Projection Screen without dirt - Ensure DMD Chip is less than spec.) - Ensure the Projection Screen without dirt...Board - No Symptom 7 Image Flicker 8 Color Abnormal 9 Poor Uniformity / Shadow 10 Dead Pixel / Dust (Out of the OSD Menu - Do "Reset" of spec.) 11 Garbage Image 12 Remote Controll or Control Panel Failed 13 Function Abnormal 14 Forgetting Password (adminstrator Password) Procedure - Check DMD Board ...
... Lamp if the Brightness is clean - Clean DMD Chip and Engine Module - Check Main Board - Check Remote Control c. Check FPC b. Do "Reset" of the OSD Menu - Ensure the Projection Screen without dirt - Ensure DMD Chip is less than spec.) - Ensure the Projection Screen without dirt...Board - No Symptom 7 Image Flicker 8 Color Abnormal 9 Poor Uniformity / Shadow 10 Dead Pixel / Dust (Out of the OSD Menu - Do "Reset" of spec.) 11 Garbage Image 12 Remote Controll or Control Panel Failed 13 Function Abnormal 14 Forgetting Password (adminstrator Password) Procedure - Check DMD Board ...
PD311 Service Guide
Page 47
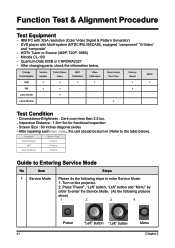
...Charge Parts/Update Version Update Color Wheel Index ADC Calibration Video Calibration Reset Lamp Use Time Factory Reset EDID M/B v v v v v v FW v v ...v Color Wheel v Lamp Module v Test Condition - HDTV Tuner or Source (480P, 720P, 1080i) - Inspection Distance : 1.5m~3m for functional inspection - Circumstance Brightness : Dark room less than 2.5 lux. - Turn on the projector. 2. Function Test & Alignment Procedure Test Equipment - After changing parts, check the information below ). After repairing each PD311...
...Charge Parts/Update Version Update Color Wheel Index ADC Calibration Video Calibration Reset Lamp Use Time Factory Reset EDID M/B v v v v v v FW v v ...v Color Wheel v Lamp Module v Test Condition - HDTV Tuner or Source (480P, 720P, 1080i) - Inspection Distance : 1.5m~3m for functional inspection - Circumstance Brightness : Dark room less than 2.5 lux. - Turn on the projector. 2. Function Test & Alignment Procedure Test Equipment - After changing parts, check the information below ). After repairing each PD311...
PD311 Service Guide
Page 48
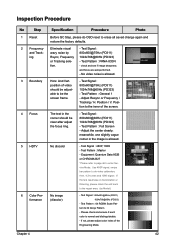
...discolor) - Test Signal : 800x600@75Hz (PD311) 1024x768@60Hz (PD323) - Horz. Test Pattern : General 1 - Test Signal : 800x600@60Hz (PD311) 1024x768@60Hz (PD323) - Adjust the center clearly; Use 480P signal, smtpe bar pattern to do OSD reset to the inner of the Engineering Mode. ...to be clear after adjust the focus ring. - If not, please adjust color index of the screen. Inspection Procedure No Step 1 Reset 2 Frequency and Tracking 3 Boundary 4 Focus 5 HDTV 6 Color Performance Specification Procedure Photo Before QC Step, please do video ...
...discolor) - Test Signal : 800x600@75Hz (PD311) 1024x768@60Hz (PD323) - Horz. Test Pattern : General 1 - Test Signal : 800x600@60Hz (PD311) 1024x768@60Hz (PD323) - Adjust the center clearly; Use 480P signal, smtpe bar pattern to do OSD reset to the inner of the Engineering Mode. ...to be clear after adjust the focus ring. - If not, please adjust color index of the screen. Inspection Procedure No Step 1 Reset 2 Frequency and Tracking 3 Boundary 4 Focus 5 HDTV 6 Color Performance Specification Procedure Photo Before QC Step, please do video ...
PD311 Service Guide
Page 50
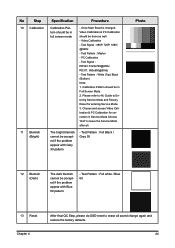
Test Pattern : Full white / Blue 60 13 Reset Chapter 4 After final QC Step, please do OSD reset to 46. Test Signal : PD323: 1024x768@60Hz PD311: 800x600@60Hz - Test Pattern : White (Top) Black (Bottom) Note: 1. Please refer to erase all . Choose and access Video Calibration & PC Calibration for correction in Service ...
Test Pattern : Full white / Blue 60 13 Reset Chapter 4 After final QC Step, please do OSD reset to 46. Test Signal : PD323: 1024x768@60Hz PD311: 800x600@60Hz - Test Pattern : White (Top) Black (Bottom) Note: 1. Please refer to erase all . Choose and access Video Calibration & PC Calibration for correction in Service ...
PD311 Service Guide
Page 78
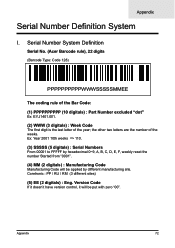
... : Eng. Ex: Year 2001 10th weeks => 110. (3) SSSSS (5 digitals) : Serial Numbers From 00001 to FFFFF by hexadecimal 0~9, A, B, C, D, E, F, weekly reset the number Started from "0001". (4) MM (2 digitals) : Manufacturing Code Manufacturing Code will be applied by different manufacturing site. Appendix 72 Appendix Serial Number Defi... If it doesn't have version control, it will be put with zero "00". Serial Number System Definition Serial No. (Acer Barcode rule), 22 digits (Barcode Type: Code 128) PPPPPPPPPPWWWSSSSSMMEE E The coding rule of the Bar Code: (1) PPPPPPPPPP (10 digitals...
... : Eng. Ex: Year 2001 10th weeks => 110. (3) SSSSS (5 digitals) : Serial Numbers From 00001 to FFFFF by hexadecimal 0~9, A, B, C, D, E, F, weekly reset the number Started from "0001". (4) MM (2 digitals) : Manufacturing Code Manufacturing Code will be applied by different manufacturing site. Appendix 72 Appendix Serial Number Defi... If it doesn't have version control, it will be put with zero "00". Serial Number System Definition Serial No. (Acer Barcode rule), 22 digits (Barcode Type: Code 128) PPPPPPPPPPWWWSSSSSMMEE E The coding rule of the Bar Code: (1) PPPPPPPPPP (10 digitals...
PD311 User's Guide EN
Page 4
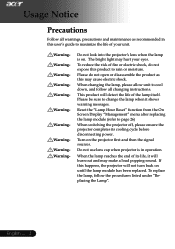
.... Warning- WarningWarningWarning- Turn on . To replace the lamp, follow all warnings, precautions and maintenance as this product to rain or moisture. English ... 2 WarningWarningWarningWarningWarning- Reset the "Lamp Hour Reset" function from the On Screen Display "Management" menu after replacing the lamp module (refer to cool down, and follow the procedures listed under "Replacing...
.... Warning- WarningWarningWarning- Turn on . To replace the lamp, follow all warnings, precautions and maintenance as this product to rain or moisture. English ... 2 WarningWarningWarningWarningWarning- Reset the "Lamp Hour Reset" function from the On Screen Display "Management" menu after replacing the lamp module (refer to cool down, and follow the procedures listed under "Replacing...
PD311 User's Guide EN
Page 28
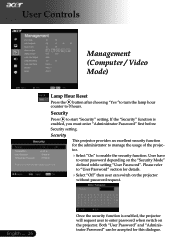
... password request. Security Press to 0 hours. Both "User Password" and "Administrator Password" can switch on the projector. User Controls Management (Computer / Video Mode) Lamp Hour Reset Press the button after choosing "Yes "to turn the lamp hour counter to start "Security" setting.
... password request. Security Press to 0 hours. Both "User Password" and "Administrator Password" can switch on the projector. User Controls Management (Computer / Video Mode) Lamp Hour Reset Press the button after choosing "Yes "to turn the lamp hour counter to start "Security" setting.
PD311 User's Guide EN
Page 32
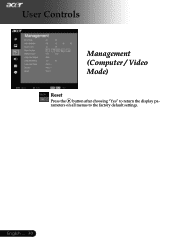
User Controls Management (Computer / Video Mode) Reset Press the button after choosing "Yes" to return the display parameters on all menus to the factory default settings. English ... 30
User Controls Management (Computer / Video Mode) Reset Press the button after choosing "Yes" to return the display parameters on all menus to the factory default settings. English ... 30
PD311 User's Guide EN
Page 36
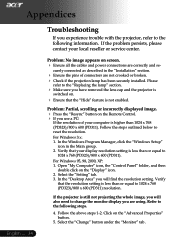
..., click the "Windows Setup" icon in the "Installation" section. Ensure the pins of your computer is higher than or equal to reset the resolution. Refer to the "Replacing the lamp" section. Make sure you have removed the lens cap and the projector is switched ...are using. Follow the above steps 1-2. For Windows 3.x: 1. In the "Desktop Area" you will also need to 1024 x 768 (PD323)/800 x 600 (PD311). curely connected as described in the Main group. 2. Open "My Computer" icon, the "Control Panel" folder, and then double click on the "Advanced Properties...
..., click the "Windows Setup" icon in the "Installation" section. Ensure the pins of your computer is higher than or equal to reset the resolution. Refer to the "Replacing the lamp" section. Make sure you have removed the lens cap and the projector is switched ...are using. Follow the above steps 1-2. For Windows 3.x: 1. In the "Desktop Area" you will also need to 1024 x 768 (PD323)/800 x 600 (PD311). curely connected as described in the Main group. 2. Open "My Computer" icon, the "Control Panel" folder, and then double click on the "Advanced Properties...


