
PD115 Service Guide
Page 10
...a result of use . Do not operate the lamp in proximity to cool down. 2. The lamp becomes high temperature after powering on -off the projector with such materials. Do not touch the lamp glass at least for the lamp to paper, cloth, or other similar lamps. 4. The lamp may... vibration, shock or degradation as its lifetime draws to the environment or conditions in a shorter period of explosion may explode due to turn off the projector after turning off -cycles will damage the lamp and reduce lamp life. Faster on . 7. Chapter 1 4 Wait at any time. Risk of ...
...a result of use . Do not operate the lamp in proximity to cool down. 2. The lamp becomes high temperature after powering on -off the projector with such materials. Do not touch the lamp glass at least for the lamp to paper, cloth, or other similar lamps. 4. The lamp may... vibration, shock or degradation as its lifetime draws to the environment or conditions in a shorter period of explosion may explode due to turn off the projector after turning off -cycles will damage the lamp and reduce lamp life. Faster on . 7. Chapter 1 4 Wait at any time. Risk of ...
PD115 Service Guide
Page 11
...Since the lamp is inhaled, it could be used lamp according to ensure proper disposal. Do not reuse the old lamp. Do not use the projector with UL1572. Disposal : For disposal of glass, do not drop the unit and do not scratch the glass. 14. Due to the high luminous...regulations to local regulations. 12. 8. Otherwise it could cause headaches, nausea, dizziness, etc. 10. Otherwise it could cause the lamp to turn off the projector and unplug the AC power cord before replacing the lamp. 16. Leave the area immediately if the lamp shatters while being operated and ventilate the...
...Since the lamp is inhaled, it could be used lamp according to ensure proper disposal. Do not reuse the old lamp. Do not use the projector with UL1572. Disposal : For disposal of glass, do not drop the unit and do not scratch the glass. 14. Due to the high luminous...regulations to local regulations. 12. 8. Otherwise it could cause headaches, nausea, dizziness, etc. 10. Otherwise it could cause the lamp to turn off the projector and unplug the AC power cord before replacing the lamp. 16. Leave the area immediately if the lamp shatters while being operated and ventilate the...
PD115 Service Guide
Page 14
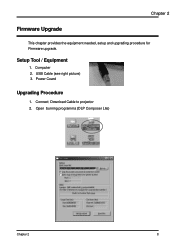
Chapter 2 Firmware Upgrade This chapter provides the equipment needed, setup and upgrading procedure for Firmware upgrade. Computer 2. Open burning programma (DLP Composer Lite) Chapter 2 8 Setup Tool / Equipment 1. USB Cable (see right picture) 3. Connect Download Cable to projector 2. Power Coard Upgrading Procedure 1.
Chapter 2 Firmware Upgrade This chapter provides the equipment needed, setup and upgrading procedure for Firmware upgrade. Computer 2. Open burning programma (DLP Composer Lite) Chapter 2 8 Setup Tool / Equipment 1. USB Cable (see right picture) 3. Connect Download Cable to projector 2. Power Coard Upgrading Procedure 1.
PD115 Service Guide
Page 15
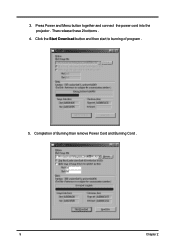
Completion of program . 5. Press Power and Menu button together and connect the power cord into the projector . Than release these 2 bottoms . 4. 3. Click the Start Download button and then start to burning of Burning than remove Power Cord and Burning Cord . 9 Chapter 2
Completion of program . 5. Press Power and Menu button together and connect the power cord into the projector . Than release these 2 bottoms . 4. 3. Click the Start Download button and then start to burning of Burning than remove Power Cord and Burning Cord . 9 Chapter 2
PD115 Service Guide
Page 16
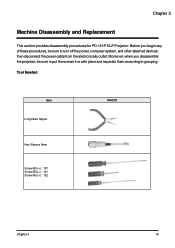
Before you disassemble the projector, be sure to grouping. Moreover, when you begin any of these procedures, be sure to put the screws in a safe place and separate them according to turn off the power, computer system, and other attached devices; then disconnect the power cable from the electronically outlet. Chapter 3 Machine Disassembly and Replacement This section provides disassembly procedures for PD-113 P DLP Projector. Tool Needed Item Long Nose Nipper Hex Sleeves 5mm Screw Bit (+) : 107 Screw Bit (+) : 101 Screw Bit (+) : 102 PHOTO Chapter 3 10
Before you disassemble the projector, be sure to grouping. Moreover, when you begin any of these procedures, be sure to put the screws in a safe place and separate them according to turn off the power, computer system, and other attached devices; then disconnect the power cable from the electronically outlet. Chapter 3 Machine Disassembly and Replacement This section provides disassembly procedures for PD-113 P DLP Projector. Tool Needed Item Long Nose Nipper Hex Sleeves 5mm Screw Bit (+) : 107 Screw Bit (+) : 101 Screw Bit (+) : 102 PHOTO Chapter 3 10

PD115 Service Guide
Page 18
Remove Lamp Cover 3. Grasp the lamp handle and pull out Lamp Module p.s Related notice of Lamp Module . 4. Loosen two screws of replace lamp pls refer to the Lamp Specification section . Note:Unplug all the cord before disaddembling the Projector. Loosen two screws of Lamp Cover 2. P2043-0013 Chapter 3 12 Disassemble Lamp Module 1.
Remove Lamp Cover 3. Grasp the lamp handle and pull out Lamp Module p.s Related notice of Lamp Module . 4. Loosen two screws of replace lamp pls refer to the Lamp Specification section . Note:Unplug all the cord before disaddembling the Projector. Loosen two screws of Lamp Cover 2. P2043-0013 Chapter 3 12 Disassemble Lamp Module 1.
PD115 Service Guide
Page 43
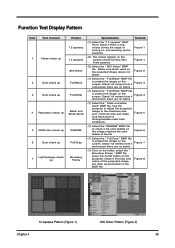
... is distinguishable under both conditions. Figure 7 (1) Click on the folder, select the " Boundary Frame " BMP file, press the AUTO button on the projector, check if the lines and colors of the file. Figure 1 (3).Select the " 800 flicker" BMP file. Function Test Display Pattern Item Test Content ...up 2 Dust check up 3 Dust check up 4 Resolution check up 5 RGB color check up 6 Dust check up 7 Light leakage check up the projector. Figure 6 (1) Select the " Full Gray " BMP file to check if the color ladder of the image matches the color ladder of the projected ...
... is distinguishable under both conditions. Figure 7 (1) Click on the folder, select the " Boundary Frame " BMP file, press the AUTO button on the projector, check if the lines and colors of the file. Figure 1 (3).Select the " 800 flicker" BMP file. Function Test Display Pattern Item Test Content ...up 2 Dust check up 3 Dust check up 4 Resolution check up 5 RGB color check up 6 Dust check up 7 Light leakage check up the projector. Figure 6 (1) Select the " Full Gray " BMP file to check if the color ladder of the image matches the color ladder of the projected ...
PD115 User's Guide EN
Page 1
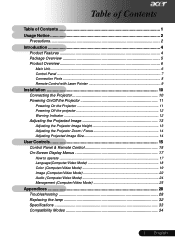
... Ports ...8 Remote Control with Laser Pointer 9 Installation 10 Connecting the Projector 10 Powering On/Off the Projector 11 Powering On the Projector 11 Powering Off the projector 12 Warning Indicator ...12 Adjusting the Projected Image 13 Adjusting the Projector Image Height 13 Adjusting the Projector Zoom / Focus 14 Adjusting Projected Image Size 14 User Controls 15...
... Ports ...8 Remote Control with Laser Pointer 9 Installation 10 Connecting the Projector 10 Powering On/Off the Projector 11 Powering On the Projector 11 Powering Off the projector 12 Warning Indicator ...12 Adjusting the Projected Image 13 Adjusting the Projector Image Height 13 Adjusting the Projector Zoom / Focus 14 Adjusting Projected Image Size 14 User Controls 15...
PD115 User's Guide EN
Page 2
... . To replace the lamp, follow all warnings, precautions and maintenance as this may hurt your unit. Please do not expose this happens, the projector will not turn back on until the lamp module has been replaced. Warning- English ... 2 When the lamp reaches the end of the lamp... shock. Warning- To reduce the risk of your eyes. Warning- Usage Notice Precautions Follow all changing instructions. Do not look into the projector's lens when the lamp is in this user's guide to cool down, and follow the procedures listed under "Replacing the Lamp". When ...
... . To replace the lamp, follow all warnings, precautions and maintenance as this may hurt your unit. Please do not expose this happens, the projector will not turn back on until the lamp module has been replaced. Warning- English ... 2 When the lamp reaches the end of the lamp... shock. Warning- To reduce the risk of your eyes. Warning- Usage Notice Precautions Follow all changing instructions. Do not look into the projector's lens when the lamp is in this user's guide to cool down, and follow the procedures listed under "Replacing the Lamp". When ...

PD115 User's Guide EN
Page 4
Introduction Product Features This product is an XGA single chip 0.55" DLPTM projector. Outstanding features include: ‹ True XGA, 1024 x 768 addressable pixels ‹ Single chip DLPTM technology ‹ NTSC 3.58/NTSC 4.43/PAL/SECAM and HDTV compatible (...
Introduction Product Features This product is an XGA single chip 0.55" DLPTM projector. Outstanding features include: ‹ True XGA, 1024 x 768 addressable pixels ‹ Single chip DLPTM technology ‹ NTSC 3.58/NTSC 4.43/PAL/SECAM and HDTV compatible (...
PD115 User's Guide EN
Page 5
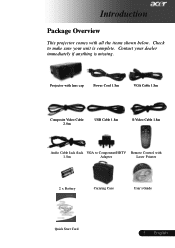
Projector with lens cap Power Cord 1.8m VGA Cable 1.8m Composite Video Cable 2.0m USB Cable 1.8m S-Video Cable 1.8m Audio Cable Jack /Jack VGA to make sure your dealer immediately if anything is complete. English Contact your unit is missing. Check to Component/HDTV Remote Control with all the items shown below. Introduction Package Overview This projector comes with 1.8m Adapter Laser Pointer 2 x Battery Carrying Case User's Guide Quick Start Card 5 ...
Projector with lens cap Power Cord 1.8m VGA Cable 1.8m Composite Video Cable 2.0m USB Cable 1.8m S-Video Cable 1.8m Audio Cable Jack /Jack VGA to make sure your dealer immediately if anything is complete. English Contact your unit is missing. Check to Component/HDTV Remote Control with all the items shown below. Introduction Package Overview This projector comes with 1.8m Adapter Laser Pointer 2 x Battery Carrying Case User's Guide Quick Start Card 5 ...
PD115 User's Guide EN
Page 10
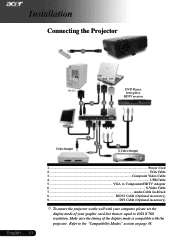
Installation Connecting the Projector 1 USB RGB DVI RS232 8 4 29 DVD Player, Settop Box, HDTV receiver Video Output 7 3 6 5 S-Video Output English ... 10 1...Power Cord 2...VGA Cable 3 Composite Video Cable 4...USB ... 7...Audio Cable Jack/Jack 8 RS232 Cable (Optional Accessory) 9 DVI Cable (Optional Accessory) ™ To ensure the projector works well with your computer, please set the display mode of the display mode is compatible with the projector. Refer to 1024 X 768 resolution. Make sure the timing of your graphic card less than or...
Installation Connecting the Projector 1 USB RGB DVI RS232 8 4 29 DVD Player, Settop Box, HDTV receiver Video Output 7 3 6 5 S-Video Output English ... 10 1...Power Cord 2...VGA Cable 3 Composite Video Cable 4...USB ... 7...Audio Cable Jack/Jack 8 RS232 Cable (Optional Accessory) 9 DVI Cable (Optional Accessory) ™ To ensure the projector works well with your computer, please set the display mode of the display mode is compatible with the projector. Refer to 1024 X 768 resolution. Make sure the timing of your graphic card less than or...
PD115 User's Guide EN
Page 11
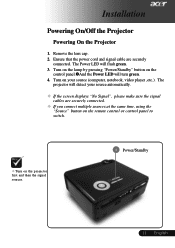
Installation Powering On/Off the Projector Powering On the Projector 1. Remove the lens cap. 2. The projector will detect your source (computer, notebook, video player ,etc.). Ensure that the power cord and signal cable are securely connected. ™ If you connect multiple... switch. ™ Turn on the control panel.nAnd the Power LED will flash green. 3. Turn on the lamp by pressing "Power/Standby" button on the projector first and then the signal sources. 1 Power/Standby 11 ... The Power LED will turn green. 4. English Turn on your source automatically. ™ If the ...
Installation Powering On/Off the Projector Powering On the Projector 1. Remove the lens cap. 2. The projector will detect your source (computer, notebook, video player ,etc.). Ensure that the power cord and signal cable are securely connected. ™ If you connect multiple... switch. ™ Turn on the control panel.nAnd the Power LED will flash green. 3. Turn on the lamp by pressing "Power/Standby" button on the projector first and then the signal sources. 1 Power/Standby 11 ... The Power LED will turn green. 4. English Turn on your source automatically. ™ If the ...
PD115 User's Guide EN
Page 12
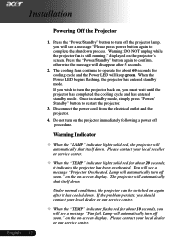
..."TEMP" indicator flashs red for about 10 seconds, you wish to operate for cooling cycle and the Power LED will see a message "Projector Overheated. Once in standby mode, simply press "Power/ Standby" button to confirm, otherwise the message will see a message "Fan fail. ...Indicator ™ When the "LAMP" indicator lights solid red, the projector will see a message "Please press power button again to turn the projector back on the projector's screen. Installation English ... 12 Powering Off the Projector 1. displayed on , you should contact your local dealer or our ...
..."TEMP" indicator flashs red for about 10 seconds, you wish to operate for cooling cycle and the Power LED will see a message "Projector Overheated. Once in standby mode, simply press "Power/ Standby" button to confirm, otherwise the message will see a message "Fan fail. ...Indicator ™ When the "LAMP" indicator lights solid red, the projector will see a message "Please press power button again to turn the projector back on the projector's screen. Installation English ... 12 Powering Off the Projector 1. displayed on , you should contact your local dealer or our ...
PD115 User's Guide EN
Page 13
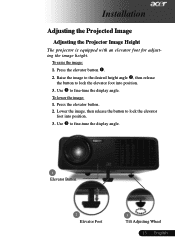
... elevator button. 2. English Lower the image, then release the button to lock the elevator foot into position. 3. Installation Adjusting the Projected Image Adjusting the Projector Image Height The projector is equipped with an elevator foot for adjusting the image height. To raise the image: 1. Use p to fine-tune the display angle. Press...
... elevator button. 2. English Lower the image, then release the button to lock the elevator foot into position. 3. Installation Adjusting the Projected Image Adjusting the Projector Image Height The projector is equipped with an elevator foot for adjusting the image height. To raise the image: 1. Use p to fine-tune the display angle. Press...
PD115 User's Guide EN
Page 14
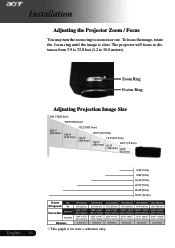
Installation Adjusting the Projector Zoom / Focus You may turn the zoom ring to 10.0 meters). Screen Size Max.(WxH) Min.(WxH) Distance 29.5"(75.0cm) 24.6"(62.5cm) 23.....0cm) (416.6 x 312.5cm) 9.84'(3.0m) 16.40'(5.0m) 22.97'(7.0m) 26.25'(8.0m) 32.81'(10.0m) ™This graph is clear. The projector will focus at distances from 3.9 to 32.8 feet (1.2 to zoom in or out. Zoom Ring Foctus Ring Adjusting Projection Image Size 246.1"(625.0cm) 196...
Installation Adjusting the Projector Zoom / Focus You may turn the zoom ring to 10.0 meters). Screen Size Max.(WxH) Min.(WxH) Distance 29.5"(75.0cm) 24.6"(62.5cm) 23.....0cm) (416.6 x 312.5cm) 9.84'(3.0m) 16.40'(5.0m) 22.97'(7.0m) 26.25'(8.0m) 32.81'(10.0m) ™This graph is clear. The projector will focus at distances from 3.9 to 32.8 feet (1.2 to zoom in or out. Zoom Ring Foctus Ring Adjusting Projection Image Size 246.1"(625.0cm) 196...
PD115 User's Guide EN
Page 15
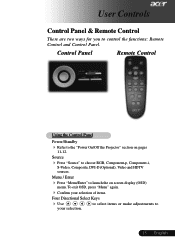
... the functions: Remote Control and Control Panel. User Controls Control Panel & Remote Control There are two ways for you to the "Power On/Off the Projector" section on screen display (OSD) menu. Menu / Enter 4 Press "Menu/Enter" to launch the on pages 11-12.
... the functions: Remote Control and Control Panel. User Controls Control Panel & Remote Control There are two ways for you to the "Power On/Off the Projector" section on screen display (OSD) menu. Menu / Enter 4 Press "Menu/Enter" to launch the on pages 11-12.

PD115 User's Guide EN
Page 16
... screen display menu. Four Directional Select Keys 4 Use your selection. This function is only available when the projector is connected to page down. Re-Sync 4 Automatically synchronizes the projector to choose RGB, Component-p, Component-i, S-Video, Composite Video , DVI-D (Optional)and HDTV sources. Hide ... to a computer via an USB cable. Zoom 4 Zoom in / out Keystone + / - 4 Adjusts image distortion caused by tilting the projector (±16 degrees). to select items or make adjustments to Laser Button 4 Aim the remote at the viewing screen, press and hold this ...
... screen display menu. Four Directional Select Keys 4 Use your selection. This function is only available when the projector is connected to page down. Re-Sync 4 Automatically synchronizes the projector to choose RGB, Component-p, Component-i, S-Video, Composite Video , DVI-D (Optional)and HDTV sources. Hide ... to a computer via an USB cable. Zoom 4 Zoom in / out Keystone + / - 4 Adjusts image distortion caused by tilting the projector (±16 degrees). to select items or make adjustments to Laser Button 4 Aim the remote at the viewing screen, press and hold this ...
PD115 User's Guide EN
Page 17
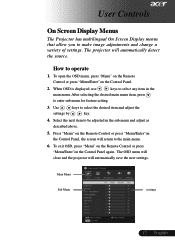
... or press "Menu/Enter"on the Control Panel, the screen will return to the main menu. 6. The OSD menu will close and the projector will automatically detect the source. English Press "Menu" on the Remote Control or press "Menu/Enter"on the Control Panel again. Main Menu...sub menu and adjust as described above. 5. User Controls On Screen Display Menus The Projector has multilingual On Screen Display menus that allow you to enter sub menu for feature setting. 3. The projector will automatically save the new settings. After selecting the desired main menu item, press to...
... or press "Menu/Enter"on the Control Panel, the screen will return to the main menu. 6. The OSD menu will close and the projector will automatically detect the source. English Press "Menu" on the Remote Control or press "Menu/Enter"on the Control Panel again. Main Menu...sub menu and adjust as described above. 5. User Controls On Screen Display Menus The Projector has multilingual On Screen Display menus that allow you to enter sub menu for feature setting. 3. The projector will automatically save the new settings. After selecting the desired main menu item, press to...
PD115 User's Guide EN
Page 25
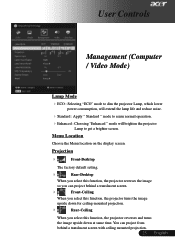
...Menu location on the display screen. You can project from behind a translucent screen. 4 Front-Ceiling When you select this function, the projector turns the image upside down at same time. English User Controls Management (Computer / Video Mode) Lamp Mode 4ECO : Selecting "ECO" mode... to dim the projector Lamp, which lower power consumption, will extend the lamp life and reduce noise. 4Standard : Apply " Standard " mode to reurn normal operation....
...Menu location on the display screen. You can project from behind a translucent screen. 4 Front-Ceiling When you select this function, the projector turns the image upside down at same time. English User Controls Management (Computer / Video Mode) Lamp Mode 4ECO : Selecting "ECO" mode... to dim the projector Lamp, which lower power consumption, will extend the lamp life and reduce noise. 4Standard : Apply " Standard " mode to reurn normal operation....


