
User Manual
Page 6
... 45 minutes prior to fall over, causing injury or damage. • This product is securely installed. It may hurt you. Only use acer ceiling mount kit for inspection. • Do not face the projector lens to break or drop it is capable of the lamp itself. ...is to wait for the fan to turn off , suggest to suitable qualified professional service personnel. • Do not stand the projector on the remote control. • The lamp becomes extremely hot during operation. The temperature inside which becomes hot. • Clean the air filter frequently if have. ...
... 45 minutes prior to fall over, causing injury or damage. • This product is securely installed. It may hurt you. Only use acer ceiling mount kit for inspection. • Do not face the projector lens to break or drop it is capable of the lamp itself. ...is to wait for the fan to turn off , suggest to suitable qualified professional service personnel. • Do not stand the projector on the remote control. • The lamp becomes extremely hot during operation. The temperature inside which becomes hot. • Clean the air filter frequently if have. ...
User Manual
Page 9
... things first viii Usage Notes viii Precautions viii Introduction 1 Product Features 1 Package Overview 2 Projector Overview 3 Projector Outlook 3 Control Panel 5 Remote Control Layout 6 Getting Started 8 Connecting the Projector 8 Turning the Projector On/Off 9 Turning on the Projector 9 Turning the projector ...distance and zoom 14 How to get a preferred image position by adjusting lens shift 16 User Controls 19 Installation menu 19 Acer Empowering Technology 20 Onscreen Display (OSD) Menus 21 Color 22 Image 24 Management 25 Setting 26 Audio...
... things first viii Usage Notes viii Precautions viii Introduction 1 Product Features 1 Package Overview 2 Projector Overview 3 Projector Outlook 3 Control Panel 5 Remote Control Layout 6 Getting Started 8 Connecting the Projector 8 Turning the Projector On/Off 9 Turning on the Projector 9 Turning the projector ...distance and zoom 14 How to get a preferred image position by adjusting lens shift 16 User Controls 19 Installation menu 19 Acer Empowering Technology 20 Onscreen Display (OSD) Menus 21 Color 22 Image 24 Management 25 Setting 26 Audio...

User Manual
Page 11
...8226; DLP® technology • Native 1920 x 1080 1080p resolution 4:3 / 16:9 / L.Box aspect ratio supported • Acer ColorBoost technology delivers nature's true colors for vivid, life-like images • High brightness and contrast ratio • Versatile display ...Acer Empowering Technology utilities (Acer eView, eTimer, ePower Management) for easy adjustment of settings • Equipped with HDMITM connection supporting HDCP • Advanced digital keystone correction optimizes presentations • Multi-language on screen display (OSD) menus • Full-function remote control...
...8226; DLP® technology • Native 1920 x 1080 1080p resolution 4:3 / 16:9 / L.Box aspect ratio supported • Acer ColorBoost technology delivers nature's true colors for vivid, life-like images • High brightness and contrast ratio • Versatile display ...Acer Empowering Technology utilities (Acer eView, eTimer, ePower Management) for easy adjustment of settings • Equipped with HDMITM connection supporting HDCP • Advanced digital keystone correction optimizes presentations • Multi-language on screen display (OSD) menus • Full-function remote control...
User Manual
Page 12
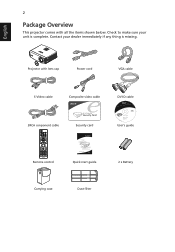
English 2 Package Overview This projector comes with lens cap Power cord VGA cable S-Video cable Composite video cable DVI-D cable 3RCA conponent cable Security card Acer Projector Remote control Quick Start Guide Quick start guide User's guide 2 x Battery Carrying case Dust filter Contact your unit is missing. SOURCE MENU TEMP RESYNC LAMP ZOOM Projector with all the items shown below. Check to make sure your dealer immediately if any thing is complete.
English 2 Package Overview This projector comes with lens cap Power cord VGA cable S-Video cable Composite video cable DVI-D cable 3RCA conponent cable Security card Acer Projector Remote control Quick Start Guide Quick start guide User's guide 2 x Battery Carrying case Dust filter Contact your unit is missing. SOURCE MENU TEMP RESYNC LAMP ZOOM Projector with all the items shown below. Check to make sure your dealer immediately if any thing is complete.

User Manual
Page 13
English 3 Projector Overview Projector Outlook Front / upper side 8 95 3 TEMP SOURCE 4 5 MENU LAMP RESYNC 10 2 1 # Description 1 Lens cap 2 Zoom lever 3 Zoom Lens 4 Focus ring 5 Remote control receivers ZOOM 7 6 # Description 6 Elevator feet 7 Tilt adjusting wheels 8 Control panel 9 Power button 10 Lens shift control rings
English 3 Projector Overview Projector Outlook Front / upper side 8 95 3 TEMP SOURCE 4 5 MENU LAMP RESYNC 10 2 1 # Description 1 Lens cap 2 Zoom lever 3 Zoom Lens 4 Focus ring 5 Remote control receivers ZOOM 7 6 # Description 6 Elevator feet 7 Tilt adjusting wheels 8 Control panel 9 Power button 10 Lens shift control rings

User Manual
Page 15
Unique Acer functions: eView, eTimer, ePower Management. Temp Indicator LED Use to select items or make adjustments to choose RGB, Component, SVideo, Composite, SCART, HDTV and HDMI&#... for distortion caused by tilting the projector. Press "SOURCE" to your selection of items. See the contents in "Turning the Projector On/ Off" section. Remote control receiver. English SOURCE 5 Control Panel 1 LAMP 2 6 TEMP 7 8 3 MENU 9 RESYNC 2 10 # 1 LAMP Function 2 KEYSTONE 3 RESYNC 4 MENU 5 POWER 6 Empowering key 7 TEMP 8 Four directional select keys 9 SOURCE 10 IR Recevier...
Unique Acer functions: eView, eTimer, ePower Management. Temp Indicator LED Use to select items or make adjustments to choose RGB, Component, SVideo, Composite, SCART, HDTV and HDMI&#... for distortion caused by tilting the projector. Press "SOURCE" to your selection of items. See the contents in "Turning the Projector On/ Off" section. Remote control receiver. English SOURCE 5 Control Panel 1 LAMP 2 6 TEMP 7 8 3 MENU 9 RESYNC 2 10 # 1 LAMP Function 2 KEYSTONE 3 RESYNC 4 MENU 5 POWER 6 Empowering key 7 TEMP 8 Four directional select keys 9 SOURCE 10 IR Recevier...
User Manual
Page 16
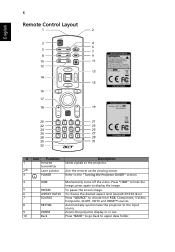
Aim the remote at the viewing screen. Press "HIDE" to hide the image, press again to display the image. 5 FREEZE To pause the screen image. 6 ASPECT RATIO To ... Press "BACK" to go back to the "Turning the Projector On/Off" section. 4 HIDE Momentarily turns off the video. Refer to upper data folder. English 6 Remote Control Layout 1 2 3 4 6 5 7 8 9 10 11 12 13 14 15 16 17 18 19 20 21 22 23 24 25 26 27 28 29 30 31 32 # Icon...
Aim the remote at the viewing screen. Press "HIDE" to hide the image, press again to display the image. 5 FREEZE To pause the screen image. 6 ASPECT RATIO To ... Press "BACK" to go back to the "Turning the Projector On/Off" section. 4 HIDE Momentarily turns off the video. Refer to upper data folder. English 6 Remote Control Layout 1 2 3 4 6 5 7 8 9 10 11 12 13 14 15 16 17 18 19 20 21 22 23 24 25 26 27 28 29 30 31 32 # Icon...
User Manual
Page 19
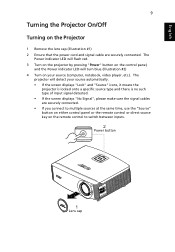
... on the projector by pressing "Power" button on the control panel, and the Power indicator LED will detect your source (computer, notebook, video player ,etc.). The projector will turn blue.(Illustration #2) 4 Turn on the remote control to multiple sources at the same time, use the ..."Source" button on either control panel or the remote control or direct source key on your source automatically. • If the screen displays "Lock"...
... on the projector by pressing "Power" button on the control panel, and the Power indicator LED will detect your source (computer, notebook, video player ,etc.). The projector will turn blue.(Illustration #2) 4 Turn on the remote control to multiple sources at the same time, use the ..."Source" button on either control panel or the remote control or direct source key on your source automatically. • If the screen displays "Lock"...

User Manual
Page 31
... will close and the projector will return to select any item in the submenu and adjust as described above. • Press "MENU" on the remote control or control panel again. After selecting the desired main menu item, press submenu for feature setting. Using the OSD menus • To open the OSD menu..., press "MENU" on the remote control or control panel. • When the OSD is displayed, use the keys to the main menu. • To exit OSD, press "MENU" on the...
... will close and the projector will return to select any item in the submenu and adjust as described above. • Press "MENU" on the remote control or control panel again. After selecting the desired main menu item, press submenu for feature setting. Using the OSD menus • To open the OSD menu..., press "MENU" on the remote control or control panel. • When the OSD is displayed, use the keys to the main menu. • To exit OSD, press "MENU" on the...

User Manual
Page 36
... settings. • Select "On" to 4:3. If the security function is enabled, your must enter the "Administrator Password" first before you press "Source" button on the remote control for details. • If "Off" is selected, then the user can turn off ", the projector will "lock" the current source channel unless you use this...
... settings. • Select "On" to 4:3. If the security function is enabled, your must enter the "Administrator Password" first before you press "Source" button on the remote control for details. • If "Off" is selected, then the user can turn off ", the projector will "lock" the current source channel unless you use this...
User Manual
Page 37
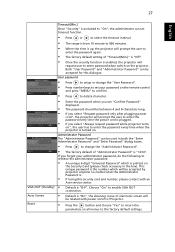
... Password". • The factory default of electronic screen will be related with an Acer service center. • Default is "Off". Administrator Password The "Administrator Password" can be used in the box). If you forgot your password on the remote control and press "MENU" to confirm. • Press to delete character. • Enter the...
... Password". • The factory default of electronic screen will be related with an Acer service center. • Default is "Off". Administrator Password The "Administrator Password" can be used in the box). If you forgot your password on the remote control and press "MENU" to confirm. • Press to delete character. • Enter the...
User Manual
Page 40
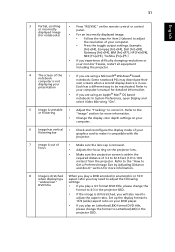
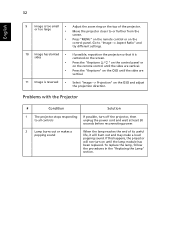
...on. 2 Partial, scrolling or incorrectly displayed image(For PC • Press "RESYNC" on the remote control or control panel. • For an incorrectly displayed image: • Open "My Computer," open the "Control (Windows 2000/ XP/Vista/Windows 7)) Panel," and then double-click the "Display" icon. &#...broken. • Check if the projector lamp has been securely installed. 30 Appendices English Troubleshooting If you experience a problem with your Acer projector, refer to UXGA (1600 x 1200). If the problem persists, please contact your local reseller or service center. Next, ...
...on. 2 Partial, scrolling or incorrectly displayed image(For PC • Press "RESYNC" on the remote control or control panel. • For an incorrectly displayed image: • Open "My Computer," open the "Control (Windows 2000/ XP/Vista/Windows 7)) Panel," and then double-click the "Display" icon. &#...broken. • Check if the projector lamp has been securely installed. 30 Appendices English Troubleshooting If you experience a problem with your Acer projector, refer to UXGA (1600 x 1200). If the problem persists, please contact your local reseller or service center. Next, ...
User Manual
Page 41
... Mirroring "On". 5 Image is within the required distance of focus • Make sure the lens cap is removed. • Adjusts the focus ring on the remote control or control or incorrectly panel. Refer to the "How to Get a Preferred Image Size by Adjusting Distance and Zoom" section for item 2 (above) to adjust the...
... Mirroring "On". 5 Image is within the required distance of focus • Make sure the lens cap is removed. • Adjusts the focus ring on the remote control or control or incorrectly panel. Refer to the "How to Get a Preferred Image Size by Adjusting Distance and Zoom" section for item 2 (above) to adjust the...
User Manual
Page 42
... zoom ring on the top of its useful life, it is sides centered on the screen. • Press the "Keystone / " on the control panel or on the remote control until the sides are vertical. • Press the "Keystone" on the OSD until the lamp module has been replaced. or too large •... the projector so that it will not turn off the projector, then to or further from the screen. • Press "MENU" on the remote control or on the control panel. To replace the lamp, follow the procedures in the "Replacing the Lamp" section. If this happens, the projector will burn out and ...
... zoom ring on the top of its useful life, it is sides centered on the screen. • Press the "Keystone / " on the control panel or on the remote control until the sides are vertical. • Press the "Keystone" on the OSD until the lamp module has been replaced. or too large •... the projector so that it will not turn off the projector, then to or further from the screen. • Press "MENU" on the remote control or on the control panel. To replace the lamp, follow the procedures in the "Replacing the Lamp" section. If this happens, the projector will burn out and ...
User Manual
Page 50
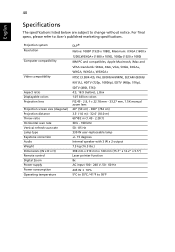
... colors Projection lens Projection screen size (diagonal) Projection distance Throw ratio Horizontal scan rate Vertical refresh scan rate Lamp type Keystone correction Audio Weight Dimensions (W x D x H) Remote control Digital Zoom Power supply Power consumption Operating temperature DLP® Native: 1080P (1920 x 1080), Maximum: UXGA (1600 x 1200),WSXGA+ (1680 x 1050), 1080p (1920 x 1080... / 41ºF to change without notice. 40 English Specifications The specifications listed below are subject to 95ºF For final specs, please refer to Acer's published marketing specifications.
... colors Projection lens Projection screen size (diagonal) Projection distance Throw ratio Horizontal scan rate Vertical refresh scan rate Lamp type Keystone correction Audio Weight Dimensions (W x D x H) Remote control Digital Zoom Power supply Power consumption Operating temperature DLP® Native: 1080P (1920 x 1080), Maximum: UXGA (1600 x 1200),WSXGA+ (1680 x 1050), 1080p (1920 x 1080... / 41ºF to change without notice. 40 English Specifications The specifications listed below are subject to 95ºF For final specs, please refer to Acer's published marketing specifications.

User Manual
Page 51
...3.5 mm audio jack output x1 • SPDIF RCA jack output x1 • 3 RCA Component video x1 • 3.5 mm jack input x1: for wired IR remote control • RJ45 x1 • DC Jack x1 • AC power cord x1 • VGA cable x1 • DVI-D cable x1 • S-Video cable... x1 • Composite video cable x1 • Component cable (3 RCA) x1 • Remote control x1 • Battery x 2 (for remote control) • User's Guide (CD-ROM) x1 • Quick start guide x1 • Security card x1 • Carrying case x1 • Dust filter...
...3.5 mm audio jack output x1 • SPDIF RCA jack output x1 • 3 RCA Component video x1 • 3.5 mm jack input x1: for wired IR remote control • RJ45 x1 • DC Jack x1 • AC power cord x1 • VGA cable x1 • DVI-D cable x1 • S-Video cable... x1 • Composite video cable x1 • Component cable (3 RCA) x1 • Remote control x1 • Battery x 2 (for remote control) • User's Guide (CD-ROM) x1 • Quick start guide x1 • Security card x1 • Carrying case x1 • Dust filter...


