User Manual (3D)
Page 4
... infra-red transmitter so that it has maximum coverage. Note: You may need to set up the 3D environment. 3 Follow the onscreen instructions to purchase additional software. 4 Ensure you have installed the drivers, you have the NVIDIA 3D glasses and IR-transmitter. Plug the USB cable in to view 3D content. English 4 Important: Only NVIDIA graphics cards are supported. 2 Download and install...
... infra-red transmitter so that it has maximum coverage. Note: You may need to set up the 3D environment. 3 Follow the onscreen instructions to purchase additional software. 4 Ensure you have installed the drivers, you have the NVIDIA 3D glasses and IR-transmitter. Plug the USB cable in to view 3D content. English 4 Important: Only NVIDIA graphics cards are supported. 2 Download and install...
User Manual (3D)
Page 7
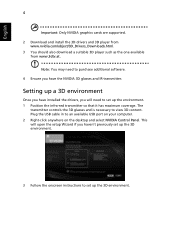
... download software and use an NVIDIA 3DTV Play ready projector with DLP glasses, refer to view content at . Note: Please refer to your graphics card's documentation. 2 Download and install the latest drivers for your graphics card vendor's website for the latest driver version. 3 You should also download a suitable 3D player such as the one available from www.3dtv.at fullscreen resolution in...
... download software and use an NVIDIA 3DTV Play ready projector with DLP glasses, refer to view content at . Note: Please refer to your graphics card's documentation. 2 Download and install the latest drivers for your graphics card vendor's website for the latest driver version. 3 You should also download a suitable 3D player such as the one available from www.3dtv.at fullscreen resolution in...

User Manual
Page 5
... work by the operating instructions, since improper adjustment of small children. Your device and its enhancements may expose you to qualified service personnel when: • the power cord or plug is damaged, cut or frayed • liquid was spilled into the projector's lens when the lamp is on the projector first and then signal sources • Do not place the product in performance, indicating...
... work by the operating instructions, since improper adjustment of small children. Your device and its enhancements may expose you to qualified service personnel when: • the power cord or plug is damaged, cut or frayed • liquid was spilled into the projector's lens when the lamp is on the projector first and then signal sources • Do not place the product in performance, indicating...
User Manual
Page 6
... use acer ceiling mount kit for mounting the projector and ensure it . It may rise and cause damage when the filter/ventilation slots clogged with any electronic components unless the projector is securely installed. The best way is showing warning message. • When changing the lamp, please allow unit to cool down, and follow all changing instructions. • Reset the "Lamp Hour Reset" function from the Onscreen display "Management" menu after replacing...
... use acer ceiling mount kit for mounting the projector and ensure it . It may rise and cause damage when the filter/ventilation slots clogged with any electronic components unless the projector is securely installed. The best way is showing warning message. • When changing the lamp, please allow unit to cool down, and follow all changing instructions. • Reset the "Lamp Hour Reset" function from the Onscreen display "Management" menu after replacing...
User Manual
Page 8
... things first Usage Notes Do: • Turn off the product before cleaning. • Use a soft cloth moistened with mild detergent to clean the display housing. • Disconnect the power plug from the Onscreen display "Management" menu after replacing the lamp module. • When switching the projector off, please ensure the projector completes its life, it shows warning messages. • Reset the "Lamp Hour Reset" function from AC outlet if the...
... things first Usage Notes Do: • Turn off the product before cleaning. • Use a soft cloth moistened with mild detergent to clean the display housing. • Disconnect the power plug from the Onscreen display "Management" menu after replacing the lamp module. • When switching the projector off, please ensure the projector completes its life, it shows warning messages. • Reset the "Lamp Hour Reset" function from AC outlet if the...

User Manual
Page 11
..., 1080p) supported • Lower power consumption and economy (ECO) mode extend lamp life • Acer EcoProjeciton Technology delivers Intelligent power management approach and physical efficiency improvement • Equipped with HDMI™ & MHL connection supporting HDCP • Support HDMI CEC function • Advanced digital keystone and 4-corner correction optimizes presentations • Smart detection delivers quick, intelligent source detection • Multi-language onscreen display (OSD) menus • Manual focus projection lens zooms up...
..., 1080p) supported • Lower power consumption and economy (ECO) mode extend lamp life • Acer EcoProjeciton Technology delivers Intelligent power management approach and physical efficiency improvement • Equipped with HDMI™ & MHL connection supporting HDCP • Support HDMI CEC function • Advanced digital keystone and 4-corner correction optimizes presentations • Smart detection delivers quick, intelligent source detection • Multi-language onscreen display (OSD) menus • Manual focus projection lens zooms up...

User Manual
Page 16
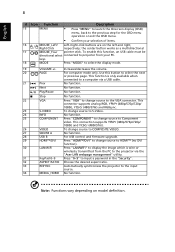
... the input source. Note: Functions vary depending on model definition. Adjusts the image to compensate for the OSD menu operation or exit the OSD menu. 3 SOURCE 4 LAMP 5 TEMP 6 RESYNC 7 MODE 8 Keystone • Confirm your selection. 2 MENU • Press "MENU" to launch the Onscreen display (OSD) menu, back to the previous step for distortion caused by tilting the projector. 9 POWER • Power Indicator LED • See the contents in "Turning the Projector On/Off" section. Lamp Indicator LED Temp Indicator LED...
... the input source. Note: Functions vary depending on model definition. Adjusts the image to compensate for the OSD menu operation or exit the OSD menu. 3 SOURCE 4 LAMP 5 TEMP 6 RESYNC 7 MODE 8 Keystone • Confirm your selection. 2 MENU • Press "MENU" to launch the Onscreen display (OSD) menu, back to the previous step for distortion caused by tilting the projector. 9 POWER • Power Indicator LED • See the contents in "Turning the Projector On/Off" section. Lamp Indicator LED Temp Indicator LED...

User Manual
Page 17
.... 7 SOURCE Changes the active source. 8 3D Press "3D" to select 3D models. 9 ZOOM Zooms the projector display in Japanese market. 12 Enter No function. 13 Four directional Use up, down, left, right buttons to select items or make select keys adjustments to your selection. 14 KEYSTONE Adjusts the image to go back one menu step. 11 Laser button Aim the remote at the viewing screen. Please see "Turning the Projector On...
.... 7 SOURCE Changes the active source. 8 3D Press "3D" to select 3D models. 9 ZOOM Zooms the projector display in Japanese market. 12 Enter No function. 13 Four directional Use up, down, left, right buttons to select items or make select keys adjustments to your selection. 14 KEYSTONE Adjusts the image to go back one menu step. 11 Laser button Aim the remote at the viewing screen. Please see "Turning the Projector On...
User Manual
Page 18
... "VGA" to change source to Component video. To enable this button to select the display mode. 19 VOLUME +/- This connection supports YPbPr (480p/576p/720p/ 1080i) and YCbCr (480i/576i). 26 VIDEO To change source to COMPOSITE VIDEO. 27 SD/USB A No function. 28 USB B For USB control and firmware upgrade. 29 HDMI™/DVI Press "HDMI™/DVI" to change source to HDMI™ (no DVI function). 30 LAN/WiFi Press "LAN/WiFi" to display the image...
... "VGA" to change source to Component video. To enable this button to select the display mode. 19 VOLUME +/- This connection supports YPbPr (480p/576p/720p/ 1080i) and YCbCr (480i/576i). 26 VIDEO To change source to COMPOSITE VIDEO. 27 SD/USB A No function. 28 USB B For USB control and firmware upgrade. 29 HDMI™/DVI Press "HDMI™/DVI" to change source to HDMI™ (no DVI function). 30 LAN/WiFi Press "LAN/WiFi" to display the image...

User Manual
Page 22
... the projector is locked onto a specific source type and there is no such type of input signal detected. • If the screen displays "No Signal", please make sure the signal cables are securely connected. • If you connect to multiple sources at the same time, use the "Source" button on either control panel or the remote control or direct source key on the Projector 1 Ensure that the power cord and signal cable are securely connected. Power button RESYNC LAMP MENU SOURCE MODE TEMP LENS SHIFT FOCUS ZOOM The Power indicator LED will flash red. 2 Turn...
... the projector is locked onto a specific source type and there is no such type of input signal detected. • If the screen displays "No Signal", please make sure the signal cables are securely connected. • If you connect to multiple sources at the same time, use the "Source" button on either control panel or the remote control or direct source key on the Projector 1 Ensure that the power cord and signal cable are securely connected. Power button RESYNC LAMP MENU SOURCE MODE TEMP LENS SHIFT FOCUS ZOOM The Power indicator LED will flash red. 2 Turn...

User Manual
Page 23
... cord. The projector will blink. Lamp will automatically turn off soon." Warning indicators: • "Projector Overheated. This onscreen message indicates that the projector has overheated. Attention! Press the power button again. 2 The LED power indicator will turn RED and blink rapidly after the projector is now safe to turn the projector immediately back on model definition. Lamp will automatically turn solid red to indicate standby mode. 5 It is turned off, and the fan(s) will stop blinking and turn off , the projector will automatically shut down, and the LED temp...
... cord. The projector will blink. Lamp will automatically turn off soon." Warning indicators: • "Projector Overheated. This onscreen message indicates that the projector has overheated. Attention! Press the power button again. 2 The LED power indicator will turn RED and blink rapidly after the projector is now safe to turn the projector immediately back on model definition. Lamp will automatically turn solid red to indicate standby mode. 5 It is turned off, and the fan(s) will stop blinking and turn off , the projector will automatically shut down, and the LED temp...

User Manual
Page 33
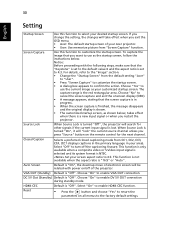
...;Wireless HD dongle settings •Language settings •DC 5V Out (Standby) Use the OSD only when the message "No signal input" is displayed on the remote control to launch the OSD for projector installation and maintenance. The menu options include settings and adjustments for screen size and distance, focus, keystone correction and more . 1 Turn on the projector by pressing "Power" button on the control pad. 2 Press the "MENU" button on the screen. English 23 User Controls Installation menu The installation menu provides an onscreen display...
...;Wireless HD dongle settings •Language settings •DC 5V Out (Standby) Use the OSD only when the message "No signal input" is displayed on the remote control to launch the OSD for projector installation and maintenance. The menu options include settings and adjustments for screen size and distance, focus, keystone correction and more . 1 Turn on the projector by pressing "Power" button on the control pad. 2 Press the "MENU" button on the screen. English 23 User Controls Installation menu The installation menu provides an onscreen display...

User Manual
Page 37
B Gain Adjusts the blue gain for color temperature optimization. G Bias Adjusts the green bias for color temperature optimization. Mode Use this function to increase the amount of red in the image. Note: "Saturation" and "Tint" functions are not supported under computer or HDMI mode. R Bias Adjusts the red bias for color temperature optimization. Effects the representation of dark scenery. G Gain Adjusts the green gain for color temperature optimization. With greater gamma value, dark scenery...
B Gain Adjusts the blue gain for color temperature optimization. G Bias Adjusts the green bias for color temperature optimization. Mode Use this function to increase the amount of red in the image. Note: "Saturation" and "Tint" functions are not supported under computer or HDMI mode. R Bias Adjusts the red bias for color temperature optimization. Effects the representation of dark scenery. G Gain Adjusts the green gain for color temperature optimization. With greater gamma value, dark scenery...

User Manual
Page 38
...; Auto: Keep the image with ceiling mounted projection. • Front-Ceiling: When you wish to fit full screen by 1.333 times. Press four directional selection keys to adjust image distortion vertically and makes a squarer image. Keystone 4 Corner Correction • Front-Desktop: The factory default setting. • Rear-Desktop: When you select this function, the projector inverts the image for ceiling-mounted projection. Sharpness The function is adjusted. Keystone is unavailable when H./ V. Press "MODE" repeatedly to adjust image...
...; Auto: Keep the image with ceiling mounted projection. • Front-Ceiling: When you wish to fit full screen by 1.333 times. Press four directional selection keys to adjust image distortion vertically and makes a squarer image. Keystone 4 Corner Correction • Front-Desktop: The factory default setting. • Rear-Desktop: When you select this function, the projector inverts the image for ceiling-mounted projection. Sharpness The function is adjusted. Keystone is unavailable when H./ V. Press "MODE" repeatedly to adjust image...
User Manual
Page 40
... red rectangular area. VGA OUT (Standby) Default is a new input signal or when you press "Source" button on all menus to use as your screen aspect ratio to turn off of your desired startup screen. To capture the image that you exit the OSD menu. • Acer: The default startup screen of the projector. Choose "No" to 4:3. Reset • Press the button and choose "Yes" to return the parameters on the remote control...
... red rectangular area. VGA OUT (Standby) Default is a new input signal or when you press "Source" button on all menus to use as your screen aspect ratio to turn off of your desired startup screen. To capture the image that you exit the OSD menu. • Acer: The default startup screen of the projector. Choose "No" to 4:3. Reset • Press the button and choose "Yes" to return the parameters on the remote control...
User Manual
Page 41
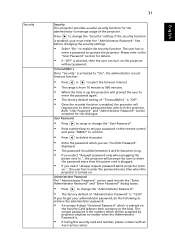
... enter the password again. • The factory default setting of "Administrator Password" is turned on the projector . If you select "Always request password while projector turns on.", the user has to delete character. • Enter the password when you see "Confirm Password" displayed. • The password should be accepted by projector anytime no matter what the Administrator Password is enabled, your password on the remote control and press "MENU" to confirm...
... enter the password again. • The factory default setting of "Administrator Password" is turned on the projector . If you select "Always request password while projector turns on.", the user has to delete character. • Enter the password when you see "Confirm Password" displayed. • The password should be accepted by projector anytime no matter what the Administrator Password is enabled, your password on the remote control and press "MENU" to confirm...

User Manual
Page 42
... power consumption, extend the lamp life and reduce noise. LAN Default is "Off". Displays the lamp's elapsed operating time (in . Press the button and choose "Yes" to turn on model definition. English 32 LAN Lock to user startup screen Default Lock User Startup Screen is "Off". Management ECO Mode High Altitude Turn Off Mode Auto Shutdown AC Power On Lamp Hour Elapse Lamp Reminding Lamp Hour Reset Choose "On" to On. If users want to do LAN control under standby mode, change VGA OUT (Standby) from Off to dim the projector lamp...
... power consumption, extend the lamp life and reduce noise. LAN Default is "Off". Displays the lamp's elapsed operating time (in . Press the button and choose "Yes" to turn on model definition. English 32 LAN Lock to user startup screen Default Lock User Startup Screen is "Off". Management ECO Mode High Altitude Turn Off Mode Auto Shutdown AC Power On Lamp Hour Elapse Lamp Reminding Lamp Hour Reset Choose "On" to On. If users want to do LAN control under standby mode, change VGA OUT (Standby) from Off to dim the projector lamp...

User Manual
Page 49
... the following troubleshooting guide. If the problem still appears, change the monitor display you are bent or broken. • Check if the projector lamp has been securely installed. or incorrectly displayed image • For an incorrectly displayed image: (for PC (Windows • Open "My Computer", open the "Control 2000/XP/Vista/ Panel", and then double-click the "Display" Windows 7/ Windows 8)) icon. • Select the "Settings" tab. • Verify that the resolution setting is lower...
... the following troubleshooting guide. If the problem still appears, change the monitor display you are bent or broken. • Check if the projector lamp has been securely installed. or incorrectly displayed image • For an incorrectly displayed image: (for PC (Windows • Open "My Computer", open the "Control 2000/XP/Vista/ Panel", and then double-click the "Display" Windows 7/ Windows 8)) icon. • Select the "Settings" tab. • Verify that the resolution setting is lower...

User Manual
Page 50
...; Mac® OS based notebook: In System Preferences, open Display and select Video Mirroring "On". 5 Image is unstable • Adjust the "Tracking" to correct it compatible with the projector. 7 Image is out of focus • Make sure the lens cap is removed. • Adjusts the focus ring on the projector lens. • Make sure the projection screen is in use. Each has a different way to flickering bar the "Image" section...
...; Mac® OS based notebook: In System Preferences, open Display and select Video Mirroring "On". 5 Image is unstable • Adjust the "Tracking" to correct it compatible with the projector. 7 Image is out of focus • Make sure the lens cap is removed. • Adjusts the focus ring on the projector lens. • Make sure the projection screen is in use. Each has a different way to flickering bar the "Image" section...

User Manual
Page 52
... to all controls unplug the power cord and wait at least 30 seconds before it may make a loud popping sound. the lamp is not working. • Projector Overheated - If this happens, the projector will burn out and may be allowed to replace it soon. the projector has exceeded its useful life, it . English 42 OSD Messages # Condition 1 Message Message Reminder • Fan Fail - Please check the following message. Prepare...
... to all controls unplug the power cord and wait at least 30 seconds before it may make a loud popping sound. the lamp is not working. • Projector Overheated - If this happens, the projector will burn out and may be allowed to replace it soon. the projector has exceeded its useful life, it . English 42 OSD Messages # Condition 1 Message Message Reminder • Fan Fail - Please check the following message. Prepare...


