
X243W User's Guide EN
Page 1
TABLE OF CONTENTS Special notes on LCD monitors 1 Information for your safety and comfort 2 Unpacking 5 Screen position adjustment 6 Connecting the power cord 7 Safety precaution 7 Cleaning your monitor 7 Power saving 8 DDC 8 Connector Pin Assignment 9 Standard Timing Table 11 Installation 12 User controls 13 How to adjust a setting 14 Troubleshooting 19
TABLE OF CONTENTS Special notes on LCD monitors 1 Information for your safety and comfort 2 Unpacking 5 Screen position adjustment 6 Connecting the power cord 7 Safety precaution 7 Cleaning your monitor 7 Power saving 8 DDC 8 Connector Pin Assignment 9 Standard Timing Table 11 Installation 12 User controls 13 How to adjust a setting 14 Troubleshooting 19
X243W User's Guide EN
Page 2
....99% or more. In this case, the screen is displayed for hours. EN-1 Turn off the Power Switch for hours. X243W SPECIAL NOTES ON LCD MONITORS The following symptoms are normal with LCD...
....99% or more. In this case, the screen is displayed for hours. EN-1 Turn off the Power Switch for hours. X243W SPECIAL NOTES ON LCD MONITORS The following symptoms are normal with LCD...
X243W User's Guide EN
Page 4
... height to qualified service personnel. The following symptoms may lead to carpal tunnel syndrome, tendonitis, tenosynovitis or other factors greatly increase the risk of the monitor, using a footrest, or raising your company's health and safety department. Long work periods, bad posture, poor work by a qualified technician to restore the product to...
... height to qualified service personnel. The following symptoms may lead to carpal tunnel syndrome, tendonitis, tenosynovitis or other factors greatly increase the risk of the monitor, using a footrest, or raising your company's health and safety department. Long work periods, bad posture, poor work by a qualified technician to restore the product to...
X243W User's Guide EN
Page 5
... as a piece of cardboard extended from the display's top front edge • Avoid adjusting your display to keep your eyes from the monitor and focusing on a distant point. • Blink frequently to an awkward viewing angle. • Avoid looking at bright light sources, .... • Eliminate glare and reflections by: • placing your display in recycling, please visit the following websites: Worldwide: http://global.acer.com/about/sustainability.htm EN-4 We do some stretching exercises. • Breathe fresh air as often as possible. • Exercise regularly ...
... as a piece of cardboard extended from the display's top front edge • Avoid adjusting your display to keep your eyes from the monitor and focusing on a distant point. • Blink frequently to an awkward viewing angle. • Avoid looking at bright light sources, .... • Eliminate glare and reflections by: • placing your display in recycling, please visit the following websites: Worldwide: http://global.acer.com/about/sustainability.htm EN-4 We do some stretching exercises. • Breathe fresh air as often as possible. • Exercise regularly ...
X243W User's Guide EN
Page 6
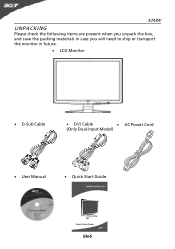
X243W UNPACKING Please check the following items are present when you unpack the box, and save the packing materials in case you will need to ship or transport the monitor in future. · LCD Monitor · D-Sub Cable · DVI Cable · AC Power Cord (Only Dual-Input Model) · User Manual · Quick Start Guide EN-5
X243W UNPACKING Please check the following items are present when you unpack the box, and save the packing materials in case you will need to ship or transport the monitor in future. · LCD Monitor · D-Sub Cable · DVI Cable · AC Power Cord (Only Dual-Input Model) · User Manual · Quick Start Guide EN-5
X243W User's Guide EN
Page 7
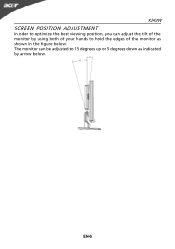
The monitor can adjust the tilt of the monitor by arrow below . X243W SCREEN POSITION ADJUSTMENT In oder to optimize the best viewing position, you can be adjusted to hold the edges of the monitor as indicated by using both of your hands to 15 degrees up or 5 degrees down as shown in the figure below . EN-6
The monitor can adjust the tilt of the monitor by arrow below . X243W SCREEN POSITION ADJUSTMENT In oder to optimize the best viewing position, you can be adjusted to hold the edges of the monitor as indicated by using both of your hands to 15 degrees up or 5 degrees down as shown in the figure below . EN-6
X243W User's Guide EN
Page 8
... the country in either 100/120V AC or 220/240 V AC voltage area. No user-adjustment is fragile. Place the monitor just below guidelines when cleaning the monitor. · Always unplug the monitor before cleaning. · Use a soft cloth to wipe the screen and cabinet front and sides. light or other heavy object..., or dust. · Do not cover the ventilation slots or openings of H05VV-F cord and plug rated 10 A, 250 V. SAFETY PRECAUTION · Avoid placing the monitor, or any other light sources may reflect on the power cord to avoid damage to the cable. · Do not expose the...
... the country in either 100/120V AC or 220/240 V AC voltage area. No user-adjustment is fragile. Place the monitor just below guidelines when cleaning the monitor. · Always unplug the monitor before cleaning. · Use a soft cloth to wipe the screen and cabinet front and sides. light or other heavy object..., or dust. · Do not cover the ventilation slots or openings of H05VV-F cord and plug rated 10 A, 250 V. SAFETY PRECAUTION · Avoid placing the monitor, or any other light sources may reflect on the power cord to avoid damage to the cable. · Do not expose the...
X243W User's Guide EN
Page 9
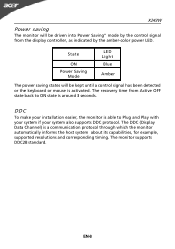
... DDC2B standard. The DDC (Display Data Channel) is a communication protocol through which the monitor automatically informs the host system about its capabilities, for example, supported resolutions and corresponding timing. State ON Power Saving Mode LED Light Blue Amber The ... display controller, as indicated by the control signal from Active OFF state back to Plug and Play with your system if your installation easier, the monitor is able to ON state is around 3 seconds. DDC To make your system also supports DDC protocol. EN-8 X243W Power saving The...
... DDC2B standard. The DDC (Display Data Channel) is a communication protocol through which the monitor automatically informs the host system about its capabilities, for example, supported resolutions and corresponding timing. State ON Power Saving Mode LED Light Blue Amber The ... display controller, as indicated by the control signal from Active OFF state back to Plug and Play with your system if your installation easier, the monitor is able to ON state is around 3 seconds. DDC To make your system also supports DDC protocol. EN-8 X243W Power saving The...
X243W User's Guide EN
Page 10
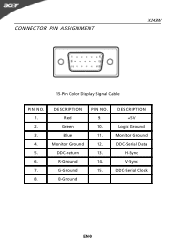
CONNECTOR PIN ASSIGNMENT X243W 15-Pin Color Display Signal Cable PIN NO. 1. 2. 3. 4. 5. 6. 7. 8. DESCRIPTION +5V Logic Ground Monitor Ground DDC-Serial Data H-Sync V-Sync DDC-Serial Clock EN-9 DESCRIPTION Red Green Blue Monitor Ground DDC-return R-Ground G-Ground B-Ground PIN NO. 9. 10. 11. 12. 13. 14. 15.
CONNECTOR PIN ASSIGNMENT X243W 15-Pin Color Display Signal Cable PIN NO. 1. 2. 3. 4. 5. 6. 7. 8. DESCRIPTION +5V Logic Ground Monitor Ground DDC-Serial Data H-Sync V-Sync DDC-Serial Clock EN-9 DESCRIPTION Red Green Blue Monitor Ground DDC-return R-Ground G-Ground B-Ground PIN NO. 9. 10. 11. 12. 13. 14. 15.
X243W User's Guide EN
Page 12
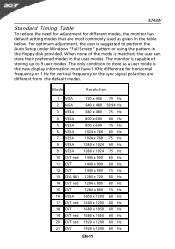
... below. When none of storing up to perform the Auto Setup under Windows "Full Screen" pattern or using the pattern in the user modes. The monitor is suggested to 9 user modes. For optimum adjustment, the user is capable of the mode is the new display information must have 1 KHz difference for...
... below. When none of storing up to perform the Auto Setup under Windows "Full Screen" pattern or using the pattern in the user modes. The monitor is suggested to 9 user modes. For optimum adjustment, the user is capable of the mode is the new display information must have 1 KHz difference for...
X243W User's Guide EN
Page 13
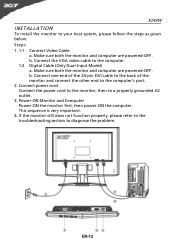
...computer's port. 2. This sequence is very important. 4. Connect one end of the 24-pin DVI cable to the back of the monitor and connect the other end to the computer. 1-2 Digital Cable (Only Dual-Input Model) a. Connect power cord Connect the power cord to ...refer to the troubleshooting section to a properly grounded AC outlet. 3. b. Make sure both the monitor and computer are powered-OFF. b. Make sure both the monitor and computer are powered-OFF. X243W INSTALLATION To install the monitor to your host system, please follow the steps as given below: Steps 1. 1-1 Connect Video...
...computer's port. 2. This sequence is very important. 4. Connect one end of the 24-pin DVI cable to the back of the monitor and connect the other end to the computer. 1-2 Digital Cable (Only Dual-Input Model) a. Connect power cord Connect the power cord to ...refer to the troubleshooting section to a properly grounded AC outlet. 3. b. Make sure both the monitor and computer are powered-OFF. b. Make sure both the monitor and computer are powered-OFF. X243W INSTALLATION To install the monitor to your host system, please follow the steps as given below: Steps 1. 1-1 Connect Video...
X243W User's Guide EN
Page 20
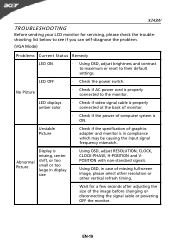
... problem. (VGA Mode) Problems Current Status Remedy LED ON · Using OSD, adjust brightness and contrast to maximum or reset to the monitor. Unstable Picture · Check if the specification of computer system is in compliance which may be causing the input signal frequency mismatch. No ... · Using OSD, adjust RESOLUTION, CLOCK, missing, center CLOCK-PHASE, H-POSITION and V- EN-19 X243W TROUBLESHOOTING Before sending your LCD monitor for a few seconds after adjusting the size of the image before changing or disconnecting the signal cable or powering OFF the...
... problem. (VGA Mode) Problems Current Status Remedy LED ON · Using OSD, adjust brightness and contrast to maximum or reset to the monitor. Unstable Picture · Check if the specification of computer system is in compliance which may be causing the input signal frequency mismatch. No ... · Using OSD, adjust RESOLUTION, CLOCK, missing, center CLOCK-PHASE, H-POSITION and V- EN-19 X243W TROUBLESHOOTING Before sending your LCD monitor for a few seconds after adjusting the size of the image before changing or disconnecting the signal cable or powering OFF the...
X243W User's Guide EN
Page 21
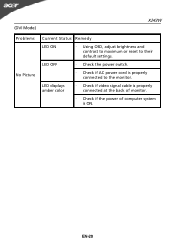
LED OFF · Check the power switch. · Check if AC power cord is ON. EN-20 LED displays amber color · Check if video signal cable is properly connected at the back of monitor. · Check if the power of computer system is properly connected to their default settings. (DVI Mode) X243W Problems No Picture Current Status Remedy LED ON · Using OSD, adjust brightness and contrast to maximum or reset to the monitor.
LED OFF · Check the power switch. · Check if AC power cord is ON. EN-20 LED displays amber color · Check if video signal cable is properly connected at the back of monitor. · Check if the power of computer system is properly connected to their default settings. (DVI Mode) X243W Problems No Picture Current Status Remedy LED ON · Using OSD, adjust brightness and contrast to maximum or reset to the monitor.


