
X243W User's Guide EN
Page 1
TABLE OF CONTENTS Special notes on LCD monitors 1 Information for your safety and comfort 2 Unpacking 5 Screen position adjustment 6 Connecting the power cord 7 Safety precaution 7 Cleaning your monitor 7 Power saving 8 DDC 8 Connector Pin Assignment 9 Standard Timing Table 11 Installation 12 User controls 13 How to adjust a setting 14 Troubleshooting 19
TABLE OF CONTENTS Special notes on LCD monitors 1 Information for your safety and comfort 2 Unpacking 5 Screen position adjustment 6 Connecting the power cord 7 Safety precaution 7 Cleaning your monitor 7 Power saving 8 DDC 8 Connector Pin Assignment 9 Standard Timing Table 11 Installation 12 User controls 13 How to adjust a setting 14 Troubleshooting 19
X243W User's Guide EN
Page 2
... nature of the fluorescent light, the screen may flicker during initial use . · The LCD screen has effective pixels of the previous screen may remain after switching the image, when the same image is recovered slowly by changing the image or turning off the Power Switch and then turn it on again to make sure the flicker disappears. · You may find slightly uneven brightness on the screen depending on the...
... nature of the fluorescent light, the screen may flicker during initial use . · The LCD screen has effective pixels of the previous screen may remain after switching the image, when the same image is recovered slowly by changing the image or turning off the Power Switch and then turn it on again to make sure the flicker disappears. · You may find slightly uneven brightness on the screen depending on the...
X243W User's Guide EN
Page 3
... these instructions carefully. The openings should never be placed near you need to disconnect power to the equipment, be blocked by unplugging all warnings and instructions marked on a bed, sofa, rug or other similar surface. Keep this product through cabinet slots as they may touch dangerous voltage points or short-out parts that the power outlet you plug the power cord into...
... these instructions carefully. The openings should never be placed near you need to disconnect power to the equipment, be blocked by unplugging all warnings and instructions marked on a bed, sofa, rug or other similar surface. Keep this product through cabinet slots as they may touch dangerous voltage points or short-out parts that the power outlet you plug the power cord into...
X243W User's Guide EN
Page 4
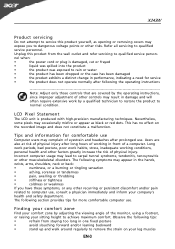
... product yourself, as black or red dots. nel when: • the power cord or plug is produced with high-precision manufacturing techniques. LCD Pixel Statement The LCD unit is damaged, ...servicing Do not attempt to service this product from staying too long in one fixed posture • avoid slouching forward and/or leaning backward • stand up and walk around regularly to remove the strain on the recorded image and does not constitute a malfunction. Long work periods, bad posture, poor work by the operating instructions, since improper adjustment of the monitor, using...
... product yourself, as black or red dots. nel when: • the power cord or plug is produced with high-precision manufacturing techniques. LCD Pixel Statement The LCD unit is damaged, ...servicing Do not attempt to service this product from staying too long in one fixed posture • avoid slouching forward and/or leaning backward • stand up and walk around regularly to remove the strain on the recorded image and does not constitute a malfunction. Long work periods, bad posture, poor work by the operating instructions, since improper adjustment of the monitor, using...
X243W User's Guide EN
Page 5
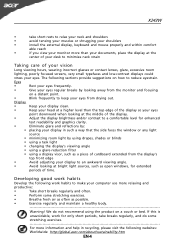
... work for extended periods of your vision Long viewing hours, wearing incorrect glasses or contact lenses, glare, excessive room lighting, poorly focused screens, very small typefaces and low-contrast displays could stress your eyes. Display • Keep your display clean. • Keep your head at a higher level than your documents, place the display at the middle of the display. • Adjust the display brightness and/or contrast...
... work for extended periods of your vision Long viewing hours, wearing incorrect glasses or contact lenses, glare, excessive room lighting, poorly focused screens, very small typefaces and low-contrast displays could stress your eyes. Display • Keep your display clean. • Keep your head at a higher level than your documents, place the display at the middle of the display. • Adjust the display brightness and/or contrast...
X243W User's Guide EN
Page 6
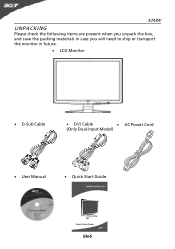
X243W UNPACKING Please check the following items are present when you unpack the box, and save the packing materials in case you will need to ship or transport the monitor in future. · LCD Monitor · D-Sub Cable · DVI Cable · AC Power Cord (Only Dual-Input Model) · User Manual · Quick Start Guide EN-5
X243W UNPACKING Please check the following items are present when you unpack the box, and save the packing materials in case you will need to ship or transport the monitor in future. · LCD Monitor · D-Sub Cable · DVI Cable · AC Power Cord (Only Dual-Input Model) · User Manual · Quick Start Guide EN-5
X243W User's Guide EN
Page 7
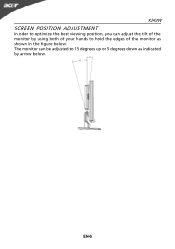
X243W SCREEN POSITION ADJUSTMENT In oder to hold the edges of the monitor by arrow below . EN-6 The monitor can be adjusted to 15 degrees up or 5 degrees down as indicated by using both of your hands to optimize the best viewing position, you can adjust the tilt of the monitor as shown in the figure below .
X243W SCREEN POSITION ADJUSTMENT In oder to hold the edges of the monitor by arrow below . EN-6 The monitor can be adjusted to 15 degrees up or 5 degrees down as indicated by using both of your hands to optimize the best viewing position, you can adjust the tilt of the monitor as shown in the figure below .
X243W User's Guide EN
Page 8
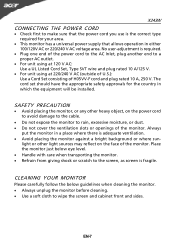
... plug rated 10 A/125 V. · For unit using at 220/240 V AC (outside of U.S.): Use a Cord Set consisting of the monitor. The cord set should have the appropriate safety approvals for your area. · This monitor has a universal power supply that allows operation in which the equipment will be installed. Place the monitor just below guidelines when cleaning the monitor. · Always unplug the monitor before cleaning. · Use...
... plug rated 10 A/125 V. · For unit using at 220/240 V AC (outside of U.S.): Use a Cord Set consisting of the monitor. The cord set should have the appropriate safety approvals for your area. · This monitor has a universal power supply that allows operation in which the equipment will be installed. Place the monitor just below guidelines when cleaning the monitor. · Always unplug the monitor before cleaning. · Use...
X243W User's Guide EN
Page 9
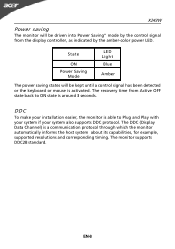
... monitor will be driven into Power Saving" mode by the control signal from Active OFF state back to Plug and Play with your system if your system also supports DDC protocol. The DDC (Display Data Channel) is a communication protocol through which the monitor automatically informs the host system about its capabilities, for example, supported resolutions and corresponding timing. State ON Power Saving Mode LED Light Blue Amber The power saving...
... monitor will be driven into Power Saving" mode by the control signal from Active OFF state back to Plug and Play with your system if your system also supports DDC protocol. The DDC (Display Data Channel) is a communication protocol through which the monitor automatically informs the host system about its capabilities, for example, supported resolutions and corresponding timing. State ON Power Saving Mode LED Light Blue Amber The power saving...
X243W User's Guide EN
Page 10
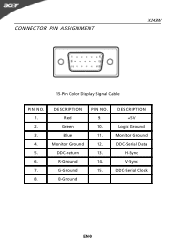
DESCRIPTION +5V Logic Ground Monitor Ground DDC-Serial Data H-Sync V-Sync DDC-Serial Clock EN-9 DESCRIPTION Red Green Blue Monitor Ground DDC-return R-Ground G-Ground B-Ground PIN NO. 9. 10. 11. 12. 13. 14. 15. CONNECTOR PIN ASSIGNMENT X243W 15-Pin Color Display Signal Cable PIN NO. 1. 2. 3. 4. 5. 6. 7. 8.
DESCRIPTION +5V Logic Ground Monitor Ground DDC-Serial Data H-Sync V-Sync DDC-Serial Clock EN-9 DESCRIPTION Red Green Blue Monitor Ground DDC-return R-Ground G-Ground B-Ground PIN NO. 9. 10. 11. 12. 13. 14. 15. CONNECTOR PIN ASSIGNMENT X243W 15-Pin Color Display Signal Cable PIN NO. 1. 2. 3. 4. 5. 6. 7. 8.

X243W User's Guide EN
Page 11
X243W 24-Pin Color Display Signal Cable PIN Meaning PIN Meaning 1. NC 16. TMDS Clock+ 12. EN-10 NC 2. Hot Plug Detect 5. NC 9. NC 10. NC 17. TMDS Data0+ 7. TMDS Data1- 21. TMDS Data2- 13. TMDS Data 2/4 Shield 15. TMDS Data0- 6. TMDS Data 0/5 Shield 8. DDC Clock 18. DDC TMDS Clock- TMDS Data1+ 22. NC 24. TMDS Data2+ 14. +5V Power 3. TMDS Clock Shield 11. TMDS Data 1/3 Shield 23. DDC Data 19. NC 20. GND(return for +5V hsync.vsync) 4.
X243W 24-Pin Color Display Signal Cable PIN Meaning PIN Meaning 1. NC 16. TMDS Clock+ 12. EN-10 NC 2. Hot Plug Detect 5. NC 9. NC 10. NC 17. TMDS Data0+ 7. TMDS Data1- 21. TMDS Data2- 13. TMDS Data 2/4 Shield 15. TMDS Data0- 6. TMDS Data 0/5 Shield 8. DDC Clock 18. DDC TMDS Clock- TMDS Data1+ 22. NC 24. TMDS Data2+ 14. +5V Power 3. TMDS Clock Shield 11. TMDS Data 1/3 Shield 23. DDC Data 19. NC 20. GND(return for +5V hsync.vsync) 4.
X243W User's Guide EN
Page 12
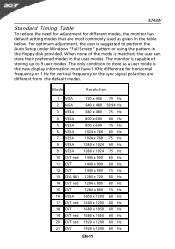
... suggested to perform the Auto Setup under Windows "Full Screen" pattern or using the pattern in the floppy disk provided. For optimum adjustment, the user is capable of the mode is the new display information must have 1 KHz difference for horizontal frequency or 1 Hz for different modes, the monitor has default setting modes that are different from the default modes. When none of storing up to store as...
... suggested to perform the Auto Setup under Windows "Full Screen" pattern or using the pattern in the floppy disk provided. For optimum adjustment, the user is capable of the mode is the new display information must have 1 KHz difference for horizontal frequency or 1 Hz for different modes, the monitor has default setting modes that are different from the default modes. When none of storing up to store as...
X243W User's Guide EN
Page 13
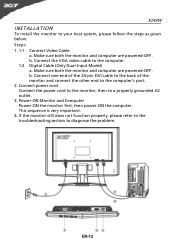
... INSTALLATION To install the monitor to the computer. 1-2 Digital Cable (Only Dual-Input Model) a. b. Connect one end of the 24-pin DVI cable to the back of the monitor and connect the other end to diagnose the problem. If the monitor still does not function properly, please refer to the troubleshooting section to the computer's port. 2. Power-ON Monitor and Computer Power-ON the monitor first, then power-ON the computer. Make...
... INSTALLATION To install the monitor to the computer. 1-2 Digital Cable (Only Dual-Input Model) a. b. Connect one end of the 24-pin DVI cable to the back of the monitor and connect the other end to diagnose the problem. If the monitor still does not function properly, please refer to the troubleshooting section to the computer's port. 2. Power-ON Monitor and Computer Power-ON the monitor first, then power-ON the computer. Make...
X243W User's Guide EN
Page 14
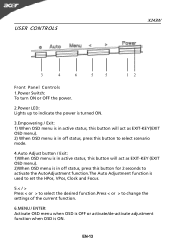
EN-13 USER CONTROLS X243W 3 4 6 5 5 12 Front Panel Controls 1.Power Switch: To turn ON or OFF the power. 2.Power LED: Lights up to indicate the power is turned ON. 3.Empowering / Exit: 1) When OSD menu is in active status, this button will act as EXIT-KEY(EXIT OSD menu). 2) When OSD menu is in off status, press this button to select scenario mode. 4.Auto Adjust button / Exit: 1)When OSD menu is in active status, this button will act as EXIT...
EN-13 USER CONTROLS X243W 3 4 6 5 5 12 Front Panel Controls 1.Power Switch: To turn ON or OFF the power. 2.Power LED: Lights up to indicate the power is turned ON. 3.Empowering / Exit: 1) When OSD menu is in active status, this button will act as EXIT-KEY(EXIT OSD menu). 2) When OSD menu is in off status, press this button to select scenario mode. 4.Auto Adjust button / Exit: 1)When OSD menu is in active status, this button will act as EXIT...
X243W User's Guide EN
Page 15
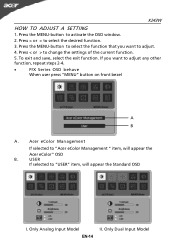
... the desired function. 3. Press < or > to adjust any other function, repeat steps 2-4. · P/X Series OSD behave When user press "MENU" button on front bezel A B A. USER If selected to activate the OSD window. 2. Only Analog Input Model II. Press the MENU-button to "USER" item, will appear the Acer eColor" OSD B. Only Dual Input Model EN-14 Acer eColor Management If selected to change the settings of the current function. 5. Press < or > to...
... the desired function. 3. Press < or > to adjust any other function, repeat steps 2-4. · P/X Series OSD behave When user press "MENU" button on front bezel A B A. USER If selected to activate the OSD window. 2. Only Analog Input Model II. Press the MENU-button to "USER" item, will appear the Acer eColor" OSD B. Only Dual Input Model EN-14 Acer eColor Management If selected to change the settings of the current function. 5. Press < or > to...
X243W User's Guide EN
Page 16
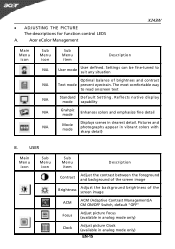
... any situation Optimal balance of the screen image ACM ACM (Adaptive Contrast Management)A CM ON/OFF Switch, default "OFF" Focus Adjust picture Focus (available in analog mode only) Clock Adjust picture Clock (available in clearest detail. · ADJUSTING THE PICTURE The descriptions for function control LEDS A. USER Main Menu icon Sub Menu icon Sub Menu item Description Contrast Adjust the contrast between the foreground and background of the screen image Brightness Adjust the background brightness of brightness and contrast Text mode prevent...
... any situation Optimal balance of the screen image ACM ACM (Adaptive Contrast Management)A CM ON/OFF Switch, default "OFF" Focus Adjust picture Focus (available in analog mode only) Clock Adjust picture Clock (available in clearest detail. · ADJUSTING THE PICTURE The descriptions for function control LEDS A. USER Main Menu icon Sub Menu icon Sub Menu item Description Contrast Adjust the contrast between the foreground and background of the screen image Brightness Adjust the background brightness of brightness and contrast Text mode prevent...
X243W User's Guide EN
Page 17
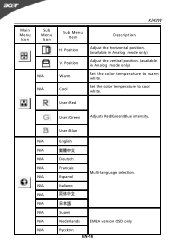
User /Blue N/A English N/A N/A Deutsch N/A Francais N/A Espanol Multi-language selection. N/A Italiano N/A N/A N/A Suomi N/A Nederlands EMEA version OSD only N/A Pyccknn EN-16 Main Menu Icon Sub Menu Icon N/A N/A Sub Menu Item H. Position V. Set the color temperature to warm white. User /Red User /Green Adjusts Red/Green/Blue intensity. Position Warm Cool X243W Description Adjust the horizontal position. (available in Analog mode only) Adjust the vertical position. (available in Analog mode only) Set the color temperature to cool white.
User /Blue N/A English N/A N/A Deutsch N/A Francais N/A Espanol Multi-language selection. N/A Italiano N/A N/A N/A Suomi N/A Nederlands EMEA version OSD only N/A Pyccknn EN-16 Main Menu Icon Sub Menu Icon N/A N/A Sub Menu Item H. Position V. Set the color temperature to warm white. User /Red User /Green Adjusts Red/Green/Blue intensity. Position Warm Cool X243W Description Adjust the horizontal position. (available in Analog mode only) Adjust the vertical position. (available in Analog mode only) Set the color temperature to cool white.
X243W User's Guide EN
Page 18
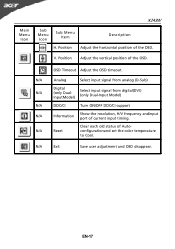
... Reset Clear each old status of the OSD. Position Adjust the vertical position of Autoconfigurationand set the color temperature to Cool. OSD Timeout Adjust the OSD timeout. N/A Exit Save user adjustment and OSD disappear. N/A Analog Select input signal from analog (D-Sub) N/A Digital (only DualInputModel) Select input signal from digital(DVI) (only Dual-Input Model) N/A DDC/CI Turn ON/OFF DDC/CI support N/A Information Show the resolution, H/V frequency andinput port of the OSD. EN-17 Position Description Adjust the horizontal position of current input timing...
... Reset Clear each old status of the OSD. Position Adjust the vertical position of Autoconfigurationand set the color temperature to Cool. OSD Timeout Adjust the OSD timeout. N/A Exit Save user adjustment and OSD disappear. N/A Analog Select input signal from analog (D-Sub) N/A Digital (only DualInputModel) Select input signal from digital(DVI) (only Dual-Input Model) N/A DDC/CI Turn ON/OFF DDC/CI support N/A Information Show the resolution, H/V frequency andinput port of the OSD. EN-17 Position Description Adjust the horizontal position of current input timing...
X243W User's Guide EN
Page 20
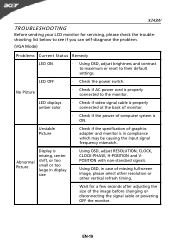
... problem. (VGA Mode) Problems Current Status Remedy LED ON · Using OSD, adjust brightness and contrast to maximum or reset to the monitor. EN-19 LED displays amber color · Check if video signal cable is properly connected at the back of monitor. · Check if the power of graphics adapter and monitor is properly connected to their default settings. LED OFF · Check the power switch. Unstable Picture · Check if the specification of computer system is · Using OSD, adjust RESOLUTION, CLOCK, missing, center CLOCK-PHASE, H-POSITION and V- Using...
... problem. (VGA Mode) Problems Current Status Remedy LED ON · Using OSD, adjust brightness and contrast to maximum or reset to the monitor. EN-19 LED displays amber color · Check if video signal cable is properly connected at the back of monitor. · Check if the power of graphics adapter and monitor is properly connected to their default settings. LED OFF · Check the power switch. Unstable Picture · Check if the specification of computer system is · Using OSD, adjust RESOLUTION, CLOCK, missing, center CLOCK-PHASE, H-POSITION and V- Using...
X243W User's Guide EN
Page 21
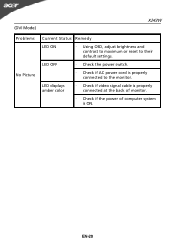
LED displays amber color · Check if video signal cable is properly connected at the back of monitor. · Check if the power of computer system is properly connected to their default settings. EN-20 LED OFF · Check the power switch. · Check if AC power cord is ON. (DVI Mode) X243W Problems No Picture Current Status Remedy LED ON · Using OSD, adjust brightness and contrast to maximum or reset to the monitor.
LED displays amber color · Check if video signal cable is properly connected at the back of monitor. · Check if the power of computer system is properly connected to their default settings. EN-20 LED OFF · Check the power switch. · Check if AC power cord is ON. (DVI Mode) X243W Problems No Picture Current Status Remedy LED ON · Using OSD, adjust brightness and contrast to maximum or reset to the monitor.

