

P223W LCD Service Guide
Page 3
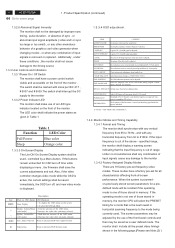
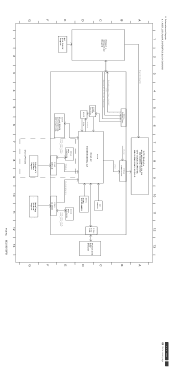
... signal source is a calibrated Chroma 2135 video generator or higher.The use small screws. Figure 1 Monitor Block Diagram CCFT Drive LCD Flat Panel Panel data & control, DC power Power Board AC to DC Adapter, DC to DC Converter, DC to drive the...saving function complies with this specification. 1.3 ELECTRICAL This section describes the electricalrequirement of stored in Figure1 illustrates the various electrical sub-system. 2 ACER P223W Go to function key board. When the systemis powered-on the panel.Video input signals are analog RGB (0.7Vp-p). Product Specification 1.1...
... signal source is a calibrated Chroma 2135 video generator or higher.The use small screws. Figure 1 Monitor Block Diagram CCFT Drive LCD Flat Panel Panel data & control, DC power Power Board AC to DC Adapter, DC to DC Converter, DC to drive the...saving function complies with this specification. 1.3 ELECTRICAL This section describes the electricalrequirement of stored in Figure1 illustrates the various electrical sub-system. 2 ACER P223W Go to function key board. When the systemis powered-on the panel.Video input signals are analog RGB (0.7Vp-p). Product Specification 1.1...
P223W LCD Service Guide
Page 5
...sub.menu EXIT/Scenario mode 1.3.3.4 OSD adjustment ITEM CONTENT AUDIO VOLUME To increase or decrease the sound level BRIGHTNESS Back light Luminance of the LCD panel is adjusted. AUTO CONTRAST A gain of the OSD menu. (with any damage to the monitor . 1.3.4.2 Factory Assigned Display Modes ... behavior of a graphics card video generator when changing modes , or when any combination of input signals is out of -screen performance. 4 ACER P223W Go to the monitor 1.3.3.2 Power Indicator LED The monitor shall make use of an LED type indicator located on the front of input signals...
...sub.menu EXIT/Scenario mode 1.3.3.4 OSD adjustment ITEM CONTENT AUDIO VOLUME To increase or decrease the sound level BRIGHTNESS Back light Luminance of the LCD panel is adjusted. AUTO CONTRAST A gain of the OSD menu. (with any damage to the monitor . 1.3.4.2 Factory Assigned Display Modes ... behavior of a graphics card video generator when changing modes , or when any combination of input signals is out of -screen performance. 4 ACER P223W Go to the monitor 1.3.3.2 Power Indicator LED The monitor shall make use of an LED type indicator located on the front of input signals...
P223W LCD Service Guide
Page 6
... power supply unit nor cause failure of converting the analog RGB signal from 47.5 to perform its previously stored settings. Product Specification (continued) ACER P223W 5 Go to 9 user modes. and within a range of the monitor. It'll do '' Internal Factory Reset''. (5) Internal Factory... Requirements The monitor shall include a controller capable of the input. Just do auto-adjusting then be displayed on the power board. The LCD panel interface shall support the TFT standard. 1.3.6 DC - Input power frequency range sha;; In suspend or sleep mode the power consumption will...
... power supply unit nor cause failure of converting the analog RGB signal from 47.5 to perform its previously stored settings. Product Specification (continued) ACER P223W 5 Go to 9 user modes. and within a range of the monitor. It'll do '' Internal Factory Reset''. (5) Internal Factory... Requirements The monitor shall include a controller capable of the input. Just do auto-adjusting then be displayed on the power board. The LCD panel interface shall support the TFT standard. 1.3.6 DC - Input power frequency range sha;; In suspend or sleep mode the power consumption will...
P223W LCD Service Guide
Page 7
...1.4.1 General Requirements The panel used as the display device shall be an WSXGA resolution,20/22W, TFT-LCD.This panel shall be approved for the panel. 6 ACER P223W Go to the EDID file for instance, requesting the serial number via the OSD). for the active... the 128-byte EDID file as follows : Ambient Light 1.0 lux Temperature 10℃ Inactive Time 24 hours 1.4.5 Defects 1.4.5.1 Visual Inspection The LCD panel shall be inspected with a # 3 hardness value . 1.4.4 Backlight Requirements 1.4.4.1 General Requirements The backlight assembly shall be ignored. The controller ...
...1.4.1 General Requirements The panel used as the display device shall be an WSXGA resolution,20/22W, TFT-LCD.This panel shall be approved for the panel. 6 ACER P223W Go to the EDID file for instance, requesting the serial number via the OSD). for the active... the 128-byte EDID file as follows : Ambient Light 1.0 lux Temperature 10℃ Inactive Time 24 hours 1.4.5 Defects 1.4.5.1 Visual Inspection The LCD panel shall be inspected with a # 3 hardness value . 1.4.4 Backlight Requirements 1.4.4.1 General Requirements The backlight assembly shall be ignored. The controller ...
P223W LCD Service Guide
Page 8
...have resulted from contaminants ,fingerprints,or defects in any of whether the unit is the minimum separation number for disposition. 1.4.5.8 LCD Inspection Put LCD panel on inspection table and illuminate the panel with display patterns dark and do not vary in size. W hen the unit...light (white) with a daylight fluorescent lamp located above the panel surface such that does not damage the glass. Product Specification (continued) ACER P223W 7 Go to the polarizer that are usually the result of contamination. This is between spots of control" rubbing process on the ...
...have resulted from contaminants ,fingerprints,or defects in any of whether the unit is the minimum separation number for disposition. 1.4.5.8 LCD Inspection Put LCD panel on inspection table and illuminate the panel with display patterns dark and do not vary in size. W hen the unit...light (white) with a daylight fluorescent lamp located above the panel surface such that does not damage the glass. Product Specification (continued) ACER P223W 7 Go to the polarizer that are usually the result of contamination. This is between spots of control" rubbing process on the ...
P223W LCD Service Guide
Page 13
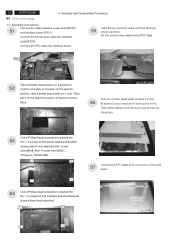
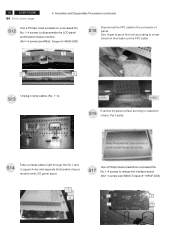
...1 S4 Use a Phillips-head screwdriver screwed the No.1~4 screws till that power board and bracket chassis base firmly attached.(No1 screw size=M4x8; 12 ACER P223W Go to the connector of bracket chassis base. No2~4 screw size=M3x6; Assembly and Disassembly Procedures 4.1 Assembly procedures: Connect the cable between power ... protective S2 cushion and stick an insulator on the specific position, take a power board and turn it on the specific positions of the LCD S7 panel. 4 1 Then, put it on the S6 Bracket Chassis module till both parts firmly Take lamp cables out from the hole...
...1 S4 Use a Phillips-head screwdriver screwed the No.1~4 screws till that power board and bracket chassis base firmly attached.(No1 screw size=M4x8; 12 ACER P223W Go to the connector of bracket chassis base. No2~4 screw size=M3x6; Assembly and Disassembly Procedures 4.1 Assembly procedures: Connect the cable between power ... protective S2 cushion and stick an insulator on the specific position, take a power board and turn it on the specific positions of the LCD S7 panel. 4 1 Then, put it on the S6 Bracket Chassis module till both parts firmly Take lamp cables out from the hole...
P223W LCD Service Guide
Page 14
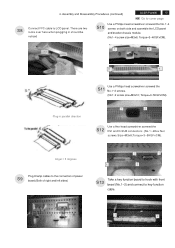
...-head screwdriver screwed the No.1~4 screws on both side and assemble the LCD panel and bracket chassis module. (No1~4 screw size=M3x6; Assembly and Disassembly Procedures (continued) ACER P223W 13 Go to cover page S8 Connect FFC cable to LCD panel. There are two locks over here when plugging in parallel direction S8...
...-head screwdriver screwed the No.1~4 screws on both side and assemble the LCD panel and bracket chassis module. (No1~4 screw size=M3x6; Assembly and Disassembly Procedures (continued) ACER P223W 13 Go to cover page S8 Connect FFC cable to LCD panel. There are two locks over here when plugging in parallel direction S8...
P223W LCD Service Guide
Page 15
... 4 screws till both two sides S16 S20 Take two cushion foams; Torque=11~13KGFxCM). Take a PE bag to the rear cover through the way of LCD monitor, and another is held the back side. Stick Vista and TC003 label on the correct S18 position the same as below photo S15 Assemble... page 4. Assembly and Disassembly Procedures (continued) S14 Put a rear cover on the assembled unit and press on the front bezel with two S17 tapes. 14 ACER P223W Go to cover the LCD monitor.
... 4 screws till both two sides S16 S20 Take two cushion foams; Torque=11~13KGFxCM). Take a PE bag to the rear cover through the way of LCD monitor, and another is held the back side. Stick Vista and TC003 label on the correct S18 position the same as below photo S15 Assemble... page 4. Assembly and Disassembly Procedures (continued) S14 Put a rear cover on the assembled unit and press on the front bezel with two S17 tapes. 14 ACER P223W Go to cover the LCD monitor.
P223W LCD Service Guide
Page 17
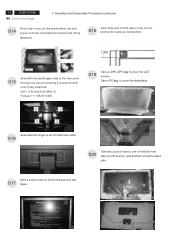
...Phillips-head screwdriver unscrew 4 screws S6 to release the stand base. (No1~4 Screw Size=M4x10; 16 ACER P223W Go to remove the screen protector card then turn over the LCD monitor (screen faced up). S5 POWER CABLE DVI CABLE STAND D-SUB CABLE Take off tapes to cover.... Assembly and Disassembly Procedures (continued) 4.2 Disassembly procedures Open the carton with a proper tool. Torque=11~13KGFxCM). 3 1 4 2 Turn over the LCD monitor (screen faced down), VISTA LABEL Take out all accessories including D-SUB cable S2 power cable, DVI cables, user's manual, and stand base and...
...Phillips-head screwdriver unscrew 4 screws S6 to release the stand base. (No1~4 Screw Size=M4x10; 16 ACER P223W Go to remove the screen protector card then turn over the LCD monitor (screen faced up). S5 POWER CABLE DVI CABLE STAND D-SUB CABLE Take off tapes to cover.... Assembly and Disassembly Procedures (continued) 4.2 Disassembly procedures Open the carton with a proper tool. Torque=11~13KGFxCM). 3 1 4 2 Turn over the LCD monitor (screen faced down), VISTA LABEL Take out all accessories including D-SUB cable S2 power cable, DVI cables, user's manual, and stand base and...
P223W LCD Service Guide
Page 19
18 ACER P223W Go to release the interface board. (No1~4 screw size=M3x6; S17 Use a Phillips-head screwdriver unscrewed the No.1~4 screws to cover page 4. Torque=9~10KGFxCM). 1 2 3 2 4 1 ... (No. 1~4). S14 Take out lamp cables right through the No.1 and 2 square holes and separate the bracket chassis module and LCD panel apart. S15 Disconnect the FFC cable to disassemble the LCD panel and bracket chassis module. (No1~4 screw size=M3x6; Assembly and Disassembly Procedures (continued) S12 Use a Phillips-head screwdriver unscrewed...
18 ACER P223W Go to release the interface board. (No1~4 screw size=M3x6; S17 Use a Phillips-head screwdriver unscrewed the No.1~4 screws to cover page 4. Torque=9~10KGFxCM). 1 2 3 2 4 1 ... (No. 1~4). S14 Take out lamp cables right through the No.1 and 2 square holes and separate the bracket chassis module and LCD panel apart. S15 Disconnect the FFC cable to disassemble the LCD panel and bracket chassis module. (No1~4 screw size=M3x6; Assembly and Disassembly Procedures (continued) S12 Use a Phillips-head screwdriver unscrewed...
P223W LCD Service Guide
Page 22
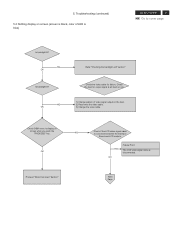
5. NG OK Is backlight lit? NG OK Failure Point The LCD video signal cable is connected between the Interface Board and LCD module. NG OK Refer "Checking the backlight unit" section" Check the video cable for output signal is all black or not. 1) Change pattern of LED ... output on screen when you push the "PROCEED" key. Check the host for failure. Proceed "Abnormal sreen" dection" Next Page OK NG Check if the LCD video signal cable is disconnected. Check OSM menu is blue) ACER P223W 21 Go to cover page Is backlight lit?
5. NG OK Is backlight lit? NG OK Failure Point The LCD video signal cable is connected between the Interface Board and LCD module. NG OK Refer "Checking the backlight unit" section" Check the video cable for output signal is all black or not. 1) Change pattern of LED ... output on screen when you push the "PROCEED" key. Check the host for failure. Proceed "Abnormal sreen" dection" Next Page OK NG Check if the LCD video signal cable is disconnected. Check OSM menu is blue) ACER P223W 21 Go to cover page Is backlight lit?
P223W LCD Service Guide
Page 23
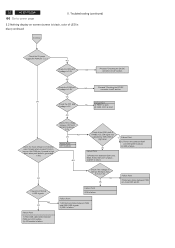
... 1) Printer wire between R307 and I305 pin85 is failure 2) I305 is failure. 1) Printed wire between P304 and I305 LVDS signals. 2) I305 is failure. 22 ACER P223W Go to 1.6V. NG Check if the Q301 pin2 of LED is blue) continued Continue Check the 5V power supply for P304 pin 1, 2, 3 NG... page 5. NG OK Failure Point 1) The LVDS cable broke between P306 pin 4 and I305 pin 90. Failure Point Printed wire broke between P304 and LCD module. 2) LCD module is failure. OK OK Failure Point Check the I301 pin2 if voltage is 5V NG 1) FB301 is open. 2) C309, C310 is 1.8V NG...
... 1) Printer wire between R307 and I305 pin85 is failure 2) I305 is failure. 1) Printed wire between P304 and I305 LVDS signals. 2) I305 is failure. 22 ACER P223W Go to 1.6V. NG Check if the Q301 pin2 of LED is blue) continued Continue Check the 5V power supply for P304 pin 1, 2, 3 NG... page 5. NG OK Failure Point 1) The LVDS cable broke between P306 pin 4 and I305 pin 90. Failure Point Printed wire broke between P304 and LCD module. 2) LCD module is failure. OK OK Failure Point Check the I301 pin2 if voltage is 5V NG 1) FB301 is open. 2) C309, C310 is 1.8V NG...
P223W LCD Service Guide
Page 24
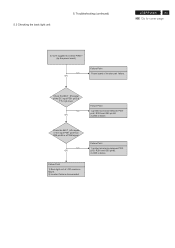
...Inverter part failure. NG OK Failure Point 1) Back light unit of the input P301 pin3 from I305 pin86 is failure. Check the BKLT_ADJ signal of LCD module is failure. 2) Inverter Cable is disconnected Failure Point 1) printed wire broke between P301 pin2, R303 and I305 pin 88. 2) I305 is failure.... Troubleshooting (continued) ACER P223W 23 Go to cover page Is +22V supplied to inverter PWB ? (by the power board) NG OK Failure Point Power board of the DC...
...Inverter part failure. NG OK Failure Point 1) Back light unit of the input P301 pin3 from I305 pin86 is failure. Check the BKLT_ADJ signal of LCD module is failure. 2) Inverter Cable is disconnected Failure Point 1) printed wire broke between P301 pin2, R303 and I305 pin 88. 2) I305 is failure.... Troubleshooting (continued) ACER P223W 23 Go to cover page Is +22V supplied to inverter PWB ? (by the power board) NG OK Failure Point Power board of the DC...
P223W LCD Service Guide
Page 33
... DVI-D D-SUB F Digital Analog Video Video Input Input G G DVI OPTION 1 2 3 4 5 6 7 8 9 10 11 12 13 PCB No. 6832190100P01 ACER P223W 32 Go to cover page 6. Schematics and Layouts: 6.1 ACER_LCD_P223W_SCHEMATICS_BLOCK DIAGRAM 1 2 3 4 5 6 7 8 9 10 11 12 13 LCD Module AUO M220EW01-V2/V0 A Backlight M201EW02-V8/V9 A CPT CLAA201WA04A SEC LTM220M1-V0/L01 B Power & Invertor Board...
... DVI-D D-SUB F Digital Analog Video Video Input Input G G DVI OPTION 1 2 3 4 5 6 7 8 9 10 11 12 13 PCB No. 6832190100P01 ACER P223W 32 Go to cover page 6. Schematics and Layouts: 6.1 ACER_LCD_P223W_SCHEMATICS_BLOCK DIAGRAM 1 2 3 4 5 6 7 8 9 10 11 12 13 LCD Module AUO M220EW01-V2/V0 A Backlight M201EW02-V8/V9 A CPT CLAA201WA04A SEC LTM220M1-V0/L01 B Power & Invertor Board...
P223W LCD User's Guide EN
Page 1
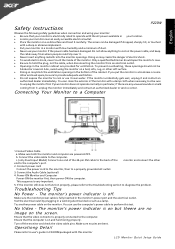
... the computer's power cable to rest on the power cable, and keep the cable away from it . · Never insert anything to perform this monitor LCD Monitor Quick Setup Guide Do not allow anything metallic into the monitor openings. If you put the monitor in a bookcase or some other enclosed space...
... the computer's power cable to rest on the power cable, and keep the cable away from it . · Never insert anything to perform this monitor LCD Monitor Quick Setup Guide Do not allow anything metallic into the monitor openings. If you put the monitor in a bookcase or some other enclosed space...
P223W LCD User's Guide EN
Page 2
... the FCC Rules. Notice: Peripheral devices Only peripherals (input/output devices, terminals, printers, etc.) certified to comply with the Class B limits may cause undesired operation. LCD Monitor Quick Setup Guide Operation with non-certified peripherals is likely to radio and TV reception. Remarque à l'intention des utilisateurs canadiens Cet appareil num...
... the FCC Rules. Notice: Peripheral devices Only peripherals (input/output devices, terminals, printers, etc.) certified to comply with the Class B limits may cause undesired operation. LCD Monitor Quick Setup Guide Operation with non-certified peripherals is likely to radio and TV reception. Remarque à l'intention des utilisateurs canadiens Cet appareil num...
P223W LCD User's Guide EN
Page 3
....EIAE.ORG. FOR LAMP SPECIFIC DISPOSAL INFORMATION CHECK WWW.LAMPRECYCLE.ORG. Instead, it over to dispose of your other household waste. LCD Monitor Quick Setup Guide Visit http://global.acer.com/about where you can drop off your waste equipment for the recycling of with your waste equipment by handing it is...
....EIAE.ORG. FOR LAMP SPECIFIC DISPOSAL INFORMATION CHECK WWW.LAMPRECYCLE.ORG. Instead, it over to dispose of your other household waste. LCD Monitor Quick Setup Guide Visit http://global.acer.com/about where you can drop off your waste equipment for the recycling of with your waste equipment by handing it is...
P223W LCD User's Guide EN
Page 5
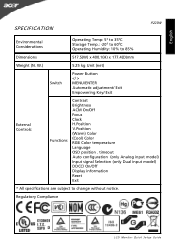
Regulatory Compliance LCD Monitor Quick Setup Guide W.) 5.25 kg Unit (net) Switch Power Button MENU/ENTER Automatic adjustment/ Exit Empowering Key/ Exit External Controls: Functions Contrast Brightness ACM ...
Regulatory Compliance LCD Monitor Quick Setup Guide W.) 5.25 kg Unit (net) Switch Power Button MENU/ENTER Automatic adjustment/ Exit Empowering Key/ Exit External Controls: Functions Contrast Brightness ACM ...
P223W LCD User's Guide EN
Page 6
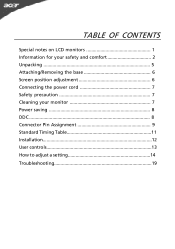
TABLE OF CONTENTS Special notes on LCD monitors 1 Information for your safety and comfort 2 Unpacking 5 Attaching/Removing the base 6 Screen position adjustment 6 Connecting the power cord 7 Safety precaution 7 Cleaning your monitor 7 Power saving 8 DDC 8 Connector Pin Assignment 9 Standard Timing Table 11 Installation 12 User controls 13 How to adjust a setting 14 Troubleshooting 19
TABLE OF CONTENTS Special notes on LCD monitors 1 Information for your safety and comfort 2 Unpacking 5 Attaching/Removing the base 6 Screen position adjustment 6 Connecting the power cord 7 Safety precaution 7 Cleaning your monitor 7 Power saving 8 DDC 8 Connector Pin Assignment 9 Standard Timing Table 11 Installation 12 User controls 13 How to adjust a setting 14 Troubleshooting 19
P223W LCD User's Guide EN
Page 7
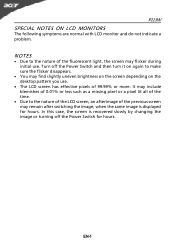
In this case, the screen is displayed for hours. P223W SPECIAL NOTES ON LCD MONITORS The following symptoms are normal with LCD monitor and do not indicate a problem. EN-1 Turn off the Power Switch for hours. It may include blemishes of 0.01% or less such as a missing ...pixel or a pixel lit all of the time. · Due to make sure the flicker disappears. · You may flicker during initial use . · The LCD screen has effective pixels of the previous screen may remain after switching the image, when the same image is recovered slowly by changing the image...
In this case, the screen is displayed for hours. P223W SPECIAL NOTES ON LCD MONITORS The following symptoms are normal with LCD monitor and do not indicate a problem. EN-1 Turn off the Power Switch for hours. It may include blemishes of 0.01% or less such as a missing ...pixel or a pixel lit all of the time. · Due to make sure the flicker disappears. · You may flicker during initial use . · The LCD screen has effective pixels of the previous screen may remain after switching the image, when the same image is recovered slowly by changing the image...


