Quick Start Guide
Page 1
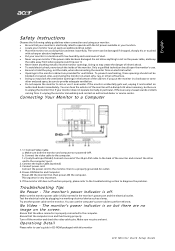
.... · Do not expose the monitor to perform this monitor LCD Monitor Quick Setup Guide Connect the video cable to the computer. 1-2 (only Dual-Input Model) Connect one end of the 24-pin DVI cable to user's guide in a working electrical device such as a lamp. Power-ON Monitor and Computer Power...
.... · Do not expose the monitor to perform this monitor LCD Monitor Quick Setup Guide Connect the video cable to the computer. 1-2 (only Dual-Input Model) Connect one end of the 24-pin DVI cable to user's guide in a working electrical device such as a lamp. Power-ON Monitor and Computer Power...
User Manual
Page 11
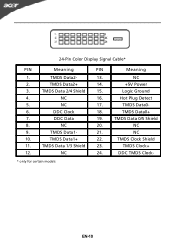
TMDS Data 2/4 Shield 15. DDC Clock 18. NC 9. NC 10. TMDS Data1+ 22. DDC TMDS Clock- * only for certain models EN-10 TMDS Data2- 13. Logic Ground 4. TMDS Data0- 6. TMDS Data 0/5 Shield 8. TMDS Clock+ 12. DDC Data 19. TMDS Data 1/3 Shield 23. TMDS Data2+ 14. +5V Power 3. NC 16. NC 24. 24-Pin Color Display Signal Cable* PIN Meaning PIN Meaning 1. NC 2. NC 20. Hot Plug Detect 5. TMDS Data0+ 7. NC 17. TMDS Data1- 21. TMDS Clock Shield 11.
TMDS Data 2/4 Shield 15. DDC Clock 18. NC 9. NC 10. TMDS Data1+ 22. DDC TMDS Clock- * only for certain models EN-10 TMDS Data2- 13. Logic Ground 4. TMDS Data0- 6. TMDS Data 0/5 Shield 8. TMDS Clock+ 12. DDC Data 19. TMDS Data 1/3 Shield 23. TMDS Data2+ 14. +5V Power 3. NC 16. NC 24. 24-Pin Color Display Signal Cable* PIN Meaning PIN Meaning 1. NC 2. NC 20. Hot Plug Detect 5. TMDS Data0+ 7. NC 17. TMDS Data1- 21. TMDS Clock Shield 11.
User Manual
Page 13
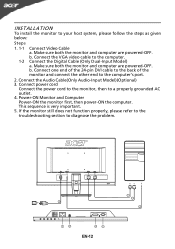
... as given below: Steps 1. 1-1 1-2 Connect Video Cable a. EN-12 Connect the Audio Cable(Only Audio-Input Model)(Optional) 3. Make sure both the monitor and computer are powered-OFF. Connect the Digital Cable (Only Dual-Input Model) a. Connect one end of the 24-pin DVI cable to the back of the monitor and...
... as given below: Steps 1. 1-1 1-2 Connect Video Cable a. EN-12 Connect the Audio Cable(Only Audio-Input Model)(Optional) 3. Make sure both the monitor and computer are powered-OFF. Connect the Digital Cable (Only Dual-Input Model) a. Connect one end of the 24-pin DVI cable to the back of the monitor and...
User Manual
Page 14
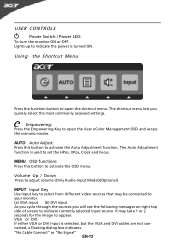
... function button to open the Acer eColor Management OSD and access the scenario modes. AUTO Auto Adjust: Press this botton to activate the Auto Adjustment function. MENU OSD functions Press this button to activate the OSD menu. Volume Up / Down Press to adjust volume (Only Audio-Input Model)(Optional) INPUT Input Key...
... function button to open the Acer eColor Management OSD and access the scenario modes. AUTO Auto Adjust: Press this botton to activate the Auto Adjustment function. MENU OSD functions Press this button to activate the OSD menu. Volume Up / Down Press to adjust volume (Only Audio-Input Model)(Optional) INPUT Input Key...

User Manual
Page 20
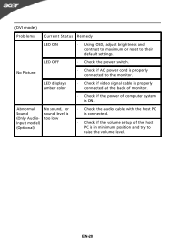
... computer system is in compliance which may be causing the input signal frequency mismatch. LED OFF · Check the power switch. Abnormal Sound (Only AudioInput model) (Optional) No sound, or sound level is too low · Check the audio cable with non-standard signals. EN-19 Abnormal Picture Display is properly...
... computer system is in compliance which may be causing the input signal frequency mismatch. LED OFF · Check the power switch. Abnormal Sound (Only AudioInput model) (Optional) No sound, or sound level is too low · Check the audio cable with non-standard signals. EN-19 Abnormal Picture Display is properly...
User Manual
Page 21
No Picture · Check if AC power cord is properly connected to their default settings. Abnormal Sound (Only AudioInput model) (Optional) No sound, or sound level is too low · Check the audio cable with the host PC is connected. · Check if the volume ...
No Picture · Check if AC power cord is properly connected to their default settings. Abnormal Sound (Only AudioInput model) (Optional) No sound, or sound level is too low · Check the audio cable with the host PC is connected. · Check if the volume ...
User Manual
Page 22
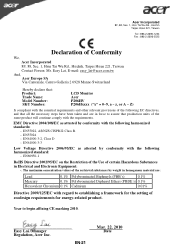
... 221, Taiwan Contact Person: Mr. Easy Lai, E-mail: easy_lai@acer.com.tw And, Acer Europe SA Via Cantonale, Centro Galleria 2 6928 Manno Switzerland Hereby declare that: Product: Trade Name: Model Number: SKU Number: LCD Monitor Acer P206HV P206Hxxxx ("x" = 0~9, a ~ z, or A ~ Z) Is ... (PBDE's) 0.1% Hexavalent Chromium 0.1% Cadmium 0.01% Directive 2009/125/EC with the following harmonized standards: -. Easy Lai /Manager Regulation, Acer Inc. EN61000-3-2, Class D -. EN-21 Mar. 22, 2010 Date The maximum concentration values of the restricted substances by conformity with regard...
... 221, Taiwan Contact Person: Mr. Easy Lai, E-mail: easy_lai@acer.com.tw And, Acer Europe SA Via Cantonale, Centro Galleria 2 6928 Manno Switzerland Hereby declare that: Product: Trade Name: Model Number: SKU Number: LCD Monitor Acer P206HV P206Hxxxx ("x" = 0~9, a ~ z, or A ~ Z) Is ... (PBDE's) 0.1% Hexavalent Chromium 0.1% Cadmium 0.01% Directive 2009/125/EC with the following harmonized standards: -. Easy Lai /Manager Regulation, Acer Inc. EN61000-3-2, Class D -. EN-21 Mar. 22, 2010 Date The maximum concentration values of the restricted substances by conformity with regard...
User Manual
Page 23
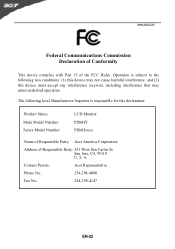
... two conditions: (1) this device may not cause harmful interference, and (2) this declaration: Product Name: Main Model Number: Series Model Number: LCD Monitor P206HV P206Hxxxx Name of Responsible Party: Acer America Corporation Address of the FCC Rules. Contact Person: Acer Representative Phone No.: 254-298-4000 Fax No.: 254-298-4147 EN-22 S. San Jose, CA...
... two conditions: (1) this device may not cause harmful interference, and (2) this declaration: Product Name: Main Model Number: Series Model Number: LCD Monitor P206HV P206Hxxxx Name of Responsible Party: Acer America Corporation Address of the FCC Rules. Contact Person: Acer Representative Phone No.: 254-298-4000 Fax No.: 254-298-4147 EN-22 S. San Jose, CA...


