Quick Start Guide
Page 1
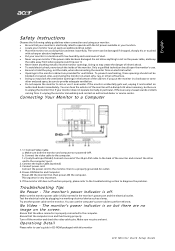
... or covered. Ensure that the computer is on the screen. Turn off . If you put the monitor in the monitor's power port and the electrical outlet. If your monitor near water. Connect the video cable to the computer. 1-2 (only Dual-Input Model) Connect one end of the 24-pin DVI cable to the back of the monitor and connect the other enclosed space, be sure to perform this monitor LCD Monitor Quick Setup Guide Make...
... or covered. Ensure that the computer is on the screen. Turn off . If you put the monitor in the monitor's power port and the electrical outlet. If your monitor near water. Connect the video cable to the computer. 1-2 (only Dual-Input Model) Connect one end of the 24-pin DVI cable to the back of the monitor and connect the other enclosed space, be sure to perform this monitor LCD Monitor Quick Setup Guide Make...
Quick Start Guide
Page 2
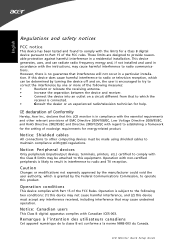
... equipment. LCD Monitor Quick Setup Guide Operation conditions This device complies with the limits for help. English Regulations and safety notices FCC notice This device has been tested and found to comply with Part 15 of the FCC Rules. Caution Changes or modifications not expressly approved by the manufacturer could void the user authority, which can radiate radio frequency energy and...
... equipment. LCD Monitor Quick Setup Guide Operation conditions This device complies with the limits for help. English Regulations and safety notices FCC notice This device has been tested and found to comply with Part 15 of the FCC Rules. Caution Changes or modifications not expressly approved by the manufacturer could void the user authority, which can radiate radio frequency energy and...
User Manual
Page 1
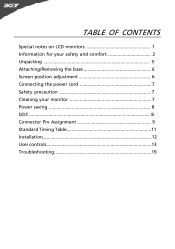
TABLE OF CONTENTS Special notes on LCD monitors 1 Information for your safety and comfort 2 Unpacking 5 Attaching/Removing the base 6 Screen position adjustment 6 Connecting the power cord 7 Safety precaution 7 Cleaning your monitor 7 Power saving 8 DDC 8 Connector Pin Assignment 9 Standard Timing Table 11 Installation 12 User controls 13 Troubleshooting 19
TABLE OF CONTENTS Special notes on LCD monitors 1 Information for your safety and comfort 2 Unpacking 5 Attaching/Removing the base 6 Screen position adjustment 6 Connecting the power cord 7 Safety precaution 7 Cleaning your monitor 7 Power saving 8 DDC 8 Connector Pin Assignment 9 Standard Timing Table 11 Installation 12 User controls 13 Troubleshooting 19
User Manual
Page 2
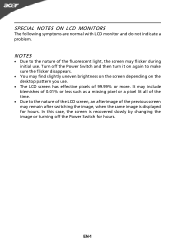
Turn off the Power Switch for hours. EN-1 NOTES · Due to the nature of the fluorescent light, the screen may flicker during initial use . · The LCD screen has effective pixels of the previous screen may find slightly uneven brightness on the screen depending on the desktop pattern you use . In this case, the screen is displayed for hours. SPECIAL NOTES ON LCD MONITORS The following symptoms are...
Turn off the Power Switch for hours. EN-1 NOTES · Due to the nature of the fluorescent light, the screen may flicker during initial use . · The LCD screen has effective pixels of the previous screen may find slightly uneven brightness on the screen depending on the desktop pattern you use . In this case, the screen is displayed for hours. SPECIAL NOTES ON LCD MONITORS The following symptoms are...

User Manual
Page 3
... cabinet slots as possible. Keep this document for future reference. EN-2 If the product falls, it could result in installation unless proper ventilation is easily accessible and located as close to the equipment operator as they may touch dangerous voltage points or short-out parts that the power outlet you plug the power cord into is provided. •...
... cabinet slots as possible. Keep this document for future reference. EN-2 If the product falls, it could result in installation unless proper ventilation is easily accessible and located as close to the equipment operator as they may touch dangerous voltage points or short-out parts that the power outlet you plug the power cord into is provided. •...
User Manual
Page 4
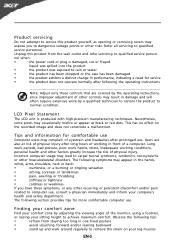
... when: • the power cord or plug is produced with high-precision manufacturing techniques. Tips and information for more comfortable computer use . Unplug this product yourself, as black or red dots. Nevertheless, some pixels may occasionally misfire or appear as opening or removing covers may complain of a computer. Observe the following the operating instructions Note: Adjust only those controls that are also at...
... when: • the power cord or plug is produced with high-precision manufacturing techniques. Tips and information for more comfortable computer use . Unplug this product yourself, as black or red dots. Nevertheless, some pixels may occasionally misfire or appear as opening or removing covers may complain of a computer. Observe the following the operating instructions Note: Adjust only those controls that are also at...
User Manual
Page 5
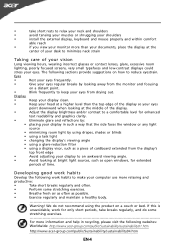
... of the display. • Adjust the display brightness and/or contrast to keep your computer use more than the top edge of the display so your eyes point downward when looking at bright light sources, such as a piece of cardboard extended from the display's top front edge • Avoid adjusting your display to an awkward viewing angle. • Avoid looking away from the monitor and focusing...
... of the display. • Adjust the display brightness and/or contrast to keep your computer use more than the top edge of the display so your eyes point downward when looking at bright light sources, such as a piece of cardboard extended from the display's top front edge • Avoid adjusting your display to an awkward viewing angle. • Avoid looking away from the monitor and focusing...
User Manual
Page 7
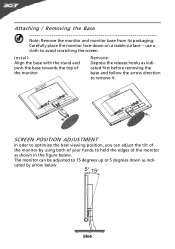
... down on a stable surface -- EN-6 Attaching / Removing the Base Note: Remove the monitor and monitor base from its packaging. SCREEN POSITION ADJUSTMENT In oder to optimize the best viewing position, you can be adjusted to hold the edges of the monitor as shown in the figure below . The monitor can adjust the tilt of the monitor by using both of the monitor. Remove: Depress the release hooks as indicated by arrow below . Carefully...
... down on a stable surface -- EN-6 Attaching / Removing the Base Note: Remove the monitor and monitor base from its packaging. SCREEN POSITION ADJUSTMENT In oder to optimize the best viewing position, you can be adjusted to hold the edges of the monitor as shown in the figure below . The monitor can adjust the tilt of the monitor by using both of the monitor. Remove: Depress the release hooks as indicated by arrow below . Carefully...

User Manual
Page 8
...: Use a UL Listed Cord Set, Type SVT wire and plug rated 10 A/125 V. · For unit using at 220/240 V AC (outside of U.S.): Use a Cord Set consisting of the monitor. EN-7 Always put the monitor in a place where there is fragile. CONNECTING THE POWER CORD · Check first to make sure that allows operation in either 100/120V AC or 220/240 V AC voltage area. CLEANING YOUR MONITOR...
...: Use a UL Listed Cord Set, Type SVT wire and plug rated 10 A/125 V. · For unit using at 220/240 V AC (outside of U.S.): Use a Cord Set consisting of the monitor. EN-7 Always put the monitor in a place where there is fragile. CONNECTING THE POWER CORD · Check first to make sure that allows operation in either 100/120V AC or 220/240 V AC voltage area. CLEANING YOUR MONITOR...
User Manual
Page 9
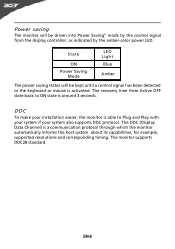
... the amber-color power LED. The monitor supports DDC2B standard. EN-8 DDC To make your system also supports DDC protocol. The DDC (Display Data Channel) is a communication protocol through which the monitor automatically informs the host system about its capabilities, for example, supported resolutions and corresponding timing. Power saving The monitor will be driven into Power Saving" mode by the control signal from Active OFF state back to Plug and...
... the amber-color power LED. The monitor supports DDC2B standard. EN-8 DDC To make your system also supports DDC protocol. The DDC (Display Data Channel) is a communication protocol through which the monitor automatically informs the host system about its capabilities, for example, supported resolutions and corresponding timing. Power saving The monitor will be driven into Power Saving" mode by the control signal from Active OFF state back to Plug and...
User Manual
Page 10
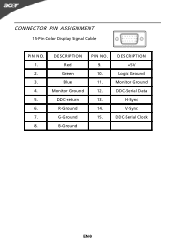
DESCRIPTION +5V Logic Ground Monitor Ground DDC-Serial Data H-Sync V-Sync DDC-Serial Clock EN-9 DESCRIPTION Red Green Blue Monitor Ground DDC-return R-Ground G-Ground B-Ground PIN NO. 9. 10. 11. 12. 13. 14. 15. CONNECTOR PIN ASSIGNMENT 15-Pin Color Display Signal Cable PIN NO. 1. 2. 3. 4. 5. 6. 7. 8.
DESCRIPTION +5V Logic Ground Monitor Ground DDC-Serial Data H-Sync V-Sync DDC-Serial Clock EN-9 DESCRIPTION Red Green Blue Monitor Ground DDC-return R-Ground G-Ground B-Ground PIN NO. 9. 10. 11. 12. 13. 14. 15. CONNECTOR PIN ASSIGNMENT 15-Pin Color Display Signal Cable PIN NO. 1. 2. 3. 4. 5. 6. 7. 8.
User Manual
Page 11
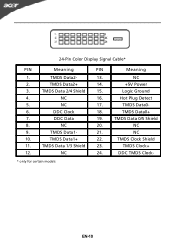
NC 16. DDC Clock 18. TMDS Clock Shield 11. TMDS Data2- 13. NC 2. NC 10. TMDS Data 2/4 Shield 15. TMDS Data 0/5 Shield 8. NC 9. NC 24. TMDS Data2+ 14. +5V Power 3. Hot Plug Detect 5. TMDS Clock+ 12. NC 17. DDC Data 19. NC 20. TMDS Data 1/3 Shield 23. TMDS Data0- 6. TMDS Data1- 21. 24-Pin Color Display Signal Cable* PIN Meaning PIN Meaning 1. TMDS Data0+ 7. TMDS Data1+ 22. DDC TMDS Clock- * only for certain models EN-10 Logic Ground 4.
NC 16. DDC Clock 18. TMDS Clock Shield 11. TMDS Data2- 13. NC 2. NC 10. TMDS Data 2/4 Shield 15. TMDS Data 0/5 Shield 8. NC 9. NC 24. TMDS Data2+ 14. +5V Power 3. Hot Plug Detect 5. TMDS Clock+ 12. NC 17. DDC Data 19. NC 20. TMDS Data 1/3 Shield 23. TMDS Data0- 6. TMDS Data1- 21. 24-Pin Color Display Signal Cable* PIN Meaning PIN Meaning 1. TMDS Data0+ 7. TMDS Data1+ 22. DDC TMDS Clock- * only for certain models EN-10 Logic Ground 4.
User Manual
Page 13
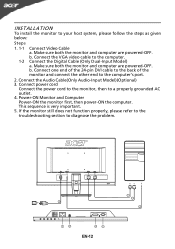
Connect the Digital Cable (Only Dual-Input Model) a. Connect one end of the 24-pin DVI cable to the back of the monitor and connect the other end to the computer. This sequence is very important. 5. Connect the Audio Cable(Only Audio-Input Model)(Optional) 3. EN-12 b. Power-ON Monitor and Computer Power-ON the monitor first, then power-ON the computer. Connect the VGA video cable to the computer's port. 2. Connect power cord Connect the power cord to the monitor, then to diagnose...
Connect the Digital Cable (Only Dual-Input Model) a. Connect one end of the 24-pin DVI cable to the back of the monitor and connect the other end to the computer. This sequence is very important. 5. Connect the Audio Cable(Only Audio-Input Model)(Optional) 3. EN-12 b. Power-ON Monitor and Computer Power-ON the monitor first, then power-ON the computer. Connect the VGA video cable to the computer's port. 2. Connect power cord Connect the power cord to the monitor, then to diagnose...
User Manual
Page 14
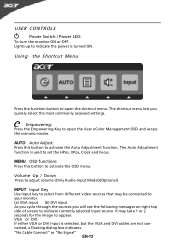
... quickly select the most commonly accessed settings. VGA or DVI If either VGA or DVI input is turned ON. Lights up to set the HPos, VPos, Clock and Focus. Volume Up / Down Press to adjust volume (Only Audio-Input Model)(Optional) INPUT Input Key Use Input key to select from different video sources that may take 1 or 2 seconds for the image to open the shortcut menu. Empowering: Press the Empowering Key to appear. USER CONTROLS Power Switch / Power LED: To turn the monitor...
... quickly select the most commonly accessed settings. VGA or DVI If either VGA or DVI input is turned ON. Lights up to set the HPos, VPos, Clock and Focus. Volume Up / Down Press to adjust volume (Only Audio-Input Model)(Optional) INPUT Input Key Use Input key to select from different video sources that may take 1 or 2 seconds for the image to open the shortcut menu. Empowering: Press the Empowering Key to appear. USER CONTROLS Power Switch / Power LED: To turn the monitor...

User Manual
Page 15
... of brightness and contrast N/A Text mode prevent eyestrain. R eflects n a tive d isp lay mode capability N/A Grahpic mode Enhances colors and emphasize fine detail. Pictures and photographs appear in vibrant colors with sharp detail. Settings can be fine-tuned to read onscreen text N/A Standard D efau lt Settin g . Features and Benefits Main Menu icon Sub Menu icon Sub Menu item Description N/A User mode User defined. Acer eColor Management Operation instructions...
... of brightness and contrast N/A Text mode prevent eyestrain. R eflects n a tive d isp lay mode capability N/A Grahpic mode Enhances colors and emphasize fine detail. Pictures and photographs appear in vibrant colors with sharp detail. Settings can be fine-tuned to read onscreen text N/A Standard D efau lt Settin g . Features and Benefits Main Menu icon Sub Menu icon Sub Menu item Description N/A User mode User defined. Acer eColor Management Operation instructions...
User Manual
Page 16
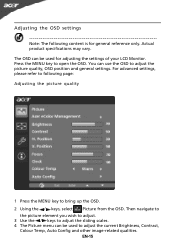
... wish to adjust. 3 Use the / keys to adjust the sliding scales. 4 The Picture menu can use the OSD to adjust the current Brightness, Contrast, Colour Temp, Auto Config and other image-related qualities. Actual product specifications may vary. For advanced settings, please refer to following content is for adjusting the settings of your LCD Monitor. Adjusting the OSD settings Note: The following page: Adjusting the picture quality 1 Press the MENU key to open the OSD. EN...
... wish to adjust. 3 Use the / keys to adjust the sliding scales. 4 The Picture menu can use the OSD to adjust the current Brightness, Contrast, Colour Temp, Auto Config and other image-related qualities. Actual product specifications may vary. For advanced settings, please refer to following content is for adjusting the settings of your LCD Monitor. Adjusting the OSD settings Note: The following page: Adjusting the picture quality 1 Press the MENU key to open the OSD. EN...
User Manual
Page 18
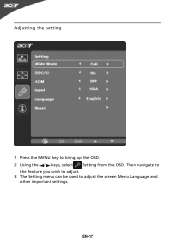
Then navigate to the feature you wish to adjust. 3 The Setting menu can be used to bring up the OSD. 2 Using the / keys, select Setting from the OSD. EN-17 Adjusting the setting 1 Press the MENU key to adjust the screen Menu Language and other important settings.
Then navigate to the feature you wish to adjust. 3 The Setting menu can be used to bring up the OSD. 2 Using the / keys, select Setting from the OSD. EN-17 Adjusting the setting 1 Press the MENU key to adjust the screen Menu Language and other important settings.

User Manual
Page 20
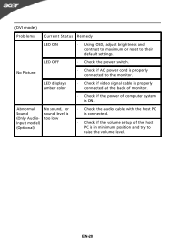
... specification of graphics adapter and monitor is properly connected to their default settings. LED displays amber color · Check if video signal cable is properly connected at the back of monitor. · Check if the power of computer system is · Using OSD, adjust RESOLUTION, CLOCK, missing, center CLOCK-PHASE, H-POSITION and V- Abnormal Picture Display is ON. EN-19 No Picture · Check if AC power cord is in case of missing full-screen size image, please select other resolution or other vertical refresh...
... specification of graphics adapter and monitor is properly connected to their default settings. LED displays amber color · Check if video signal cable is properly connected at the back of monitor. · Check if the power of computer system is · Using OSD, adjust RESOLUTION, CLOCK, missing, center CLOCK-PHASE, H-POSITION and V- Abnormal Picture Display is ON. EN-19 No Picture · Check if AC power cord is in case of missing full-screen size image, please select other resolution or other vertical refresh...
User Manual
Page 21
...; Check the power switch. No Picture · Check if AC power cord is properly connected to their default settings. LED displays amber color · Check if video signal cable is properly connected at the back of monitor. · Check if the power of the host PC is ON. EN-20 Abnormal Sound (Only AudioInput model) (Optional) No sound, or sound level is too low · Check the audio cable with the host PC is connected. · Check if the volume setup of...
...; Check the power switch. No Picture · Check if AC power cord is properly connected to their default settings. LED displays amber color · Check if video signal cable is properly connected at the back of monitor. · Check if the power of the host PC is ON. EN-20 Abnormal Sound (Only AudioInput model) (Optional) No sound, or sound level is too low · Check the audio cable with the host PC is connected. · Check if the volume setup of...
User Manual
Page 22
... Mar. 22, 2010 Date EN55022, AS/NZS CISPR22 Class B. -. Year to establishing a framework for the setting of ecodesign requirements for energy-related product. Acer Incorporated 8F, 88, Sec. 1, Hsin Tai Wu Rd., Hsichih Taipei Hsien 221, Taiwan Tel : 886-2-...Hsichih, Taipei Hsien 221, Taiwan Contact Person: Mr. Easy Lai, E-mail: easy_lai@acer.com.tw And, Acer Europe SA Via Cantonale, Centro Galleria 2 6928 Manno Switzerland Hereby declare that: Product: Trade Name: Model Number: SKU Number: LCD Monitor Acer P206HV P206Hxxxx ("x" = 0~9, a ~ z, or A ~ Z) Is compliant with the essential...
... Mar. 22, 2010 Date EN55022, AS/NZS CISPR22 Class B. -. Year to establishing a framework for the setting of ecodesign requirements for energy-related product. Acer Incorporated 8F, 88, Sec. 1, Hsin Tai Wu Rd., Hsichih Taipei Hsien 221, Taiwan Tel : 886-2-...Hsichih, Taipei Hsien 221, Taiwan Contact Person: Mr. Easy Lai, E-mail: easy_lai@acer.com.tw And, Acer Europe SA Via Cantonale, Centro Galleria 2 6928 Manno Switzerland Hereby declare that: Product: Trade Name: Model Number: SKU Number: LCD Monitor Acer P206HV P206Hxxxx ("x" = 0~9, a ~ z, or A ~ Z) Is compliant with the essential...


