Acer R271 Support and Manuals
Get Help and Manuals for this Acer Computers item
Popular Acer R271 Manual Pages
User Manual - Page 2
... of Acer Incorporated. Acer Incorporated. No part of this publication without the prior written permission of this manual or supplementary documents and publications. All Rights Reserved. Acer LCD Monitor User Guide
Model number Serial number Date of purchase Place of purchase
Acer and the Acer logo are used herein for a particular purpose. Acer LCD Monitor User Guide Original...
User Manual - Page 5
... all products plugged into a nongrounded power outlet. The overall system load must not exceed 80% of all servicing to replace the power cord set . Do not insert the plug into the wall outlet does not exceed the fuse rating. • Do not overload a power outlet, strip or receptacle by other risks. The plug only fits...
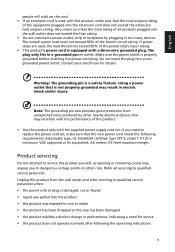
User Manual - Page 9
...for the setting of ecodesign requirements for energy-related product.
RU Jan / Sr. Manager
Date
Regulation, Acer Inc.
ix English
Declaration of Conformity
We, Acer Incorporated 8F,...-02-939-921 ,Fax: +39-02 9399-2913 www.acer.it
Declare under our own responsibility that the product:
Product:
LCD Monitor
Trade Name:
Acer
Model Number:
SKU Number:
xxxxxx;
("x" = 0~9, a ~ ...
User Manual - Page 10
...
This device complies with Part 15 of Responsible Party:
Contact Person: Phone No.: Fax No.:
LCD Monitor
xxxxxx ("x" = 0~9, a ~ z, or A ~ Z) Acer America Corporation
333 West San Carlos St. The following local Manufacturer /Importer is subject to the following two conditions: (1) this device may not cause harmful interference, and (2) this declaration:
Product: Model Number: SKU Number...
User Manual - Page 11

... assignment
4
15-pin color display signal cable
4
24-pin color display signal cable
4
19-pin color display signal cable
5
Standard timing table
6
Installation
7
Users controls
8
Panel controls
8
Using the Shortcut Menu
9
Acer eColor Management
10
Operation instructions
10
Features and benefits
10
Using the OSD Menus
11
Picture Menu
11
OSD Menu
12...
User Manual - Page 14
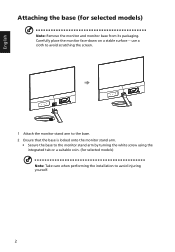
... monitor stand arm.
• Secure the base to the monitor stand arm by turning the white screw using the integrated tab or a suitable coin. (for selected models)
Note: Remove the monitor and monitor base from its packaging. Carefully place the monitor face-down on a stable surface -- English
Attaching the base (for selected models) Note: Take care when performing the installation...
User Manual - Page 15
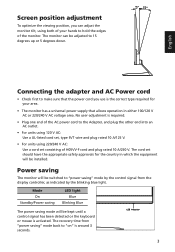
...which the equipment will be installed. The cord set should have the appropriate safety approvals for your hands to 15 degrees up or 5 degrees down. Power saving
The monitor will be switched to the...light. The monitor can adjust the monitor tilt, using 220/240 V AC: Use a cord set , type SVT wire and plug rated 10 A/125 V.
• For units using both of your area.
• The monitor has a ...
User Manual - Page 16

English
Display Data Channel (DDC)
To make installation easier, so long as your system supports the DDC protocol, the monitor is a communication protocol through which the monitor automatically informs the host system about its capabilities; The DDC is able to plug-and-play. Description
1
TMDS data 2-
2
TMDS data 2+
3
TMDS data 2/4 shield
4
NC
5
...
User Manual - Page 18
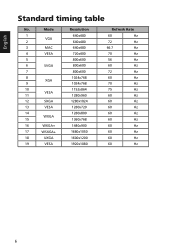
Mode
1 VGA
2
3
MAC
4
VESA
5
6
SVGA
7
8 XGA
9
10 VESA
11
12
SXGA
13
VESA
14 WXGA
15
16
WXGA+
17
WSXGA+
18
UXGA
19
VESA
Resolution 640x480 640x480 640x480 720x400 800x600 800x600 800x600 1024x768 1024x768 1152x864 1280x960
1280x1024 1280x720 1280x800 1360x768 1440x900 1680x1050 1600x1200 1920x1080
Refresh Rate
60
Hz
72
Hz
66.7
Hz
70
Hz
56
Hz
60...
User Manual - Page 19
... the steps below:
Steps
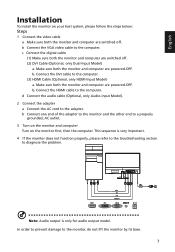
1 Connect the video cable a Make sure both the monitor and computer are switched off . (2) DVI Cable (Optional, only Dual-Input Model) a. Note: Audio output is very important.
4 If the monitor does not function properly, please refer to the troubleshooting section to the computer.
b Connect the VGA video cable to diagnose the...
User Manual - Page 20
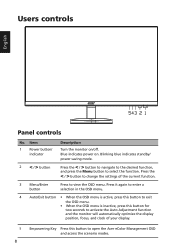
...this button for
two seconds to activate the Auto Adjustment function and the monitor will automatically optimize the display position, focus, and clock of the ...view the OSD menu. Press the
< / > button to change the settings of your display.
5 Empowering Key Press this button to select the function... open the Acer eColor Management OSD and access the scenario modes.
8 Blue indicates power on /off...
User Manual - Page 21

... settings. Volume
Input
Input
Press the Volume button to adjust volume. (Optional, only Audio-Input Model)
Press the Input button to select from different video sources that may be connected to open the shortcut menu.
English
Using the Shortcut Menu
AUTO
Input
Press any of your monitor. (Optional, only Dual-Input Model or HDMI-Input Model...
User Manual - Page 22
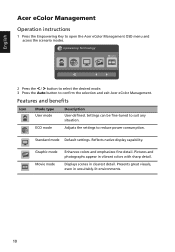
...Graphic mode Movie mode
Enhances colors and emphasizes fine detail.
Standard mode Default settings.
Features and benefits
Icon
Mode type User mode
Description
User-defined. English
Acer eColor Management
Operation instructions
1 Press the Empowering Key to confirm the selection and exit Acer eColor Management. mpowering Technology User ECO Standard Graphics Movie
2 Press the...
User Manual - Page 23
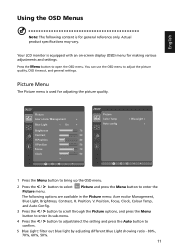
... equipped with an on-screen display (OSD) menu for making various adjustments and settings. English
Using the OSD Menus
Note: The following options are available in the Picture menu: Acer ecolor Management,
Blue Light, Brightness, Contrast, H.
Your LCD monitor is for adjusting the picture quality. You can use the OSD menu to
confirm...
User Manual - Page 27

... off the monitor.
15 Using the OSD menu, adjust focus, clock, H-position and V-position with non-standard signals. Check the display setting on and in compliance which may be causing the input signal frequency mismatch.
Wait for servicing, please check the troubleshooting list below to see if you can self-diagnose the problem.
Check if...
Acer R271 Reviews
We have not received any reviews for Acer yet.