User Manual
Page 2
... system, or transmitted, in this manual or supplementary documents and publications. Acer Incorporated. No part of Acer Incorporated. Acer LCD Monitor User Guide Original Issue: 09/2014 Changes may be made periodically to the information in any form or by any person of Acer Incorporated. All correspondence concerning your computer. All Rights Reserved. Record the model number, serial number, purchase date and place of purchase...
... system, or transmitted, in this manual or supplementary documents and publications. Acer Incorporated. No part of Acer Incorporated. Acer LCD Monitor User Guide Original Issue: 09/2014 Changes may be made periodically to the information in any form or by any person of Acer Incorporated. All correspondence concerning your computer. All Rights Reserved. Record the model number, serial number, purchase date and place of purchase...

User Manual
Page 3
.... Keep this case, the screen is displayed for hours. Special notes on LCD monitors The following are normal with the LCD monitor and do not indicate a problem. • Due to the nature of the fluorescent light, the screen may include blemishes of the previous screen may remain after switching the image, when the same image is recovered slowly by changing the image or turning off the power switch and...
.... Keep this case, the screen is displayed for hours. Special notes on LCD monitors The following are normal with the LCD monitor and do not indicate a problem. • Due to the nature of the fluorescent light, the screen may include blemishes of the previous screen may remain after switching the image, when the same image is recovered slowly by changing the image or turning off the power switch and...
User Manual
Page 4
... this monitor, do not increase it after your ears have adjusted. • Limit the amount of internal components and to block out noisy surroundings. • Turn the volume down if you plug the power cord into is easily accessible and located as close to unplug the power cord from the type of power available, consult your hearing, follow these instructions. •...
... this monitor, do not increase it after your ears have adjusted. • Limit the amount of internal components and to block out noisy surroundings. • Turn the volume down if you plug the power cord into is easily accessible and located as close to unplug the power cord from the type of power available, consult your hearing, follow these instructions. •...
User Manual
Page 5
... products plugged into the wall outlet does not exceed the fuse rating. • Do not overload a power outlet, strip or receptacle by other risks. If power strips are used with the supplied power supply cord set , make sure that the new power cord meets the following the operating instructions v Warning! The grounding pin is properly grounded before inserting the power cord plug. The plug only fits in a grounded power outlet...
... products plugged into the wall outlet does not exceed the fuse rating. • Do not overload a power outlet, strip or receptacle by other risks. If power strips are used with the supplied power supply cord set , make sure that the new power cord meets the following the operating instructions v Warning! The grounding pin is properly grounded before inserting the power cord plug. The plug only fits in a grounded power outlet...

User Manual
Page 6
... small children. English Note: Adjust only those controls that are covered by a qualified technician to restore the product to this electronic device into the trash when discarding. Areas with a potentially explosive atmosphere and obey all signs and instructions. For more information and help when recycling, please go to normal condition. IT Equipment Recycling Information Acer is strongly...
... small children. English Note: Adjust only those controls that are covered by a qualified technician to restore the product to this electronic device into the trash when discarding. Areas with a potentially explosive atmosphere and obey all signs and instructions. For more information and help when recycling, please go to normal condition. IT Equipment Recycling Information Acer is strongly...
User Manual
Page 7
... backward • stand up and walk around regularly to carpal tunnel syndrome, tendonitis, tenosynovitis or other musculoskeletal disorders. This has no effect on your comfort zone by pushing the power button. English LCD pixel statement The LCD unit is produced with high-precision manufacturing techniques. The following tips: • refrain from Sleep mode by adjusting the viewing angle of user inactivity. •...
... backward • stand up and walk around regularly to carpal tunnel syndrome, tendonitis, tenosynovitis or other musculoskeletal disorders. This has no effect on your comfort zone by pushing the power button. English LCD pixel statement The LCD unit is produced with high-precision manufacturing techniques. The following tips: • refrain from Sleep mode by adjusting the viewing angle of user inactivity. •...
User Manual
Page 8
... as often as open windows, for extended periods of your vision Long viewing hours, wearing incorrect glasses or contact lenses, glare, excessive room lighting, poorly focused screens, very small typefaces and low-contrast displays could stress your eyes regular breaks by using drapes, shades or blinds • using a task light • changing the display's viewing angle • using a glare-reduction filter • using a display visor, such...
... as often as open windows, for extended periods of your vision Long viewing hours, wearing incorrect glasses or contact lenses, glare, excessive room lighting, poorly focused screens, very small typefaces and low-contrast displays could stress your eyes regular breaks by using drapes, shades or blinds • using a task light • changing the display's viewing angle • using a glare-reduction filter • using a display visor, such...

User Manual
Page 11
... x Unpacking 1 Attaching the base (for selected models) 2 Screen position adjustment 3 Connecting the adapter and AC Power cord 3 Power saving 3 Display Data Channel (DDC) 4 Connector pin assignment 4 15-pin color display signal cable 4 24-pin color display signal cable 4 19-pin color display signal cable 5 Standard timing table 6 Installation 7 Users controls 8 Panel controls 8 Using the Shortcut Menu 9 Acer eColor Management 10 Operation instructions 10 Features and benefits 10 Using the OSD Menus 11 Picture Menu 11 OSD Menu 12 Setting Menu 13
... x Unpacking 1 Attaching the base (for selected models) 2 Screen position adjustment 3 Connecting the adapter and AC Power cord 3 Power saving 3 Display Data Channel (DDC) 4 Connector pin assignment 4 15-pin color display signal cable 4 24-pin color display signal cable 4 19-pin color display signal cable 5 Standard timing table 6 Installation 7 Users controls 8 Panel controls 8 Using the Shortcut Menu 9 Acer eColor Management 10 Operation instructions 10 Features and benefits 10 Using the OSD Menus 11 Picture Menu 11 OSD Menu 12 Setting Menu 13
User Manual
Page 13
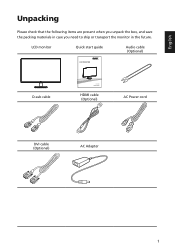
English Unpacking Please check that the following items are present when you unpack the box, and save the packing materials in case you need to ship or transport the monitor in the future. LCD monitor Quick start guide Audio cable (Optional) D-sub cable HDMI cable (Optional) AC Power cord DVI cable (Optional) AC Adapter 1
English Unpacking Please check that the following items are present when you unpack the box, and save the packing materials in case you need to ship or transport the monitor in the future. LCD monitor Quick start guide Audio cable (Optional) D-sub cable HDMI cable (Optional) AC Power cord DVI cable (Optional) AC Adapter 1
User Manual
Page 14
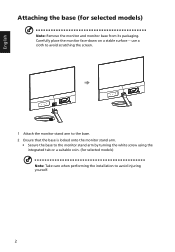
use a cloth to avoid scratching the screen. 1 Attach the monitor stand arm to the base. 2 Ensure that the base is locked onto the monitor stand arm. • Secure the base to avoid injuring yourself. 2 English Attaching the base (for selected models) Note: Take care when performing the installation to the monitor stand arm by turning the white screw using the integrated tab or a suitable coin. (for selected models) Note: Remove the monitor and monitor base from its packaging. Carefully place the monitor face-down on a stable surface --
use a cloth to avoid scratching the screen. 1 Attach the monitor stand arm to the base. 2 Ensure that the base is locked onto the monitor stand arm. • Secure the base to avoid injuring yourself. 2 English Attaching the base (for selected models) Note: Take care when performing the installation to the monitor stand arm by turning the white screw using the integrated tab or a suitable coin. (for selected models) Note: Remove the monitor and monitor base from its packaging. Carefully place the monitor face-down on a stable surface --
User Manual
Page 15
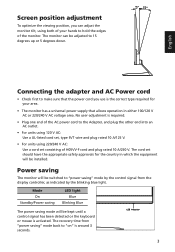
... and plug rated 10 A/125 V. • For units using both of your area. • The monitor has a universal power supply that the power cord you can be switched to "power saving" mode by the blinking blue light. Mode On Standby/Power saving LED light Blue Blinking Blue The power saving mode will be installed. The recovery time from the display controller, as indicated by the control signal from "power saving" mode back to "on" is around 3 seconds. 3 The cord set consisting of the monitor. The monitor can adjust the monitor tilt, using...
... and plug rated 10 A/125 V. • For units using both of your area. • The monitor has a universal power supply that the power cord you can be switched to "power saving" mode by the blinking blue light. Mode On Standby/Power saving LED light Blue Blinking Blue The power saving mode will be installed. The recovery time from the display controller, as indicated by the control signal from "power saving" mode back to "on" is around 3 seconds. 3 The cord set consisting of the monitor. The monitor can adjust the monitor tilt, using...

User Manual
Page 16
.... English Display Data Channel (DDC) To make installation easier, so long as your system supports the DDC protocol, the monitor is a communication protocol through which the monitor automatically informs the host system about its capabilities; Connector pin assignment 15-pin color display signal cable 1 5 6 10 11 15 PIN No. The DDC is able to plug-and-play. for example, supported resolutions and corresponding timing. Description 1 Red 2 Green 3 Blue 4 Monitor...
.... English Display Data Channel (DDC) To make installation easier, so long as your system supports the DDC protocol, the monitor is a communication protocol through which the monitor automatically informs the host system about its capabilities; Connector pin assignment 15-pin color display signal cable 1 5 6 10 11 15 PIN No. The DDC is able to plug-and-play. for example, supported resolutions and corresponding timing. Description 1 Red 2 Green 3 Blue 4 Monitor...
User Manual
Page 19
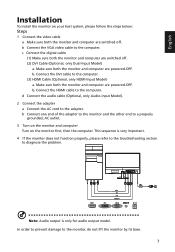
... the problem. In order to prevent damage to the computer. b Connect the VGA video cable to the monitor, do not lift the monitor by its base. 7 Connect the DVI cable to the computer. b. Connect the HDMI cable to the computer. (3) HDMI Cable (Optional, only HDMI-Input Model) a. Make sure both the monitor and computer are powered-OFF. d Connect the audio cable (Optional, only Audio-input Model). 2 Connect the adapter a Connect the AC cord to a properly grounded, AC outlet. 3 Turn on the monitor and computer Turn...
... the problem. In order to prevent damage to the computer. b Connect the VGA video cable to the monitor, do not lift the monitor by its base. 7 Connect the DVI cable to the computer. b. Connect the HDMI cable to the computer. (3) HDMI Cable (Optional, only HDMI-Input Model) a. Make sure both the monitor and computer are powered-OFF. d Connect the audio cable (Optional, only Audio-input Model). 2 Connect the adapter a Connect the AC cord to a properly grounded, AC outlet. 3 Turn on the monitor and computer Turn...
User Manual
Page 20
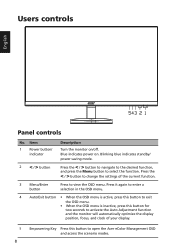
Users controls English Panel controls No. Item 1 Power button/ indicator Description Turn the monitor on . Press the < / > button to change the settings of your display. 5 Empowering Key Press this button for two seconds to activate the Auto Adjustment function and the monitor will automatically optimize the display position, focus, and clock of the current function. 3 Menu/Enter button Press to view the OSD menu. Press it again to enter a selection in the OSD menu. 4 Auto/Exit button • When the...
Users controls English Panel controls No. Item 1 Power button/ indicator Description Turn the monitor on . Press the < / > button to change the settings of your display. 5 Empowering Key Press this button for two seconds to activate the Auto Adjustment function and the monitor will automatically optimize the display position, focus, and clock of the current function. 3 Menu/Enter button Press to view the OSD menu. Press it again to enter a selection in the OSD menu. 4 Auto/Exit button • When the...

User Manual
Page 21
... automatically optimize the display position, focus, and clock of the function buttons (Empowering Key, Auto button, or Menu button) to open the shortcut menu. Menu Press the Menu button to your display. English Using the Shortcut Menu AUTO Input Press any of your monitor. (Optional, only Dual-Input Model or HDMI-Input Model) 9 Volume Input Input Press the Volume button to adjust volume. (Optional, only Audio-Input Model) Press the Input button to select from different video sources that may be connected to activate the OSD menu. The shortcut menu lets you quickly...
... automatically optimize the display position, focus, and clock of the function buttons (Empowering Key, Auto button, or Menu button) to open the shortcut menu. Menu Press the Menu button to your display. English Using the Shortcut Menu AUTO Input Press any of your monitor. (Optional, only Dual-Input Model or HDMI-Input Model) 9 Volume Input Input Press the Volume button to adjust volume. (Optional, only Audio-Input Model) Press the Input button to select from different video sources that may be connected to activate the OSD menu. The shortcut menu lets you quickly...
User Manual
Page 22
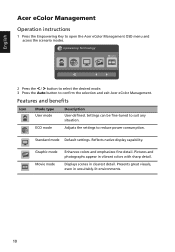
ECO mode Adjusts the settings to open the Acer eColor Management OSD menu and access the scenario modes. Displays scenes in vibrant colors with sharp detail. English Acer eColor Management Operation instructions 1 Press the Empowering Key to reduce power consumption. Reflects native display capability. Graphic mode Movie mode Enhances colors and emphasizes fine detail. mpowering Technology User ECO Standard Graphics Movie 2 Press the < / > button to select the desired mode. 3 Press the Auto button to suit...
ECO mode Adjusts the settings to open the Acer eColor Management OSD menu and access the scenario modes. Displays scenes in vibrant colors with sharp detail. English Acer eColor Management Operation instructions 1 Press the Empowering Key to reduce power consumption. Reflects native display capability. Graphic mode Movie mode Enhances colors and emphasizes fine detail. mpowering Technology User ECO Standard Graphics Movie 2 Press the < / > button to select the desired mode. 3 Press the Auto button to suit...
User Manual
Page 23
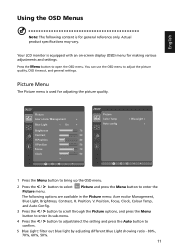
... < / > button to select Picture and press the Menu button to confirm. 5 Blue Light: filter out blue light by adjusting different Blue Light showing ratio - 80%, 70%, 60%, 50%. 11 Your LCD monitor is used for adjusting the picture quality. Actual product specifications may vary. Picture Menu The Picture menu is equipped with an on-screen display (OSD) menu for general reference only. English Using the OSD Menus Note: The following options are available in the Picture menu: Acer ecolor Management, Blue Light, Brightness, Contrast, H. Position, V. Position, Focus...
... < / > button to select Picture and press the Menu button to confirm. 5 Blue Light: filter out blue light by adjusting different Blue Light showing ratio - 80%, 70%, 60%, 50%. 11 Your LCD monitor is used for adjusting the picture quality. Actual product specifications may vary. Picture Menu The Picture menu is equipped with an on-screen display (OSD) menu for general reference only. English Using the OSD Menus Note: The following options are available in the Picture menu: Acer ecolor Management, Blue Light, Brightness, Contrast, H. Position, V. Position, Focus...
User Manual
Page 25
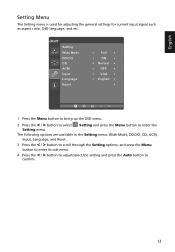
Setting Wide Mode DDC/CI OD ACM Input Language Reset Full ON Normal OFF VGA English 1 Press the Menu button to bring up the OSD menu. 2 Press the < / > button to select Setting and press the Menu button to confirm. 13 English Setting Menu The Setting menu is used for adjusting the general settings for current input signal such as aspect ratio, OSD language, and etc. The following options are available in the Setting menu: Wide Mode, DDC/CI, OD, ACM, Input, Language, and Reset. 3 Press the...
Setting Wide Mode DDC/CI OD ACM Input Language Reset Full ON Normal OFF VGA English 1 Press the Menu button to bring up the OSD menu. 2 Press the < / > button to select Setting and press the Menu button to confirm. 13 English Setting Menu The Setting menu is used for adjusting the general settings for current input signal such as aspect ratio, OSD language, and etc. The following options are available in the Setting menu: Wide Mode, DDC/CI, OD, ACM, Input, Language, and Reset. 3 Press the...

User Manual
Page 27
...diagnose the problem. Blinking Blue Check if the power cord is properly connected at the back of graphics adapter and monitor is missing, off the monitor. 15 Check if the video signal cable is properly connected to their default settings. Check the power switch. VGA Mode Problem No picture visible LED status Blue Off Remedy Using the OSD menu, adjust brightness and contrast to maximum or reset to the monitor. Check the display setting on your LCD monitor for a few seconds after adjusting the size of a missing image, please select another resolution or vertical refresh rate.
...diagnose the problem. Blinking Blue Check if the power cord is properly connected at the back of graphics adapter and monitor is missing, off the monitor. 15 Check if the video signal cable is properly connected to their default settings. Check the power switch. VGA Mode Problem No picture visible LED status Blue Off Remedy Using the OSD menu, adjust brightness and contrast to maximum or reset to the monitor. Check the display setting on your LCD monitor for a few seconds after adjusting the size of a missing image, please select another resolution or vertical refresh rate.
User Manual
Page 28
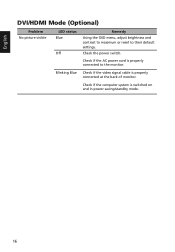
Blinking Blue Check if the video signal cable is switched on and in power saving/standby mode. 16 English DVI/HDMI Mode (Optional) Problem No picture visible LED status Blue Off Remedy Using the OSD menu, adjust brightness and contrast to maximum or reset to the monitor. Check if the AC power cord is properly connected to their default settings. Check if the computer system is properly connected at the back of monitor. Check the power switch.
Blinking Blue Check if the video signal cable is switched on and in power saving/standby mode. 16 English DVI/HDMI Mode (Optional) Problem No picture visible LED status Blue Off Remedy Using the OSD menu, adjust brightness and contrast to maximum or reset to the monitor. Check if the AC power cord is properly connected to their default settings. Check if the computer system is properly connected at the back of monitor. Check the power switch.

