
User Manual (3D)
Page 3
... need 3D glasses to support 144Hz sync signal for instructions how to turn them on page 4. In order to enhance battery life, they turn off , otherwise the image may not be shown a reminder that 3D is a power switch on one of inactivity. If you do not wish to view 3D content, you have bought has integrated DLP technology. Acer projectors need to ensure the...
... need 3D glasses to support 144Hz sync signal for instructions how to turn them on page 4. In order to enhance battery life, they turn off , otherwise the image may not be shown a reminder that 3D is a power switch on one of inactivity. If you do not wish to view 3D content, you have bought has integrated DLP technology. Acer projectors need to ensure the...

User Manual (3D)
Page 4
... refer to open the OSD. Setting up the environment. 1 Set the refresh rate to 100/120 Hz on the projector remote control to your graphics card. Others, please set up a 3D environment Once you are viewing Blu-ray 3D content over an HDMI 1.4a or later connection is not supported on the left-hand side of the window. To download software and use an NVIDIA...
... refer to open the OSD. Setting up the environment. 1 Set the refresh rate to 100/120 Hz on the projector remote control to your graphics card. Others, please set up a 3D environment Once you are viewing Blu-ray 3D content over an HDMI 1.4a or later connection is not supported on the left-hand side of the window. To download software and use an NVIDIA...

User Manual
Page 5
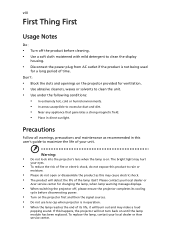
... the life span and darken the image. • Locations near fire alarms. • Locations with all servicing to qualified service personnel when: • the power cord or plug is damaged, cut or frayed • liquid was spilled into the projector's lens when the lamp is poorly ventilated or confined. The bright light may result in the following the operating instructions Note: Adjust only those controls that...
... the life span and darken the image. • Locations near fire alarms. • Locations with all servicing to qualified service personnel when: • the power cord or plug is damaged, cut or frayed • liquid was spilled into the projector's lens when the lamp is poorly ventilated or confined. The bright light may result in the following the operating instructions Note: Adjust only those controls that...
User Manual
Page 6
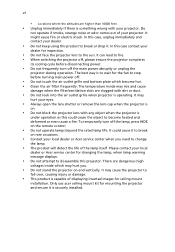
... slots are clogged with your eyes. • Always open the lens shutter or remove the lens cap when the projector is under operation as this product to become hot. • Clean the air filter frequently. It might cause fire or electric shock. Please contact your local dealer or Acer service center for changing the lamp, when lamp warning message displays. • Do not attempt to the sun...
... slots are clogged with your eyes. • Always open the lens shutter or remove the lens cap when the projector is under operation as this product to become hot. • Clean the air filter frequently. It might cause fire or electric shock. Please contact your local dealer or Acer service center for changing the lamp, when lamp warning message displays. • Do not attempt to the sun...
User Manual
Page 8
... local dealer or Acer service center for changing the lamp, when lamp warning message displays. • When switching the projector off the product before disconnecting power. • Turn on the projector first and then the signal sources. • Do not use lens cap when projector is in operation. • When the lamp reaches the end of its life, it will burn out and may make a loud popping sound. To replace the lamp, contact your...
... local dealer or Acer service center for changing the lamp, when lamp warning message displays. • When switching the projector off the product before disconnecting power. • Turn on the projector first and then the signal sources. • Do not use lens cap when projector is in operation. • When the lamp reaches the end of its life, it will burn out and may make a loud popping sound. To replace the lamp, contact your...

User Manual
Page 11
... x 800 WXGA resolution, Auto/Full/4:3/16:9/L.Box aspect ratio supported • Enables projecting 3D content via DLP Link Technology: Blu-Ray 3D supported • One-touch "3D" button on , the projector dynamically adjusts the power consumption of the lamp according to the brightness of the lamp by up to the 3D functions • Acer ColorBoost technology delivers vivid, life-like images • High brightness and contrast...
... x 800 WXGA resolution, Auto/Full/4:3/16:9/L.Box aspect ratio supported • Enables projecting 3D content via DLP Link Technology: Blu-Ray 3D supported • One-touch "3D" button on , the projector dynamically adjusts the power consumption of the lamp according to the brightness of the lamp by up to the 3D functions • Acer ColorBoost technology delivers vivid, life-like images • High brightness and contrast...
User Manual
Page 13
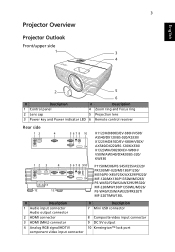
... 2 5 6 # Description # Description 1 Control panel 4 Zoom ring and Focus ring 2 Lens cap 5 Projection lens 3 Power key and Power indicator LED 6 Remote control receiver Rear side 12 4 5 6 7 8...P1350W/M326S/ PE-W45S/F25WS/AW329S/PR320/ MF-220/MW130/P1350WL/M326/ PE-W45/F25W/AW329/PR320T/ MF-220T/MW130L # Description 1 Audio input connector Audio output connector 2 HDMI connector 3 HDMI (MHL) connector 4 Analog RGB signal/HDTV/ component video input connector # Description 7 Mini USB connector 8 Composite video input connector 9 DC 5V output 10 Kensington™ lock port
... 2 5 6 # Description # Description 1 Control panel 4 Zoom ring and Focus ring 2 Lens cap 5 Projection lens 3 Power key and Power indicator LED 6 Remote control receiver Rear side 12 4 5 6 7 8...P1350W/M326S/ PE-W45S/F25WS/AW329S/PR320/ MF-220/MW130/P1350WL/M326/ PE-W45/F25W/AW329/PR320T/ MF-220T/MW130L # Description 1 Audio input connector Audio output connector 2 HDMI connector 3 HDMI (MHL) connector 4 Analog RGB signal/HDTV/ component video input connector # Description 7 Mini USB connector 8 Composite video input connector 9 DC 5V output 10 Kensington™ lock port

User Manual
Page 17
... page. Use this button to HDMI™ (or MHL). (for adjusting 3D settings. 13 SOURCE Changes the active source. 14 MODE Chooses a display mode. 15 MENU Launches the Onscreen Display (OSD) menu or exits the OSD menu. 16 HIDE Press "HIDE" to VGA. press again to display the image. 17 HDMI/MHL To change source to composite video. 20 LAN/WiFi (No function) 21 Keypad 0~9 Press "0~9" to input a password in or out. This connection supports analog RGB...
... page. Use this button to HDMI™ (or MHL). (for adjusting 3D settings. 13 SOURCE Changes the active source. 14 MODE Chooses a display mode. 15 MENU Launches the Onscreen Display (OSD) menu or exits the OSD menu. 16 HIDE Press "HIDE" to VGA. press again to display the image. 17 HDMI/MHL To change source to composite video. 20 LAN/WiFi (No function) 21 Keypad 0~9 Press "0~9" to input a password in or out. This connection supports analog RGB...
User Manual
Page 21
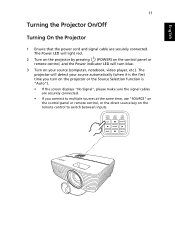
... Power LED will light red. 2 Turn on the projector by pressing (POWER) on the control panel or remote control, and the Power indicator LED will detect your source (computer, notebook, video player, etc.). The projector will turn on the projector or the Source Selection function is the first time you turn blue. 3 Turn on your source automatically (when it is "Auto"). • If the screen displays "No Signal", please make sure the signal cables are securely connected. English 11 Turning the Projector On/Off Turning...
... Power LED will light red. 2 Turn on the projector by pressing (POWER) on the control panel or remote control, and the Power indicator LED will detect your source (computer, notebook, video player, etc.). The projector will turn on the projector or the Source Selection function is the first time you turn blue. 3 Turn on your source automatically (when it is "Auto"). • If the screen displays "No Signal", please make sure the signal cables are securely connected. English 11 Turning the Projector On/Off Turning...
User Manual
Page 25
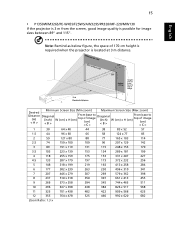
... 637 x 398 438 384 826 x 517 568 11 325 701 x 438 482 422 909 x 568 625 12 355 764 x 478 525 460 992 x 620 682 Zoom Ratio: 1.3 x 15 • P1350W/M326S/PE-W45S/F25WS/AW329S/PR320/MF-220/MW130 If the projector is 3 m from the screen, good image quality is located at 3 m distance.
... 637 x 398 438 384 826 x 517 568 11 325 701 x 438 482 422 909 x 568 625 12 355 764 x 478 525 460 992 x 620 682 Zoom Ratio: 1.3 x 15 • P1350W/M326S/PE-W45S/F25WS/AW329S/PR320/MF-220/MW130 If the projector is 3 m from the screen, good image quality is located at 3 m distance.
User Manual
Page 30
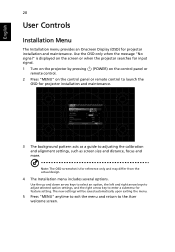
... adjusting the calibration and alignment settings, such as a guide to enter a submenu for feature setting. Note: The OSD screenshot is displayed on the screen or when the projector searches for input signal. 1 Turn on the projector by pressing remote control. (POWER) on the control panel or 2 Press "MENU" on the control panel or remote control to launch the OSD for projector installation and maintenance. 3 The background pattern acts as screen size and distance, focus and more. The new settings...
... adjusting the calibration and alignment settings, such as a guide to enter a submenu for feature setting. Note: The OSD screenshot is displayed on the screen or when the projector searches for input signal. 1 Turn on the projector by pressing remote control. (POWER) on the control panel or 2 Press "MENU" on the control panel or remote control to launch the OSD for projector installation and maintenance. 3 The background pattern acts as screen size and distance, focus and more. The new settings...
User Manual
Page 33
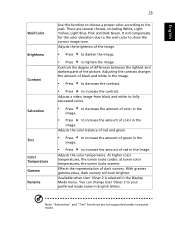
... dark scenery. At higher color temperatures, the screen looks colder; Adjusting the contrast changes the amount of red in the Display Mode menu. Effects the representation of color in the image. Note: "Saturation" and "Tint" functions are several choices, including White, Light Yellow, Light Blue, Pink and Dark Green. There are not supported under computer mode. English Wall Color Brightness Contrast Saturation Tint Color Temperature Gamma Rename 23 Use this function to choose...
... dark scenery. At higher color temperatures, the screen looks colder; Adjusting the contrast changes the amount of red in the Display Mode menu. Effects the representation of color in the image. Note: "Saturation" and "Tint" functions are several choices, including White, Light Yellow, Light Blue, Pink and Dark Green. There are not supported under computer mode. English Wall Color Brightness Contrast Saturation Tint Color Temperature Gamma Rename 23 Use this function to choose...

User Manual
Page 34
... use of image. • Desktop • Ceiling: Turns the image upside down for WXGA/1080p models): Keeps the original signal aspect ratio and zooms in by 1.333 times. Position (Horizontal Position) This function is unavailable when Auto Keystone is set to move the image right. Manual Keystone Sharpness H. 24 English Image Projection Mode Projection Location Aspect Ratio Auto Keystone • Front: The factory default setting. • Rear: Reverses the image so you can project from behind a translucent screen. • Auto: Automatically adjusts projection...
... use of image. • Desktop • Ceiling: Turns the image upside down for WXGA/1080p models): Keeps the original signal aspect ratio and zooms in by 1.333 times. Position (Horizontal Position) This function is unavailable when Auto Keystone is set to move the image right. Manual Keystone Sharpness H. 24 English Image Projection Mode Projection Location Aspect Ratio Auto Keystone • Front: The factory default setting. • Rear: Reverses the image so you can project from behind a translucent screen. • Auto: Automatically adjusts projection...
User Manual
Page 35
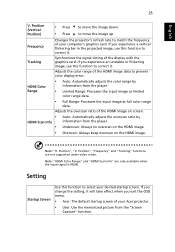
... the input signal is HDMI. If you change the setting, it will take effect when you experience a vertical flickering bar in the projected image, use this function to move the image up. Adjusts the color range of your desired startup screen. Note: "HDMI Color Range" and "HDMI Scan Info" are not supported under video mode. Position (Vertical Position) • Press • Press to correct it . Synchronizes the signal timing of the display...
... the input signal is HDMI. If you change the setting, it will take effect when you experience a vertical flickering bar in the projected image, use this function to move the image up. Adjusts the color range of your desired startup screen. Note: "HDMI Color Range" and "HDMI Scan Info" are not supported under video mode. Position (Vertical Position) • Press • Press to correct it . Synchronizes the signal timing of the display...
User Manual
Page 36
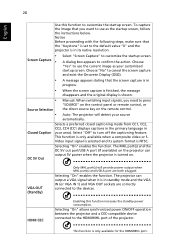
..." to cancel the screen capture and exist the Onscreen Display (OSD). • A message appears stating that the "Keystone" is set to the default value "0" and the projector is shown. • Source Selection Manual: When switching input signals, you want to use the current image as the startup screen, follow the instructions below. 26 English Use this function increases the standby power consumption. VGA OUT (Standby) Only MHL port(s) will detect your area...
..." to cancel the screen capture and exist the Onscreen Display (OSD). • A message appears stating that the "Keystone" is set to the default value "0" and the projector is shown. • Source Selection Manual: When switching input signals, you want to use the current image as the startup screen, follow the instructions below. 26 English Use this function increases the standby power consumption. VGA OUT (Standby) Only MHL port(s) will detect your area...
User Manual
Page 38
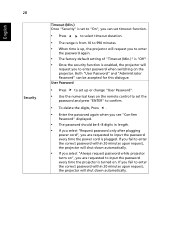
... up or change "User Password". • Use the numerical keys on the remote control to set the password and press "ENTER" to confirm. • To delete the digits, Press . • Enter the password again when you are requested to input the password every time the power cord is plugged. User Password • Press to set up , the projector will request you to enter the password again. • The factory default setting of "Timeout...
... up or change "User Password". • Use the numerical keys on the remote control to set the password and press "ENTER" to confirm. • To delete the digits, Press . • Enter the password again when you are requested to input the password every time the power cord is plugged. User Password • Press to set up , the projector will request you to enter the password again. • The factory default setting of "Timeout...

User Manual
Page 39
... your projector. Security Reset 29 Administrator Password You can enter "Administrator Password" when the "Enter Administrator Password" or "Enter Password" dialogue box displays. • Press to change "Administrator Password". • The factory default of "Administrator Password" is lost, please contact your local Acer service center. Lock User Startup Screen This function is locked and cannot be accepted by default. English If set to "ON", the startup screen is set to the factory default settings. If...
... your projector. Security Reset 29 Administrator Password You can enter "Administrator Password" when the "Enter Administrator Password" or "Enter Password" dialogue box displays. • Press to change "Administrator Password". • The factory default of "Administrator Password" is lost, please contact your local Acer service center. Lock User Startup Screen This function is locked and cannot be accepted by default. English If set to "ON", the startup screen is set to the factory default settings. If...

User Manual
Page 40
... "POWER" on the control panel for 7 seconds and the Control Panel Lock will also lower the power consumption, reduce noise, and extend the lamp life. 30 Management English ECO Mode High Altitude Turn Off Mode Auto Shutdown (Minutes) Menu Display Time (Seconds) AC Power On Control Panel Lock Choose "On" to the normal mode. When the projector is in standby mode to turn on when power is by pressing the power button twice. • Instant Resume: Enables you set. •...
... "POWER" on the control panel for 7 seconds and the Control Panel Lock will also lower the power consumption, reduce noise, and extend the lamp life. 30 Management English ECO Mode High Altitude Turn Off Mode Auto Shutdown (Minutes) Menu Display Time (Seconds) AC Power On Control Panel Lock Choose "On" to the normal mode. When the projector is in standby mode to turn on when power is by pressing the power button twice. • Instant Resume: Enables you set. •...

User Manual
Page 46
Problems with the Projector # Condition Solution 1 The projector stops responding • If possible, turn on the control panel or remote control. Go to "Image" > "Auto Keystone" or "Image" > "Manual Keystone" to make a loud popping sound. To replace the lamp, contact your local dealer or Acer service center. Go to "Image" > "Aspect Ratio" and try different settings. 10 Image has slanted • If possible, reposition the projector so that the control panel lock function is disabled. 2 Lamp burns out...
Problems with the Projector # Condition Solution 1 The projector stops responding • If possible, turn on the control panel or remote control. Go to "Image" > "Auto Keystone" or "Image" > "Manual Keystone" to make a loud popping sound. To replace the lamp, contact your local dealer or Acer service center. Go to "Image" > "Aspect Ratio" and try different settings. 10 Image has slanted • If possible, reposition the projector so that the control panel lock function is disabled. 2 Lamp burns out...
User Manual
Page 48
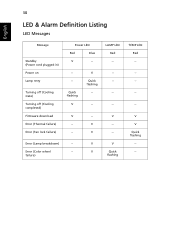
V -- Error (Lamp breakdown) -- failure) V V V Quick flashing TEMP LED Red -- --- -- -- Quick flashing V V Quick flashing -- -- V LAMP LED Red -- --- -- -- Error (Color wheel -- V V Quick flashing --- V --- 38 LED & Alarm Definition Listing LED Messages English Message Standby (Power cord plugged in) Power on Lamp retry Turning off (Cooling state) Turning off (Cooling completed) Firmware download Error (Thermal failure) Error (Fan lock failure) Power LED Red Blue V -- --- V -- --
V -- Error (Lamp breakdown) -- failure) V V V Quick flashing TEMP LED Red -- --- -- -- Quick flashing V V Quick flashing -- -- V LAMP LED Red -- --- -- -- Error (Color wheel -- V V Quick flashing --- V --- 38 LED & Alarm Definition Listing LED Messages English Message Standby (Power cord plugged in) Power on Lamp retry Turning off (Cooling state) Turning off (Cooling completed) Firmware download Error (Thermal failure) Error (Fan lock failure) Power LED Red Blue V -- --- V -- --


