User Manual
Page 2
... or trademarks are trademarks or registered trademarks of purchase Acer and the Acer logo are recorded on the label affixed to their respective companies. Copyright © 2012. Acer Projector X111/X1140/X1140A/X1240/X1340W/P1340W Series Model number Serial number Date of purchase Place ...." All Rights Reserved. The serial number and model number are registered trademarks of such revisions or changes. Acer Projector X111/X1140/X1140A/X1240/X1340W/P1340W Series User's Guide Original Issue: 4/2012 Changes may be made periodically to notify any means, electronically, ...
... or trademarks are trademarks or registered trademarks of purchase Acer and the Acer logo are recorded on the label affixed to their respective companies. Copyright © 2012. Acer Projector X111/X1140/X1140A/X1240/X1340W/P1340W Series Model number Serial number Date of purchase Place ...." All Rights Reserved. The serial number and model number are registered trademarks of such revisions or changes. Acer Projector X111/X1140/X1140A/X1240/X1340W/P1340W Series User's Guide Original Issue: 4/2012 Changes may be made periodically to notify any means, electronically, ...

User Manual
Page 9
... to Optimize Image Size and Distance 11 How to Get a Preferred Image Size by Adjusting Distance and Zoom 13 User Controls 15 Installation Menu 15 Acer Empowering Technology 16 Onscreen Display (OSD) Menus 18 Color 19 Image 21 Setting 24 Management 27 Audio (X1140A/X1240/X1340W...
... to Optimize Image Size and Distance 11 How to Get a Preferred Image Size by Adjusting Distance and Zoom 13 User Controls 15 Installation Menu 15 Acer Empowering Technology 16 Onscreen Display (OSD) Menus 18 Color 19 Image 21 Setting 24 Management 27 Audio (X1140A/X1240/X1340W...

User Manual
Page 11
...: The projector will also be detected for 5 seconds. • Acer EcoProjection Technology delivers Intelligent power management approach and physical efficiency improvement • Empowering Key reveals Acer Empowering Technology functions for easy adjustment of the image being projected. English...: Native 1024 x 768 XGA resolution Auto / 4:3 / 16:9 aspect ratio supported X1340W/P1340W: Native 1280 x 800 WXGA resolution Auto/ Full / 4:3 /16:9 / L.Box aspect ratio supported • Acer ColorBoost technology delivers vivid, life-like images • High brightness and contrast ratio •...
...: The projector will also be detected for 5 seconds. • Acer EcoProjection Technology delivers Intelligent power management approach and physical efficiency improvement • Empowering Key reveals Acer Empowering Technology functions for easy adjustment of the image being projected. English...: Native 1024 x 768 XGA resolution Auto / 4:3 / 16:9 aspect ratio supported X1340W/P1340W: Native 1280 x 800 WXGA resolution Auto/ Full / 4:3 /16:9 / L.Box aspect ratio supported • Acer ColorBoost technology delivers vivid, life-like images • High brightness and contrast ratio •...

User Manual
Page 13
... adjusting wheel 4 Power key and Power indicator LED Rear side (X1140A/X1240/X1340W) 12 3 45 6 # Description 5 Zoom ring 6 Focus ring 7 Remote control receiver (X111/X1140) 1 3 4 5 (P1340W) 4 15 7 3 26 8 9 9 10 # Description # Description 1 Mini USB connector 6 Audio input connector Audio output connector 2 Monitor loop-through output connector 7 HDMI connector 3 Analog RGB signal/HDTV...
... adjusting wheel 4 Power key and Power indicator LED Rear side (X1140A/X1240/X1340W) 12 3 45 6 # Description 5 Zoom ring 6 Focus ring 7 Remote control receiver (X111/X1140) 1 3 4 5 (P1340W) 4 15 7 3 26 8 9 9 10 # Description # Description 1 Mini USB connector 6 Audio input connector Audio output connector 2 Monitor loop-through output connector 7 HDMI connector 3 Analog RGB signal/HDTV...

User Manual
Page 15
...YPbPr (480p/576p/720p/1080i/1080p), and YCbCr (480i/576i). (No function) To change source to the "Turning the Projector On/Off" section. Enables unique Acer functions: eView, eTimer, ePower Management, e3D. Zooms the projector display in the "Setting" > "Security" OSD. 5 Remote Control Layout English ENTER BACK PgUp PgDn... to the input source. To change source to HDMI™ (or DVI) (for the model with HDMI™ or DVI connector). (For P1340W) Sends signals to VGA. To pause the screen image. Press "0~9" to input a password in or out. To change source to the projector.
...YPbPr (480p/576p/720p/1080i/1080p), and YCbCr (480i/576i). (No function) To change source to the "Turning the Projector On/Off" section. Enables unique Acer functions: eView, eTimer, ePower Management, e3D. Zooms the projector display in the "Setting" > "Security" OSD. 5 Remote Control Layout English ENTER BACK PgUp PgDn... to the input source. To change source to HDMI™ (or DVI) (for the model with HDMI™ or DVI connector). (For P1340W) Sends signals to VGA. To pause the screen image. Press "0~9" to input a password in or out. To change source to the projector.

User Manual
Page 16
..., composite video, HDMI or HDTV source. To turn on/off the volume. (No function) (No function) (No function) (No function) (X111/X1140/X1140A/X1240) (X1340W/P1340W) VZ.JDW00.001
..., composite video, HDMI or HDTV source. To turn on/off the volume. (No function) (No function) (No function) (No function) (X111/X1140/X1140A/X1240) (X1340W/P1340W) VZ.JDW00.001

User Manual
Page 22
12 • X1340W/P1340W If the projector is 3 m from the screen, good image quality is located at 3 m distance. Max screen size Min screen size 93" 84" Height: 128 cm ...
12 • X1340W/P1340W If the projector is 3 m from the screen, good image quality is located at 3 m distance. Max screen size Min screen size 93" 84" Height: 128 cm ...

User Manual
Page 24
14 • X1340W/P1340W To obtain an image size of image < D > 46 61 76 91 107 122 137 152 183 229 274 305 381 457 English 2.5 m 2.3 m Desired distance 70" ...
14 • X1340W/P1340W To obtain an image size of image < D > 46 61 76 91 107 122 137 152 183 229 274 305 381 457 English 2.5 m 2.3 m Desired distance 70" ...

User Manual
Page 25
...or 2 Press "MENU" on the control panel or remote control to launch the OSD for projector installation and maintenance. (X111/X1140) (X1140A/X1240/ X1340W/P1340W) 3 The background pattern acts as a guide to adjusting the calibration and alignment settings, such as screen size and distance, focus and more. 4 The ... down arrow keys to select an option, the left and right arrow keys to adjust selected option settings, and the right arrow key to the Acer welcome screen. The new settings will be saved automatically upon exiting the menu. 5 Press "MENU" anytime to exit the menu and return to...
...or 2 Press "MENU" on the control panel or remote control to launch the OSD for projector installation and maintenance. (X111/X1140) (X1140A/X1240/ X1340W/P1340W) 3 The background pattern acts as a guide to adjusting the calibration and alignment settings, such as screen size and distance, focus and more. 4 The ... down arrow keys to select an option, the left and right arrow keys to adjust selected option settings, and the right arrow key to the Acer welcome screen. The new settings will be saved automatically upon exiting the menu. 5 Press "MENU" anytime to exit the menu and return to...
User Manual
Page 26
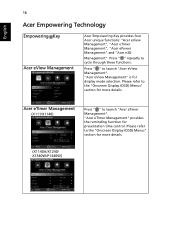
... details. Press " " repeatly to launch "Acer eView Management". Press " " to cycle through these functions. Please refer to the "Onscreen Display (OSD) Menus" section for presentation time control. Acer eTimer Management (X111/X1140) Press " " ...selection. Please refer to launch "Acer eTimer Management". English 16 Acer Empowering Technology Empowering Key Acer eView Management Acer Empowering Key provides four Acer unique functions: "Acer eView Management", "Acer eTimer Management", "Acer ePower Management" and "Acer e3D Management". "Acer eView Management" is for more ...
... details. Press " " repeatly to launch "Acer eView Management". Press " " to cycle through these functions. Please refer to the "Onscreen Display (OSD) Menus" section for presentation time control. Acer eTimer Management (X111/X1140) Press " " ...selection. Please refer to launch "Acer eTimer Management". English 16 Acer Empowering Technology Empowering Key Acer eView Management Acer Empowering Key provides four Acer unique functions: "Acer eView Management", "Acer eTimer Management", "Acer ePower Management" and "Acer e3D Management". "Acer eView Management" is for more ...

User Manual
Page 29
... video in the image. • Press to decrease the contrast. • Press to show the correct image tone. Color (X111/X1140) 19 (X1140A/X1240/X1340W/P1340W) English Display Mode Wall Color Brightness Contrast There are several choices, including White, Light Yellow, Light Blue, Pink and Dark Green. Use this function to...
... video in the image. • Press to decrease the contrast. • Press to show the correct image tone. Color (X111/X1140) 19 (X1140A/X1240/X1340W/P1340W) English Display Mode Wall Color Brightness Contrast There are several choices, including White, Light Yellow, Light Blue, Pink and Dark Green. Use this function to...

User Manual
Page 31
... you can project behind a translucent screen with ceiling mounted projection. English 21 Image (X111/X1140) (X1140A/X1240/X1340W) (P1340W) • • Projection • (X111/X1140) • Projection • Mode (X1140A/ X1240/X1340W/ • P1340W) Front-Desktop: The factory default setting. Rear: Reverses the image so you select this function, the projector reverses...
... you can project behind a translucent screen with ceiling mounted projection. English 21 Image (X111/X1140) (X1140A/X1240/X1340W) (P1340W) • • Projection • (X111/X1140) • Projection • Mode (X1140A/ X1240/X1340W/ • P1340W) Front-Desktop: The factory default setting. Rear: Reverses the image so you select this function, the projector reverses...

User Manual
Page 32
... • Press • Press to "On". Auto Keystone Automatically adjusts image distortion caused by tilting projection (±40 degrees). X1340W/ P1340W) Manual Keystone Sharpness H. Position (Vertical Position) Manually adjusts image distortion caused by tilting (X1140A/X1240/ projection (±40 degrees). Aspect Ratio... The image will be scaled to fit the screen and displayed using a 16:9 ratio. • L.Box (X1340W/P1340W): Keeps the original signal aspect ratio and zooms in by 1.333 times. 22 English Projection • Location (X1140A/X1240/ • X1340W...
... • Press • Press to "On". Auto Keystone Automatically adjusts image distortion caused by tilting projection (±40 degrees). X1340W/ P1340W) Manual Keystone Sharpness H. Position (Vertical Position) Manually adjusts image distortion caused by tilting (X1140A/X1240/ projection (±40 degrees). Aspect Ratio... The image will be scaled to fit the screen and displayed using a 16:9 ratio. • L.Box (X1340W/P1340W): Keeps the original signal aspect ratio and zooms in by 1.333 times. 22 English Projection • Location (X1140A/X1240/ • X1340W...

User Manual
Page 33
... rate to prevent color display error. If you experience a vertical flickering bar in the projected image, use this function to correct it . HDMI Color Range (P1340W) • Auto: Automatically adjusts the color range by information from the player. • Limited Range: Processes the input image as limited color range data. &#...image as full color range data. Underscan: Always no overscan on the HDMI image. • Overscan: Always keep overscan on screen. • HDMI Scan Info (P1340W) • Auto: Automatically adjusts the overscan ratio by information from the player.
... rate to prevent color display error. If you experience a vertical flickering bar in the projected image, use this function to correct it . HDMI Color Range (P1340W) • Auto: Automatically adjusts the color range by information from the player. • Limited Range: Processes the input image as limited color range data. &#...image as full color range data. Underscan: Always no overscan on the HDMI image. • Overscan: Always keep overscan on screen. • HDMI Scan Info (P1340W) • Auto: Automatically adjusts the overscan ratio by information from the player.

User Manual
Page 34
If you change the setting, it will take effect when you exit the OSD menu. • Acer: The default startup screen of your desired startup screen. English 24 Setting (X111/X1140) (X1140A/X1240/X1340W) (P1340W) Startup Screen (P1340W) Use this function to select your Acer projector. • User: Use the memorized picture from the "Screen Capture" function.
If you change the setting, it will take effect when you exit the OSD menu. • Acer: The default startup screen of your desired startup screen. English 24 Setting (X111/X1140) (X1140A/X1240/X1340W) (P1340W) Startup Screen (P1340W) Use this function to select your Acer projector. • User: Use the memorized picture from the "Screen Capture" function.

User Manual
Page 35
...is set to the default value "0", and the "Aspect Ratio" is shown. For details, refer to the "Image" section. • Screen Capture (P1340W) • Change the "Startup Screen" from CC1, CC2, CC3, CC4, (CC1 displays captions in the primary language in your customized startup screen....screen. Select "Off" to the factory default settings. Closed Caption Selects a preferred closed captioning mode from the default setting "Acer" to confirm the action. Reset Press after choosing "Yes" to return the display parameters on all menus to turn off the captioning feature....
...is set to the default value "0", and the "Aspect Ratio" is shown. For details, refer to the "Image" section. • Screen Capture (P1340W) • Change the "Startup Screen" from CC1, CC2, CC3, CC4, (CC1 displays captions in the primary language in your customized startup screen....screen. Select "Off" to the factory default settings. Closed Caption Selects a preferred closed captioning mode from the default setting "Acer" to confirm the action. Reset Press after choosing "Yes" to return the display parameters on all menus to turn off the captioning feature....

User Manual
Page 36
... "On" to change "User Password". • Use the numerical keys on the projector. You have to manage the projector. Press to enable the security function. P1340W The factory default of "Timeout (Min.)" is "Off". • Once the security function is enabled, the projector will request you can be 4~8 digits in length...
... "On" to change "User Password". • Use the numerical keys on the projector. You have to manage the projector. Press to enable the security function. P1340W The factory default of "Timeout (Min.)" is "Off". • Once the security function is enabled, the projector will request you can be 4~8 digits in length...

User Manual
Page 37
...matter what the administrator password is. • If the Security Card is printed on the Security Card that came with your local Acer service center. This unique password will also lower the power consumption, reduce noise, and extend the lamp life. English 27 Administrator ...is turned on, the projector fans operate at full speed continuously to cool down the projector's temperature. Management (X111/X1140) (X1140A/X1240/X1340W/P1340W) ECO Mode High Altitude Choose "On" to dim the projector lamp, which is lost, please contact your projector. When this function is "1234...
...matter what the administrator password is. • If the Security Card is printed on the Security Card that came with your local Acer service center. This unique password will also lower the power consumption, reduce noise, and extend the lamp life. English 27 Administrator ...is turned on, the projector fans operate at full speed continuously to cool down the projector's temperature. Management (X111/X1140) (X1140A/X1240/X1340W/P1340W) ECO Mode High Altitude Choose "On" to dim the projector lamp, which is lost, please contact your projector. When this function is "1234...

User Manual
Page 38
... "Yes" to turn the lamp hour counter to show up 30 hours before end of any warning notifications. Audio (X1140A/X1240/X1340W/P1340W) (X1140A/X1240/X1340W) (P1340W) Volume Mute Alarm Volume (P1340W) • Press to decrease the volume. • Press to increase the volume. • Choose "On" to turn mute on. • Choose...
... "Yes" to turn the lamp hour counter to show up 30 hours before end of any warning notifications. Audio (X1140A/X1240/X1340W/P1340W) (X1140A/X1240/X1340W) (P1340W) Volume Mute Alarm Volume (P1340W) • Press to decrease the volume. • Press to increase the volume. • Choose "On" to turn mute on. • Choose...

User Manual
Page 39
... wearing DLP 3D glasses, you may need to execute "Invert" to get best match of left/right image sequence to get the correct image (for P1340W) Supported timing NTSC, PAL Choose "On" to enable the 3D function supported by TI DLP 3D technology. • On Select this item while using DLP... card and HQFS format file or DVD with corresponding SW player. • Off Turns off the 3D mode. 3D (X111/X1140) 29 (X1140A/X1240/X1340W/P1340W) English 3D 3D Sync Invert Selects "On" to display the 3D warning message. 3D Warning Message Note: Supported 3D signal timings: Signal source type Video...
... wearing DLP 3D glasses, you may need to execute "Invert" to get best match of left/right image sequence to get the correct image (for P1340W) Supported timing NTSC, PAL Choose "On" to enable the 3D function supported by TI DLP 3D technology. • On Select this item while using DLP... card and HQFS format file or DVD with corresponding SW player. • Off Turns off the 3D mode. 3D (X111/X1140) 29 (X1140A/X1240/X1340W/P1340W) English 3D 3D Sync Invert Selects "On" to display the 3D warning message. 3D Warning Message Note: Supported 3D signal timings: Signal source type Video...