

User Manual
Page 3
... wall outlet before removing the power supply unit from overheating. Turning the product off before cleaning Unplug this product near or over a radiator or heat register, or in a built-in a fire or electric shock. Caution for cleaning. Warnings! • Do not use liquid cleaners or aerosol cleaners. The openings should never be blocked by unplugging all warnings and instructions marked on an...
... wall outlet before removing the power supply unit from overheating. Turning the product off before cleaning Unplug this product near or over a radiator or heat register, or in a built-in a fire or electric shock. Caution for cleaning. Warnings! • Do not use liquid cleaners or aerosol cleaners. The openings should never be blocked by unplugging all warnings and instructions marked on an...
User Manual
Page 5
... darkening the image. • Locations near fire alarms. • Locations with all servicing to qualified service personnel. Do not operate if smoke, strange noise or odor comes out of small children. v Product servicing Do not attempt to service this product from walls and free flow of air around the projector is necessary. • Locations where temperatures may become excessively high, such as opening or removing covers may...
... darkening the image. • Locations near fire alarms. • Locations with all servicing to qualified service personnel. Do not operate if smoke, strange noise or odor comes out of small children. v Product servicing Do not attempt to service this product from walls and free flow of air around the projector is necessary. • Locations where temperatures may become excessively high, such as opening or removing covers may...
User Manual
Page 6
... not look into the air outlet grille when projector is showing warning message. • When changing the lamp, please allow unit to cool down, and follow all changing instructions. • Reset the "Lamp Hour Reset" function from the Onscreen display "Management" menu after replacing the lamp module. • Do not attempt to change the lamp when is operating. To temporarily turn off . • Do not touch air outlet grille and bottom...
... not look into the air outlet grille when projector is showing warning message. • When changing the lamp, please allow unit to cool down, and follow all changing instructions. • Reset the "Lamp Hour Reset" function from the Onscreen display "Management" menu after replacing the lamp module. • Do not attempt to change the lamp when is operating. To temporarily turn off . • Do not touch air outlet grille and bottom...
User Manual
Page 8
... changing the lamp, please allow unit to maximize the life of time. To replace the lamp, follow all changing instructions. • This product will detect the life of the lamp itself. viii First things first Usage Notes Do: • Turn off , please ensure the projector completes its life, it will not turn back on . Please be sure to change the lamp when it shows warning messages. • Reset the "Lamp Hour Reset...
... changing the lamp, please allow unit to maximize the life of time. To replace the lamp, follow all changing instructions. • This product will detect the life of the lamp itself. viii First things first Usage Notes Do: • Turn off , please ensure the projector completes its life, it will not turn back on . Please be sure to change the lamp when it shows warning messages. • Reset the "Lamp Hour Reset...

User Manual
Page 9
... Started 11 Connecting the Projector (P1101/P1201/P1203P/P1206P/ P1303PW) 11 Connecting the Projector (P1101C/P1201B/P1203PB/ P1203Pi/P1201i/P1201n) 12 Turning the Projector On/Off 14 Turning on the Projector 14 Turning the projector off 15 Adjusting the Projected Image 16 Adjusting the Height of Projected Image 16 How to optimize image size and distance 17 How to get a preferred image size by adjusting distance and zoom 21 User Controls 25 Installation menu 25 Acer Empowering Technology 26 Onscreen Display (OSD...
... Started 11 Connecting the Projector (P1101/P1201/P1203P/P1206P/ P1303PW) 11 Connecting the Projector (P1101C/P1201B/P1203PB/ P1203Pi/P1201i/P1201n) 12 Turning the Projector On/Off 14 Turning on the Projector 14 Turning the projector off 15 Adjusting the Projected Image 16 Adjusting the Height of Projected Image 16 How to optimize image size and distance 17 How to get a preferred image size by adjusting distance and zoom 21 User Controls 25 Installation menu 25 Acer Empowering Technology 26 Onscreen Display (OSD...
User Manual
Page 11
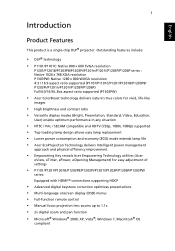
... utilities (Acer eView, eTimer, ePower, eOpening Management) for easy adjustment of settings • P1101/P1201/P1201B/P1203PB/P1203Pi/P1201i/P1203P/P1206P/P1303PW series: Equipped with HDMI™ connections supporting HDCP • Advanced digital keystone correction optimizes presentations • Multi-language onscreen display (OSD) menus • Full-function remote control • Manual focus projection lens zooms up to 1.1x • 2x digital zoom and pan function • Microsoft® Windows®...
... utilities (Acer eView, eTimer, ePower, eOpening Management) for easy adjustment of settings • P1101/P1201/P1201B/P1203PB/P1203Pi/P1201i/P1203P/P1206P/P1303PW series: Equipped with HDMI™ connections supporting HDCP • Advanced digital keystone correction optimizes presentations • Multi-language onscreen display (OSD) menus • Full-function remote control • Manual focus projection lens zooms up to 1.1x • 2x digital zoom and pan function • Microsoft® Windows®...

User Manual
Page 16
... 6 Control Panel 1 6 2 7 3 8 4 9 5 2 # Icon Function Description 1 LAMP Lamp Indicator LED 2 Keystone Adjusts the image to compensate for distortion caused by tilting the projector (± 40 degrees). 3 RESYNC 4 MENU Automatically synchronizes the projector to the input source. • Press "MENU" to launch the Onscreen display (OSD) menu, back to the previous step for the OSD menu operation or exit the OSD menu. • Confirm your selection of items. 5 POWER See the contents in "Turning...
... 6 Control Panel 1 6 2 7 3 8 4 9 5 2 # Icon Function Description 1 LAMP Lamp Indicator LED 2 Keystone Adjusts the image to compensate for distortion caused by tilting the projector (± 40 degrees). 3 RESYNC 4 MENU Automatically synchronizes the projector to the input source. • Press "MENU" to launch the Onscreen display (OSD) menu, back to the previous step for the OSD menu operation or exit the OSD menu. • Confirm your selection of items. 5 POWER See the contents in "Turning...
User Manual
Page 17
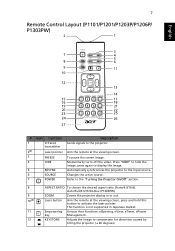
... image. 5 RESYNC Automatically synchronizes the projector to the input source. 6 SOURCE Changes the active source. 7 POWER Refer to the projector. Auto/Full/4:3/16:9/L.Box (P1303PW) ZOOM Zooms the projector display in Japanese market. 7 Remote Control Layout (P1101/P1201/P1203P/P1206P/ P1303PW) 2 1 English 3 7 4 5 8 6 9 11 10 12 13 14 15 17 16 18 19 21 20 22 23 25 24 26 27 # Icon Function Description 1 Infrared Sends signals to the "Turning...
... image. 5 RESYNC Automatically synchronizes the projector to the input source. 6 SOURCE Changes the active source. 7 POWER Refer to the projector. Auto/Full/4:3/16:9/L.Box (P1303PW) ZOOM Zooms the projector display in Japanese market. 7 Remote Control Layout (P1101/P1201/P1203P/P1206P/ P1303PW) 2 1 English 3 7 4 5 8 6 9 11 10 12 13 14 15 17 16 18 19 21 20 22 23 25 24 26 27 # Icon Function Description 1 Infrared Sends signals to the "Turning...
User Manual
Page 18
... picture. 18 COLOR Press "COLOR" to adjust the color temperature of items. 14 PgUp/PgDn For computer mode only. select keys 13 MENU • Press "MENU" to launch the Onscreen display (OSD) menu, back to the previous step for the model if with HDMI™ connector) 25 MUTE To turn on/off the volume. 26 WIRELESS No function. 27 KeyPad 0~9 Press "0~9" to input a password in the "Security settings". Use...
... picture. 18 COLOR Press "COLOR" to adjust the color temperature of items. 14 PgUp/PgDn For computer mode only. select keys 13 MENU • Press "MENU" to launch the Onscreen display (OSD) menu, back to the previous step for the model if with HDMI™ connector) 25 MUTE To turn on/off the volume. 26 WIRELESS No function. 27 KeyPad 0~9 Press "0~9" to input a password in the "Security settings". Use...
User Manual
Page 19
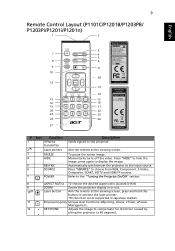
.../Off" section. 8 9 10(#) 11 12 ASPECT RATIO To choose the desired aspect ratio (Auto/4:3/16:9) ZOOM Zooms the projector display in Japanese market. KEYSTONE Adjusts the image to display the image. This function is not supported in or out. Momentarily turns off the video. 9 Remote Control Layout (P1101C/P1201B/P1203PB/ P1203Pi/P1201i/P1201n) 1 2 English 3 7 4 5 8 6 9 11 10 28 12 13 14 15 17 16 18 19...
.../Off" section. 8 9 10(#) 11 12 ASPECT RATIO To choose the desired aspect ratio (Auto/4:3/16:9) ZOOM Zooms the projector display in Japanese market. KEYSTONE Adjusts the image to display the image. This function is not supported in or out. Momentarily turns off the video. 9 Remote Control Layout (P1101C/P1201B/P1203PB/ P1203Pi/P1201i/P1201n) 1 2 English 3 7 4 5 8 6 9 11 10 28 12 13 14 15 17 16 18 19...
User Manual
Page 24
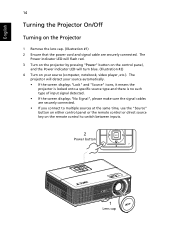
... input signal detected. • If the screen displays "No Signal", please make sure the signal cables are securely connected. The Power indicator LED will flash red. 3 Turn on the projector by pressing "Power" button on the control panel, and the Power indicator LED will detect your source (computer, notebook, video player ,etc.). The projector will turn blue. (Illustration #2) 4 Turn on the Projector 1 Remove the lens cap. (Illustration #1) 2 Ensure that the power cord and signal cable are securely connected. • If you connect to multiple sources at the same time, use...
... input signal detected. • If the screen displays "No Signal", please make sure the signal cables are securely connected. The Power indicator LED will flash red. 3 Turn on the projector by pressing "Power" button on the control panel, and the Power indicator LED will detect your source (computer, notebook, video player ,etc.). The projector will turn blue. (Illustration #2) 4 Turn on the Projector 1 Remove the lens cap. (Illustration #1) 2 Ensure that the power cord and signal cable are securely connected. • If you connect to multiple sources at the same time, use...

User Manual
Page 27
... cm height is required when located at a desired distance from the screen. • P1101/P1101C/P1201/P1201B/P1203PB/P1203Pi/P1201n/P1201i/P1203P/ P1206P series Example: If the projector is 3 m from the screen, good image quality is positioned at 3m distance. English 17 How to optimize image size and distance Consult the table below figure, the space of image Figure: Fixed distance with different zoom and screen size.
... cm height is required when located at a desired distance from the screen. • P1101/P1101C/P1201/P1201B/P1203PB/P1203Pi/P1201n/P1201i/P1203P/ P1206P series Example: If the projector is 3 m from the screen, good image quality is positioned at 3m distance. English 17 How to optimize image size and distance Consult the table below figure, the space of image Figure: Fixed distance with different zoom and screen size.
User Manual
Page 35
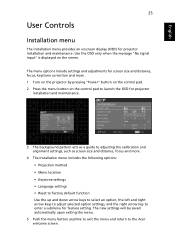
... only when the message "No signal input" is displayed on the control pad to launch the OSD for projector installation and maintenance. 3 The background pattern acts as a guide to adjusting the calibration and alignment settings, such as screen size and distance, focus and more . 4 The Installation menu includes the following options: • Projection method • Menu location • Keystone settings • Language settings • Reset to factory default function Use the up and down arrow keys...
... only when the message "No signal input" is displayed on the control pad to launch the OSD for projector installation and maintenance. 3 The background pattern acts as a guide to adjusting the calibration and alignment settings, such as screen size and distance, focus and more . 4 The Installation menu includes the following options: • Projection method • Menu location • Keystone settings • Language settings • Reset to factory default function Use the up and down arrow keys...
User Manual
Page 43
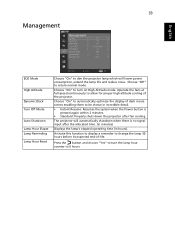
... ECO Mode High Altitude Dynamic Black Turn Off Mode Auto Shutdown Lamp Hour Elapse Lamp Reminding Lamp Hour Reset Choose "On" to dim the projector lamp which will automatically shutdown when there is pressed again within 2 minutes. • Standard: Properly shuts down the projector after the allocated time. (in minutes) Displays the lamp's elapsed operating time (in incredible detail. • Instant Resume: Resumes the system when the Power button is no signal input after fan...
... ECO Mode High Altitude Dynamic Black Turn Off Mode Auto Shutdown Lamp Hour Elapse Lamp Reminding Lamp Hour Reset Choose "On" to dim the projector lamp which will automatically shutdown when there is pressed again within 2 minutes. • Standard: Properly shuts down the projector after the allocated time. (in minutes) Displays the lamp's elapsed operating time (in incredible detail. • Instant Resume: Resumes the system when the Power button is no signal input after fan...

User Manual
Page 45
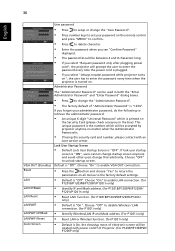
... switch on the projector without password. Please refer to 1280 x 800 before you use this function. If the security function is enabled, your screen aspect ratio to change the "Security" setting. Timeout(Min.) Once "Security" is activated to 1024 x 768 before you use this dialogue. Note: For WXGA models, to get best quality for you desired image, suggest end-user set PC resolution...
... switch on the projector without password. Please refer to 1280 x 800 before you use this function. If the security function is enabled, your screen aspect ratio to change the "Security" setting. Timeout(Min.) Once "Security" is activated to 1024 x 768 before you use this dialogue. Note: For WXGA models, to get best quality for you desired image, suggest end-user set PC resolution...
User Manual
Page 46
... users change that arbitrarily. Choose "On" to delete character. • Enter the password when you forgot your password on . If you see "Confirm Password" displayed. • The password should be used in the box). This unique password is the number which is printed on all menus to the factory default settings. • Default is turned on the remote control and press "MENU" to confirm. • Press to enable LAN connection...
... users change that arbitrarily. Choose "On" to delete character. • Enter the password when you forgot your password on . If you see "Confirm Password" displayed. • The password should be used in the box). This unique password is the number which is printed on all menus to the factory default settings. • Default is turned on the remote control and press "MENU" to confirm. • Press to enable LAN connection...
User Manual
Page 53
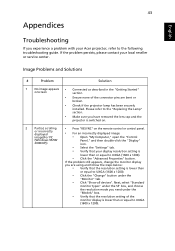
... experience a problem with your Acer projector, refer to the following troubleshooting guide. If the problem persists, please contact your local reseller or service center. 43 Appendices English Troubleshooting If you have removed the lens cap and the projector is switched on. 2 Partial, scrolling or incorrectly displayed image(For PC • Press "RESYNC" on the remote control or control panel. • For an incorrectly displayed image: • Open "My Computer," open the "Control (Windows 95...
... experience a problem with your Acer projector, refer to the following troubleshooting guide. If the problem persists, please contact your local reseller or service center. 43 Appendices English Troubleshooting If you have removed the lens cap and the projector is switched on. 2 Partial, scrolling or incorrectly displayed image(For PC • Press "RESYNC" on the remote control or control panel. • For an incorrectly displayed image: • Open "My Computer," open the "Control (Windows 95...

User Manual
Page 54
.... • Change the display color depth settings on the projector lens. • Make sure the projection screen is within the required distance of the • If you are using an Apple® Mac® OS based notebook: In System Preferences, open Display and select Video Mirroring "On". 5 Image is unstable • Adjust the "Tracking" to flickering bar the "Image" section for more information. • Check and reconfigure the display mode of...
.... • Change the display color depth settings on the projector lens. • Make sure the projection screen is within the required distance of the • If you are using an Apple® Mac® OS based notebook: In System Preferences, open Display and select Video Mirroring "On". 5 Image is unstable • Adjust the "Tracking" to flickering bar the "Image" section for more information. • Check and reconfigure the display mode of...
User Manual
Page 59
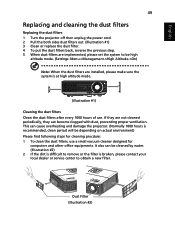
... is difficult to remove or the filter is at high altitude mode. (Illustration #1) Cleaning the dust filters Clean the dust filters after every 1000 hours of use a small vacuum cleaner designed for cleaning procdure: 1 To clean the dust filters, use . English 49 Replacing and cleaning the dust filters Replacing the dust filters 1 Turn the projector off then unplug the power cord. 2 Pull the both sides dust filters out. (Illustration #1) 3 Clean or replace the dust filter. 4 To put...
... is difficult to remove or the filter is at high altitude mode. (Illustration #1) Cleaning the dust filters Clean the dust filters after every 1000 hours of use a small vacuum cleaner designed for cleaning procdure: 1 To clean the dust filters, use . English 49 Replacing and cleaning the dust filters Replacing the dust filters 1 Turn the projector off then unplug the power cord. 2 Pull the both sides dust filters out. (Illustration #1) 3 Clean or replace the dust filter. 4 To put...

User Manual
Page 64
Projection system Resolution Computer compatibility Video compatibility Aspect ratio Displayable colors Projection lens Projection screen size (diagonal) Projection distance Throw ratio Horizontal scan rate Vertical refresh scan rate Lamp type Keystone correction Audio Weight Dimensions (W x D x H) Remote control Digital Zoom Power supply DLP® P1101/P1101C: Native: SVGA (800 x 600) , Maximum: UXGA (1600 x 1200), 1080p(1920x1080) P1201/P1201B/P1203PB/P1203Pi/P1201n/P1201i/P1203P/ P1206P: Native: XGA (1024 x 768), Maximum: UXGA (1600 x 1200), 1080p(1920x1080) P1303PW series...
Projection system Resolution Computer compatibility Video compatibility Aspect ratio Displayable colors Projection lens Projection screen size (diagonal) Projection distance Throw ratio Horizontal scan rate Vertical refresh scan rate Lamp type Keystone correction Audio Weight Dimensions (W x D x H) Remote control Digital Zoom Power supply DLP® P1101/P1101C: Native: SVGA (800 x 600) , Maximum: UXGA (1600 x 1200), 1080p(1920x1080) P1201/P1201B/P1203PB/P1203Pi/P1201n/P1201i/P1203P/ P1206P: Native: XGA (1024 x 768), Maximum: UXGA (1600 x 1200), 1080p(1920x1080) P1303PW series...


