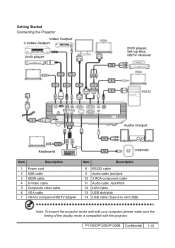
Acer P1200i Projector Service Guide
Page 14
1-3 Product Overview Projector Outlook Front /Upper side Item Description 1 Control panel 2 Ventilation (inlet) 3 Ventilation (outlet) 4 Elevator button 5 Elevator foot Item Description 6 Zoom lever 7 Remote control receiver 8 Focus ring 9 Zoom lens 10 Lens cap P1100C/P1200i/P1200B Confidential 1-
Acer P1200i Projector Service Guide
Page 17
... Function Description 1 LAMP Lamp Indicator LED 2 KEYSTONE Adjusts the image to compensate for distortion caused by tilting the projector (±40 degrees). 3 RESYNC Automatically synchronizes the projector to the input source. • Press "MENU" to launch the Onscreen display (OSD) 4 MENU menu, back...for the OSD menu operation or exit the OSD menu. • Confirm your selection of items. 5 POWER See the contents in "Turning the Projector On/Off" section. 6 TEMP Temp Indicator LED 7 Four directional select keys Use to choose RGB, Component, SVideo, Composite, SCART, HDTV ...
Acer P1200i Projector Service Guide
Page 19
...19 VGA connector supports analog RGB, YPbPr (480p/576p/720p/ 1080i), YCbCr (480i/576i) and RGBsync. P1100C/P1200i/P1200B Confidential 1-13 Unique Acer functions: eOpening, eView, eTimer, ePower Management. 12 KEYSTONE Adjusts the image to compensate for the OSD menu operation or exit the OSD menu. ...• Confirm your selection of items. 14 PAGE For computer mode only. Automatically synchronizes the projector to select the next or previous page. Use this button to activate the laser pointer. To pause the screen image. Press "SOURCE"...
Acer P1200i Projector Service Guide
Page 20
... change source to HDMI™. Use up, down, left, right buttons to select items or make adjustments to toggle between SD and USB A sources. This projector supports various file formats of photo/audio/ video. Note: "#"Japan area is not supported "*" No DVI function P1100C/P1200i/P1200B Confidential 1-14 Press "LAN/WiFi...
Acer P1200i Projector Service Guide
Page 21
P1100C/P1200i/P1200B Confidential 1-15 Getting Started Connecting the Projector Item Description 1 Power cord 2 USB cable 3 HDMI cable 4 S-Video cable 5 Composite video cable 6 VGA cable 7 VGA to component/HDTV adapter Item Description 8 RS232 cable 9 Audio cable jack/jack 10 3 RCA component cable 11 Audio cable Jack/RCA 12 LAN Cable 13 USB disk/stick 14 USB cable (Type A to mini USB) Note: To ensure the projector works well with your computer, please make sure the timing of the display mode is compatible with the projector.
Acer P1200i Projector Service Guide
Page 24
Long Nose Nipper 6. P1100C/P1200i/P1200B Confidential 2- Screw Bit (+): 107 3. Tweezers 7. Hex Sleeves 5mm 5. Operators should wear electrostatic chains. * Note: - Projector * Before you have to get into Service Mode and record the lamp usage hour, please refer to replace the Main Board, you start: This process is protective level II. If you need to section 2-16. Screw Bit (+): 105 2. Screw Bit (-): 107 4. Chapter 2 Disassembly & Assembly Process 2-1 Equipment Needed & Product Overview 1.
Acer P1200i Projector Service Guide
Page 25
2-2 Disassemble Lamp Module 1. Loosen 2 screws (as blue arrows point). 4. Pull upward the Lamp Cover Module (as red circle) on the left/right side of the projector. 3. Push forward the Lamp Cover Moudle (as red circle). 2. Take off the Lamp Module. P1100C/P1200i/P1200B Confidential 2- Unscrew 1 screw (as yellow arrows) on the Lamp Module. 5.
Acer P1200i Projector Service Guide
Page 63
...;�f�o�r�m��a�t�(�H�Q�F��S���fi�le��)�. - Ensure that your Projector is ��g�o�o��d�a��n�d��y�o�u��m��u�s�t�f�a�c�...
Acer P1200i Projector Service Guide
Page 64
No Symptom Procedure - If you forget the Password, please do the following steps to get the Universal Password: (1) Click the "AcerSNID" Forgetting Pass17 word (adminis- trator Password) (2) Input SNID number. (SNID number is on the Security Card. Then the Universal Password will be accepted by projector anytime no matter what the Administrator Password is printed on the Security Card) (3) Click "Calculate". This unique password is a back door of Administrator Password which is . - P1100C/P1200i/P1200B Confidential 3- An unique Universal Password which will appear.
Acer P1200i Projector Service Guide
Page 66
DVD player with SVGA/XGA resolution - Turn on the projector 2. The following actions sequentially to get into Service Mode (1) Press "Power", "Left", "Left" and "Menu" buttons sequentially. (2) Service Mode will allow you to erase all ...
Acer P1200i Projector Service Guide
Page 73
... "G Sensor Calibration" for " correction in Service Mode. Test equipment: video generator - It should be done as well. (1) Test signal: 480i (2) Test Pattern: SMPTEbar - Please put the Projector on a horizontal surface. - P1100C/P1200i/P1200B Confidential 4- Choose "Exit" to access "Video Calibration for correction. Color saturation - The color should be in right order. - Test...
Acer P1200i Projector Service Guide
Page 75
... performed and the color can not discolor. 6. 3D Test Procedure Inspection item Inspection Distance Criteria - Distances from the screen: 2.38M - Connect VGA IN port of Projector with HDMI output - Screen Size: 60 inches diagonal 1. HDMI Test (For P1200i/P1200B) Procedure Inspection item Inspection Distance Criteria - Product must be warmed up for...
Acer P1200i Projector Service Guide
Page 77
... sequentially to correct the test pattern. - There should be adjusted when the test pattern appears flashing, abnormal color, or missing color. After about 5 seconds, the projector will be sufficient and normal. Note: Color Wheel Index should not have any lack of RGBW. - picture (1) 4-11 Color Wheel Index Adjustment picture (2) Check pattern...
Acer P1200i Projector Service Guide
Page 78
... - Turn on the screen. 2. Check any abnormal color, line distortion or any noise on the projector and plug USB flash disk into USB A1 or USB A2 port of PC. Connect the PC and Projector by mini USB Cable Note: please ensure you PC firewell is closed - Select "PHOTO" to USB... disk. - PC will find the USB new hardware automatically - next continue complete P1100C/P1200i/P1200B Confidential 4-13 4-12. Switch source to connect with projector while " " appears on the PC screen - PC will automatically try to USB A. - Check whether the...
Acer P1200i Projector Service Guide
Page 79
...;o�r�S��e�t�ti�n�g� (1) Power on projector. (2) Press "Menu" to get into OSD Mode. (3) Select "Setting ->LAN", choose "On" (4) Record projector IP address through LAN IP/ Mask (Record IP address: 192.168.100.10). (5) Connect projector with PC by LAN cable. 2. PC Setting (1). Click "Properties". (2). Click "Properties...
Acer P1200i Projector Service Guide
Page 80
....255.255.0(as red square). Execute "Internet Explorer". 2. (3) 2. (4) 3. (1) (2). Note: The HOST ID (192.168.100.XXX) of PC IP address must be different from the projector IP address recorded down in 4-11-1. - T��e�s�t �P�r�o�c�e�d�u��re� (1). (3). Click "OK". (4). Visit the...
Acer P1200i Projector Service Guide
Page 81
3.(4) (4) Click "Save" to save the "Acer_W5.exe". 3.(5) (5) Double click "Acer_W5.exe". 3.(6) (6) Click "Next". (7) Double click "Acer Projector Gateway W5" on desktop. 3.(7) P1100C/P1200i/P1200B Confidential 4-16
Acer P1200i Projector Service Guide
Page 82
Plug the PC mouse into USB A1 port or USB A2 of the projector . - Move the mouse to check whether the cursor on screen is also moving P1100C/P1200i/P1200B Confidential 4-17 (8) Click "Ok". 3.(8) (9) Check whether the PC image has been projected by the projector. (10) -
Acer P1200i Projector Service Guide
Page 83
... -The setting procedure is same as red square). Note: The HOST ID (192.168.100.XXX) of PC IP address must be different from the projector IP address recorded down in 4-11-1. - Modify the IP address to 192.168.100.12 Modify Subnet mask to 255.255.255.0(as 4-11-1. 2. Right...
Acer P1200i Projector Service Guide
Page 84
P1100C/P1200i/P1200B Confidential 4-19 Test Procedure Test Procedure for Wireless function is the same as Network Function Test. Please refer to connect the Wireless Module. (7)Message "Connected" appears on the screen. 3. (6) Double click "Acer Projector" to 4-11-3.