

User Manual
Page 4
... of power indicated on the power cord. Do not locate this product where people will probably cause unexpected short current or damage rotor devices or lamp. The overall system load must not exceed 80% of all products plugged into a non-grounded power outlet. Do not insert the plug into the... that the total ampere rating of the equipment plugged into the extension cord does not exceed the extension cord ampere rating. If you need to replace the power cord set . Using electrical power • This product should not exceed 80% of the power strip's input rating. • This product's AC ...
... of power indicated on the power cord. Do not locate this product where people will probably cause unexpected short current or damage rotor devices or lamp. The overall system load must not exceed 80% of all products plugged into a non-grounded power outlet. Do not insert the plug into the... that the total ampere rating of the equipment plugged into the extension cord does not exceed the extension cord ampere rating. If you need to replace the power cord set . Using electrical power • This product should not exceed 80% of the power strip's input rating. • This product's AC ...
User Manual
Page 6
... may hurt your dealer. • Do not keep using this product to break on rare occasions. • Never replace the lamp assembly or any object when the projector is under operation as this case, unplug immediately and contact your eyes. • Always open the lens ...your dealer for ceiling mount installation. It may hurt you. It could cause it is on end vertically. Only use acer ceiling mount kit for replacement. • Do not operate lamps beyond the rated lamp life. To temporarily turn off . • Do not touch the air outlet grille and bottom plate which become heated...
... may hurt your dealer. • Do not keep using this product to break on rare occasions. • Never replace the lamp assembly or any object when the projector is under operation as this case, unplug immediately and contact your eyes. • Always open the lens ...your dealer for ceiling mount installation. It may hurt you. It could cause it is on end vertically. Only use acer ceiling mount kit for replacement. • Do not operate lamps beyond the rated lamp life. To temporarily turn off . • Do not touch the air outlet grille and bottom plate which become heated...
User Manual
Page 8
... • Please do not open or disassemble the product as recommended in this user's guide to maximize the life of time. To replace the lamp, follow all warnings, precautions and maintenance as this happens, the projector will not turn back on until the...Use a soft cloth moistened with mild detergent to clean the display housing. • Disconnect the power plug from the Onscreen Display "Management" menu after replacing the lamp module. • When switching the projector off the product before disconnecting power. • Turn on the projector first and then the signal sources. &#...
... • Please do not open or disassemble the product as recommended in this user's guide to maximize the life of time. To replace the lamp, follow all warnings, precautions and maintenance as this happens, the projector will not turn back on until the...Use a soft cloth moistened with mild detergent to clean the display housing. • Disconnect the power plug from the Onscreen Display "Management" menu after replacing the lamp module. • When switching the projector off the product before disconnecting power. • Turn on the projector first and then the signal sources. &#...

User Manual
Page 10
Troubleshooting 28 LED & Alarm Definition Listing 32 Replacing the Lamp 33 Ceiling Mount Installation 34 Specifications 37 Compatibility Modes 40 Regulations and safety notices 44
Troubleshooting 28 LED & Alarm Definition Listing 32 Replacing the Lamp 33 Ceiling Mount Installation 34 Specifications 37 Compatibility Modes 40 Regulations and safety notices 44
User Manual
Page 38
..."Settings" tab. • Verify that the resolution setting of the connector pins are bent or broken. • Check if the projection lamp has been securely installed. If the problem still appears, change the monitor display you are correctly connected as onscreen described in the "Getting ...If you need under the SP box, and choose the resolution mode you experience a problem with your Acer projector, refer to the following troubleshooting guide. Please refer to the "Replacing the Lamp" section. • Make sure the projector is lower than or equal to 1600 x 1200 or ...
..."Settings" tab. • Verify that the resolution setting of the connector pins are bent or broken. • Check if the projection lamp has been securely installed. If the problem still appears, change the monitor display you are correctly connected as onscreen described in the "Getting ...If you need under the SP box, and choose the resolution mode you experience a problem with your Acer projector, refer to the following troubleshooting guide. Please refer to the "Replacing the Lamp" section. • Make sure the projector is lower than or equal to 1600 x 1200 or ...
User Manual
Page 40
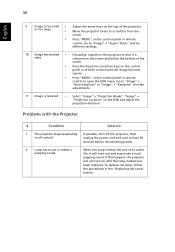
... the screen and below the bottom of the screen. • Press the Keystone correction keys on the control panel or remote control until the lamp module has been replaced. If this happens, the projector will burn out and may make adjustments. 11 Image is reversed • Select "Image" > "Projection Mode",..." on until the image becomes square. • Press "MENU" on the control panel or remote control to open the OSD menu. To replace the lamp, follow the procedures in the "Replacing the Lamp" section. or too large • Move the projector closer to make a loud popping sound.
... the screen and below the bottom of the screen. • Press the Keystone correction keys on the control panel or remote control until the lamp module has been replaced. If this happens, the projector will burn out and may make adjustments. 11 Image is reversed • Select "Image" > "Projection Mode",..." on until the image becomes square. • Press "MENU" on the control panel or remote control to open the OSD menu. To replace the lamp, follow the procedures in the "Replacing the Lamp" section. or too large • Move the projector closer to make a loud popping sound.

User Manual
Page 41
...! Please also check the dust filters if they are installed. Replace the lamp - the system fan is clogged with dust, please clean it soon. If the dust filter is not working. Lamp is approaching the end of its recommended operating temperature and must be allowed to cool down before... it is about to replace it . Projector Overheated - Prepare to reach its maximum lifetime. Fan Fail. the...
...! Please also check the dust filters if they are installed. Replace the lamp - the system fan is clogged with dust, please clean it soon. If the dust filter is not working. Lamp is approaching the end of its recommended operating temperature and must be allowed to cool down before... it is about to replace it . Projector Overheated - Prepare to reach its maximum lifetime. Fan Fail. the...
User Manual
Page 43
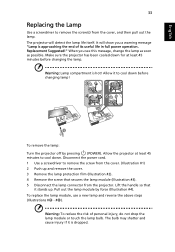
... power cord. 1 Use a screwdriver to cool down for at least 45 minutes before changing lamp! 3 5 2 1 4 1 6 2 8 2 7 8 1 To remove the lamp: Turn the projector off by force (Illustration #4). To replace the lamp module, use a new lamp and reverse the above steps (Illustrations # 5 - # 8 ). When you a warning message "Lamp is approaching the end of personal injury, do not drop the...
... power cord. 1 Use a screwdriver to cool down for at least 45 minutes before changing lamp! 3 5 2 1 4 1 6 2 8 2 7 8 1 To remove the lamp: Turn the projector off by force (Illustration #4). To replace the lamp module, use a new lamp and reverse the above steps (Illustrations # 5 - # 8 ). When you a warning message "Lamp is approaching the end of personal injury, do not drop the...


