
User Manual (3D)
Page 3
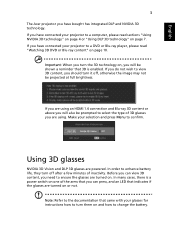
... for instructions how to turn the 3D technology on, you will also be shown a reminder that indicates if the glasses are using an HDMI 1.4 connection and Blu-ray 3D content or above you will be prompted to ensure the glasses are powered. Using 3D glasses NVIDIA 3D Vision and DLP 3D glasses are turned on. English 3 The Acer projector you have connected your projector...
... for instructions how to turn the 3D technology on, you will also be shown a reminder that indicates if the glasses are using an HDMI 1.4 connection and Blu-ray 3D content or above you will be prompted to ensure the glasses are powered. Using 3D glasses NVIDIA 3D Vision and DLP 3D glasses are turned on. English 3 The Acer projector you have connected your projector...
User Manual (3D)
Page 4
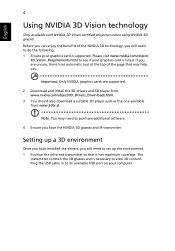
... software. 4 Ensure you have installed the drivers, you . The transmitter controls the 3D glasses and is an automatic tool at . Note: You may help you will need to set up the environment. 1 Position the infra-red transmitter so that may need to do the following. 1 Ensure your graphics card is listed. If you are supported. 2 Download and install the 3D drivers...
... software. 4 Ensure you have installed the drivers, you . The transmitter controls the 3D glasses and is an automatic tool at . Note: You may help you will need to set up the environment. 1 Position the infra-red transmitter so that may need to do the following. 1 Ensure your graphics card is listed. If you are supported. 2 Download and install the 3D drivers...
User Manual (3D)
Page 8
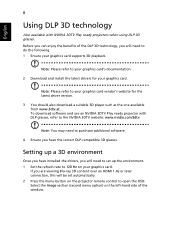
....3dtv.at. Select the Image section (second menu option) on your graphics card supports 3D playback. To download software and use an NVIDIA 3DTV Play ready projector with NVIDIA 3DTV Play ready projectors when using DLP 3D glasses. Note: Please refer to your graphics card. Note: You may need to set automatically. 2 Press the menu button on the projector remote control to the NVIDIA 3DTV website...
....3dtv.at. Select the Image section (second menu option) on your graphics card supports 3D playback. To download software and use an NVIDIA 3DTV Play ready projector with NVIDIA 3DTV Play ready projectors when using DLP 3D glasses. Note: Please refer to your graphics card. Note: You may need to set automatically. 2 Press the menu button on the projector remote control to the NVIDIA 3DTV website...
User Manual (3D)
Page 11
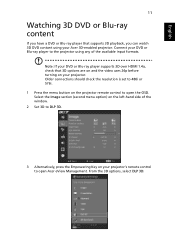
Older connections should check the resolution is set to 480i or 576i. 1 Press the menu button on the projector remote control to open Acer eView Management. Select the Image section (second menu option) on the left-hand side of the available input formats. English 11 Watching 3D DVD or Blu-ray content If you can watch 3D DVD contant using any of the window. 2 Set 3D to DLP 3D...
Older connections should check the resolution is set to 480i or 576i. 1 Press the menu button on the projector remote control to open Acer eView Management. Select the Image section (second menu option) on the left-hand side of the available input formats. English 11 Watching 3D DVD or Blu-ray content If you can watch 3D DVD contant using any of the window. 2 Set 3D to DLP 3D...
User Manual
Page 3
... covered. This product should never be seriously damaged. • Slots and openings are provided for future reference. Keep this product from the wall outlet before cleaning Unplug this document for ventilation to protect it from the power supplies. Follow all power cords from overheating. If the product falls, it could result in installation unless proper ventilation is easily accessible and located...
... covered. This product should never be seriously damaged. • Slots and openings are provided for future reference. Keep this product from the wall outlet before cleaning Unplug this document for ventilation to protect it from the power supplies. Follow all power cords from overheating. If the product falls, it could result in installation unless proper ventilation is easily accessible and located...

User Manual
Page 5
For safety reasons, do not use non-compliant parts when adding or changing components. It v Product servicing Do not attempt to service this product from walls and free flow of air around the projector is necessary. • Locations where temperatures may become excessively high, such as opening or removing covers may hurt your eyes. • Turn on . Consult your reseller for service • the product does not...
For safety reasons, do not use non-compliant parts when adding or changing components. It v Product servicing Do not attempt to service this product from walls and free flow of air around the projector is necessary. • Locations where temperatures may become excessively high, such as opening or removing covers may hurt your eyes. • Turn on . Consult your reseller for service • the product does not...
User Manual
Page 6
...; Do not keep using this projector. The best way is operating. The temperature inside which becomes hot. • Clean the air filter frequently if have adjusted. • Do not listen to music at high volumes for inspection. • Do not face the projector lens to suitable qualified professional service personnel. • Do not stand the projector on . • Do not block the projector lens with dirt...
...; Do not keep using this projector. The best way is operating. The temperature inside which becomes hot. • Clean the air filter frequently if have adjusted. • Do not listen to music at high volumes for inspection. • Do not face the projector lens to suitable qualified professional service personnel. • Do not stand the projector on . • Do not block the projector lens with dirt...
User Manual
Page 9
... 2 Projector Overview 3 Projector Outlook 3 Control Panel 4 Remote Control Layout 5 Getting Started 7 Connecting the Projector 7 Turning the Projector On/Off 8 Turning on the Projector 8 Turning the projector off 9 Adjusting the Projected Image 10 Adjusting the Height of Projected Image 10 How to optimize image size and distance 11 How to get a preferred image size by adjusting distance and zoom 13 User Controls 15 Installation menu 15 Acer Empowering Technology 16 Onscreen Display (OSD) Menus 17 Color 18 Image 20 Setting 22 Management 25 Audio 25...
... 2 Projector Overview 3 Projector Outlook 3 Control Panel 4 Remote Control Layout 5 Getting Started 7 Connecting the Projector 7 Turning the Projector On/Off 8 Turning on the Projector 8 Turning the projector off 9 Adjusting the Projected Image 10 Adjusting the Height of Projected Image 10 How to optimize image size and distance 11 How to get a preferred image size by adjusting distance and zoom 13 User Controls 15 Installation menu 15 Acer Empowering Technology 16 Onscreen Display (OSD) Menus 17 Color 18 Image 20 Setting 22 Management 25 Audio 25...
User Manual
Page 11
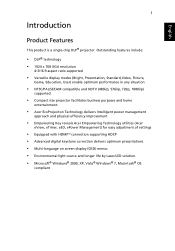
... Management) for easy adjustment of settings • Equipped with HDMITM connection supporting HDCP • Advanced digital keystone correction delivers optimum presentations • Multi-language on screen display (OSD) menus • Environmental light source and longer life by Laser/LED solution. • Microsoft® Windows® 2000, XP, Vista® Windows® 7, Macintosh® OS compliant English 1 Introduction Product Features This product is a single-chip DLP® projector.
... Management) for easy adjustment of settings • Equipped with HDMITM connection supporting HDCP • Advanced digital keystone correction delivers optimum presentations • Multi-language on screen display (OSD) menus • Environmental light source and longer life by Laser/LED solution. • Microsoft® Windows® 2000, XP, Vista® Windows® 7, Macintosh® OS compliant English 1 Introduction Product Features This product is a single-chip DLP® projector.
User Manual
Page 14
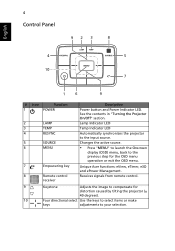
...English 4 Control Panel 92 3 8 4 5 10 7 1 6 9 # Icon Function 1 POWER 2 LAMP 3 TEMP 4 RESYNC 5 SOURCE 6 MENU 7 Empowering key 8 Remote control receiver Description Power button and Power Indicator LED. See the contents in "Turning the Projector On/Off" section. Changes the active source. • Press "MENU" to launch the Onscreen display (OSD) menu, back to the input source. Unique Acer functions: eView, eTimer, e3D and ePower Management. Receives signals from remote control. 9 Keystone Adjusts the image to compensate for the OSD menu operation or exit...
...English 4 Control Panel 92 3 8 4 5 10 7 1 6 9 # Icon Function 1 POWER 2 LAMP 3 TEMP 4 RESYNC 5 SOURCE 6 MENU 7 Empowering key 8 Remote control receiver Description Power button and Power Indicator LED. See the contents in "Turning the Projector On/Off" section. Changes the active source. • Press "MENU" to launch the Onscreen display (OSD) menu, back to the input source. Unique Acer functions: eView, eTimer, e3D and ePower Management. Receives signals from remote control. 9 Keystone Adjusts the image to compensate for the OSD menu operation or exit...
User Manual
Page 15
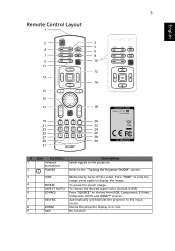
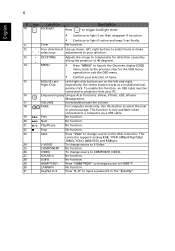
... image. 4 FREEZE To pause the screen image. 5 ASPECT RATIO To choose the desired aspect ratio (Auto/4:3/16:9) 6 SOURCE Press "SOURCE" to choose from RGB, Component, S-Video, Composite, HDTV and HDMI™ sources. 7 RESYNC Automatically synchronizes the projector to the "Turning the Projector On/Off" section. 3 HIDE Momentarily turns off the video. Refer to the input source. 8 ZOOM Zooms the projector display in or out. 9 Back No function. English 5 Remote Control Layout 1 Backlight LED...
... image. 4 FREEZE To pause the screen image. 5 ASPECT RATIO To choose the desired aspect ratio (Auto/4:3/16:9) 6 SOURCE Press "SOURCE" to choose from RGB, Component, S-Video, Composite, HDTV and HDMI™ sources. 7 RESYNC Automatically synchronizes the projector to the "Turning the Projector On/Off" section. 3 HIDE Momentarily turns off the video. Refer to the input source. 8 ZOOM Zooms the projector display in or out. 9 Back No function. English 5 Remote Control Layout 1 Backlight LED...
User Manual
Page 16
... change source to HDMI™. 30 LAN/WiFi No function. 31 KeyPad 0~9 Press "0~9" to the previous step for the OSD menu operation or exit the OSD menu. • Confirm your PC. 16 Empowering key Unique Acer functions: eView, eTimer, e3D, ePower Management. 17 VOLUME Increases/decreases the volume. 18 PAGE For computer mode only. Use this function, an USB cable must be connected...
... change source to HDMI™. 30 LAN/WiFi No function. 31 KeyPad 0~9 Press "0~9" to the previous step for the OSD menu operation or exit the OSD menu. • Confirm your PC. 16 Empowering key Unique Acer functions: eView, eTimer, e3D, ePower Management. 17 VOLUME Increases/decreases the volume. 18 PAGE For computer mode only. Use this function, an USB cable must be connected...
User Manual
Page 17
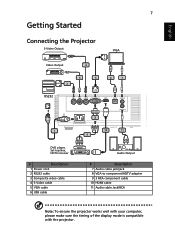
... W R USB USB D-Sub 7 Getting Started Connecting the Projector S-Video Output VGA Video Output 4 Y HDMI RS232 RS232 3 2 Y 5 D-Sub RS232 VIDEO S-VIDEO VGA IN 6 7 HDMI USB Ctrl AUDIO IN HDTV adapter 8 HDMI AUDIO OUT 1 DVD player, Set-top Box, HDTV receiver RBG 10 9 RBG 11 Audio Output # Description 1 Power cord 2 RS232 cable 3 Composite video cable 4 S-Video cable 5 VGA cable 6 USB cable # Description 7 Audio cable jack/jack 8 VGA to component/HDTV adapter 9 3 RCA component cable 10 HDMI cable 11 Audio cable Jack/RCA Note: To ensure the projector works well...
... W R USB USB D-Sub 7 Getting Started Connecting the Projector S-Video Output VGA Video Output 4 Y HDMI RS232 RS232 3 2 Y 5 D-Sub RS232 VIDEO S-VIDEO VGA IN 6 7 HDMI USB Ctrl AUDIO IN HDTV adapter 8 HDMI AUDIO OUT 1 DVD player, Set-top Box, HDTV receiver RBG 10 9 RBG 11 Audio Output # Description 1 Power cord 2 RS232 cable 3 Composite video cable 4 S-Video cable 5 VGA cable 6 USB cable # Description 7 Audio cable jack/jack 8 VGA to component/HDTV adapter 9 3 RCA component cable 10 HDMI cable 11 Audio cable Jack/RCA Note: To ensure the projector works well...
User Manual
Page 18
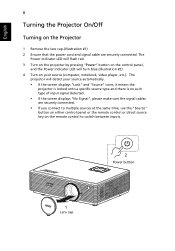
... time, use the "Source" button on either control panel or the remote control or direct source key on your source automatically. • If the screen displays "Lock" and "Source" icons, it means the projector is locked onto a specific source type and there is no such type of input signal detected. • If the screen displays "No Signal", please make sure the signal cables are securely connected. The projector will turn blue.(Illustration #2) 4 Turn on the remote control to switch between inputs. 2 Power button 1 Lens cap The Power indicator LED will flash red. 3 Turn...
... time, use the "Source" button on either control panel or the remote control or direct source key on your source automatically. • If the screen displays "Lock" and "Source" icons, it means the projector is locked onto a specific source type and there is no such type of input signal detected. • If the screen displays "No Signal", please make sure the signal cables are securely connected. The projector will turn blue.(Illustration #2) 4 Turn on the remote control to switch between inputs. 2 Power button 1 Lens cap The Power indicator LED will flash red. 3 Turn...
User Manual
Page 25
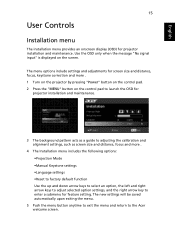
... only when the message "No signal input" is displayed on the control pad to launch the OSD for projector installation and maintenance. 3 The background pattern acts as a guide to adjusting the calibration and alignment settings, such as screen size and distance, focus and more . 4 The Installation menu includes the following options: •Projection Mode •Manual Keystone settings •Language settings •Reset to factory default function Use the up and down arrow keys to select...
... only when the message "No signal input" is displayed on the control pad to launch the OSD for projector installation and maintenance. 3 The background pattern acts as a guide to adjusting the calibration and alignment settings, such as screen size and distance, focus and more . 4 The Installation menu includes the following options: •Projection Mode •Manual Keystone settings •Language settings •Reset to factory default function Use the up and down arrow keys to select...
User Manual
Page 30
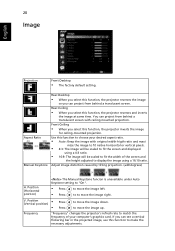
..." changes the projector's refresh rate to match the frequency of the screen and the height adjusted to display the image using a 4:3 ratio. • 16:9: The image will be scaled to fit the width of your desired aspect ratio. • Auto: Keep the image with ceiling mounted projection. to make the necessary adjustments. Rear-Ceiling • When you select this function, the projector reverses and inverts the image at same time. Adjust image...
..." changes the projector's refresh rate to match the frequency of the screen and the height adjusted to display the image using a 4:3 ratio. • 16:9: The image will be scaled to fit the width of your desired aspect ratio. • Auto: Keep the image with ceiling mounted projection. to make the necessary adjustments. Rear-Ceiling • When you select this function, the projector reverses and inverts the image at same time. Adjust image...
User Manual
Page 32
...:9" or "Auto" . Note: For WXGA models, to get best quality for you use as your screen aspect ratio to the "Image" section. • Change the "Startup Screen" from "Screen Capture" function. Use this function. If you change the setting, the changes will take effect when you exit the OSD menu. • Acer: The default startup screen of your Acer projector. • User: Use memorize picture from the default setting "Acer" to "User". • Press "Screen Capture...
...:9" or "Auto" . Note: For WXGA models, to get best quality for you use as your screen aspect ratio to the "Image" section. • Change the "Startup Screen" from "Screen Capture" function. Use this function. If you change the setting, the changes will take effect when you exit the OSD menu. • Acer: The default startup screen of your Acer projector. • User: Use memorize picture from the default setting "Acer" to "User". • Press "Screen Capture...
User Manual
Page 33
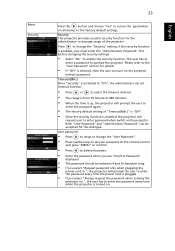
... to operate the projector. Both "User Password" and "Administrator Password" can turn on the remote control and press "MENU" to confirm. • Press to setup or change the "Security" setting. If the security function is activated to "On", the administrator can set your must enter the "Administrator Password" first before changing the security settings. • Select "On" to enter the password again. • The factory default setting of the projector . User password •...
... to operate the projector. Both "User Password" and "Administrator Password" can turn on the remote control and press "MENU" to confirm. • Press to setup or change the "Security" setting. If the security function is activated to "On", the administrator can set your must enter the "Administrator Password" first before changing the security settings. • Select "On" to enter the password again. • The factory default setting of the projector . User password •...
User Manual
Page 35
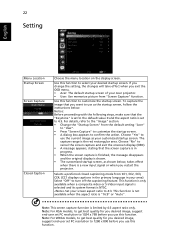
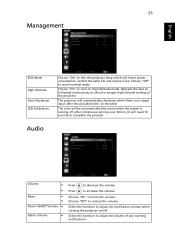
... function to allow for proper high altitude cooling of any warning notifications. The projector will automatically shutdown when there is no signal input after the allocated time. (in minutes) The color will be automatically fine tuned while the system is turning off after continuous running over 30 min. (it will lower power consumption, extend the lamp life and reduce noise. Choose...
... function to allow for proper high altitude cooling of any warning notifications. The projector will automatically shutdown when there is no signal input after the allocated time. (in minutes) The color will be automatically fine tuned while the system is turning off after continuous running over 30 min. (it will lower power consumption, extend the lamp life and reduce noise. Choose...
User Manual
Page 39
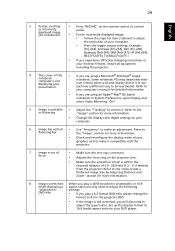
... difficulty changing resolutions or your monitor freezes, restart all equipment including the projector. 4 The screen of your graphics card to 16:9 (wide) aspect ratio on the remote control or control or incorrectly panel. Set up the display format to make an adjustment. displayed image (for notebooks) • For an incorrectly displayed image: • Follow the steps for more information. • Change the display color depth settings on the projector lens. •...
... difficulty changing resolutions or your monitor freezes, restart all equipment including the projector. 4 The screen of your graphics card to 16:9 (wide) aspect ratio on the remote control or control or incorrectly panel. Set up the display format to make an adjustment. displayed image (for notebooks) • For an incorrectly displayed image: • Follow the steps for more information. • Change the display color depth settings on the projector lens. •...


