

User Manual
Page 3
... power supply unit: • Install the power supply unit before connecting the power cord to the AC power outlet. • Unplug the power cord before cleaning. These openings must not be seriously damaged. • Slots and openings are provided for your safety and comfort Read these instructions carefully. Use a damp cloth for future reference. The openings should never be sure to unplug the power cord from the electrical outlet. Warnings...
... power supply unit: • Install the power supply unit before connecting the power cord to the AC power outlet. • Unplug the power cord before cleaning. These openings must not be seriously damaged. • Slots and openings are provided for your safety and comfort Read these instructions carefully. Use a damp cloth for future reference. The openings should never be sure to unplug the power cord from the electrical outlet. Warnings...
User Manual
Page 5
... expose you to dangerous voltage points or other controls may result in following the operating instructions Note: Adjust only those controls that is poorly ventilated or confined. It v Product servicing Do not attempt to service this product from walls and free flow of air around the projector is necessary. • Locations where temperatures may become excessively high, such as opening or removing covers may contain small...
... expose you to dangerous voltage points or other controls may result in following the operating instructions Note: Adjust only those controls that is poorly ventilated or confined. It v Product servicing Do not attempt to service this product from walls and free flow of air around the projector is necessary. • Locations where temperatures may become excessively high, such as opening or removing covers may contain small...
User Manual
Page 6
... cycle before turning main power off the main power abruptly or unplug the projector during operation. Refer servicing only to the sun. The best way is operating. In this case, unplug immediately and contact your dealer. • Do not keep using this case contact your eyes. • Always open the lens shutter or remove the lens cap when the projector is under operation as this...
... cycle before turning main power off the main power abruptly or unplug the projector during operation. Refer servicing only to the sun. The best way is operating. In this case, unplug immediately and contact your dealer. • Do not keep using this case contact your eyes. • Always open the lens shutter or remove the lens cap when the projector is under operation as this...
User Manual
Page 9
... 2 Projector Overview 3 Projector Outlook 3 Control Panel 4 Remote Control Layout 5 Getting Started 7 Connecting the Projector 7 Turning the Projector On/Off 8 Turning on the Projector 8 Turning the projector off 9 Adjusting the Projected Image 10 Adjusting the Height of Projected Image 10 How to optimize image size and distance 11 User Controls 13 Installation menu 13 Acer Empowering Technology 14 Onscreen Display (OSD) Menus 15 Color 16 Image 17 Setting 19 Management 19 Audio 20 3D 21 Language 22 How to Play iPhone/iPod/iPad Media via K330...
... 2 Projector Overview 3 Projector Outlook 3 Control Panel 4 Remote Control Layout 5 Getting Started 7 Connecting the Projector 7 Turning the Projector On/Off 8 Turning on the Projector 8 Turning the projector off 9 Adjusting the Projected Image 10 Adjusting the Height of Projected Image 10 How to optimize image size and distance 11 User Controls 13 Installation menu 13 Acer Empowering Technology 14 Onscreen Display (OSD) Menus 15 Color 16 Image 17 Setting 19 Management 19 Audio 20 3D 21 Language 22 How to Play iPhone/iPod/iPad Media via K330...
User Manual
Page 11
... (Acer eView, eTimer, e3D, ePower Management) for easy adjustment of settings • Equipped with HDMITM connection supporting HDCP • Advanced digital keystone correction delivers optimum presentations • Multi-language on screen display (OSD) menus • 1.7x digital zoom and pan move function • Environmental light source and longer life by LED solution. • Enjoy media playback via USB, RAM and SD card reader. • Microsoft® Windows...
... (Acer eView, eTimer, e3D, ePower Management) for easy adjustment of settings • Equipped with HDMITM connection supporting HDCP • Advanced digital keystone correction delivers optimum presentations • Multi-language on screen display (OSD) menus • 1.7x digital zoom and pan move function • Environmental light source and longer life by LED solution. • Enjoy media playback via USB, RAM and SD card reader. • Microsoft® Windows...
User Manual
Page 13
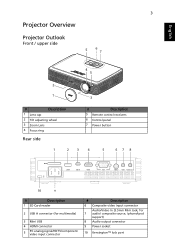
... / upper side 5 6 7 4 5 2 1 3 # Description 1 Lens cap 2 Tilt adjusting wheel 3 Zoom Lens 4 Focus ring Rear side # Description 5 Remote control receivers 6 Control panel 7 Power button 1 23 4 5 67 8 10 9 # Description 1 SD Card reader 2 USB A connector (for multimedia) 3 Mini USB 4 HDMI connector 5 PC analog signal/HDTV/component video input connector # Description 6 Composite video input connector Audio/Video In (3.5mm Mini Jack, for 7 audio/ composite source, iphone/ipod support) 8 Audio output connector 9 Power socket 10 Kensington™ lock port
... / upper side 5 6 7 4 5 2 1 3 # Description 1 Lens cap 2 Tilt adjusting wheel 3 Zoom Lens 4 Focus ring Rear side # Description 5 Remote control receivers 6 Control panel 7 Power button 1 23 4 5 67 8 10 9 # Description 1 SD Card reader 2 USB A connector (for multimedia) 3 Mini USB 4 HDMI connector 5 PC analog signal/HDTV/component video input connector # Description 6 Composite video input connector Audio/Video In (3.5mm Mini Jack, for 7 audio/ composite source, iphone/ipod support) 8 Audio output connector 9 Power socket 10 Kensington™ lock port
User Manual
Page 14
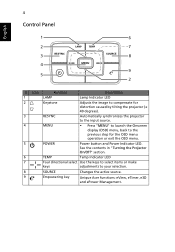
4 Control Panel English 1 6 2 7 3 8 4 9 5 2 # Icon Function Description 1 LAMP Lamp Indicator LED 2 Keystone Adjusts the image to compensate for distortion caused by tilting the projector (± 40 degrees). 3 RESYNC 4 MENU Automatically synchronizes the projector to the input source. • Press "MENU" to launch the Onscreen display (OSD) menu, back to your selection. 8 SOURCE Changes the active source. 9 Empowering key Unique Acer functions: eView, eTimer, e3D and ePower Management. See the contents in "Turning the Projector On...
4 Control Panel English 1 6 2 7 3 8 4 9 5 2 # Icon Function Description 1 LAMP Lamp Indicator LED 2 Keystone Adjusts the image to compensate for distortion caused by tilting the projector (± 40 degrees). 3 RESYNC 4 MENU Automatically synchronizes the projector to the input source. • Press "MENU" to launch the Onscreen display (OSD) menu, back to your selection. 8 SOURCE Changes the active source. 9 Empowering key Unique Acer functions: eView, eTimer, e3D and ePower Management. See the contents in "Turning the Projector On...
User Manual
Page 15
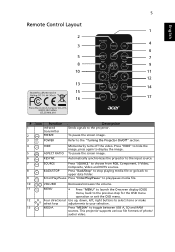
Refer to toggle between USB A, SD and RAM sources. This projector supports various file formats of photo/ audio/ video. To pause the screen image. Press "HIDE" to hide the image, press again to display the image. 5 ASPECT RATIO To pause the screen image. 6 RESYNC Automatically synchronizes the projector to the input source. 7 SOURCE Press "SOURCE" to choose from RGB, Component, S-Video, Composite, Video and HDTV sources. 8 BACK/STOP Press "Back/Stop" to...
Refer to toggle between USB A, SD and RAM sources. This projector supports various file formats of photo/ audio/ video. To pause the screen image. Press "HIDE" to hide the image, press again to display the image. 5 ASPECT RATIO To pause the screen image. 6 RESYNC Automatically synchronizes the projector to the input source. 7 SOURCE Press "SOURCE" to choose from RGB, Component, S-Video, Composite, Video and HDTV sources. 8 BACK/STOP Press "Back/Stop" to...

User Manual
Page 17
... # Description 1 Power cord 2 VGA cable 3 VGA to component/HDTV adapter 4 3 RCA component cable 5 HDMI cable 6 3.5 mm jack A/V 7 Adapter for iPod/iPhone/iPad # Description 8 3.5 mm jack A/V to RCA cable 9 SD card 10 USB disk/stick 11 USB charging cable for iPod/iPhone/iPad 12 Composite video cable 13 Audio cable Jack/RCA 14 USB cable Note: To ensure the projector works well with your computer, please make sure the timing of the display mode is compatible...
... # Description 1 Power cord 2 VGA cable 3 VGA to component/HDTV adapter 4 3 RCA component cable 5 HDMI cable 6 3.5 mm jack A/V 7 Adapter for iPod/iPhone/iPad # Description 8 3.5 mm jack A/V to RCA cable 9 SD card 10 USB disk/stick 11 USB charging cable for iPod/iPhone/iPad 12 Composite video cable 13 Audio cable Jack/RCA 14 USB cable Note: To ensure the projector works well with your computer, please make sure the timing of the display mode is compatible...
User Manual
Page 18
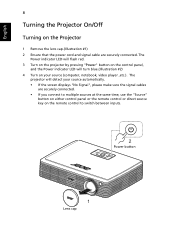
... the Projector 1 Remove the lens cap.(Illustration #1) 2 Ensure that the power cord and signal cable are securely connected. • If you connect to switch between inputs. 2 Power button 1 Lens cap The projector will turn blue.(Illustration #2) 4 Turn on the remote control to multiple sources at the same time, use the "Source" button on either control panel or the remote control or direct source key on your source automatically. • If the screen displays "No Signal", please make sure the signal cables are securely connected. The Power indicator LED will flash red. 3 Turn on...
... the Projector 1 Remove the lens cap.(Illustration #1) 2 Ensure that the power cord and signal cable are securely connected. • If you connect to switch between inputs. 2 Power button 1 Lens cap The projector will turn blue.(Illustration #2) 4 Turn on the remote control to multiple sources at the same time, use the "Source" button on either control panel or the remote control or direct source key on your source automatically. • If the screen displays "No Signal", please make sure the signal cables are securely connected. The Power indicator LED will flash red. 3 Turn on...
User Manual
Page 23
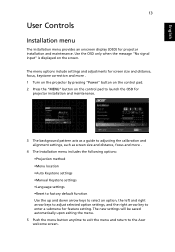
... OSD for projector installation and maintenance. The new settings will be saved automatically upon exiting the menu. 5 Push the menu button anytime to exit the menu and return to enter a submenu for feature setting. The menu options include settings and adjustments for screen size and distance, focus, keystone correction and more . 4 The Installation menu includes the following options: •Projection method •Menu location •Auto Keystone settings •Manual Keystone settings •Language settings •Reset to factory default function Use the...
... OSD for projector installation and maintenance. The new settings will be saved automatically upon exiting the menu. 5 Push the menu button anytime to exit the menu and return to enter a submenu for feature setting. The menu options include settings and adjustments for screen size and distance, focus, keystone correction and more . 4 The Installation menu includes the following options: •Projection method •Menu location •Auto Keystone settings •Manual Keystone settings •Language settings •Reset to factory default function Use the...
User Manual
Page 27
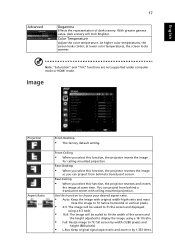
... your desired aspect ratio. • Auto: Keep the image with ceiling mounted projection. Image Projection Aspect Ratio Front-Desktop • The factory default setting. Rear-Ceiling • When you select this function to fit full screen by width (1280 pixels) and height (800 pixels). • L.Box: Keep original signal aspect ratio and zoom in by 1.333 times. Color Temperature Adjust the color temperature. At higher color temperatures, the screen looks colder; Rear-Desktop • When...
... your desired aspect ratio. • Auto: Keep the image with ceiling mounted projection. Image Projection Aspect Ratio Front-Desktop • The factory default setting. Rear-Ceiling • When you select this function to fit full screen by width (1280 pixels) and height (800 pixels). • L.Box: Keep original signal aspect ratio and zoom in by 1.333 times. Color Temperature Adjust the color temperature. At higher color temperatures, the screen looks colder; Rear-Desktop • When...
User Manual
Page 28
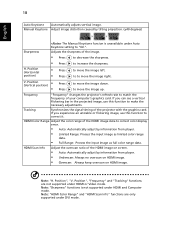
... flickering image, use this function to move the image left. Note: "Sharpness" functions is unavailable under HDMI or Video mode. Tracking Synchronizes the signal timing of your computer's graphics card. Manual Keystone Adjust image distortion caused by information from player. • Limited Range: Prosess the input image as limited color range data. • Full Range: Prosess the input image as full color range data. Adjusts the sharpness of the HDMI image data to move the image...
... flickering image, use this function to move the image left. Note: "Sharpness" functions is unavailable under HDMI or Video mode. Tracking Synchronizes the signal timing of your computer's graphics card. Manual Keystone Adjust image distortion caused by information from player. • Limited Range: Prosess the input image as limited color range data. • Full Range: Prosess the input image as full color range data. Adjusts the sharpness of the HDMI image data to move the image...

User Manual
Page 29
... factory default settings. Choose "On" to turn on High Altitude mode. Press the button and choose "Yes" to return the parameters on the display screen. Operate the fans at full speed continuously to access internal memory (RAM) when linkage USB cable. This function is not available when the aspect ratio is no signal input after the allocated time. (in your screen aspect ratio to 4:3. The projector will lower power...
... factory default settings. Choose "On" to turn on High Altitude mode. Press the button and choose "Yes" to return the parameters on the display screen. Operate the fans at full speed continuously to access internal memory (RAM) when linkage USB cable. This function is not available when the aspect ratio is no signal input after the allocated time. (in your screen aspect ratio to 4:3. The projector will lower power...
User Manual
Page 36
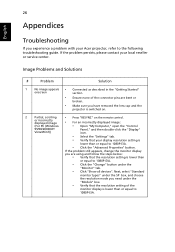
... the "Change" button under the "Monitor" tab. • Click "Show all devices". Next, select "Standard monitor types" under the SP box, and choose the resolution mode you need under the "Models" box. • Verify that the resolution setting is switched on. 2 Partial, scrolling • Press "RESYNC" on the remote control. 26 Appendices English Troubleshooting If you experience a problem with your Acer projector, refer to...
... the "Change" button under the "Monitor" tab. • Click "Show all devices". Next, select "Standard monitor types" under the SP box, and choose the resolution mode you need under the "Models" box. • Verify that the resolution setting is switched on. 2 Partial, scrolling • Press "RESYNC" on the remote control. 26 Appendices English Troubleshooting If you experience a problem with your Acer projector, refer to...
User Manual
Page 37
... to flickering bar the "Image" section for detailed information. • If you play an Letterbox(LBX) format DVD title, please change the format to be reactivated. Refer to your computer's manual for more information. • Check and reconfigure the display mode of focus • Make sure the lens cap is removed. • Adjusts the focus ring on the projector lens. • Make sure the projection screen...
... to flickering bar the "Image" section for detailed information. • If you play an Letterbox(LBX) format DVD title, please change the format to be reactivated. Refer to your computer's manual for more information. • Check and reconfigure the display mode of focus • Make sure the lens cap is removed. • Adjusts the focus ring on the projector lens. • Make sure the projection screen...
User Manual
Page 44
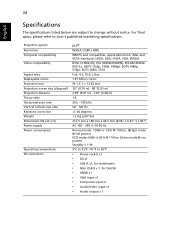
... subject to Acer's published marketing specifications. For final specs, please refer to change without notice. Projection system Resolution Computer compatibility Video compatibility Aspect ratio Displayable colors Projection lens Projection screen size (diagonal) Projection distance Throw ratio Horizontal scan rate Vertical refresh scan rate Keystone correction Weight Dimensions (W x D x H) Power supply Power consumption Operating temperature I/O connectors DLP® WXGA (1280 x 800) IBM PC and compatibles, Apple Macintosh, iMac and VESA standards: SXGA, XGA, SVGA, VGA, WXGA NTSC...
... subject to Acer's published marketing specifications. For final specs, please refer to change without notice. Projection system Resolution Computer compatibility Video compatibility Aspect ratio Displayable colors Projection lens Projection screen size (diagonal) Projection distance Throw ratio Horizontal scan rate Vertical refresh scan rate Keystone correction Weight Dimensions (W x D x H) Power supply Power consumption Operating temperature I/O connectors DLP® WXGA (1280 x 800) IBM PC and compatibles, Apple Macintosh, iMac and VESA standards: SXGA, XGA, SVGA, VGA, WXGA NTSC...
User Manual (Media Manual)
Page 10
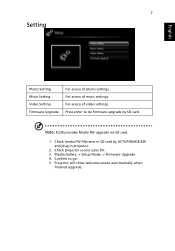
Check projector source upto SD. 3. Projector will show welcome screen automatically when finished upgrade. Press enter to go. 5. Note: K330 provides Media FW upgrade via SD card. 1. Media Gallery -> Setup Mode -> Firmware Upgrade 4. 7 Setting English Photo Setting Music Setting Video Setting Firmware Upgrade For access of video settings. Confirm to do firmware upgrade by ACTUPGRADE.BIN and plug in projector. 2. For access of photo settings. Check media FW filename in SD card by SD card. For access of music settings.
Check projector source upto SD. 3. Projector will show welcome screen automatically when finished upgrade. Press enter to go. 5. Note: K330 provides Media FW upgrade via SD card. 1. Media Gallery -> Setup Mode -> Firmware Upgrade 4. 7 Setting English Photo Setting Music Setting Video Setting Firmware Upgrade For access of video settings. Confirm to do firmware upgrade by ACTUPGRADE.BIN and plug in projector. 2. For access of photo settings. Check media FW filename in SD card by SD card. For access of music settings.
User Manual (Media Manual)
Page 19
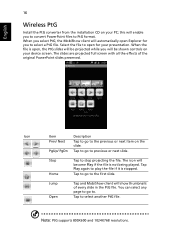
... be shown controls on your PC; Note: PtG supports 800X600 and 1024X768 resolutions. English 16 Wireless PtG Install the PtG converter from the installation CD on your device screen. Jump Open Tap and MobiShow client will enable you will automatically open for you select PtG, the MobiShow client will be projected while you ... You can select any page to go to the first slide. When you to select a PtG file. The slides are projected full screen with all the effects of every slide in the PtG file. When the file is not being played. Tap Play again to ....
... be shown controls on your PC; Note: PtG supports 800X600 and 1024X768 resolutions. English 16 Wireless PtG Install the PtG converter from the installation CD on your device screen. Jump Open Tap and MobiShow client will enable you will automatically open for you select PtG, the MobiShow client will be projected while you ... You can select any page to go to the first slide. When you to select a PtG file. The slides are projected full screen with all the effects of every slide in the PtG file. When the file is not being played. Tap Play again to ....

User Manual (Media Manual)
Page 23
... Acer projector, refer to the following troubleshooting guide. Remove to projector CD manual's problems troubleshooting. 3 USB/SD read fail Please make sure the USB device or SD card is over 500mA. 5 Media file not found or can't be opened in this manual. Problems and Solution # Problem Solution 1 The projector stops If possible, turn off the projector, then unplug responding to all the power cord and wait at least 30 seconds controls...
... Acer projector, refer to the following troubleshooting guide. Remove to projector CD manual's problems troubleshooting. 3 USB/SD read fail Please make sure the USB device or SD card is over 500mA. 5 Media file not found or can't be opened in this manual. Problems and Solution # Problem Solution 1 The projector stops If possible, turn off the projector, then unplug responding to all the power cord and wait at least 30 seconds controls...


