

User Manual (3D)
Page 1
Acer Projectors with 3D Technology Quick Guide
Acer Projectors with 3D Technology Quick Guide

User Manual (3D)
Page 2
© 2012 All Rights Reserved. Acer Projector Series Quick Guide Original Issue: 8/2012 Model number Serial number Date of purchase Place of purchase
© 2012 All Rights Reserved. Acer Projector Series Quick Guide Original Issue: 8/2012 Model number Serial number Date of purchase Place of purchase
User Manual (3D)
Page 3
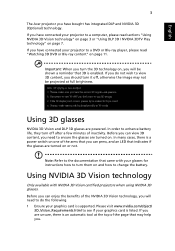
...top of the NVIDIA 3D Vision technology, you can press, and an LED that may help you need to do the following. 1 Ensure your projector to a computer, please read "Watching 3D DVD or Blu-ray content" on page 11. Using NVIDIA 3D Vision technology Only available with your...battery life, they turn off , otherwise the image may not be shown a reminder that came with NVIDIA 3D Vision certified projectors when using NVIDIA 3D glasses. English 3 The Acer projector you have connected your glasses for instructions how to turn them on and how to change the battery. If you are powered...
...top of the NVIDIA 3D Vision technology, you can press, and an LED that may help you need to do the following. 1 Ensure your projector to a computer, please read "Watching 3D DVD or Blu-ray content" on page 11. Using NVIDIA 3D Vision technology Only available with your...battery life, they turn off , otherwise the image may not be shown a reminder that came with NVIDIA 3D Vision certified projectors when using NVIDIA 3D glasses. English 3 The Acer projector you have connected your glasses for instructions how to turn them on and how to change the battery. If you are powered...
User Manual (3D)
Page 5
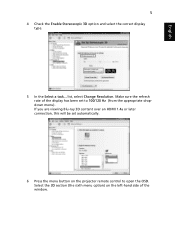
English 5 4 Check the Enable Stereoscopic 3D option and select the correct display type. 5 In the Select a task... Make sure the refresh rate of the window. If you are viewing Blu-ray 3D content over an HDMI 1.4a or later connection, this will be set automatically. 6 Press the menu button on the left-hand side of the display has been set to open the OSD. Select the 3D section (the sixth menu option) on the projector remote control to 100/120 Hz (from the appropriate dropdown menu). list, select Change Resolution.
English 5 4 Check the Enable Stereoscopic 3D option and select the correct display type. 5 In the Select a task... Make sure the refresh rate of the window. If you are viewing Blu-ray 3D content over an HDMI 1.4a or later connection, this will be set automatically. 6 Press the menu button on the left-hand side of the display has been set to open the OSD. Select the 3D section (the sixth menu option) on the projector remote control to 100/120 Hz (from the appropriate dropdown menu). list, select Change Resolution.
User Manual (3D)
Page 6
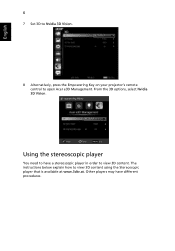
Other players may have a stereoscopic player in order to open Acer e3D Management. English 6 7 Set 3D to Nvidia 3D Vision. 8 Alternatively, press the Empowering Key on your projector's remote control to view 3D content. Using the stereoscopic player You need to have different procedures. The instructions below explain how to view 3D content using the Stereoscopic player that is available at www.3dtv.at. From the 3D options, select Nvidia 3D Vision.
Other players may have a stereoscopic player in order to open Acer e3D Management. English 6 7 Set 3D to Nvidia 3D Vision. 8 Alternatively, press the Empowering Key on your projector's remote control to view 3D content. Using the stereoscopic player You need to have different procedures. The instructions below explain how to view 3D content using the Stereoscopic player that is available at www.3dtv.at. From the 3D options, select Nvidia 3D Vision.
User Manual (3D)
Page 7
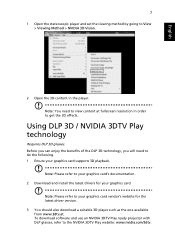
... enjoy the benefits of the DLP 3D technology, you will need to view content at . To download software and use an NVIDIA 3DTV Play ready projector with DLP glasses, refer to your graphics card vendor's website for your graphics card supports 3D playback. English 7 1 Open the stereoscopic player and set the...
... enjoy the benefits of the DLP 3D technology, you will need to view content at . To download software and use an NVIDIA 3DTV Play ready projector with DLP glasses, refer to your graphics card vendor's website for your graphics card supports 3D playback. English 7 1 Open the stereoscopic player and set the...
User Manual (3D)
Page 8
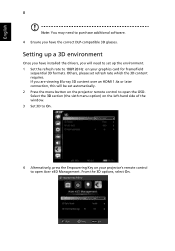
..., you have the correct DLP-compatible 3D glasses. Setting up the environment. 1 Set the refresh rate to 100/120 Hz on the projector remote control to open Acer e3D Management. From the 3D options, select On. If you are viewing Blu-ray 3D content over an HDMI 1.4a or later connection..., this will need to purchase additional software. 4 Ensure you will be set automatically. 2 Press the menu button on your projector's remote control to open...
..., you have the correct DLP-compatible 3D glasses. Setting up the environment. 1 Set the refresh rate to 100/120 Hz on the projector remote control to open Acer e3D Management. From the 3D options, select On. If you are viewing Blu-ray 3D content over an HDMI 1.4a or later connection..., this will need to purchase additional software. 4 Ensure you will be set automatically. 2 Press the menu button on your projector's remote control to open...
User Manual (3D)
Page 9
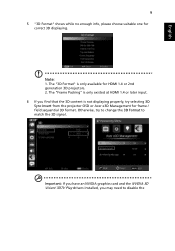
Otherwise, try selecting 3D Sync Invert from the projector OSD or Acer e3D Management for HDMI 1.4 or 2nd generation 3D projectors. 2. The "3D Format" is only available for frame / field sequential 3D format. The "Frame Packing" is not displaying properly, try to change the 3D Format ...
Otherwise, try selecting 3D Sync Invert from the projector OSD or Acer e3D Management for HDMI 1.4 or 2nd generation 3D projectors. 2. The "3D Format" is only available for frame / field sequential 3D format. The "Frame Packing" is not displaying properly, try to change the 3D Format ...
User Manual (3D)
Page 11
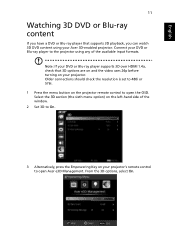
...check the resolution is set to 480i or 576i. 1 Press the menu button on the projector remote control to open Acer e3D Management. Connect your DVD or Blu-ray player to the projector using your Acer 3D-enabled projector. English 11 Watching 3D DVD or Blu-ray content If you can watch 3D DVD content... using any of the window. 2 Set 3D to On. 3 Alternatively, press the Empowering Key on your projector's remote control to open the OSD.
...check the resolution is set to 480i or 576i. 1 Press the menu button on the projector remote control to open Acer e3D Management. Connect your DVD or Blu-ray player to the projector using your Acer 3D-enabled projector. English 11 Watching 3D DVD or Blu-ray content If you can watch 3D DVD content... using any of the window. 2 Set 3D to On. 3 Alternatively, press the Empowering Key on your projector's remote control to open the OSD.
User Manual (3D)
Page 12
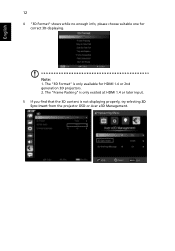
Note: 1. The "3D Format" is not displaying properly, try selecting 3D Sync Invert from the projector OSD or Acer e3D Management. The "Frame Packing" is only existed at HDMI 1.4 or later input. 5 If you find that the 3D content is only available for correct 3D displaying. English 12 4 "3D Format" shows while no enough info, please choose suitable one for HDMI 1.4 or 2nd generation 3D projectors. 2.
Note: 1. The "3D Format" is not displaying properly, try selecting 3D Sync Invert from the projector OSD or Acer e3D Management. The "Frame Packing" is only existed at HDMI 1.4 or later input. 5 If you find that the 3D content is only available for correct 3D displaying. English 12 4 "3D Format" shows while no enough info, please choose suitable one for HDMI 1.4 or 2nd generation 3D projectors. 2.
User Manual (3D)
Page 13
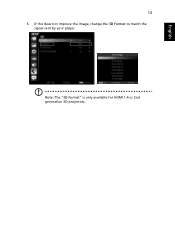
English 13 6 If this does not improve the image, change the 3D Format to match the signal sent by your player. Note: The "3D Format" is only available for HDMI 1.4 or 2nd generation 3D projectors.
English 13 6 If this does not improve the image, change the 3D Format to match the signal sent by your player. Note: The "3D Format" is only available for HDMI 1.4 or 2nd generation 3D projectors.

User Manual
Page 2
...unit should include the serial number, model number and purchase information. Acer Projector K135/K135P/K135S/L221/LK-W12/K132/L221F/LK-W12L Series Model number Serial number Date of purchase Place of purchase Acer and the Acer logo are recorded on the label affixed to notify any means, ...fitness for identification purposes only and belong to the contents hereof and specifically disclaims the implied warranties of HDMI Licensing LLC." Acer Projector K135/K135P/K135S/L221/LK-W12/K132/L221F/LK-W12L Series User's Guide Original Issue: 02/2013 Changes may be incorporated in this ...
...unit should include the serial number, model number and purchase information. Acer Projector K135/K135P/K135S/L221/LK-W12/K132/L221F/LK-W12L Series Model number Serial number Date of purchase Place of purchase Acer and the Acer logo are recorded on the label affixed to notify any means, ...fitness for identification purposes only and belong to the contents hereof and specifically disclaims the implied warranties of HDMI Licensing LLC." Acer Projector K135/K135P/K135S/L221/LK-W12/K132/L221F/LK-W12L Series User's Guide Original Issue: 02/2013 Changes may be incorporated in this ...

User Manual
Page 3
... unplugging all warnings and instructions marked on the product. The openings should never be placed near water. • Do not place this product from the projector. • If the system has multiple sources of any kind into the product.
... unplugging all warnings and instructions marked on the product. The openings should never be placed near water. • Do not place this product from the projector. • If the system has multiple sources of any kind into the product.

User Manual
Page 5
...by the operating instructions, since improper adjustment of other risks. Keep them out of the reach of air around the projector is something wrong with your projector. The bright may hurt your reseller for service • the product does not operate normally after following environments: ...excessive humidity, dust, or cigarette smoke may result in following the operating instructions Note: Adjust only those controls that is on the projector first and then signal sources • Do not place the product in damage and will often require extensive work by a qualified technician...
...by the operating instructions, since improper adjustment of other risks. Keep them out of the reach of air around the projector is something wrong with your projector. The bright may hurt your reseller for service • the product does not operate normally after following environments: ...excessive humidity, dust, or cigarette smoke may result in following the operating instructions Note: Adjust only those controls that is on the projector first and then signal sources • Do not place the product in damage and will often require extensive work by a qualified technician...
User Manual
Page 6
... power. • Do not frequently turn off . • Do not touch air outlet grille and bottom plate which may cause the projector to disassemble this projector. vi might cause fire or electric shock. The best way is operating. There are dangerous high voltages inside may rise and cause damage ...when the filter/ventilation slots clogged with any object when the projector is under operation as this could cause the object to become heated and deformed or even cause a fire. • Do not attempt to...
... power. • Do not frequently turn off . • Do not touch air outlet grille and bottom plate which may cause the projector to disassemble this projector. vi might cause fire or electric shock. The best way is operating. There are dangerous high voltages inside may rise and cause damage ...when the filter/ventilation slots clogged with any object when the projector is under operation as this could cause the object to become heated and deformed or even cause a fire. • Do not attempt to...
User Manual
Page 8
...the slots and openings on . Precautions Follow all warnings, precautions and maintenance as recommended in operation. Warning: • Do not look into the projector's lens when the light is on the unit provided for a long period of fire or electric shock, do not expose this product to rain ... or disassemble the product as this may hurt your unit. viii First things first Usage Notes Do: • Turn off , please ensure the projector completes its cooling cycle before cleaning. • Use a soft cloth moistened with mild detergent to clean the display housing. • Disconnect the ...
...the slots and openings on . Precautions Follow all warnings, precautions and maintenance as recommended in operation. Warning: • Do not look into the projector's lens when the light is on the unit provided for a long period of fire or electric shock, do not expose this product to rain ... or disassemble the product as this may hurt your unit. viii First things first Usage Notes Do: • Turn off , please ensure the projector completes its cooling cycle before cleaning. • Use a soft cloth moistened with mild detergent to clean the display housing. • Disconnect the ...

User Manual
Page 9
... 4 Control Panel 5 Remote Control Layout 6 MHL (Mobile High-Definition Link) Control 8 Getting Started 10 Connecting the Projector 10 Turning the Projector On/Off 11 Turning on the Projector 11 Turning the projector off 12 Adjusting the Projected Image 13 Adjusting the Height of Projected Image 13 How to optimize image size and distance 14...
... 4 Control Panel 5 Remote Control Layout 6 MHL (Mobile High-Definition Link) Control 8 Getting Started 10 Connecting the Projector 10 Turning the Projector On/Off 11 Turning on the Projector 11 Turning the projector off 12 Adjusting the Projected Image 13 Adjusting the Height of Projected Image 13 How to optimize image size and distance 14...

User Manual
Page 11
...Bright, Standard, Movie, Picture, Game, User) enable optimum performance in any situation. • Compact size projector facilitates business purposes and home entertainment. • Acer EcoProjeciton Technology delivers Intelligent power management approach and physical efficiency improvement. • Equipped with HDMI™ connection ...light source and longer life by LED solution. • Enjoy media playback via USB, RAM and Micro SD card reader. (for K135/ K135P/K135S/L221/LK-W12 only) • Microsoft® Windows® 2000, XP, Vista®, Windows® 7, Windows® 8, ...
...Bright, Standard, Movie, Picture, Game, User) enable optimum performance in any situation. • Compact size projector facilitates business purposes and home entertainment. • Acer EcoProjeciton Technology delivers Intelligent power management approach and physical efficiency improvement. • Equipped with HDMI™ connection ...light source and longer life by LED solution. • Enjoy media playback via USB, RAM and Micro SD card reader. (for K135/ K135P/K135S/L221/LK-W12 only) • Microsoft® Windows® 2000, XP, Vista®, Windows® 7, Windows® 8, ...

User Manual
Page 12
Check to D-sub cable (option) English Projector POWER FREEZE HIDE RATIO MODE SOURCE BACK ENTER MENU ZOOM MUTE Remote control (for K132/L221F/LKW12L series only) Power cord XXXXXX 3V Battery AC to DC power adapter K132/ K135/P/S/ LK-W12/L/ L221/F Series P/N:MC.JGM11.003 User's guide Quick start guide Carrying case MHL...
Check to D-sub cable (option) English Projector POWER FREEZE HIDE RATIO MODE SOURCE BACK ENTER MENU ZOOM MUTE Remote control (for K132/L221F/LKW12L series only) Power cord XXXXXX 3V Battery AC to DC power adapter K132/ K135/P/S/ LK-W12/L/ L221/F Series P/N:MC.JGM11.003 User's guide Quick start guide Carrying case MHL...

User Manual
Page 14
English 4 Projector Overview Projector Outlook Front / upper side 3 4 5 6 2 # Description 1 Projection lens 2 Tilt adjusting wheel 3 Focus ring Rear side 1 # Description 4 Power button 5 Control panel 6 Remote control receiver K135/K135P/K135S/L221/LK-W12 1 2 3 K132/L221F/LKW12L 4 756 # Description # 1 Remote control receiver 5 2 Universal connector for VGA in/ Audio out connector 6 DC Input Description USB connector
English 4 Projector Overview Projector Outlook Front / upper side 3 4 5 6 2 # Description 1 Projection lens 2 Tilt adjusting wheel 3 Focus ring Rear side 1 # Description 4 Power button 5 Control panel 6 Remote control receiver K135/K135P/K135S/L221/LK-W12 1 2 3 K132/L221F/LKW12L 4 756 # Description # 1 Remote control receiver 5 2 Universal connector for VGA in/ Audio out connector 6 DC Input Description USB connector


