

User Manual
Page 9
... image size and distance 14 How to get a preferred image size by adjusting distance and zoom 17 How to get a preferred image position by adjusting lens shift 20 User Controls 23 Installation menu 23 Onscreen Display (OSD) Menus 25 Color 26 Image 28 Setting 30 Management 33 Audio 34 3D 35 Language...
... image size and distance 14 How to get a preferred image size by adjusting distance and zoom 17 How to get a preferred image position by adjusting lens shift 20 User Controls 23 Installation menu 23 Onscreen Display (OSD) Menus 25 Color 26 Image 28 Setting 30 Management 33 Audio 34 3D 35 Language...

User Manual
Page 12
English 2 • Microsoft® Windows® 2000, XP, Vista®, Windows® 7, Windows® 8, OS compliant • Manual lens shift adjustment Note: Functions vary depending on model definition.
English 2 • Microsoft® Windows® 2000, XP, Vista®, Windows® 7, Windows® 8, OS compliant • Manual lens shift adjustment Note: Functions vary depending on model definition.
User Manual
Page 14
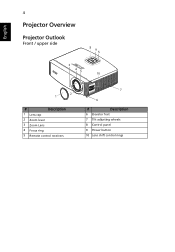
English 4 Projector Overview Projector Outlook Front / upper side 8 9 5 ENTER TEMP MENU SOURCE BACK LAMP 3 4 5 10 ZOOM 2 1 # Description 1 Lens cap 2 Zoom lever 3 Zoom Lens 4 Focus ring 5 Remote control receivers 7 6 # Description 6 Elevator feet 7 Tilt adjusting wheels 8 Control panel 9 Power button 10 Lens shift control rings
English 4 Projector Overview Projector Outlook Front / upper side 8 9 5 ENTER TEMP MENU SOURCE BACK LAMP 3 4 5 10 ZOOM 2 1 # Description 1 Lens cap 2 Zoom lever 3 Zoom Lens 4 Focus ring 5 Remote control receivers 7 6 # Description 6 Elevator feet 7 Tilt adjusting wheels 8 Control panel 9 Power button 10 Lens shift control rings
User Manual
Page 23
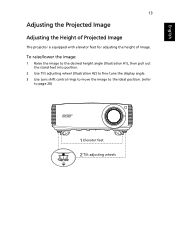
English 13 Adjusting the Projected Image Adjusting the Height of Projected Image The projector is equipped with elevator feet for adjusting the height of image. To raise/lower the image: 1 Raise the image to the desired height angle (Illustration #1), then pull out the stand feet into position. 2 Use Tilt adjusting wheel (Illustration #2) to fine-tune the display angle. 3 Use Lens shift control rings to move the image to the ideal position. (refer to page 20) 1 Elevator feet 2 Tilt adjusting wheels
English 13 Adjusting the Projected Image Adjusting the Height of Projected Image The projector is equipped with elevator feet for adjusting the height of image. To raise/lower the image: 1 Raise the image to the desired height angle (Illustration #1), then pull out the stand feet into position. 2 Use Tilt adjusting wheel (Illustration #2) to fine-tune the display angle. 3 Use Lens shift control rings to move the image to the ideal position. (refer to page 20) 1 Elevator feet 2 Tilt adjusting wheels

User Manual
Page 30
Vertical Lens Shift ring Horizontal Lens Shift ring Note: The figures shown in this section are for adjusting the position of projected image right and left or up and down without requiring you to physically move the projector. The figures between units can be different due to assembly tolerance. English 20 How to get a preferred image position by adjusting lens shift The projector is equipped with lens shift for reference only not approximate value.
Vertical Lens Shift ring Horizontal Lens Shift ring Note: The figures shown in this section are for adjusting the position of projected image right and left or up and down without requiring you to physically move the projector. The figures between units can be different due to assembly tolerance. English 20 How to get a preferred image position by adjusting lens shift The projector is equipped with lens shift for reference only not approximate value.


