
Quick Guide
Page 3
... view 3D content, you will be projected at full brightness. In order to turn off , otherwise the image may not be shown a reminder that came with your projector to enjoy perfect 3D performance without compatibility issues. H7532BD needs 3D glasses to support 144Hz sync signal for instructions how to enhance battery life, they turn them on page 8. English 3 The Acer projector you have connected...
... view 3D content, you will be projected at full brightness. In order to turn off , otherwise the image may not be shown a reminder that came with your projector to enjoy perfect 3D performance without compatibility issues. H7532BD needs 3D glasses to support 144Hz sync signal for instructions how to enhance battery life, they turn them on page 8. English 3 The Acer projector you have connected...
Quick Guide
Page 4
... transmitter controls the 3D glasses and is an automatic tool at . English 4 Using NVIDIA 3D Vision technology Only available with NVIDIA 3D Vision certified projectors when using NVIDIA 3D glasses. Important: Only NVIDIA graphics cards are unsure, there is necessary to an available USB port on your graphics card is supported. Plug the USB cable in to view 3D content...
... transmitter controls the 3D glasses and is an automatic tool at . English 4 Using NVIDIA 3D Vision technology Only available with NVIDIA 3D Vision certified projectors when using NVIDIA 3D glasses. Important: Only NVIDIA graphics cards are unsure, there is necessary to an available USB port on your graphics card is supported. Plug the USB cable in to view 3D content...
Quick Guide
Page 8
... 3D content over an HDMI 1.4a or later connection, this will need to open the OSD. Note: You may need to your graphics card's documentation. 2 Download and install the latest drivers for your graphics card vendor's website for frame/field sequential 3D formats. Others, please set automatically. 2 Press the menu button on the projector remote control to purchase additional software. 4 Ensure you will...
... 3D content over an HDMI 1.4a or later connection, this will need to open the OSD. Note: You may need to your graphics card's documentation. 2 Download and install the latest drivers for your graphics card vendor's website for frame/field sequential 3D formats. Others, please set automatically. 2 Press the menu button on the projector remote control to purchase additional software. 4 Ensure you will...
User Manual
Page 5
... free flow of air around the projector is necessary. • Locations where temperatures may become excessively high, such as opening or removing covers may expose you to dangerous voltage points or other controls may result in damage and will often require extensive work by the operating instructions, since improper adjustment of other risks. For safety reasons, do not use non-compliant parts when adding or changing components. Keep...
... free flow of air around the projector is necessary. • Locations where temperatures may become excessively high, such as opening or removing covers may expose you to dangerous voltage points or other controls may result in damage and will often require extensive work by the operating instructions, since improper adjustment of other risks. For safety reasons, do not use non-compliant parts when adding or changing components. Keep...
User Manual
Page 6
... dealer. • Do not keep using this product to disassemble this case, unplug immediately and contact your dealer for ceiling mount installation. Please be sure to change the lamp when is showing warning message. • When changing the lamp, please allow unit to cool down, and follow all changing instructions. • Reset the "Lamp Hour Reset" function from the Onscreen display "Management" menu after replacing the lamp module. • Do not...
... dealer. • Do not keep using this product to disassemble this case, unplug immediately and contact your dealer for ceiling mount installation. Please be sure to change the lamp when is showing warning message. • When changing the lamp, please allow unit to cool down, and follow all changing instructions. • Reset the "Lamp Hour Reset" function from the Onscreen display "Management" menu after replacing the lamp module. • Do not...

User Manual
Page 8
... do not open or disassemble the product as recommended in operation. • When the lamp reaches the end of its life, it shows warning messages. • Reset the "Lamp Hour Reset" function from AC outlet if the product is not being used for ventilation. • Use abrasive cleaners, waxes or solvents to clean the unit. • Use under "Replacing the Lamp". Precautions Follow all changing instructions. • This...
... do not open or disassemble the product as recommended in operation. • When the lamp reaches the end of its life, it shows warning messages. • Reset the "Lamp Hour Reset" function from AC outlet if the product is not being used for ventilation. • Use abrasive cleaners, waxes or solvents to clean the unit. • Use under "Replacing the Lamp". Precautions Follow all changing instructions. • This...
User Manual
Page 9
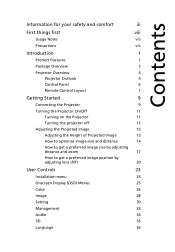
... 4 Control Panel 6 Remote Control Layout 7 Getting Started 9 Connecting the Projector 9 Turning the Projector On/Off 11 Turning on the Projector 11 Turning the projector off 12 Adjusting the Projected Image 13 Adjusting the Height of Projected Image 13 How to optimize image size and distance 14 How to get a preferred image size by adjusting distance and zoom 17 How to get a preferred image position by adjusting lens shift 20 User Controls 23 Installation menu 23 Onscreen Display (OSD) Menus 25 Color 26 Image 28 Setting 30 Management 33 Audio...
... 4 Control Panel 6 Remote Control Layout 7 Getting Started 9 Connecting the Projector 9 Turning the Projector On/Off 11 Turning on the Projector 11 Turning the projector off 12 Adjusting the Projected Image 13 Adjusting the Height of Projected Image 13 How to optimize image size and distance 14 How to get a preferred image size by adjusting distance and zoom 17 How to get a preferred image position by adjusting lens shift 20 User Controls 23 Installation menu 23 Onscreen Display (OSD) Menus 25 Color 26 Image 28 Setting 30 Management 33 Audio...

User Manual
Page 11
... lamp replacement • Lower power consumption and economy (ECO) mode extends lamp life • Acer EcoProjeciton Technology delivers Intelligent power management approach and physical efficiency improvement • Equipped with HDMI™ connection supporting HDCP • Advanced digital keystone correction optimizes presentations • Smart detection delivers quick, intelligent source detection • Multi-language on screen display (OSD) menus • Full-function remote control • Manual focus projection lens zooms up to 1.5x • 2x digital zoom...
... lamp replacement • Lower power consumption and economy (ECO) mode extends lamp life • Acer EcoProjeciton Technology delivers Intelligent power management approach and physical efficiency improvement • Equipped with HDMI™ connection supporting HDCP • Advanced digital keystone correction optimizes presentations • Smart detection delivers quick, intelligent source detection • Multi-language on screen display (OSD) menus • Full-function remote control • Manual focus projection lens zooms up to 1.5x • 2x digital zoom...

User Manual
Page 15
.../Cb Pr/Cr AUDIO IN 2 WIRED REMOTE 1 15 16 17 18 19 20 # Description # 1 Power socket 11 2 LAN (RJ45 Port for 10/100M Ethernet) 12 3 Mini USB Ctrl connector (for firmware upgrade and USB display) 13 4 USB A1 connector 14 5 USB A2 connector (supports USB wireless adapter) 15 6 HDMI 3 connector 16 7 HDMI 1/HDMI 2 connector (supports 2D to 3D feature) 17 8 PC analog signal/HDTV/SCART/compo- 18 nent video input connector (VGA IN 1) 9 Monitor...
.../Cb Pr/Cr AUDIO IN 2 WIRED REMOTE 1 15 16 17 18 19 20 # Description # 1 Power socket 11 2 LAN (RJ45 Port for 10/100M Ethernet) 12 3 Mini USB Ctrl connector (for firmware upgrade and USB display) 13 4 USB A1 connector 14 5 USB A2 connector (supports USB wireless adapter) 15 6 HDMI 3 connector 16 7 HDMI 1/HDMI 2 connector (supports 2D to 3D feature) 17 8 PC analog signal/HDTV/SCART/compo- 18 nent video input connector (VGA IN 1) 9 Monitor...

User Manual
Page 17
... display the image. 5 FREEZE Pause the screen image. 6 MEDIA_SETUP Press "MEDIA SETUP"/"SETUP" to enter media OSD setting. 7 SOURCE Changes the active source. 8 3D Press "3D" to select 3D models. 9 ZOOM Zooms the projector display in Japanese market. 12 Enter Press "ENTER" to play media file. 13 Four directional Use up, down, left, right buttons to select items or make select keys adjustments to your selection. 14 KEYSTONE Adjusts the image...
... display the image. 5 FREEZE Pause the screen image. 6 MEDIA_SETUP Press "MEDIA SETUP"/"SETUP" to enter media OSD setting. 7 SOURCE Changes the active source. 8 3D Press "3D" to select 3D models. 9 ZOOM Zooms the projector display in Japanese market. 12 Enter Press "ENTER" to play media file. 13 Four directional Use up, down, left, right buttons to select items or make select keys adjustments to your selection. 14 KEYSTONE Adjusts the image...

User Manual
Page 18
... wirelessly transmitted from your selection of media mode. Stop Press "Stop" to stop playing media file. 22 VGA Press "VGA" to change source to Component video. the center button works as a multidirectional 17 MOUSE_Four pointer stick. Play/Pause Press "Play/Pause" to select the display mode. 19 VOLUME +/- Use this function, an USB cable must be directional select connected to projector from the PC to the projector...
... wirelessly transmitted from your selection of media mode. Stop Press "Stop" to stop playing media file. 22 VGA Press "VGA" to change source to Component video. the center button works as a multidirectional 17 MOUSE_Four pointer stick. Play/Pause Press "Play/Pause" to select the display mode. 19 VOLUME +/- Use this function, an USB cable must be directional select connected to projector from the PC to the projector...
User Manual
Page 21
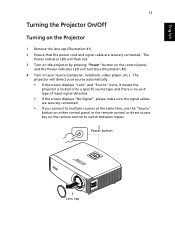
... input signal detected. • If the screen displays "No Signal", please make sure the signal cables are securely connected. The Power indicator LED will flash red. 3 Turn on the projector by pressing "Power" button on the control panel, and the Power indicator LED will detect your source (computer, notebook, video player ,etc.). The projector will turn blue.(Illustration #2) 4 Turn on the Projector 1 Remove the lens cap.(Illustration #1) 2 Ensure that the power cord and signal cable are securely connected. • If you connect to multiple sources at the same time, use...
... input signal detected. • If the screen displays "No Signal", please make sure the signal cables are securely connected. The Power indicator LED will flash red. 3 Turn on the projector by pressing "Power" button on the control panel, and the Power indicator LED will detect your source (computer, notebook, video player ,etc.). The projector will turn blue.(Illustration #2) 4 Turn on the Projector 1 Remove the lens cap.(Illustration #1) 2 Ensure that the power cord and signal cable are securely connected. • If you connect to multiple sources at the same time, use...

User Manual
Page 33
... as a guide to adjusting the calibration and alignment settings, such as screen size and distance, focus and more . 1 Turn on the projector by pressing "Power" button on the control pad. 2 Press the "MENU" button on the screen. The menu options include settings and adjustments for screen size and distance, focus, keystone correction and more . 4 The Installation menu includes the following options: •Projection method •Manual Keystone settings •LAN/WiFi settings •LAN IP/ Mask settings •Language settings •Reset to factory default function Use the...
... as a guide to adjusting the calibration and alignment settings, such as screen size and distance, focus and more . 1 Turn on the projector by pressing "Power" button on the control pad. 2 Press the "MENU" button on the screen. The menu options include settings and adjustments for screen size and distance, focus, keystone correction and more . 4 The Installation menu includes the following options: •Projection method •Manual Keystone settings •LAN/WiFi settings •LAN IP/ Mask settings •Language settings •Reset to factory default function Use the...

User Manual
Page 36
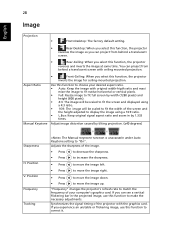
...; Press to be shown in the image. Adjusts the color balance of red and green. • Press to increase the amount of green in the image. • Press to show the correct image tone. 26 Color English Display Mode Wall color Brightness Contrast Saturation Tint Color Temperature Dynamic Black Gamma There are several choices, including white, light yellow, light blue, pink, dark green. "Contrast" controls the difference between the lightest and...
...; Press to be shown in the image. Adjusts the color balance of red and green. • Press to increase the amount of green in the image. • Press to show the correct image tone. 26 Color English Display Mode Wall color Brightness Contrast Saturation Tint Color Temperature Dynamic Black Gamma There are several choices, including white, light yellow, light blue, pink, dark green. "Contrast" controls the difference between the lightest and...
User Manual
Page 38
... be scaled to fit the screen and displayed using a 16:9 ratio. • L.Box: Keep original signal aspect ratio and zoom in the projected image, use this function to move the image left. Synchronizes the signal timing of the screen and the height adjusted to display the image using a 4:3 ratio. • 16:9: The image will be scaled to move the image up. to move the image right. • Press to move...
... be scaled to fit the screen and displayed using a 16:9 ratio. • L.Box: Keep original signal aspect ratio and zoom in the projected image, use this function to move the image left. Synchronizes the signal timing of the screen and the height adjusted to display the image using a 4:3 ratio. • 16:9: The image will be scaled to move the image up. to move the image right. • Press to move...

User Manual
Page 40
... you exit the OSD menu. • Acer: The default startup screen of Projector. Choose "Yes" to use as the startup screen, follow the instructions below , takes effect when there is the red rectangular area. Choose "On" to enable VGA OUT connection. When source lock is turned "off the captioning feature. Default is lost. 30 English Setting Startup Screen Screen Capture Source Lock Closed Caption Auto Screen VGA OUT (Standby) LAN/WiFi Reset Use this function to customize...
... you exit the OSD menu. • Acer: The default startup screen of Projector. Choose "Yes" to use as the startup screen, follow the instructions below , takes effect when there is the red rectangular area. Choose "On" to enable VGA OUT connection. When source lock is turned "off the captioning feature. Default is lost. 30 English Setting Startup Screen Screen Capture Source Lock Closed Caption Auto Screen VGA OUT (Standby) LAN/WiFi Reset Use this function to customize...

User Manual
Page 41
... dialogue. English Security 31 Security This projector provides a useful security function for the administrator to change the "Administrator Password". • The factory default of "Administrator Password" is "1234". If the security function is enabled, your administrator password, do the following to enter password when switch on . User Password • Press to setup or change the "User Password". • Press number keys to set timeout function. • Press or...
... dialogue. English Security 31 Security This projector provides a useful security function for the administrator to change the "Administrator Password". • The factory default of "Administrator Password" is "1234". If the security function is enabled, your administrator password, do the following to enter password when switch on . User Password • Press to setup or change the "User Password". • Press number keys to set timeout function. • Press or...

User Manual
Page 43
... signal input after the allocated time. (default is pressed again within 2 minutes. The projector will lower power consumption, extend the lamp life and reduce noise. English 33 Management ECO Mode High Altitude Turn Off Mode Timer Auto Shutdown Lamp Hour Elapse Lamp Reminding Lamp Hour Reset Choose "On" to dim the projector lamp which timer mode to display on the screen. Activate this function to change the lamp 30 hours before its expected end-of-life. Instant Off: Shuts down the projector...
... signal input after the allocated time. (default is pressed again within 2 minutes. The projector will lower power consumption, extend the lamp life and reduce noise. English 33 Management ECO Mode High Altitude Turn Off Mode Timer Auto Shutdown Lamp Hour Elapse Lamp Reminding Lamp Hour Reset Choose "On" to dim the projector lamp which timer mode to display on the screen. Activate this function to change the lamp 30 hours before its expected end-of-life. Instant Off: Shuts down the projector...

User Manual
Page 47
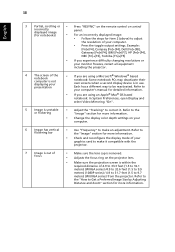
... the remote control or control panel. 37 Appendices English Troubleshooting If you experience a problem with your local reseller or service center. If the problem still appears, change the monitor display you are bent or broken. • Check if the projector lamp has been securely installed. incorrectly displayed • For an incorrectly displayed image: image(For PC • Open "My Computer," open the "Control (Windows 2000/XP/ Panel," and then double-click the "Display" Vista/Windows 7/ Windows...
... the remote control or control panel. 37 Appendices English Troubleshooting If you experience a problem with your local reseller or service center. If the problem still appears, change the monitor display you are bent or broken. • Check if the projector lamp has been securely installed. incorrectly displayed • For an incorrectly displayed image: image(For PC • Open "My Computer," open the "Control (Windows 2000/XP/ Panel," and then double-click the "Display" Vista/Windows 7/ Windows...
User Manual
Page 48
... difficulty changing resolutions or your monitor freezes, restart all equipment including the projector. 4 The screen of your presentation • If you are using an Apple® Mac® OS based notebook: In System Preferences, open Display and select Video Mirroring "On". 5 Image is unstable • Adjust the "Tracking" to correct it compatible with the projector. 7 Image is out of focus • Make sure the lens...
... difficulty changing resolutions or your monitor freezes, restart all equipment including the projector. 4 The screen of your presentation • If you are using an Apple® Mac® OS based notebook: In System Preferences, open Display and select Video Mirroring "On". 5 Image is unstable • Adjust the "Tracking" to correct it compatible with the projector. 7 Image is out of focus • Make sure the lens...


