
User Manual (3D)
Page 1
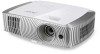
Acer Projectors with 3D Technology Quick Guide
Acer Projectors with 3D Technology Quick Guide

User Manual (3D)
Page 2
Acer Projector Series Quick Guide Original Issue: 8/2012 Model number Serial number Date of purchase Place of purchase © 2012 All Rights Reserved.
Acer Projector Series Quick Guide Original Issue: 8/2012 Model number Serial number Date of purchase Place of purchase © 2012 All Rights Reserved.
User Manual (3D)
Page 3
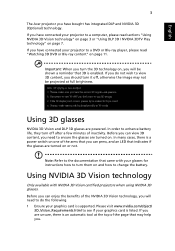
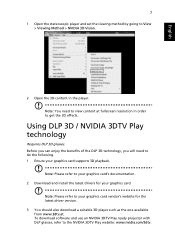
... after a few minutes of the arms that you do the following. 1 Ensure your graphics card is an automatic tool at full brightness. English 3 The Acer projector you are powered. Before you can enjoy the benefits of the page that came with NVIDIA 3D Vision certified... sections "Using NVIDIA 3D Vision technology" on page 3 or "Using DLP 3D / NVIDIA 3DTV Play technology" on or not. If you have connected your projector to the documentation that may not be shown a reminder that indicates if the glasses are turned on page 11. Note: Refer to a computer, please read...
... after a few minutes of the arms that you do the following. 1 Ensure your graphics card is an automatic tool at full brightness. English 3 The Acer projector you are powered. Before you can enjoy the benefits of the page that came with NVIDIA 3D Vision certified... sections "Using NVIDIA 3D Vision technology" on page 3 or "Using DLP 3D / NVIDIA 3DTV Play technology" on or not. If you have connected your projector to the documentation that may not be shown a reminder that indicates if the glasses are turned on page 11. Note: Refer to a computer, please read...
User Manual (3D)
Page 5
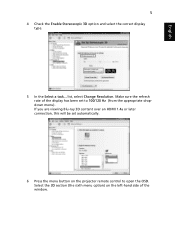
If you are viewing Blu-ray 3D content over an HDMI 1.4a or later connection, this will be set to open the OSD. list, select Change Resolution. Make sure the refresh rate of the display has been set automatically. 6 Press the menu button on the left-hand side of the window. Select the 3D section (the sixth menu option) on the projector remote control to 100/120 Hz (from the appropriate dropdown menu). English 5 4 Check the Enable Stereoscopic 3D option and select the correct display type. 5 In the Select a task...
If you are viewing Blu-ray 3D content over an HDMI 1.4a or later connection, this will be set to open the OSD. list, select Change Resolution. Make sure the refresh rate of the display has been set automatically. 6 Press the menu button on the left-hand side of the window. Select the 3D section (the sixth menu option) on the projector remote control to 100/120 Hz (from the appropriate dropdown menu). English 5 4 Check the Enable Stereoscopic 3D option and select the correct display type. 5 In the Select a task...
User Manual (3D)
Page 6
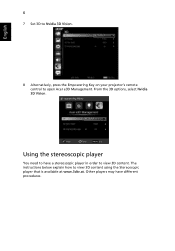
Other players may have a stereoscopic player in order to view 3D content. English 6 7 Set 3D to Nvidia 3D Vision. 8 Alternatively, press the Empowering Key on your projector's remote control to view 3D content using the Stereoscopic player that is available at www.3dtv.at. From the 3D options, select Nvidia 3D Vision. The instructions below explain how to open Acer e3D Management. Using the stereoscopic player You need to have different procedures.
Other players may have a stereoscopic player in order to view 3D content. English 6 7 Set 3D to Nvidia 3D Vision. 8 Alternatively, press the Empowering Key on your projector's remote control to view 3D content using the Stereoscopic player that is available at www.3dtv.at. From the 3D options, select Nvidia 3D Vision. The instructions below explain how to open Acer e3D Management. Using the stereoscopic player You need to have different procedures.
User Manual (3D)
Page 7
... resolution in the player. Using DLP 3D / NVIDIA 3DTV Play technology Requires DLP 3D glasses. To download software and use an NVIDIA 3DTV Play ready projector with DLP glasses, refer to your graphics card vendor's website for your graphics card. Note: Please refer to the NVIDIA 3DTV Play website: www.nvidia...
... resolution in the player. Using DLP 3D / NVIDIA 3DTV Play technology Requires DLP 3D glasses. To download software and use an NVIDIA 3DTV Play ready projector with DLP glasses, refer to your graphics card vendor's website for your graphics card. Note: Please refer to the NVIDIA 3DTV Play website: www.nvidia...
User Manual (3D)
Page 8
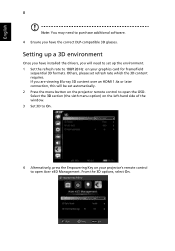
Setting up the environment. 1 Set the refresh rate to 100/120 Hz on your projector's remote control to open the OSD. If you are viewing Blu-ray 3D content over an HDMI 1.4a or later connection, this will need to ... options, select On. English 8 Note: You may need to set up a 3D environment Once you will be set automatically. 2 Press the menu button on the projector remote control to open Acer e3D Management. Others, please set refresh rate which the 3D content requires.
Setting up the environment. 1 Set the refresh rate to 100/120 Hz on your projector's remote control to open the OSD. If you are viewing Blu-ray 3D content over an HDMI 1.4a or later connection, this will need to ... options, select On. English 8 Note: You may need to set up a 3D environment Once you will be set automatically. 2 Press the menu button on the projector remote control to open Acer e3D Management. Others, please set refresh rate which the 3D content requires.
User Manual (3D)
Page 9
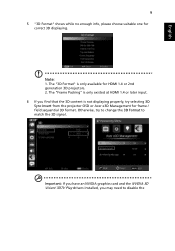
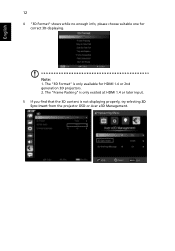
Note: 1. Otherwise, try selecting 3D Sync Invert from the projector OSD or Acer e3D Management for frame / field sequential 3D format. The "Frame Packing" is only existed at HDMI 1.4 or later input. 6 If you may need to match ... change the 3D Format to disable the English 9 5 "3D Format" shows while no enough info, please choose suitable one for HDMI 1.4 or 2nd generation 3D projectors. 2.
Note: 1. Otherwise, try selecting 3D Sync Invert from the projector OSD or Acer e3D Management for frame / field sequential 3D format. The "Frame Packing" is only existed at HDMI 1.4 or later input. 6 If you may need to match ... change the 3D Format to disable the English 9 5 "3D Format" shows while no enough info, please choose suitable one for HDMI 1.4 or 2nd generation 3D projectors. 2.
User Manual (3D)
Page 11
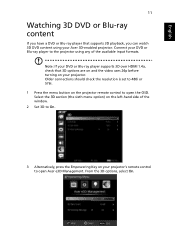
... 1.4a, check that supports 3D playback, you can watch 3D DVD content using your DVD or Blu-ray player to the projector using any of the window. 2 Set 3D to open Acer e3D Management. Older connections should check the resolution is set to 480i or 576i. 1 Press the menu button on the... projector remote control to On. 3 Alternatively, press the Empowering Key on the left-hand side of the available input formats. Select the 3D...
... 1.4a, check that supports 3D playback, you can watch 3D DVD content using your DVD or Blu-ray player to the projector using any of the window. 2 Set 3D to open Acer e3D Management. Older connections should check the resolution is set to 480i or 576i. 1 Press the menu button on the... projector remote control to On. 3 Alternatively, press the Empowering Key on the left-hand side of the available input formats. Select the 3D...
User Manual (3D)
Page 12
English 12 4 "3D Format" shows while no enough info, please choose suitable one for HDMI 1.4 or 2nd generation 3D projectors. 2. The "Frame Packing" is only existed at HDMI 1.4 or later input. 5 If you find that the 3D content is only available for correct 3D displaying. The "3D Format" is not displaying properly, try selecting 3D Sync Invert from the projector OSD or Acer e3D Management. Note: 1.
English 12 4 "3D Format" shows while no enough info, please choose suitable one for HDMI 1.4 or 2nd generation 3D projectors. 2. The "Frame Packing" is only existed at HDMI 1.4 or later input. 5 If you find that the 3D content is only available for correct 3D displaying. The "3D Format" is not displaying properly, try selecting 3D Sync Invert from the projector OSD or Acer e3D Management. Note: 1.
User Manual (3D)
Page 13
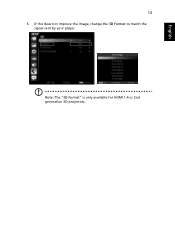
Note: The "3D Format" is only available for HDMI 1.4 or 2nd generation 3D projectors. English 13 6 If this does not improve the image, change the 3D Format to match the signal sent by your player.
Note: The "3D Format" is only available for HDMI 1.4 or 2nd generation 3D projectors. English 13 6 If this does not improve the image, change the 3D Format to match the signal sent by your player.

User Manual
Page 1
Acer Projector H7550ST/E155S/HE-815ST/H1P1403/ H7550STz/H7550BD/E155D/HE-815J/ H1P1406/H7550BDz Series User's Guide
Acer Projector H7550ST/E155S/HE-815ST/H1P1403/ H7550STz/H7550BD/E155D/HE-815J/ H1P1406/H7550BDz Series User's Guide
User Manual
Page 2
..., by photocopy, recording or otherwise, without obligation to your unit should include the serial number, model number and purchase information. Acer Projector User's Guide Original Issue: 11/2014 Changes may be reproduced, stored in a retrieval system, or transmitted, in this manual ...either expressed or implied, with respect to their respective companies. Acer Projector Model number Serial number Date of purchase Place of purchase Acer and the Acer logo are trademarks or registered trademarks of Acer Incorporated. "HDMITM, the HDMI logo and High-Definition Multimedia Interface...
..., by photocopy, recording or otherwise, without obligation to your unit should include the serial number, model number and purchase information. Acer Projector User's Guide Original Issue: 11/2014 Changes may be reproduced, stored in a retrieval system, or transmitted, in this manual ...either expressed or implied, with respect to their respective companies. Acer Projector Model number Serial number Date of purchase Place of purchase Acer and the Acer logo are trademarks or registered trademarks of Acer Incorporated. "HDMITM, the HDMI logo and High-Definition Multimedia Interface...

User Manual
Page 3
... this product through cabinet slots as close to the AC power outlet. • Unplug the power cord before removing the power supply unit from the projector. • If the system has multiple sources of any kind into the product. Never spill liquid of power, disconnect power from the system by placing...
... this product through cabinet slots as close to the AC power outlet. • Unplug the power cord before removing the power supply unit from the projector. • If the system has multiple sources of any kind into the product. Never spill liquid of power, disconnect power from the system by placing...

User Manual
Page 5
...service personnel when: • the power cord or plug is damaged, cut or frayed • liquid was spilled into the projector's lens when the lamp is on the projector first and then signal sources. • Do not place the product in damage and will often require extensive work by the operating... the product to normal condition. v Product servicing Do not attempt to service this product from walls and free flow of air around the projector are necessary. • Locations where temperatures may become excessively high, such as opening or removing covers may contain small parts.
...service personnel when: • the power cord or plug is damaged, cut or frayed • liquid was spilled into the projector's lens when the lamp is on the projector first and then signal sources. • Do not place the product in damage and will often require extensive work by the operating... the product to normal condition. v Product servicing Do not attempt to service this product from walls and free flow of air around the projector are necessary. • Locations where temperatures may become excessively high, such as opening or removing covers may contain small parts.

User Manual
Page 6
...the lamp which has its cooling cycle before turning main power off the lamp, press HIDE on end vertically. Only use acer ceiling mount kit for mounting the projector and ensure it . The best way is operating. Please be sure to change the lamp when warning messages display. &#...8226; When changing the lamp, please allow the projector to cool down, and follow all changing instructions. • Reset the "Lamp Hour Reset" function from the Onscreen Display "Management" menu after ...
...the lamp which has its cooling cycle before turning main power off the lamp, press HIDE on end vertically. Only use acer ceiling mount kit for mounting the projector and ensure it . The best way is operating. Please be sure to change the lamp when warning messages display. &#...8226; When changing the lamp, please allow the projector to cool down, and follow all changing instructions. • Reset the "Lamp Hour Reset" function from the Onscreen Display "Management" menu after ...

User Manual
Page 7
... the volume if you . For more information on the Waste from Electrical and Electronics Equipment (WEEE) regulations, visit http://www.acer-group.com/public/ Sustainability/index.htm Mercury advisory For projectors or electronic products containing an LCD/CRT monitor or display: "Lamp(s) contain Mercury, Dispose Properly." Disposal instructions Do not throw this...
... the volume if you . For more information on the Waste from Electrical and Electronics Equipment (WEEE) regulations, visit http://www.acer-group.com/public/ Sustainability/index.htm Mercury advisory For projectors or electronic products containing an LCD/CRT monitor or display: "Lamp(s) contain Mercury, Dispose Properly." Disposal instructions Do not throw this...

User Manual
Page 8
... be sure to change the lamp when it will burn out and may cause electric shock. • When changing the lamp, please allow the projector to cool down, and follow the procedures listed under the following conditions: • In extremely hot, cold or humid environments. • In...cloth moistened with mild detergent to clean the unit. • Use under "Replacing the Lamp". Don't: • Block the slots and openings on the projector provided for a long period of the lamp itself. To replace the lamp, follow all warnings, precautions and maintenance as this may make a loud popping...
... be sure to change the lamp when it will burn out and may cause electric shock. • When changing the lamp, please allow the projector to cool down, and follow the procedures listed under the following conditions: • In extremely hot, cold or humid environments. • In...cloth moistened with mild detergent to clean the unit. • Use under "Replacing the Lamp". Don't: • Block the slots and openings on the projector provided for a long period of the lamp itself. To replace the lamp, follow all warnings, precautions and maintenance as this may make a loud popping...

User Manual
Page 9
... Thing First viii Usage Notes viii Precautions viii Introduction 1 Product Features 1 Package Overview 2 Projector Overview 3 Projector Outlook 3 Control Panel 4 Remote Control Layout 5 MHL Feature Introduction 7 Getting Started 8 Connecting the Projector 8 Turning the Projector On/Off 9 Turning On the Projector 9 Turning Off the Projector 10 Adjusting the Projected Image 11 Adjusting the Height of the Projected Image...
... Thing First viii Usage Notes viii Precautions viii Introduction 1 Product Features 1 Package Overview 2 Projector Overview 3 Projector Outlook 3 Control Panel 4 Remote Control Layout 5 MHL Feature Introduction 7 Getting Started 8 Connecting the Projector 8 Turning the Projector On/Off 9 Turning On the Projector 9 Turning Off the Projector 10 Adjusting the Projected Image 11 Adjusting the Height of the Projected Image...

User Manual
Page 11
... help decrease lamp power consumption and further extend lamp life. - English 1 Introduction Product Features This product is a single-chip DLP® projector, including the following outstanding features: • DLP® technology • Native 1920 x 1080 1080p resolution, Auto/Full/4:3/16:9/L.Box aspect ...via 2D to 3D convert function • One-touch "3D" button on , the projector dynamically adjusts the power consumption of the lamp according to the 3D functions • Acer ColorBoost technology delivers vivid, life-like images • High brightness and contrast ratio •...
... help decrease lamp power consumption and further extend lamp life. - English 1 Introduction Product Features This product is a single-chip DLP® projector, including the following outstanding features: • DLP® technology • Native 1920 x 1080 1080p resolution, Auto/Full/4:3/16:9/L.Box aspect ...via 2D to 3D convert function • One-touch "3D" button on , the projector dynamically adjusts the power consumption of the lamp according to the 3D functions • Acer ColorBoost technology delivers vivid, life-like images • High brightness and contrast ratio •...


