

User Manual
Page 4
... locate this product yourself, as opening or removing covers may result in a grounded power outlet. The plug only fits in electric shock and/or injury. The grounding pin is used , the load should be operated from the type of power indicated on the marking label. Note: The grounding pin also provides good protection from the wall outlet and refer servicing...
... locate this product yourself, as opening or removing covers may result in a grounded power outlet. The plug only fits in electric shock and/or injury. The grounding pin is used , the load should be operated from the type of power indicated on the marking label. Note: The grounding pin also provides good protection from the wall outlet and refer servicing...

User Manual
Page 5
... change in following the operating instructions Note: Adjust only those controls that is on. At least 50cm clearance from walls and free flow of air around the projector is necessary. • Locations where temperatures may become excessively high, such as inside of a car with all windows rolled up. • Locations where excessive humidity, dust, or cigarette smoke may contaminate optical components, shortening the life...
... change in following the operating instructions Note: Adjust only those controls that is on. At least 50cm clearance from walls and free flow of air around the projector is necessary. • Locations where temperatures may become excessively high, such as inside of a car with all windows rolled up. • Locations where excessive humidity, dust, or cigarette smoke may contaminate optical components, shortening the life...

User Manual
Page 6
... capable of desktop or ceiling mount mode only, and its own removable cover. Please be placed in a horizontal way by means of displaying inverted images for mounting the projector and ensure it to change the lamp when is operating. Refer servicing only to removing the lamp assembly for replacement. • Do not operate lamps beyond the rated lamp life. Only use acer ceiling mount kit for ceiling mount installation. vi • Do not touch air outlet grille and bottom...
... capable of desktop or ceiling mount mode only, and its own removable cover. Please be placed in a horizontal way by means of displaying inverted images for mounting the projector and ensure it to change the lamp when is operating. Refer servicing only to removing the lamp assembly for replacement. • Do not operate lamps beyond the rated lamp life. Only use acer ceiling mount kit for ceiling mount installation. vi • Do not touch air outlet grille and bottom...

User Manual
Page 8
... projector completes its life, it shows warning messages. • Reset the "Lamp Hour Reset" function from the Onscreen display "Management" menu after replacing the lamp module. • When switching the projector off the product before disconnecting power. • Turn on the projector first and then the signal sources. • Do not use lens cap when projector is not being used for a long period of the lamp itself. The bright light may make a loud popping sound. To replace...
... projector completes its life, it shows warning messages. • Reset the "Lamp Hour Reset" function from the Onscreen display "Management" menu after replacing the lamp module. • When switching the projector off the product before disconnecting power. • Turn on the projector first and then the signal sources. • Do not use lens cap when projector is not being used for a long period of the lamp itself. The bright light may make a loud popping sound. To replace...

User Manual
Page 10
... 1 Package Overview 2 Projector Overview 4 Projector Outlook 4 Control Panel 7 Remote Control Layout 8 MHL (Mobile High-Definition Link) Control 11 Getting Started 13 Connecting the Projector 13 Turning the Projector On/Off 15 Turning on the Projector 15 Turning the projector off 16 Adjusting the Projected Image 17 Adjusting the Height of Projected Image 17 How to get a preferred image size by adjusting distance and zoom 18 User Controls 28 Installation menu 28 Onscreen Display (OSD) Menus 29 Color 30 Image 34 Setting 37 Management 40 Audio 42 3D...
... 1 Package Overview 2 Projector Overview 4 Projector Outlook 4 Control Panel 7 Remote Control Layout 8 MHL (Mobile High-Definition Link) Control 11 Getting Started 13 Connecting the Projector 13 Turning the Projector On/Off 15 Turning on the Projector 15 Turning the projector off 16 Adjusting the Projected Image 17 Adjusting the Height of Projected Image 17 How to get a preferred image size by adjusting distance and zoom 18 User Controls 28 Installation menu 28 Onscreen Display (OSD) Menus 29 Color 30 Image 34 Setting 37 Management 40 Audio 42 3D...
User Manual
Page 12
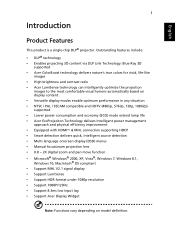
... power consumption and economy (ECO) mode extend lamp life • Acer EcoProjeciton Technology delivers Intelligent power management approach and physical efficiency improvement • Equipped with HDMI™ & MHL connection supporting HDCP • Smart detection delivers quick, intelligent source detection • Multi-language onscreen display (OSD) menus • Manual focus/zoom projection lens • 0.8 ~ 2X digital zoom and pan move function • Microsoft® Windows® 2000, XP, Vista®, Windows 7, Windows 8.1, Windows...
... power consumption and economy (ECO) mode extend lamp life • Acer EcoProjeciton Technology delivers Intelligent power management approach and physical efficiency improvement • Equipped with HDMI™ & MHL connection supporting HDCP • Smart detection delivers quick, intelligent source detection • Multi-language onscreen display (OSD) menus • Manual focus/zoom projection lens • 0.8 ~ 2X digital zoom and pan move function • Microsoft® Windows® 2000, XP, Vista®, Windows 7, Windows 8.1, Windows...

User Manual
Page 16
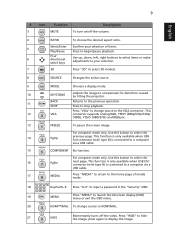
5 Rear side (Type A) 12 34 5 67 8 9 10 English 34 58 9 3 2 4 5 11 5 6 8 9 10 12 # Description 1 Power socket 2 HDMI (MHL) connector 3 HDMI connector 4 DC 5V output (service) 5 PC analog signal/HDTV/component video input connector 6 RS232 connector 7 Kensington™ lock port # Description 8 Composite video input connector 9 Audio in connector 10 Audio out connector 11 Monitor loop-through output connector (for VGA IN 1, VGA IN only) 12 3D SYNC connector Note: Functions vary depending on model definition.
5 Rear side (Type A) 12 34 5 67 8 9 10 English 34 58 9 3 2 4 5 11 5 6 8 9 10 12 # Description 1 Power socket 2 HDMI (MHL) connector 3 HDMI connector 4 DC 5V output (service) 5 PC analog signal/HDTV/component video input connector 6 RS232 connector 7 Kensington™ lock port # Description 8 Composite video input connector 9 Audio in connector 10 Audio out connector 11 Monitor loop-through output connector (for VGA IN 1, VGA IN only) 12 3D SYNC connector Note: Functions vary depending on model definition.

User Manual
Page 18
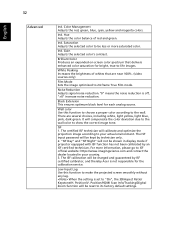
7 Control Panel 1 2 3 English 4 7 8 5 9 6 10 # Icon Function 1 POWER POWER 2 LAMP LAMP 3 TEMP TEMP 4 POWER Description Power Indicator LED Lamp Indicator LED Temp Indicator LED See the contents in "Turning the Projector On/Off" section. 5 Four directional select Use to select items or make keys adjustments to your selection of items. 9 KEYSTONE Adjusts the image to compensate for distortion caused by tilting the projector. 10 MENU MENU Press "MENU" to the previous operation. Note: Functions vary depending on model definition. Confirm your selection. 6 BACK...
7 Control Panel 1 2 3 English 4 7 8 5 9 6 10 # Icon Function 1 POWER POWER 2 LAMP LAMP 3 TEMP TEMP 4 POWER Description Power Indicator LED Lamp Indicator LED Temp Indicator LED See the contents in "Turning the Projector On/Off" section. 5 Four directional select Use to select items or make keys adjustments to your selection of items. 9 KEYSTONE Adjusts the image to compensate for distortion caused by tilting the projector. 10 MENU MENU Press "MENU" to the previous operation. Note: Functions vary depending on model definition. Confirm your selection. 6 BACK...
User Manual
Page 20
... the VGA connector. Press "VGA" to change source to a computer via a USB cable. 17 MEDIA Press "MEDIA" to return to the home page of items. Press to begin/pause playback. 6 Four directional select keys Use up, down, left, right buttons to select items or make adjustments to your selection. 7 3D Press "3D" to select 3D models. 8 SOURCE Changes the active source. 9 MODE Chooses a display mode. 10 KEYSTONE Adjusts the image...
... the VGA connector. Press "VGA" to change source to a computer via a USB cable. 17 MEDIA Press "MEDIA" to return to the home page of items. Press to begin/pause playback. 6 Four directional select keys Use up, down, left, right buttons to select items or make adjustments to your selection. 7 3D Press "3D" to select 3D models. 8 SOURCE Changes the active source. 9 MODE Chooses a display mode. 10 KEYSTONE Adjusts the image...

User Manual
Page 21
English 10 # Icon Function Description 22 ZOOM IN Zooms the projector display in. 23 VIDEO To change source to COMPOSITE VIDEO. 24 ZOOM OUT Zooms the projector display out. 25 LAN/WiFi No function. 26 Backlight Remote backlight. 27 Laser pointer Aim the remote at the viewing screen. 28 Laser button Aim the remote at the viewing screen, press and hold this button to activate the laser pointer. Note: Functions vary depending on model definition.
English 10 # Icon Function Description 22 ZOOM IN Zooms the projector display in. 23 VIDEO To change source to COMPOSITE VIDEO. 24 ZOOM OUT Zooms the projector display out. 25 LAN/WiFi No function. 26 Backlight Remote backlight. 27 Laser pointer Aim the remote at the viewing screen. 28 Laser button Aim the remote at the viewing screen, press and hold this button to activate the laser pointer. Note: Functions vary depending on model definition.

User Manual
Page 27
... power button again to ensure continued optimal lamp operation. The lamp will automatically turn off soon." Note 1: Whenever the projector automatically shuts down , and the LED temp indicator will blink. Attention! Please do not turn off projector within 1 minute after the projector is now safe to turn the projector immediately back on model definition. Press the power button again. 2 The LED power indicator will turn RED and blink rapidly after power on. Lamp will stop blinking and turn solid red to indicate standby mode...
... power button again to ensure continued optimal lamp operation. The lamp will automatically turn off soon." Note 1: Whenever the projector automatically shuts down , and the LED temp indicator will blink. Attention! Please do not turn off projector within 1 minute after the projector is now safe to turn the projector immediately back on model definition. Press the power button again. 2 The LED power indicator will turn RED and blink rapidly after power on. Lamp will stop blinking and turn solid red to indicate standby mode...

User Manual
Page 39
... User Controls Installation menu The installation menu provides an onscreen display (OSD) for projector installation and maintenance. 3 The background pattern acts as a guide to adjusting the calibration and alignment settings, such as screen size and distance, focus and more . 1 Turn on the projector by pressing "Power" button on the control pad. 2 Press the "MENU" button on the remote control to launch the OSD for projector installation and maintenance. Use the OSD only when the message "No signal input" is displayed on model definition. Use...
... User Controls Installation menu The installation menu provides an onscreen display (OSD) for projector installation and maintenance. 3 The background pattern acts as a guide to adjusting the calibration and alignment settings, such as screen size and distance, focus and more . 1 Turn on the projector by pressing "Power" button on the control pad. 2 Press the "MENU" button on the remote control to launch the OSD for projector installation and maintenance. Use the OSD only when the message "No signal input" is displayed on model definition. Use...

User Manual
Page 42
... white, light yellow, light blue, pink, dark green. R Gain Adjusts the red gain for color temperature optimization. Effects the representation of the current "User 1", "User 2" or "User 3" except itself. It will showup the "color profile" and "rename". Adjusting the contrast changes the amount of color in the image. • Press to decrease the contrast. • Press to choose CT1, CT2, CT3, User mode. B Gain Adjusts the blue gain for color temperature optimization. G Gain Adjusts the green...
... white, light yellow, light blue, pink, dark green. R Gain Adjusts the red gain for color temperature optimization. Effects the representation of the current "User 1", "User 2" or "User 3" except itself. It will showup the "color profile" and "rename". Adjusting the contrast changes the amount of color in the image. • Press to decrease the contrast. • Press to choose CT1, CT2, CT3, User mode. B Gain Adjusts the blue gain for color temperature optimization. G Gain Adjusts the green...
User Manual
Page 43
...-screen color spectrum that are several choices, including white, light yellow, light blue, pink, dark green. ISF 1. Position/HDMI Scan Info/Tracking/Digital Zoom function will not be reset to make the projected screen smoothly without any lag. Color Management Adjusts the red, green, blue, cyan, yellow and magenta colors. Ind. Wall color Use this function to its factory default settings. The certified ISF technician will compensate the color deviation due to the wall color to -life images. Hue Adjusts the color...
...-screen color spectrum that are several choices, including white, light yellow, light blue, pink, dark green. ISF 1. Position/HDMI Scan Info/Tracking/Digital Zoom function will not be reset to make the projected screen smoothly without any lag. Color Management Adjusts the red, green, blue, cyan, yellow and magenta colors. Ind. Wall color Use this function to its factory default settings. The certified ISF technician will compensate the color deviation due to the wall color to -life images. Hue Adjusts the color...

User Manual
Page 45
Front-Ceiling: When you can project from behind a translucent screen. Front: The factory default setting. • Projection Location Rear: Reverses the image so you select this function, the projector reverses and inverts the image at same time. Adjust image distortion caused by tilting projection. The Manual Keystone function is unavailable under Auto Keystone setting to display the image using a 16:9 ratio. • L.Box: Keep original signal aspect ratio and zoom in by width (3840 pixels) and height (2160...
Front-Ceiling: When you can project from behind a translucent screen. Front: The factory default setting. • Projection Location Rear: Reverses the image so you select this function, the projector reverses and inverts the image at same time. Adjust image distortion caused by tilting projection. The Manual Keystone function is unavailable under Auto Keystone setting to display the image using a 16:9 ratio. • L.Box: Keep original signal aspect ratio and zoom in by width (3840 pixels) and height (2160...

User Manual
Page 48
... OSD menu. • Acer: The default startup screen of your customized startup screen. Manual by source menu, Auto by Smart Detection. Set your desired startup screen. Warning! Default is "Off". If you restart the projector. To capture the image that the "Keystone" is NTSC. Press "Start" to enable HDMI CEC function. press "Back" to previous UI . • A dialog box appears to enable VGA OUT connection. Choose "ENTER" to use the current image...
... OSD menu. • Acer: The default startup screen of your customized startup screen. Manual by source menu, Auto by Smart Detection. Set your desired startup screen. Warning! Default is "Off". If you restart the projector. To capture the image that the "Keystone" is NTSC. Press "Start" to enable HDMI CEC function. press "Back" to previous UI . • A dialog box appears to enable VGA OUT connection. Choose "ENTER" to use the current image...
User Manual
Page 49
... see "Confirm Password" displayed. • The password should be used in .", the projector will prompt the user to enter the password every time the power cord is plugged. • If you forgot your must enter the "Administrator Password" first before changing the security settings. • Select "On" to change the "Administrator Password". • The factory default of the projector . Timeout(Min.) Once "Security" is activated to operate the projector. English...
... see "Confirm Password" displayed. • The password should be used in .", the projector will prompt the user to enter the password every time the power cord is plugged. • If you forgot your must enter the "Administrator Password" first before changing the security settings. • Select "On" to change the "Administrator Password". • The factory default of the projector . Timeout(Min.) Once "Security" is activated to operate the projector. English...

User Manual
Page 51
... Menu Display Time (Seconds) Auto Power On Control Panel Lock Lamp Information Choose "On" to dim the projector lamp which will automatically shutdown when there is no signal input after the allocated time. (default is 15 minutes) Choose the OSD menu display time. (Default is "On". Choose "Off" to turn on projector while VGA power plug in . Off Default is set to "Off" and not required to go back to "Full Lock" again. • Pop up a warning message...
... Menu Display Time (Seconds) Auto Power On Control Panel Lock Lamp Information Choose "On" to dim the projector lamp which will automatically shutdown when there is no signal input after the allocated time. (default is 15 minutes) Choose the OSD menu display time. (Default is "On". Choose "Off" to turn on projector while VGA power plug in . Off Default is set to "Off" and not required to go back to "Full Lock" again. • Pop up a warning message...

User Manual
Page 55
...: • Verify that your display resolution setting is lower than or equal to WUXGA-RB (1920 x 1200). • Click the "Change" button under the "Models" box. • Verify that the resolution setting of the monitor display is switched on. 2 Partial, scrolling • For an incorrectly displayed image: or incorrectly displayed image (for PC (Windows 2000/XP/Vista/ • Open "My Computer", open the "Control Panel", and then double-click...
...: • Verify that your display resolution setting is lower than or equal to WUXGA-RB (1920 x 1200). • Click the "Change" button under the "Models" box. • Verify that the resolution setting of the monitor display is switched on. 2 Partial, scrolling • For an incorrectly displayed image: or incorrectly displayed image (for PC (Windows 2000/XP/Vista/ • Open "My Computer", open the "Control Panel", and then double-click...

User Manual
Page 58
... control panel lock function is clogged with the Projector # Condition Solution 1 The projector stops responding • If possible, turn on until the lamp module has been replaced. Problems with dust, please clean it soon. Prepare to reach its useful life, it may make a loud popping sound. To replace the lamp, follow the procedures in the "Replacing the Lamp (For service personnel only)" section. Please check the following message. Please also check...
... control panel lock function is clogged with the Projector # Condition Solution 1 The projector stops responding • If possible, turn on until the lamp module has been replaced. Problems with dust, please clean it soon. Prepare to reach its useful life, it may make a loud popping sound. To replace the lamp, follow the procedures in the "Replacing the Lamp (For service personnel only)" section. Please check the following message. Please also check...


