
Quick Start Guide
Page 1
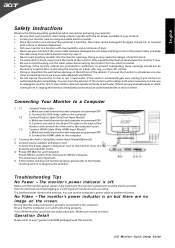
... connected to hold the plug, not the cable, when disconnecting the monitor from it carefully. Turn off . b. Connect HDMI Cable (Only HDMI-Input Model) a. Only a qualified technician should not be damaged if dropped, sharply hit, or touched with a sharp or abrasive implement. • Put your monitor if the power cable has been damaged. Connect the VGA video cable to a properly grounded AC outlet. 4. LCD Monitor Quick Setup Guide To prevent overheating, these openings should open the monitor...
... connected to hold the plug, not the cable, when disconnecting the monitor from it carefully. Turn off . b. Connect HDMI Cable (Only HDMI-Input Model) a. Only a qualified technician should not be damaged if dropped, sharply hit, or touched with a sharp or abrasive implement. • Put your monitor if the power cable has been damaged. Connect the VGA video cable to a properly grounded AC outlet. 4. LCD Monitor Quick Setup Guide To prevent overheating, these openings should open the monitor...
Quick Start Guide
Page 2
... with your waste equipment for help to radio communications. Caution Changes or modifications not expressly approved by the manufacturer could void the user authority, which can radiate radio frequency energy and, if not installed and used in accordance with non-certified ...collection point for a Class B digital device pursuant to maintain compliance with Part 15 of the FCC rules. Operation conditions This device complies with EMC regulations. LCD Monitor Quick Setup Guide This device generates, uses, and can be made using shielded cables to Part 15 of the FCC Rules....
... with your waste equipment for help to radio communications. Caution Changes or modifications not expressly approved by the manufacturer could void the user authority, which can radiate radio frequency energy and, if not installed and used in accordance with non-certified ...collection point for a Class B digital device pursuant to maintain compliance with Part 15 of the FCC rules. Operation conditions This device complies with EMC regulations. LCD Monitor Quick Setup Guide This device generates, uses, and can be made using shielded cables to Part 15 of the FCC Rules....
User Manual
Page 1
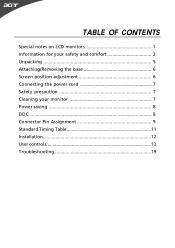
TABLE OF CONTENTS Special notes on LCD monitors 1 Information for your safety and comfort 2 Unpacking 5 Attaching/Removing the base 6 Screen position adjustment 6 Connecting the power cord 7 Safety precaution 7 Cleaning your monitor 7 Power saving 8 DDC 8 Connector Pin Assignment 9 Standard Timing Table 11 Installation 12 User controls 13 Troubleshooting 19
TABLE OF CONTENTS Special notes on LCD monitors 1 Information for your safety and comfort 2 Unpacking 5 Attaching/Removing the base 6 Screen position adjustment 6 Connecting the power cord 7 Safety precaution 7 Cleaning your monitor 7 Power saving 8 DDC 8 Connector Pin Assignment 9 Standard Timing Table 11 Installation 12 User controls 13 Troubleshooting 19

User Manual
Page 2
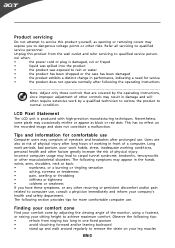
... brightness on the screen depending on again to the nature of 99.99% or more. In this case, the screen is displayed for hours. EN-1 Turn off the Power Switch for hours. SPECIAL NOTES ON LCD MONITORS The following symptoms are normal with LCD monitor and do not indicate a problem. It may include blemishes of 0.01% or less such as a missing pixel or a pixel...
... brightness on the screen depending on again to the nature of 99.99% or more. In this case, the screen is displayed for hours. EN-1 Turn off the Power Switch for hours. SPECIAL NOTES ON LCD MONITORS The following symptoms are normal with LCD monitor and do not indicate a problem. It may include blemishes of 0.01% or less such as a missing pixel or a pixel...

User Manual
Page 3
... the electrical outlet. Keep this document for your earing. • Gradually increase the volume until you plug the power cord into the product. • To avoid damage of internal components and to the equipment operator as they may touch dangerous voltage points or short-out parts that could be seriously damaged. • Slots and openings are provided for...
... the electrical outlet. Keep this document for your earing. • Gradually increase the volume until you plug the power cord into the product. • To avoid damage of internal components and to the equipment operator as they may touch dangerous voltage points or short-out parts that could be seriously damaged. • Slots and openings are provided for...
User Manual
Page 4
... as opening or removing covers may complain of eyestrain and headaches after long hours of working conditions, personal health and other controls may result in damage and will often require extensive work habits, stress, inadequate working in front of a computer. Users are covered by adjusting the viewing angle of the monitor, using a footrest, or raising your comfort zone by the operating instructions, since improper adjustment...
... as opening or removing covers may complain of eyestrain and headaches after long hours of working conditions, personal health and other controls may result in damage and will often require extensive work habits, stress, inadequate working in front of a computer. Users are covered by adjusting the viewing angle of the monitor, using a footrest, or raising your comfort zone by the operating instructions, since improper adjustment...

User Manual
Page 5
... reduce eyestrain. For more information and help in such a way that the side faces the window or any light source • minimizing room light by looking at the middle of the display. • Adjust the display brightness and/or contrast to a comfortable level for extended periods of time. Developing good work habits Develop the following work for only short periods, take short...
... reduce eyestrain. For more information and help in such a way that the side faces the window or any light source • minimizing room light by looking at the middle of the display. • Adjust the display brightness and/or contrast to a comfortable level for extended periods of time. Developing good work habits Develop the following work for only short periods, take short...

User Manual
Page 6
UNPACKING Please check the following items are present when you unpack the box, and save the packing materials in case you will need to ship or transport the monitor in future. • LCD Monitor • AC Power Cord • HDMI Cabel (Optional) • Power adaptor • D-Sub Cable (Optional) • DVI Cable (Optional) • Audio Cable (Optional) • User Manual • Quick Start Guide EN-5
UNPACKING Please check the following items are present when you unpack the box, and save the packing materials in case you will need to ship or transport the monitor in future. • LCD Monitor • AC Power Cord • HDMI Cabel (Optional) • Power adaptor • D-Sub Cable (Optional) • DVI Cable (Optional) • Audio Cable (Optional) • User Manual • Quick Start Guide EN-5
User Manual
Page 7
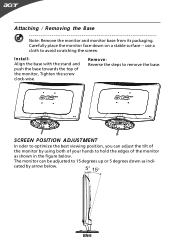
... on a stable surface -- Remove: Reverse the steps to avoid scratching the screen. Carefully place the monitor face-down as shown in the figure below . SCREEN POSITION ADJUSTMENT In oder to optimize the best viewing position, you can be adjusted to hold the edges of the monitor, Tighten the screw clock-wise. use a cloth to remove the base. Attaching / Removing the Base Note: Remove the monitor and monitor base from its packaging. EN-6
... on a stable surface -- Remove: Reverse the steps to avoid scratching the screen. Carefully place the monitor face-down as shown in the figure below . SCREEN POSITION ADJUSTMENT In oder to optimize the best viewing position, you can be adjusted to hold the edges of the monitor, Tighten the screw clock-wise. use a cloth to remove the base. Attaching / Removing the Base Note: Remove the monitor and monitor base from its packaging. EN-6

User Manual
Page 8
...; Handle with care when transporting the monitor. • Refrain from giving shock or scratch to the screen, as screen is adequate ventilation. • Avoid placing the monitor against a bright background or where sun- CONNECTING THE POWER CORD • Check first to make sure that allows operation in which the equipment will be installed. No user-adjustment is the correct type required for the...
...; Handle with care when transporting the monitor. • Refrain from giving shock or scratch to the screen, as screen is adequate ventilation. • Avoid placing the monitor against a bright background or where sun- CONNECTING THE POWER CORD • Check first to make sure that allows operation in which the equipment will be installed. No user-adjustment is the correct type required for the...
User Manual
Page 9
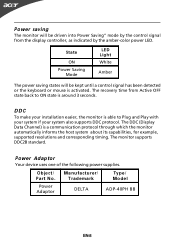
Ob je c t / Part No. Manufacturer/ Trademark Type/ Model Power Adaptor DELTA ADP-40PH BB EN-8 State LED Light ON Power Saving Mode White Amber The power saving states will be kept until a control signal has been detected or the keyboard or mouse is activated. The recovery time from the display controller, as indicated by the amber-color power LED. The monitor supports DDC2B standard. DDC To make your installation easier, the monitor is able...
Ob je c t / Part No. Manufacturer/ Trademark Type/ Model Power Adaptor DELTA ADP-40PH BB EN-8 State LED Light ON Power Saving Mode White Amber The power saving states will be kept until a control signal has been detected or the keyboard or mouse is activated. The recovery time from the display controller, as indicated by the amber-color power LED. The monitor supports DDC2B standard. DDC To make your installation easier, the monitor is able...
User Manual
Page 10
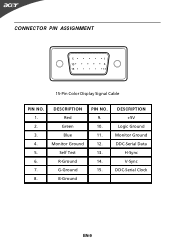
DESCRIPTION Red Green Blue Monitor Ground Self Test R-Ground G-Ground B-Ground PIN NO. 9. 10. 11. 12. 13. 14. 15. CONNECTOR PIN ASSIGNMENT 5 1 10 6 15 11 15-Pin Color Display Signal Cable PIN NO. 1. 2. 3. 4. 5. 6. 7. 8. DESCRIPTION +5V Logic Ground Monitor Ground DDC-Serial Data H-Sync V-Sync DDC-Serial Clock EN-9
DESCRIPTION Red Green Blue Monitor Ground Self Test R-Ground G-Ground B-Ground PIN NO. 9. 10. 11. 12. 13. 14. 15. CONNECTOR PIN ASSIGNMENT 5 1 10 6 15 11 15-Pin Color Display Signal Cable PIN NO. 1. 2. 3. 4. 5. 6. 7. 8. DESCRIPTION +5V Logic Ground Monitor Ground DDC-Serial Data H-Sync V-Sync DDC-Serial Clock EN-9

User Manual
Page 11
...models EN-10 Meaning TMDS Clock+ TMDS Clock Shield TMDS Clock- TMDS Data 2/4 Shield 15. 4. DDC Data 19. 8. TMDS Data0 Shield 17. 9. on device) SCL SDA DDC/CEC Ground +5V Power Hot Plug Detect NC 17. 6. NC 20. 9. NC 24. TMDS Data2+ 10. 2. TMDS Data1 Shield 14. 6. 24-Pin Color Display Signal Cable.... 4. DDC Clock 18. 7. Meaning NC +5V Power Logic Ground Hot Plug Detect TMDS Data0TMDS Data0+ TMDS Data 0/5 Shield NC NC TMDS Clock Shield TMDS Clock+ DDC TMDS Clock- 19-Pin color display signal cable* PIN Meaning PIN 1. TMDS Data2+ 14. 3....
...models EN-10 Meaning TMDS Clock+ TMDS Clock Shield TMDS Clock- TMDS Data 2/4 Shield 15. 4. DDC Data 19. 8. TMDS Data0 Shield 17. 9. on device) SCL SDA DDC/CEC Ground +5V Power Hot Plug Detect NC 17. 6. NC 20. 9. NC 24. TMDS Data2+ 10. 2. TMDS Data1 Shield 14. 6. 24-Pin Color Display Signal Cable.... 4. DDC Clock 18. 7. Meaning NC +5V Power Logic Ground Hot Plug Detect TMDS Data0TMDS Data0+ TMDS Data 0/5 Shield NC NC TMDS Clock Shield TMDS Clock+ DDC TMDS Clock- 19-Pin color display signal cable* PIN Meaning PIN 1. TMDS Data2+ 14. 3....

User Manual
Page 13
... 1. 1-1 Connect Video Cable a. Power-ON Monitor and Computer Power-ON the monitor first, then power-ON the computer. b. b. INSTALLATION To install the monitor to diagnose the problem. This sequence is very important. 5. Make sure both the monitor and computer are powered-OFF. Connect power adaptor and power cord Connect the power adaptor and power cord to the monitor, then to the computer. 2. Connect the HDMI cable to a properly grounded AC outlet. 4. b. Connect the Audio Cable(Only Audio-Input Model)(Optional) 3. Make sure both the monitor...
... 1. 1-1 Connect Video Cable a. Power-ON Monitor and Computer Power-ON the monitor first, then power-ON the computer. b. b. INSTALLATION To install the monitor to diagnose the problem. This sequence is very important. 5. Make sure both the monitor and computer are powered-OFF. Connect power adaptor and power cord Connect the power adaptor and power cord to the monitor, then to the computer. 2. Connect the HDMI cable to a properly grounded AC outlet. 4. b. Connect the Audio Cable(Only Audio-Input Model)(Optional) 3. Make sure both the monitor...
User Manual
Page 14
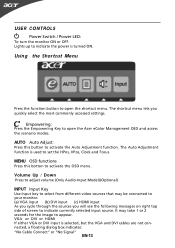
... of screen to your monitor. (a) VGA input (b) DVI input (c) HDMI input As you cycle through the sources you quickly select the most commonly accessed settings. Volume Up / Down Press to adjust volume (Only Audio-Input Model)(Optional) INPUT Input Key Use Input key to select from different video sources that may take 1 or 2 seconds for the image to activate the Auto Adjustment function. MENU OSD functions Press this button to appear. Using the Shortcut Menu Press the function button to open the shortcut menu...
... of screen to your monitor. (a) VGA input (b) DVI input (c) HDMI input As you cycle through the sources you quickly select the most commonly accessed settings. Volume Up / Down Press to adjust volume (Only Audio-Input Model)(Optional) INPUT Input Key Use Input key to select from different video sources that may take 1 or 2 seconds for the image to activate the Auto Adjustment function. MENU OSD functions Press this button to appear. Using the Shortcut Menu Press the function button to open the shortcut menu...
User Manual
Page 15
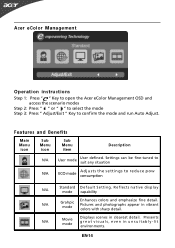
... instructions Step 1: Press " " Key to open the Acer eColor Management OSD and access the scenario modes Step 2: Press " " or " " to select the mode Step 3: Press " Adjust/Exit " Key to reduce pow consumption N/A Standard D e fault Settin g. R eflects n ative d isp la y mode capability N/A Grahpic mode Enhances colors and emphasize fine detail. Pictures and photographs appear in unsuitably-lit environments. Features and Benefits Main Menu...
... instructions Step 1: Press " " Key to open the Acer eColor Management OSD and access the scenario modes Step 2: Press " " or " " to select the mode Step 3: Press " Adjust/Exit " Key to reduce pow consumption N/A Standard D e fault Settin g. R eflects n ative d isp la y mode capability N/A Grahpic mode Enhances colors and emphasize fine detail. Pictures and photographs appear in unsuitably-lit environments. Features and Benefits Main Menu...

User Manual
Page 16
... you wish to open the OSD. You can be used to adjust the picture quality, OSD Timeout and general settings. The OSD can be used for general reference only. Actual product specifications may vary. Use the to Enter to the item page. 3 Use the / keys to adjust the sliding scales. 4 The Picture menu can use the OSD to adjust the current Brightness, Contrast, Colour Temp, Auto Config and other image-related qualities.
... you wish to open the OSD. You can be used to adjust the picture quality, OSD Timeout and general settings. The OSD can be used for general reference only. Actual product specifications may vary. Use the to Enter to the item page. 3 Use the / keys to adjust the sliding scales. 4 The Picture menu can use the OSD to adjust the current Brightness, Contrast, Colour Temp, Auto Config and other image-related qualities.
User Manual
Page 20
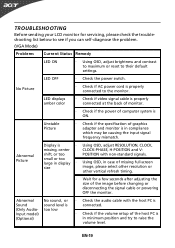
No Picture · Check if AC power cord is properly connected to their default settings. EN-19 Unstable Picture · Check if the specification of the host PC is in compliance which may be causing the input signal frequency mismatch. Abnormal Sound (Only AudioInput model) (Optional) No sound, or sound level is too low · Check the audio cable with non-standard signals. LED OFF · Check the power switch. Using OSD, in display · size Using OSD, adjust RESOLUTION, CLOCK, CLOCK-PHASE, H-POSITION and...
No Picture · Check if AC power cord is properly connected to their default settings. EN-19 Unstable Picture · Check if the specification of the host PC is in compliance which may be causing the input signal frequency mismatch. Abnormal Sound (Only AudioInput model) (Optional) No sound, or sound level is too low · Check the audio cable with non-standard signals. LED OFF · Check the power switch. Using OSD, in display · size Using OSD, adjust RESOLUTION, CLOCK, CLOCK-PHASE, H-POSITION and...
User Manual
Page 21
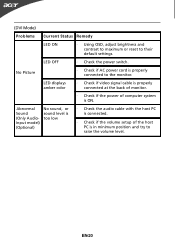
... in minimum position and try to raise the volume level. EN-20 LED OFF · Check the power switch. LED displays amber color · Check if video signal cable is properly connected at the back of monitor. · Check if the power of the host PC is ON. (DVI Mode) Problems Current Status Remedy LED ON · Using OSD, adjust brightness and contrast to maximum or reset to the monitor. No Picture · Check if AC power cord is properly connected to their default settings.
... in minimum position and try to raise the volume level. EN-20 LED OFF · Check the power switch. LED displays amber color · Check if video signal cable is properly connected at the back of monitor. · Check if the power of the host PC is ON. (DVI Mode) Problems Current Status Remedy LED ON · Using OSD, adjust brightness and contrast to maximum or reset to the monitor. No Picture · Check if AC power cord is properly connected to their default settings.
User Manual
Page 22
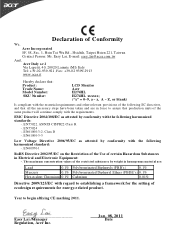
E N61000-3-2, Class D -. Year to establishing a framework for the setting of ecodesign requirements for energy-related product. Easy Lai /Manager Regulation, Acer Inc. E N61000-3-3 Low Voltage Directive 2006/ 95/E C as attested by con formity with the following harmonized st anda rds: ... s.r.l Via Lepetit, 40, 20020 Lainate (MI) Italy Tel: +39-02-939-921 ,Fax: +39-02 9399-2913 www.acer.i t Hereby declare that: P roduct : T rade Name: M odel Number: SKU Nu mb er: LCD Monitor Acer H274H L H274H L xxxxxx; ("x" = 0~9, a ~ z, A ~ Z , or blank) Is compliant with the essential requirements ...
E N61000-3-2, Class D -. Year to establishing a framework for the setting of ecodesign requirements for energy-related product. Easy Lai /Manager Regulation, Acer Inc. E N61000-3-3 Low Voltage Directive 2006/ 95/E C as attested by con formity with the following harmonized st anda rds: ... s.r.l Via Lepetit, 40, 20020 Lainate (MI) Italy Tel: +39-02-939-921 ,Fax: +39-02 9399-2913 www.acer.i t Hereby declare that: P roduct : T rade Name: M odel Number: SKU Nu mb er: LCD Monitor Acer H274H L H274H L xxxxxx; ("x" = 0~9, a ~ z, A ~ Z , or blank) Is compliant with the essential requirements ...


