

User Manual
Page 2
... in this manual or supplementary documents and publications. This company makes no representations or warranties, either expressed or implied, with respect to their respective companies. All Rights Reserved. Acer LCD Monitor User Guide Model number Serial number Date of purchase Place of purchase Acer and the Acer logo are used herein for identification purposes only and belong to the contents hereof and specifically disclaims the...
... in this manual or supplementary documents and publications. This company makes no representations or warranties, either expressed or implied, with respect to their respective companies. All Rights Reserved. Acer LCD Monitor User Guide Model number Serial number Date of purchase Place of purchase Acer and the Acer logo are used herein for identification purposes only and belong to the contents hereof and specifically disclaims the...

User Manual
Page 3
... by changing the image or turning off the power switch for future reference. Follow all the time. • Due to the nature of the LCD screen, an afterimage of the fluorescent light, the screen may find slightly uneven brightness on the screen depending on the product. Special notes on again to make sure the flicker disappears. • You may flicker during initial use . • The LCD screen...
... by changing the image or turning off the power switch for future reference. Follow all the time. • Due to the nature of the LCD screen, an afterimage of the fluorescent light, the screen may find slightly uneven brightness on the screen depending on the product. Special notes on again to make sure the flicker disappears. • You may flicker during initial use . • The LCD screen...
User Manual
Page 4
... turning up the volume to prevent battery leakage, do not place the product on an unstable cart, stand or table. Using electrical power • This product should never be blocked or covered. When you . If the product falls, it could result in installation unless proper ventilation is easily accessible and located as close to rest on the power cord...
... turning up the volume to prevent battery leakage, do not place the product on an unstable cart, stand or table. Using electrical power • This product should never be blocked or covered. When you . If the product falls, it could result in installation unless proper ventilation is easily accessible and located as close to rest on the power cord...

User Manual
Page 5
... protection from the wall outlet and refer servicing to qualified service personnel when: • the power cord or plug is equipped with the supplied power supply cord set , make sure that may interfere with the performance of the branch circuit rating. Warning! Also, make sure that is not properly grounded may expose you need for details. Unplug this product yourself, as opening or removing covers may result in...
... protection from the wall outlet and refer servicing to qualified service personnel when: • the power cord or plug is equipped with the supplied power supply cord set , make sure that may interfere with the performance of the branch circuit rating. Warning! Also, make sure that is not properly grounded may expose you need for details. Unplug this product yourself, as opening or removing covers may result in...

User Manual
Page 6
Switch off the device near gas pumps at Acer are in damage and will often require extensive work by the operating instructions, since improper adjustment of our other controls may contain small parts. They include below deck on the Waste from Electrical and Electronics Equipment (WEEE) regulations, visit http://global.acer.com/about/sustainability.htm Keep them out of the...
Switch off the device near gas pumps at Acer are in damage and will often require extensive work by the operating instructions, since improper adjustment of our other controls may contain small parts. They include below deck on the Waste from Electrical and Electronics Equipment (WEEE) regulations, visit http://global.acer.com/about/sustainability.htm Keep them out of the...
User Manual
Page 7
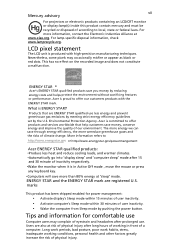
... Industries Alliance at "sleep" mode. vii Mercury advisory For projectors or electronic products containing an LCD/CRT monitor or display:lamp(s) inside this product contain mercury and must be recycled or disposed of eyestrain and headaches after prolonged use. Products that help customers save you money by pushing the power button. For lamp-specific disposal information, check www.lamprecycle.org. Acer is in front...
... Industries Alliance at "sleep" mode. vii Mercury advisory For projectors or electronic products containing an LCD/CRT monitor or display:lamp(s) inside this product contain mercury and must be recycled or disposed of eyestrain and headaches after prolonged use. Products that help customers save you money by pushing the power button. For lamp-specific disposal information, check www.lamprecycle.org. Acer is in front...
User Manual
Page 8
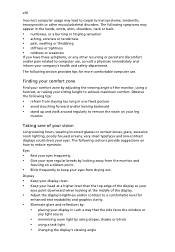
... these symptoms, or any light source • minimizing room light by adjusting the viewing angle of your vision Long viewing hours, wearing incorrect glasses or contact lenses, glare, excessive room lighting, poorly focused screens, very small typefaces and low-contrast displays could stress your comfort zone by using drapes, shades or blinds • using a task light • changing the display's viewing angle The following tips: •...
... these symptoms, or any light source • minimizing room light by adjusting the viewing angle of your vision Long viewing hours, wearing incorrect glasses or contact lenses, glare, excessive room lighting, poorly focused screens, very small typefaces and low-contrast displays could stress your comfort zone by using drapes, shades or blinds • using a task light • changing the display's viewing angle The following tips: •...
User Manual
Page 9
... Lai Tel: 886-2-8691-3089 Fax: 886-2-8691-3120 E-mail: easy_lai@acer.com.tw Hereby declare that: Product: 23" LCD Monitor Trade Name: Acer or eMachines or Gateway or packard bell Model Number: H233H SKU Number: H233Hxxxx (x can be 0-9, A-Z or blank) Is compliant with the essential...the Restriction of the Use of certain Hazardous Substances in Electrical and Electronic Equipment. Year to an awkward viewing angle. • Avoid looking at bright light sources, such as open windows, for extended periods of time. Developing good work habits to make your display to begin affixing CE...
... Lai Tel: 886-2-8691-3089 Fax: 886-2-8691-3120 E-mail: easy_lai@acer.com.tw Hereby declare that: Product: 23" LCD Monitor Trade Name: Acer or eMachines or Gateway or packard bell Model Number: H233H SKU Number: H233Hxxxx (x can be 0-9, A-Z or blank) Is compliant with the essential...the Restriction of the Use of certain Hazardous Substances in Electrical and Electronic Equipment. Year to an awkward viewing angle. • Avoid looking at bright light sources, such as open windows, for extended periods of time. Developing good work habits to make your display to begin affixing CE...
User Manual
Page 11
... the base (for selected models) 3 Screen position adjustment 4 Connecting the power cord 4 Power saving 4 Connecting the docking device (for selected models) 5 Display Data Channel (DDC) 5 Connector pin assignment 5 15-pin color display signal cable 5 24-pin color display signal cable 6 19-pin color display signal cable* 6 Standard timing table 7 Installation 8 Users controls 9 Front panel controls 9 Acer eColor Management 10 Operation instructions 10 Features and benefits 10 Adjusting the OSD settings 11 Adjusting the picture quality 11 Adjusting the OSD...
... the base (for selected models) 3 Screen position adjustment 4 Connecting the power cord 4 Power saving 4 Connecting the docking device (for selected models) 5 Display Data Channel (DDC) 5 Connector pin assignment 5 15-pin color display signal cable 5 24-pin color display signal cable 6 19-pin color display signal cable* 6 Standard timing table 7 Installation 8 Users controls 9 Front panel controls 9 Acer eColor Management 10 Operation instructions 10 Features and benefits 10 Adjusting the OSD settings 11 Adjusting the picture quality 11 Adjusting the OSD...
User Manual
Page 13
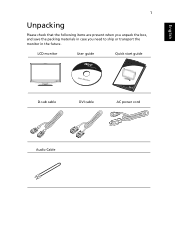
LCD monitor User guide Quick start guide D-sub cable DVI cable AC power cord Audio Cable English 1 Unpacking Please check that the following items are present when you unpack the box, and save the packing materials in case you need to ship or transport the monitor in the future.
LCD monitor User guide Quick start guide D-sub cable DVI cable AC power cord Audio Cable English 1 Unpacking Please check that the following items are present when you unpack the box, and save the packing materials in case you need to ship or transport the monitor in the future.
User Manual
Page 14
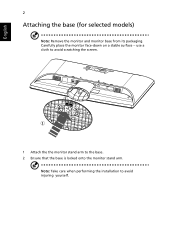
use a cloth to avoid scratching the screen. 2 1 1 Attach the the monitor stand arm to avoid injuring yourself. Carefully place the monitor face-down on a stable surface -- Note: Take care when performing the installation to the base. 2 Ensure that the base is locked onto the monitor stand arm. English 2 Attaching the base (for selected models) Note: Remove the monitor and monitor base from its packaging.
use a cloth to avoid scratching the screen. 2 1 1 Attach the the monitor stand arm to avoid injuring yourself. Carefully place the monitor face-down on a stable surface -- Note: Take care when performing the installation to the base. 2 Ensure that the base is locked onto the monitor stand arm. English 2 Attaching the base (for selected models) Note: Remove the monitor and monitor base from its packaging.
User Manual
Page 15
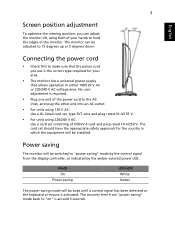
.... The recovery time from the display controller, as indicated by the amber-colored power LED. No useradjustment is required. • Plug one end of H05VV-F cord and plug rated 10 A/250 V. Power saving The monitor will be switched to 15 degrees up or 5 degrees down. The monitor can adjust the monitor tilt, using both of the monitor. Mode On Power saving LED light White Amber The power saving mode will be installed. Connecting the power cord • Check first to hold the edges...
.... The recovery time from the display controller, as indicated by the amber-colored power LED. No useradjustment is required. • Plug one end of H05VV-F cord and plug rated 10 A/250 V. Power saving The monitor will be switched to 15 degrees up or 5 degrees down. The monitor can adjust the monitor tilt, using both of the monitor. Mode On Power saving LED light White Amber The power saving mode will be installed. Connecting the power cord • Check first to hold the edges...
User Manual
Page 16
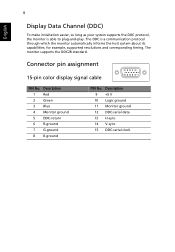
... its capabilities; Connector pin assignment 15-pin color display signal cable 1 5 6 10 11 15 PIN No. Description 9 +5 V 10 Logic ground 11 Monitor ground 12 DDC-serial data 13 H-sync 14 V-sync 15 DDC-serial clock for example, supported resolutions and corresponding timing. Description 1 Red 2 Green 3 Blue 4 Monitor ground 5 DDC-return 6 R-ground 7 G-ground 8 B-ground PIN No. The DDC is able to plug-and-play. The monitor supports the DDC2B standard...
... its capabilities; Connector pin assignment 15-pin color display signal cable 1 5 6 10 11 15 PIN No. Description 9 +5 V 10 Logic ground 11 Monitor ground 12 DDC-serial data 13 H-sync 14 V-sync 15 DDC-serial clock for example, supported resolutions and corresponding timing. Description 1 Red 2 Green 3 Blue 4 Monitor ground 5 DDC-return 6 R-ground 7 G-ground 8 B-ground PIN No. The DDC is able to plug-and-play. The monitor supports the DDC2B standard...
User Manual
Page 17
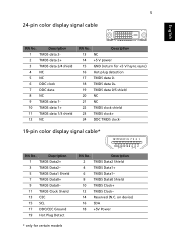
... No. on device) 16 SDA 18 +5V Power * only for +5 V hsync.vsync) 16 Hot-plug detection 17 TMDS data 0- 18 TMDS data 0+ 19 TMDS data 0/5 shield 20 NC 21 NC 22 TMDS clock shield 23 TMDS clock+ 24 DDC TMDS clock- 19-pin color display signal cable* 1917151311 9 7 5 3 1 1816141210 8 ...-pin color display signal cable English PIN No. Description 1 TMDS data 2- 2 TMDS data 2+ 3 TMDS data 2/4 shield 4 NC 5 NC 6 DDC clock 7 DDC data 8 NC 9 TMDS data 1- 10 TMDS data 1+ 11 TMDS data 1/3 shield 12 NC PIN No. Description 13 NC 14 +5 V power 15 GND (return for certain models
... No. on device) 16 SDA 18 +5V Power * only for +5 V hsync.vsync) 16 Hot-plug detection 17 TMDS data 0- 18 TMDS data 0+ 19 TMDS data 0/5 shield 20 NC 21 NC 22 TMDS clock shield 23 TMDS clock+ 24 DDC TMDS clock- 19-pin color display signal cable* 1917151311 9 7 5 3 1 1816141210 8 ...-pin color display signal cable English PIN No. Description 1 TMDS data 2- 2 TMDS data 2+ 3 TMDS data 2/4 shield 4 NC 5 NC 6 DDC clock 7 DDC data 8 NC 9 TMDS data 1- 10 TMDS data 1+ 11 TMDS data 1/3 shield 12 NC PIN No. Description 13 NC 14 +5 V power 15 GND (return for certain models
User Manual
Page 19
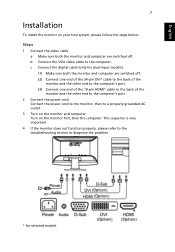
... monitor and computer Turn on the monitor first, then the computer. c Connect the digital cable (only for selected models English 7 Installation To install the monitor on your host system, please follow the steps below: Steps 1 Connect the video cable a Make sure both the monitor and computer are switched off . (2) Connect one end of the 24-pin DVI* cable to the back of the monitor and the other end to the computer's port. (3) Connect...
... monitor and computer Turn on the monitor first, then the computer. c Connect the digital cable (only for selected models English 7 Installation To install the monitor on your host system, please follow the steps below: Steps 1 Connect the video cable a Make sure both the monitor and computer are switched off . (2) Connect one end of the 24-pin DVI* cable to the back of the monitor and the other end to the computer's port. (3) Connect...
User Manual
Page 20
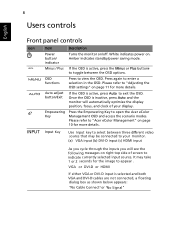
... below appears: "No Cable Connect"or "No S ignal" Press again to exit the OSD. INPUT Input Key Use Input key to "Acer eColor Management" on . 8 Users controls English Front panel controls Icon Item Description Power button/ indicator Turns the monitor on right top side of your monitor. (a) VGA input (b) DVI-D input (c) HDMI input As you cycle through the inputs you will automatically optimize the display position, focus, and clock of screen to toggle between three different video source that may take...
... below appears: "No Cable Connect"or "No S ignal" Press again to exit the OSD. INPUT Input Key Use Input key to "Acer eColor Management" on . 8 Users controls English Front panel controls Icon Item Description Power button/ indicator Turns the monitor on right top side of your monitor. (a) VGA input (b) DVI-D input (c) HDMI input As you cycle through the inputs you will automatically optimize the display position, focus, and clock of screen to toggle between three different video source that may take...
User Manual
Page 21
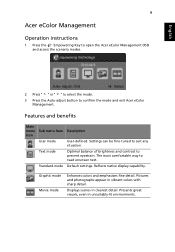
... confirm the mode and exit Acer eColor Management. English 9 Acer eColor Management Operation instructions 1 Press the Empowering Key to open the Acer eColor Management OSD and access the scenario modes. 2 Press " " or " " to select the mode. 3 Press the Auto-adjust button to read onscreen text. Standard mode Default settings. Pictures and photographs appear in vibrant colors with sharp detail. Features and benefits Main menu Sub menu item Description icon User mode User-defined.
... confirm the mode and exit Acer eColor Management. English 9 Acer eColor Management Operation instructions 1 Press the Empowering Key to open the Acer eColor Management OSD and access the scenario modes. 2 Press " " or " " to select the mode. 3 Press the Auto-adjust button to read onscreen text. Standard mode Default settings. Pictures and photographs appear in vibrant colors with sharp detail. Features and benefits Main menu Sub menu item Description icon User mode User-defined.

User Manual
Page 22
... for adjusting the settings of your LCD Monitor. You can use the OSD to adjust the current Brightness, Contrast, Colour Temp, Auto Config and other image-related qualities. The OSD can be used to adjust the picture quality, OSD position and general settings. English 10 Adjusting the OSD settings Note: The following page: Adjusting the picture quality 1 Press the Menu key to open the OSD. Then navigate to the picture element you wish to adjust. 3 Use the / keys to adjust the...
... for adjusting the settings of your LCD Monitor. You can use the OSD to adjust the current Brightness, Contrast, Colour Temp, Auto Config and other image-related qualities. The OSD can be used to adjust the picture quality, OSD position and general settings. English 10 Adjusting the OSD settings Note: The following page: Adjusting the picture quality 1 Press the Menu key to open the OSD. Then navigate to the picture element you wish to adjust. 3 Use the / keys to adjust the...
User Manual
Page 26
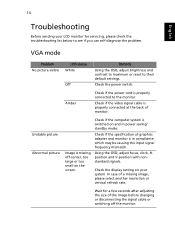
... monitor is properly connected at the back of the image before changing or disconnecting the signal cable or switching off -center, too large or too small on your LCD monitor for a few seconds after adjusting the size of monitor. Check if the video signal cable is in power saving/ standby mode. Check the power switch. 14 English Troubleshooting Before sending your system. VGA mode Problem No picture visible LED status White Off Remedy Using the OSD, adjust brightness and contrast to maximum or reset to their default settings...
... monitor is properly connected at the back of the image before changing or disconnecting the signal cable or switching off -center, too large or too small on your LCD monitor for a few seconds after adjusting the size of monitor. Check if the video signal cable is in power saving/ standby mode. Check the power switch. 14 English Troubleshooting Before sending your system. VGA mode Problem No picture visible LED status White Off Remedy Using the OSD, adjust brightness and contrast to maximum or reset to their default settings...

User Manual
Page 27
Check that the computer system is properly connected to their default settings. Amber Check if the AC power cord is switched on and in power saving/ standby mode. * for selected models Check the power switch. Check if the video signal cable is properly connected at the back of monitor. 15 English DVI/HDMI* mode Problem No picture visible LED status White Off Remedy Using the OSD, adjust brightness and contrast to maximum or reset to the monitor.
Check that the computer system is properly connected to their default settings. Amber Check if the AC power cord is switched on and in power saving/ standby mode. * for selected models Check the power switch. Check if the video signal cable is properly connected at the back of monitor. 15 English DVI/HDMI* mode Problem No picture visible LED status White Off Remedy Using the OSD, adjust brightness and contrast to maximum or reset to the monitor.

