

User Manual
Page 4
...and without distortion. • After setting the volume level, do not increase it after your ears have adjusted. • Limit the amount of power available, consult your hearing, follow these instructions. • Gradually increase the volume until you can 't hear people speaking near water. • ...8226; Never push objects of any vibrating environment which will probably cause unexpected short current or damage internal devices. • The adapter is easily accessible and located as close to the equipment operator as they may touch dangerous voltage points or short-out parts that ...
...and without distortion. • After setting the volume level, do not increase it after your ears have adjusted. • Limit the amount of power available, consult your hearing, follow these instructions. • Gradually increase the volume until you can 't hear people speaking near water. • ...8226; Never push objects of any vibrating environment which will probably cause unexpected short current or damage internal devices. • The adapter is easily accessible and located as close to the equipment operator as they may touch dangerous voltage points or short-out parts that ...
User Manual
Page 13
...xi Unpacking 1 Attaching the base (for selected models) 2 Screen position adjustment 3 Connecting the adapter and AC Power cord 3 Power saving 3 Display Data Channel (DDC) 4 Connector pin assignment 4 15-pin color display ...signal cable 4 24-pin color display signal cable 4 19-pin color display signal cable 5 Standard timing table 6 Installation 7 MHL (Mobile High-Definition Link) 8 Users controls 9 Panel controls 9 Using the Shortcut Menu 10 Acer...
...xi Unpacking 1 Attaching the base (for selected models) 2 Screen position adjustment 3 Connecting the adapter and AC Power cord 3 Power saving 3 Display Data Channel (DDC) 4 Connector pin assignment 4 15-pin color display ...signal cable 4 24-pin color display signal cable 4 19-pin color display signal cable 5 Standard timing table 6 Installation 7 MHL (Mobile High-Definition Link) 8 Users controls 9 Panel controls 9 Using the Shortcut Menu 10 Acer...

User Manual
Page 15
English Unpacking Please check that the following items are present when you unpack the box, and save the packing materials in case you need to ship or transport the monitor in the future. LCD monitor Quick start guide MHL cable (Optional) D-sub cable HDMI cable (Optional) AC Power cord DVI cable (Optional) AC Adapter Audio cable (Optional) 1
English Unpacking Please check that the following items are present when you unpack the box, and save the packing materials in case you need to ship or transport the monitor in the future. LCD monitor Quick start guide MHL cable (Optional) D-sub cable HDMI cable (Optional) AC Power cord DVI cable (Optional) AC Adapter Audio cable (Optional) 1

User Manual
Page 17
.... Screen position adjustment To optimize the viewing position, you can be adjusted to 15 degrees up or 5 degrees down. 5 15 English Connecting the adapter and AC Power cord • Check first to make sure that allows operation in which the equipment will be installed. No user-adjustment is required. • Plug... one end of the AC power cord to the Adapter, and plug the other end into an AC outlet. • For units using 120 V AC: Use a UL-listed cord set, type ...
.... Screen position adjustment To optimize the viewing position, you can be adjusted to 15 degrees up or 5 degrees down. 5 15 English Connecting the adapter and AC Power cord • Check first to make sure that allows operation in which the equipment will be installed. No user-adjustment is required. • Plug... one end of the AC power cord to the Adapter, and plug the other end into an AC outlet. • For units using 120 V AC: Use a UL-listed cord set, type ...
User Manual
Page 21
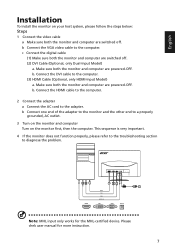
...Cable (Optional, only HDMI-Input Model) a. c Connect the digital cable (1) Make sure both the monitor and computer are switched off . b Connect one end of the adapter to the monitor and the other end to a properly grounded, AC outlet. 3 Turn on the monitor and computer Turn on your host system, please follow... the steps below: Steps 1 Connect the video cable a Make sure both the monitor and computer are powered-OFF. Make sure both the monitor and computer are powered-OFF. Please chek user manual for the MHL-certified device.
...Cable (Optional, only HDMI-Input Model) a. c Connect the digital cable (1) Make sure both the monitor and computer are switched off . b Connect one end of the adapter to the monitor and the other end to a properly grounded, AC outlet. 3 Turn on the monitor and computer Turn on your host system, please follow... the steps below: Steps 1 Connect the video cable a Make sure both the monitor and computer are powered-OFF. Make sure both the monitor and computer are powered-OFF. Please chek user manual for the MHL-certified device.

User Manual
Page 30
... please select another resolution or vertical refresh rate. Check the display setting on the screen.) Blue Check if the specification of monitor. Check the power switch. Wait for servicing, please check the troubleshooting list below to see if you can self-diagnose the problem. Check if the video signal ...cable is properly connected at the back of graphics adapter and monitor is switched on and in compliance which may be causing the input signal frequency mismatch. Check if the computer system is in...
... please select another resolution or vertical refresh rate. Check the display setting on the screen.) Blue Check if the specification of monitor. Check the power switch. Wait for servicing, please check the troubleshooting list below to see if you can self-diagnose the problem. Check if the video signal ...cable is properly connected at the back of graphics adapter and monitor is switched on and in compliance which may be causing the input signal frequency mismatch. Check if the computer system is in...


