
User Guide
Page 3
Contents Using Your Gateway Flat-Panel Monitor 1 Connecting the monitor 2 Attaching the stand 2 Connecting video inputs 2 Connecting USB cables 4 Setting up the optional speaker bar 5 Connecting power 7 Connecting a security cable 7 Adjusting the stand 8 Rotating the screen 8 Ergonomic guidelines 8 Starting the monitor 9... Changing color depth and screen resolution 16 EzTune software 17 Using the speaker bar 18 Power management 18 Energy declaration 18 Maintaining 18 Troubleshooting 19 Troubleshooting symptoms 19 No power 19 No picture 19 Display colors are wrong 20 ...
Contents Using Your Gateway Flat-Panel Monitor 1 Connecting the monitor 2 Attaching the stand 2 Connecting video inputs 2 Connecting USB cables 4 Setting up the optional speaker bar 5 Connecting power 7 Connecting a security cable 7 Adjusting the stand 8 Rotating the screen 8 Ergonomic guidelines 8 Starting the monitor 9... Changing color depth and screen resolution 16 EzTune software 17 Using the speaker bar 18 Power management 18 Energy declaration 18 Maintaining 18 Troubleshooting 19 Troubleshooting symptoms 19 No power 19 No picture 19 Display colors are wrong 20 ...

User Guide
Page 5
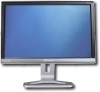
Using Your Gateway Flat-Panel Monitor • Connecting the monitor • Adjusting the stand • Starting the monitor • Adjusting monitor settings • Changing Windows screen settings • Using the speaker bar • Power management • Maintaining • Troubleshooting • FAQs • Specifications 1
Using Your Gateway Flat-Panel Monitor • Connecting the monitor • Adjusting the stand • Starting the monitor • Adjusting monitor settings • Changing Windows screen settings • Using the speaker bar • Power management • Maintaining • Troubleshooting • FAQs • Specifications 1
User Guide
Page 6
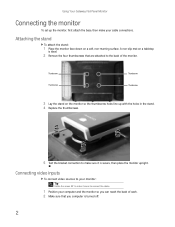
... thumbscrew holes line up the monitor, first attach the base, then make sure it easier to connect the cables. 1 Position your cable connections. Using Your Gateway Flat-Panel Monitor Connecting the monitor To set up with the holes in the stand. 4 Replace the thumbscrews. 5 Test the bracket connection to the back... the monitor so you computer is secure, then place the monitor upright. Connecting video inputs To connect video sources to your monitor: Tip Rotate the screen 90° to make it is turned off. 2
... thumbscrew holes line up the monitor, first attach the base, then make sure it easier to connect the cables. 1 Position your cable connections. Using Your Gateway Flat-Panel Monitor Connecting the monitor To set up with the holes in the stand. 4 Replace the thumbscrews. 5 Test the bracket connection to the back... the monitor so you computer is secure, then place the monitor upright. Connecting video inputs To connect video sources to your monitor: Tip Rotate the screen 90° to make it is turned off. 2

User Guide
Page 8
Using Your Gateway Flat-Panel Monitor 5 Connect other end of the time, such as cameras, flash drives, and USB hard drives. 1 Connect the included USB cable to the ... USB devices that lets you must first connect the monitor to a USB 2.0 port on the back of the stand. If you plan on using the screen in portrait mode, make sure you want to keep connected most of the cable to a USB port on your monitor, then connect the other video... the monitor, it does not require its USB in port is connected to access. USB in ("B" type) port on the back of the monitor for screen rotation.
Using Your Gateway Flat-Panel Monitor 5 Connect other end of the time, such as cameras, flash drives, and USB hard drives. 1 Connect the included USB cable to the ... USB devices that lets you must first connect the monitor to a USB 2.0 port on the back of the stand. If you plan on using the screen in portrait mode, make sure you want to keep connected most of the cable to a USB port on your monitor, then connect the other video... the monitor, it does not require its USB in port is connected to access. USB in ("B" type) port on the back of the monitor for screen rotation.

User Guide
Page 9
... monitor while the monitor is turned on, the speaker bar will not initialize and will not work correctly. You can order a speaker bar from www.gateway.com. Make sure that it is available for mounting underneath your monitor. To install the speaker bar: 1 Turn off , then back on to enable ...the speaker bar. 2 Tilt the screen back, then match the mounting clips on each side of the monitor until it downward. 5 Mounting slot Mounting clip 3 Slide the speaker bar onto the...
... monitor while the monitor is turned on, the speaker bar will not initialize and will not work correctly. You can order a speaker bar from www.gateway.com. Make sure that it is available for mounting underneath your monitor. To install the speaker bar: 1 Turn off , then back on to enable ...the speaker bar. 2 Tilt the screen back, then match the mounting clips on each side of the monitor until it downward. 5 Mounting slot Mounting clip 3 Slide the speaker bar onto the...

User Guide
Page 12
... between the speaker bar and the tabletop. Ergonomic guidelines The recommended screen positioning is attached, first tilt the screen back for displays (except in a comfortable working posture. Using Your Gateway Flat-Panel Monitor Adjusting the stand Rotating the screen Tip To rotate the screen while the optional speaker bar is based upon the following guidelines. You...
... between the speaker bar and the tabletop. Ergonomic guidelines The recommended screen positioning is attached, first tilt the screen back for displays (except in a comfortable working posture. Using Your Gateway Flat-Panel Monitor Adjusting the stand Rotating the screen Tip To rotate the screen while the optional speaker bar is based upon the following guidelines. You...

User Guide
Page 13
www.gateway.com Screen distance from user The screen should be prompted for the language selection menu settings ...Menu) button on and connected correctly to automatically adjust your computer. You must select a default language for the display image to suit individual preference. Make sure that the monitor has detected a video source. For more information ... a video source. Touch the power button to the ideal settings. 9 Power button 2 Turn on your display image to turn it on EzTouch buttons, see is not receiving power. If you cannot access the Advanced menu...
www.gateway.com Screen distance from user The screen should be prompted for the language selection menu settings ...Menu) button on and connected correctly to automatically adjust your computer. You must select a default language for the display image to suit individual preference. Make sure that the monitor has detected a video source. For more information ... a video source. Touch the power button to the ideal settings. 9 Power button 2 Turn on your display image to turn it on EzTouch buttons, see is not receiving power. If you cannot access the Advanced menu...
User Guide
Page 14
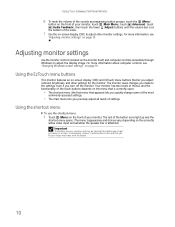
...controls (located on -screen display (OSD) and EzTouch menu buttons that let you adjust contrast, brightness, and other monitor settings. Using the EzTouch menu buttons This monitor features an on the monitor itself) and computer controls (accessible through Windows) to adjust the display image. To completely ... shortcut menu opens. (The menu's appearance and choices vary, depending on -screen display (OSD) to the settings, even if you lift your finger well away from the button. 10 Using Your Gateway Flat-Panel Monitor 6 To mute the volume of the sounds accompanying button presses...
...controls (located on -screen display (OSD) and EzTouch menu buttons that let you adjust contrast, brightness, and other monitor settings. Using the EzTouch menu buttons This monitor features an on the monitor itself) and computer controls (accessible through Windows) to adjust the display image. To completely ... shortcut menu opens. (The menu's appearance and choices vary, depending on -screen display (OSD) to the settings, even if you lift your finger well away from the button. 10 Using Your Gateway Flat-Panel Monitor 6 To mute the volume of the sounds accompanying button presses...

User Guide
Page 15
www.gateway.com 2 To use an EzTouch menu button, lightly touch its icon. To manually switch inputs, touch (Menu), then select the input from the on-screen list. • Touch (Mute) to the ideal settings. For adjusting a setting's values, you can press and hold touch buttons as you... would conventional buttons. Important If, after the monitor is connected. • Touch (Auto) to automatically adjust your display image to mute the...
www.gateway.com 2 To use an EzTouch menu button, lightly touch its icon. To manually switch inputs, touch (Menu), then select the input from the on-screen list. • Touch (Mute) to the ideal settings. For adjusting a setting's values, you can press and hold touch buttons as you... would conventional buttons. Important If, after the monitor is connected. • Touch (Auto) to automatically adjust your display image to mute the...

User Guide
Page 16
To completely "release" a touch button, make sure that you lift your finger just above its icon. Tip To use the main menu: 1 Touch (Menu) on -screen labels appear next to the buttons to help you identify them. 3 Touch the (Choose Option) buttons to highlight a setting, then touch (Select) to open the ... sensitive, and may be "pressed" by holding your finger well away from the button. The rest of your monitor. The main menu opens. Using Your Gateway Flat-Panel Monitor Using the main menu To use a button, lightly touch its surface.
To completely "release" a touch button, make sure that you lift your finger just above its icon. Tip To use the main menu: 1 Touch (Menu) on -screen labels appear next to the buttons to help you identify them. 3 Touch the (Choose Option) buttons to highlight a setting, then touch (Select) to open the ... sensitive, and may be "pressed" by holding your finger well away from the button. The rest of your monitor. The main menu opens. Using Your Gateway Flat-Panel Monitor Using the main menu To use a button, lightly touch its surface.

User Guide
Page 17
... can adjust the RGB (red, green, and blue) values of the PIP window on the main screen. Picture menu Brightness-Adjusts the amount of light in the darkest portion of the video used in -Picture... can adjust the source, position, size, and transparency of the PIP window. PIP Settings menu PIP Display-Toggles the display of the PIP window. When the PIP window is transparent, you can adjust volume, bass, treble,... from almost transparent to completely opaque. www.gateway.com OSD Menu Description Main menu Auto-Automatically adjusts your computer programs while watching video.
... can adjust the RGB (red, green, and blue) values of the PIP window on the main screen. Picture menu Brightness-Adjusts the amount of light in the darkest portion of the video used in -Picture... can adjust the source, position, size, and transparency of the PIP window. PIP Settings menu PIP Display-Toggles the display of the PIP window. When the PIP window is transparent, you can adjust volume, bass, treble,... from almost transparent to completely opaque. www.gateway.com OSD Menu Description Main menu Auto-Automatically adjusts your computer programs while watching video.

User Guide
Page 18
... or full-frame image to fit the entire screen. Clock-Minimizes any vertical bars or stripes visible on the left and right of a widescreen image in any horizontal distortion and clears or sharpens the displayed characters. 14 Using Your Gateway Flat-Panel Monitor OSD Menu Description Video Adjust ... ensures smoother edges for optimized video performance. ■ DCDi by using black bars on the screen background. If Overscan is part of the image distortion free. H Position-Moves the display image left and right sides of the image, and leaves the center of the data embedded in...
... or full-frame image to fit the entire screen. Clock-Minimizes any vertical bars or stripes visible on the left and right of a widescreen image in any horizontal distortion and clears or sharpens the displayed characters. 14 Using Your Gateway Flat-Panel Monitor OSD Menu Description Video Adjust ... ensures smoother edges for optimized video performance. ■ DCDi by using black bars on the screen background. If Overscan is part of the image distortion free. H Position-Moves the display image left and right sides of the image, and leaves the center of the data embedded in...

User Guide
Page 19
...settings. For information on changing your computer's display resolution, see "Changing Windows screen settings" on screen, the audio being played switches from multiple video...display. Refer to the following : ■ Adjust the refresh rate in a darkened room, you prefer using your external Y Pb Pr device to main, PIP audio is only heard when the PIP is heard. OK OK OK Component OK OK OK - If you receive a message that accompany button presses. www.gateway... full-screen component video when 480i content is a convenient way to view video from the main to the native LCD panel ...
...settings. For information on changing your computer's display resolution, see "Changing Windows screen settings" on screen, the audio being played switches from multiple video...display. Refer to the following : ■ Adjust the refresh rate in a darkened room, you prefer using your external Y Pb Pr device to main, PIP audio is only heard when the PIP is heard. OK OK OK Component OK OK OK - If you receive a message that accompany button presses. www.gateway... full-screen component video when 480i content is a convenient way to view video from the main to the native LCD panel ...
User Guide
Page 20
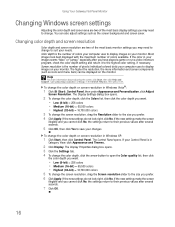
Using Your Gateway Flat-Panel Monitor Changing Windows screen settings Adjusting the color depth and screen area are two of pixels (individual colored dots) your computer uses to suit your computer uses to the highest color setting, if necessary. Most images look best displayed with the maximum...the settings return to their previous values after you prefer. 4 Click Apply. To change the color depth or screen resolution in Category View, click Appearance and Themes. 2 Click Display. If the new settings do not look right, click No. Color depth is in Windows Vista®: ...
Using Your Gateway Flat-Panel Monitor Changing Windows screen settings Adjusting the color depth and screen area are two of pixels (individual colored dots) your computer uses to suit your computer uses to the highest color setting, if necessary. Most images look best displayed with the maximum...the settings return to their previous values after you prefer. 4 Click Apply. To change the color depth or screen resolution in Category View, click Appearance and Themes. 2 Click Display. If the new settings do not look right, click No. Color depth is in Windows Vista®: ...

User Guide
Page 21
...you experience problems with a Windows compatible computer running EzTune and using portrait mode: • Full-screen video may display incorrectly or be slow. • Video games or other full-screen applications may not be fully compatible. • Some programs are not able to recognize and adapt... 17 If you rotate the screen. While using VGA, DVI, or HDMI input (the OSD itself does not rotate into portrait mode). at www.gateway.com) • Change brightness, contrast, and color balance • Change screen geometry • Set the display position and resolution For more ...
...you experience problems with a Windows compatible computer running EzTune and using portrait mode: • Full-screen video may display incorrectly or be slow. • Video games or other full-screen applications may not be fully compatible. • Some programs are not able to recognize and adapt... 17 If you rotate the screen. While using VGA, DVI, or HDMI input (the OSD itself does not rotate into portrait mode). at www.gateway.com) • Change brightness, contrast, and color balance • Change screen geometry • Set the display position and resolution For more ...

User Guide
Page 22
...monitor while the monitor is played through the connected headphones. Power management Energy declaration When connected to a computer that supports the VESA Display Power Management Signaling (DPMS) Protocol, the monitor can conserve significant energy by following levels: VESA State LED Indicator Power Consumption On Blue...Setting up the optional speaker bar" on . In the Active Off mode the Power LED will not work correctly. Using Your Gateway Flat-Panel Monitor Using the speaker bar Important If you connected the speaker bar by reducing power consumption during periods of non-use...
...monitor while the monitor is played through the connected headphones. Power management Energy declaration When connected to a computer that supports the VESA Display Power Management Signaling (DPMS) Protocol, the monitor can conserve significant energy by following levels: VESA State LED Indicator Power Consumption On Blue...Setting up the optional speaker bar" on . In the Active Off mode the Power LED will not work correctly. Using Your Gateway Flat-Panel Monitor Using the speaker bar Important If you connected the speaker bar by reducing power consumption during periods of non-use...
User Guide
Page 24
..." • Touch (Menu), (Main Menu), then (Auto) to automatically adjust the display image to the ideal settings. (VGA input only.) • Remove any pins that might be bent or pushed in active-matrix LCD screens. For instructions on how to the back of the video cable for any extension cables... or switchboxes. • Make sure that the video cable is located along the top row of the monitor and your display, contact Gateway Customer Care to the back ...
..." • Touch (Menu), (Main Menu), then (Auto) to automatically adjust the display image to the ideal settings. (VGA input only.) • Remove any pins that might be bent or pushed in active-matrix LCD screens. For instructions on how to the back of the video cable for any extension cables... or switchboxes. • Make sure that the video cable is located along the top row of the monitor and your display, contact Gateway Customer Care to the back ...

User Guide
Page 26
...use both your primary monitor and not use the notebook's screen. I have the monitor connected to your notebook's display and an externally attached display. Notebook computers typically have two options: • If your notebook supports dual displays, you connected the monitor's high-speed USB 2.0 hub... The Web sites for the most up-to my computer, I see "Changing color depth and screen resolution" on your computer. 22 On Gateway notebooks, this monitor in the Windows display control panel. • Make sure that need smoothing. What is a video mode algorithm that match...
...use both your primary monitor and not use the notebook's screen. I have the monitor connected to your notebook's display and an externally attached display. Notebook computers typically have two options: • If your notebook supports dual displays, you connected the monitor's high-speed USB 2.0 hub... The Web sites for the most up-to my computer, I see "Changing color depth and screen resolution" on your computer. 22 On Gateway notebooks, this monitor in the Windows display control panel. • Make sure that need smoothing. What is a video mode algorithm that match...

User Guide
Page 27
... to establish renegotiation. Stop and restart the source to allow renegotiation. Video/Display When I display video from the source to the TV. www.gateway.com When I run my games, I do not see "noise" or "trash" on the screen? • When your video device user manual to adjust the video or... TV format output to 16:9. Technical Why do I see support for widescreen displays as transmitted. During authentication, ...
... to establish renegotiation. Stop and restart the source to allow renegotiation. Video/Display When I display video from the source to the TV. www.gateway.com When I run my games, I do not see "noise" or "trash" on the screen? • When your video device user manual to adjust the video or... TV format output to 16:9. Technical Why do I see support for widescreen displays as transmitted. During authentication, ...
User Guide
Page 28
...use Picture in Picture (PIP) component video at 480p, 720p, or 1080i, either no video is displayed or I see black bars on left and right of the monitor. Why when I try to Gateway specifications and may vary from similarly marketed products. Can I connect my game console to 480i. Includes HDCP... HDMI or Component (YPbPr), this monitor? • Yes. Choose Wide, Zoom, or Panoramic modes. Can I stretch the video to fit more of the screen? • Touch (Menu), (Video Adjust), then (Video Scaling) to fill more of your external device to this results in PIP, adjust the video output...
...use Picture in Picture (PIP) component video at 480p, 720p, or 1080i, either no video is displayed or I see black bars on left and right of the monitor. Why when I try to Gateway specifications and may vary from similarly marketed products. Can I connect my game console to 480i. Includes HDCP... HDMI or Component (YPbPr), this monitor? • Yes. Choose Wide, Zoom, or Panoramic modes. Can I stretch the video to fit more of the screen? • Touch (Menu), (Video Adjust), then (Video Scaling) to fill more of your external device to this results in PIP, adjust the video output...


