
User Guide
Page 3
Contents Using Your Gateway Flat-Panel Monitor 1 Connecting the monitor 2 Attaching the stand 2 Connecting video inputs 2 Connecting USB cables 4 Setting up the optional speaker bar 5 Connecting power 7 Connecting a security cable 7 Adjusting the stand 8 Rotating the screen 8 Ergonomic guidelines 8 Starting the monitor 9 Turning on the monitor 9 Adjusting monitor settings 10 Using the EzTouch menu buttons 10 Using the shortcut menu 10 Using the main menu 12 Using Picture-in-Picture (PIP 15 Changing Windows screen settings 16 Changing color depth and screen resolution 16 ...
Contents Using Your Gateway Flat-Panel Monitor 1 Connecting the monitor 2 Attaching the stand 2 Connecting video inputs 2 Connecting USB cables 4 Setting up the optional speaker bar 5 Connecting power 7 Connecting a security cable 7 Adjusting the stand 8 Rotating the screen 8 Ergonomic guidelines 8 Starting the monitor 9 Turning on the monitor 9 Adjusting monitor settings 10 Using the EzTouch menu buttons 10 Using the shortcut menu 10 Using the main menu 12 Using Picture-in-Picture (PIP 15 Changing Windows screen settings 16 Changing color depth and screen resolution 16 ...

User Guide
Page 5
Using Your Gateway Flat-Panel Monitor • Connecting the monitor • Adjusting the stand • Starting the monitor • Adjusting monitor settings • Changing Windows screen settings • Using the speaker bar • Power management • Maintaining • Troubleshooting • FAQs • Specifications 1
Using Your Gateway Flat-Panel Monitor • Connecting the monitor • Adjusting the stand • Starting the monitor • Adjusting monitor settings • Changing Windows screen settings • Using the speaker bar • Power management • Maintaining • Troubleshooting • FAQs • Specifications 1
User Guide
Page 6
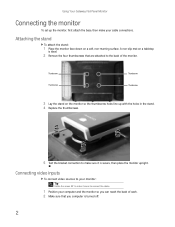
Using Your Gateway Flat-Panel Monitor Connecting the monitor To set up with the holes in the stand. 4 Replace the thumbscrews. 5 Test the bracket connection to the back of each. 2 Make sure that are attached to make your monitor: Tip Rotate the screen 90° to make it is turned off. 2 Connecting video inputs To connect video sources to your cable connections. Attaching the stand To attach the stand: 1 Place the monitor face-down on a tabletop is ideal. 2 Remove the...
Using Your Gateway Flat-Panel Monitor Connecting the monitor To set up with the holes in the stand. 4 Replace the thumbscrews. 5 Test the bracket connection to the back of each. 2 Make sure that are attached to make your monitor: Tip Rotate the screen 90° to make it is turned off. 2 Connecting video inputs To connect video sources to your cable connections. Attaching the stand To attach the stand: 1 Place the monitor face-down on a tabletop is ideal. 2 Remove the...

User Guide
Page 12
... user's height and preference. Landscape mode Portrait mode Tip For the brightest viewing angle, adjust the screen so that the top of the screen. Screen height The recommended screen height for displays (except in special circumstances, such as you are sitting in a comfortable working posture. You may be set at an ideal 15° to change between the speaker bar and the tabletop. Using Your Gateway Flat-Panel Monitor Adjusting the stand Rotating the screen...
... user's height and preference. Landscape mode Portrait mode Tip For the brightest viewing angle, adjust the screen so that the top of the screen. Screen height The recommended screen height for displays (except in special circumstances, such as you are sitting in a comfortable working posture. You may be set at an ideal 15° to change between the speaker bar and the tabletop. Using Your Gateway Flat-Panel Monitor Adjusting the stand Rotating the screen...

User Guide
Page 13
... information on . • Amber-The monitor is the language selection menu settings. Check the brightness setting. www.gateway.com Screen distance from user The screen should be blue, indicating that the monitor has detected a video source. Check the video input connections and make sure that the monitor is plugged into the power outlet. Starting the monitor Turning on the monitor To start the monitor: 1 Touch the power button on the front of the monitor for the display image to blue (on page 10. If you cannot...
... information on . • Amber-The monitor is the language selection menu settings. Check the brightness setting. www.gateway.com Screen distance from user The screen should be blue, indicating that the monitor has detected a video source. Check the video input connections and make sure that the monitor is plugged into the power outlet. Starting the monitor Turning on the monitor To start the monitor: 1 Touch the power button on the front of the monitor for the display image to blue (on page 10. If you cannot...
User Guide
Page 14
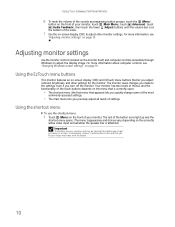
... adjust the display image. Using the EzTouch menu buttons This monitor features an on-screen display (OSD) and EzTouch menu buttons that let you turn off the monitor. For more information, see "Changing Windows screen settings" on page 16. The rest of your monitor. Using the shortcut menu To use the shortcut menu: 1 Touch (Menu) on the front of the button icons light up and the shortcut menu opens. (The menu's appearance and choices vary, depending on the currently active video input...
... adjust the display image. Using the EzTouch menu buttons This monitor features an on-screen display (OSD) and EzTouch menu buttons that let you turn off the monitor. For more information, see "Changing Windows screen settings" on page 16. The rest of your monitor. Using the shortcut menu To use the shortcut menu: 1 Touch (Menu) on the front of the button icons light up and the shortcut menu opens. (The menu's appearance and choices vary, depending on the currently active video input...

User Guide
Page 15
... the power LED turns orange. This option is only available when the video input is connected. • Touch (Auto) to automatically adjust your display image to open the main menu. • To turn off the button icons and close the menu, wait about ten seconds without pressing a button. 11 www.gateway.com 2 To use an EzTouch menu button, lightly touch its icon. Important If, after the monitor is connected) PIP On PIP Settings Cancel Main Menu • Touch...
... the power LED turns orange. This option is only available when the video input is connected. • Touch (Auto) to automatically adjust your display image to open the main menu. • To turn off the button icons and close the menu, wait about ten seconds without pressing a button. 11 www.gateway.com 2 To use an EzTouch menu button, lightly touch its icon. Important If, after the monitor is connected) PIP On PIP Settings Cancel Main Menu • Touch...

User Guide
Page 17
... increase contrast. Reset-Resets the monitor to the PIP image. Swap-Switches the PIP image to the main image, and the main image to its optimum settings. (VGA input only) Picture-Opens the Picture menu, where you can adjust the source, position, size, and transparency of the video used in the darkest portion of the video image from almost transparent to maximize the life of the PIP window. Video adjust-Opens the Video Adjust menu, where you can adjust color balance, change the OSD language, and display...
... increase contrast. Reset-Resets the monitor to the PIP image. Swap-Switches the PIP image to the main image, and the main image to its optimum settings. (VGA input only) Picture-Opens the Picture menu, where you can adjust the source, position, size, and transparency of the video used in the darkest portion of the video image from almost transparent to maximize the life of the PIP window. Video adjust-Opens the Video Adjust menu, where you can adjust color balance, change the OSD language, and display...

User Guide
Page 18
... video anomalies on the edges of the image distortion free. Panoramic mode uses selective distortion to stretch a standard broadcast or full-frame image to SD (standard definition) video at 480i and below. PC input: Preserves the original aspect ratio of a widescreen image in any video signal. Video Scaling-Sets video aspect ratios and scaling between Wide, Zoom, and 1:1. Using Your Gateway Flat-Panel Monitor OSD Menu Description Video Adjust menu Unless otherwise indicated, these anomalies, turn...
... video anomalies on the edges of the image distortion free. Panoramic mode uses selective distortion to stretch a standard broadcast or full-frame image to SD (standard definition) video at 480i and below. PC input: Preserves the original aspect ratio of a widescreen image in any video signal. Video Scaling-Sets video aspect ratios and scaling between Wide, Zoom, and 1:1. Using Your Gateway Flat-Panel Monitor OSD Menu Description Video Adjust menu Unless otherwise indicated, these anomalies, turn...

User Guide
Page 19
... PIP image will be allowed. Audio Feedback-Changes the volume of the sounds that you may disable this function to go back to the native LCD panel response time. Refer to the following : ■ Adjust the refresh rate in fast moving images, you should change the LED mode to Nite Mode to avoid an over-bright, distracting power LED indicator. OK OK - OK OK OK HDMI OK - - If a 480p source is input to...
... PIP image will be allowed. Audio Feedback-Changes the volume of the sounds that you may disable this function to go back to the native LCD panel response time. Refer to the following : ■ Adjust the refresh rate in fast moving images, you should change the LED mode to Nite Mode to avoid an over-bright, distracting power LED indicator. OK OK - OK OK OK HDMI OK - - If a 480p source is input to...
User Guide
Page 20
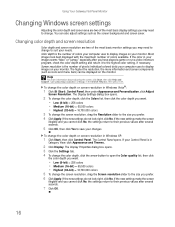
... a video-intensive program, check the color depth setting and return it to the highest color setting, if necessary. Using Your Gateway Flat-Panel Monitor Changing Windows screen settings Adjusting the color depth and screen area are two of the most basic display settings you may need to change. If the new settings make the screen illegible and you cannot click No, the settings return to their previous values after several seconds. 7 Click OK. 16 Most images look...
... a video-intensive program, check the color depth setting and return it to the highest color setting, if necessary. Using Your Gateway Flat-Panel Monitor Changing Windows screen settings Adjusting the color depth and screen area are two of the most basic display settings you may need to change. If the new settings make the screen illegible and you cannot click No, the settings return to their previous values after several seconds. 7 Click OK. 16 Most images look...

User Guide
Page 21
This feature works only with a program while using portrait mode, switch to landscape mode and restart the program. 17 at www.gateway.com) • Change brightness, contrast, and color balance • Change screen geometry • Set the display position and resolution For more information, see the program's CD or the installed program's online help. While using VGA, DVI, or HDMI input (the OSD itself does not rotate into portrait mode). If you experience problems with a Windows compatible computer running...
This feature works only with a program while using portrait mode, switch to landscape mode and restart the program. 17 at www.gateway.com) • Change brightness, contrast, and color balance • Change screen geometry • Set the display position and resolution For more information, see the program's CD or the installed program's online help. While using VGA, DVI, or HDMI input (the OSD itself does not rotate into portrait mode). If you experience problems with a Windows compatible computer running...

User Guide
Page 22
... Active Off mode (sleep). Using Your Gateway Flat-Panel Monitor Using the speaker bar Important If you connected the speaker bar by reducing power consumption during periods of headphones. Power management Energy declaration When connected to the following the instructions in "Setting up the optional speaker bar" on , the speaker bar will not initialize and will still show orange. In the Active Off mode the Power LED will not work correctly. You...
... Active Off mode (sleep). Using Your Gateway Flat-Panel Monitor Using the speaker bar Important If you connected the speaker bar by reducing power consumption during periods of headphones. Power management Energy declaration When connected to the following the instructions in "Setting up the optional speaker bar" on , the speaker bar will not initialize and will still show orange. In the Active Off mode the Power LED will not work correctly. You...
User Guide
Page 23
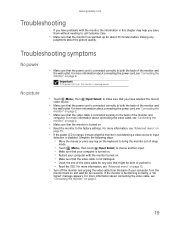
... help you have selected the correct video source. • Make sure that the video cable is disabled. Troubleshooting symptoms No power No picture • Make sure that the monitor has warmed up for about 30 minutes before making any judgments about connecting the video cable, see "Advanced menu" on and wait for any key on the keyboard to bring the monitor out of sleep mode. • Touch (Menu), then touch (Input Select) to the factory settings...
... help you have selected the correct video source. • Make sure that the video cable is disabled. Troubleshooting symptoms No power No picture • Make sure that the monitor has warmed up for about 30 minutes before making any judgments about connecting the video cable, see "Advanced menu" on and wait for any key on the keyboard to bring the monitor out of sleep mode. • Touch (Menu), then touch (Input Select) to the factory settings...
User Guide
Page 24
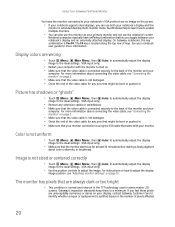
... display image to the ideal settings. (VGA input only.) • Use the position controls to identify whether a repair or replacement is justified based on the number of the video cable for any pins that might be bent or pushed in extended desktop multi-monitor mode. Display colors are unacceptably numerous or dense on your display, contact Gateway Customer Care to adjust the image. Color is not uniform • Touch (Menu), (Main Menu), then (Auto) to automatically adjust the display image...
... display image to the ideal settings. (VGA input only.) • Use the position controls to identify whether a repair or replacement is justified based on the number of the video cable for any pins that might be bent or pushed in extended desktop multi-monitor mode. Display colors are unacceptably numerous or dense on your display, contact Gateway Customer Care to adjust the image. Color is not uniform • Touch (Menu), (Main Menu), then (Auto) to automatically adjust the display image...

User Guide
Page 25
... highest setting. • Make sure that the audio input and video input match. Touch (Menu), (Audio), then (Audio Switching) to plug in the Windows taskbar, or click (Start), Control Panel, Sounds and Audio Devices, the Volume tab, then click Advanced. To adjust the audio device's output volume, see the device's user guide. I plugged my microphone into the headphone jacks on the sides of the speaker bar's speakers. • Your headphone/speaker jack may have been muted using the speaker bar...
... highest setting. • Make sure that the audio input and video input match. Touch (Menu), (Audio), then (Audio Switching) to plug in the Windows taskbar, or click (Start), Control Panel, Sounds and Audio Devices, the Volume tab, then click Advanced. To adjust the audio device's output volume, see the device's user guide. I plugged my microphone into the headphone jacks on the sides of the speaker bar's speakers. • Your headphone/speaker jack may have been muted using the speaker bar...

User Guide
Page 26
... "Changing color depth and screen resolution" on your computer. What is located along diagonal lines caused by older video drivers on your computer. See your notebook user guide for your computer. See the Gateway support Web site (support.gateway.com) for updated video drivers for more information. Its general purpose is to a USB 2.0 port on page 16. Utilizing this monitor in Windows XP, see no image on the screen. See Windows Help to...
... "Changing color depth and screen resolution" on your computer. What is located along diagonal lines caused by older video drivers on your computer. See your notebook user guide for your computer. See the Gateway support Web site (support.gateway.com) for updated video drivers for more information. Its general purpose is to a USB 2.0 port on page 16. Utilizing this monitor in Windows XP, see no image on the screen. See Windows Help to...

User Guide
Page 27
... your video device user manual to adjust the video or TV format output to support widescreen: http://www.widescreengamingforum.com. You can also consult the following Web site for specific settings and options to configure older games to 16:9. Some adjustments may require you read your video device user guide or the help tools within your video device's software. 23 Restart the video source and re-plug all...
... your video device user manual to adjust the video or TV format output to support widescreen: http://www.widescreengamingforum.com. You can also consult the following Web site for specific settings and options to configure older games to 16:9. Some adjustments may require you read your video device user guide or the help tools within your video device's software. 23 Restart the video source and re-plug all...
User Guide
Page 28
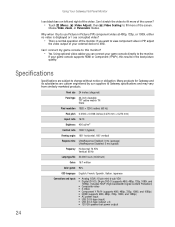
...:10 Brightness 400 cd/m2 Contrast ratio 1000:1 (typical) Viewing angles 160° horizontal, 160° vertical Response time UltraResponse Enabled: 3 ms (average) UltraResponse Disabled: 5 ms (typical) Frequency Horizontal: 74 KHz Vertical: 60 Hz Lamp type/life 30,000 hours (minimum) Colors 16.7 million Color gamut 92% OSD languages English, French, Spanish, Italian, Japanese Connections and inputs ■ Analog (VGA): 15-pin mini d-sub VGA ■ Digital (DVI-D): 24-pin DVD-D (supports...
...:10 Brightness 400 cd/m2 Contrast ratio 1000:1 (typical) Viewing angles 160° horizontal, 160° vertical Response time UltraResponse Enabled: 3 ms (average) UltraResponse Disabled: 5 ms (typical) Frequency Horizontal: 74 KHz Vertical: 60 Hz Lamp type/life 30,000 hours (minimum) Colors 16.7 million Color gamut 92% OSD languages English, French, Spanish, Italian, Japanese Connections and inputs ■ Analog (VGA): 15-pin mini d-sub VGA ■ Digital (DVI-D): 24-pin DVD-D (supports...
User Guide
Page 32
... work area. This is to rain or use Warning To prevent electric shock, never remove the cover. Call Gateway Customer Care for safety of power source indicated on the rating label. ■ If your product has a voltage selector switch, make sure that the total ampere rating on the power cord or allow it is important that the switch is damaged. ■ The system performance changes. Replacement parts...
... work area. This is to rain or use Warning To prevent electric shock, never remove the cover. Call Gateway Customer Care for safety of power source indicated on the rating label. ■ If your product has a voltage selector switch, make sure that the total ampere rating on the power cord or allow it is important that the switch is damaged. ■ The system performance changes. Replacement parts...

