

User Guide
Page 27
Indicators Indicators The computer has six easy-to-read status indicators (LEDs) under the display screen. Media Activity Lights when the floppy drive, hard disk or CD-ROM drive (or other media bay module) is being charged. Battery Charge Lights when ...
Indicators Indicators The computer has six easy-to-read status indicators (LEDs) under the display screen. Media Activity Lights when the floppy drive, hard disk or CD-ROM drive (or other media bay module) is being charged. Battery Charge Lights when ...
User Guide
Page 29
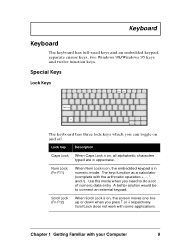
The keys function as a calculator (complete with your Computer 9 Scroll Lock (Fn-F12) When Scroll Lock is on, the screen moves one line up or down when you need to connect an external keypad. Num Lock (Fn-F11) When Num Lock is on, the embedded ...
The keys function as a calculator (complete with your Computer 9 Scroll Lock (Fn-F12) When Scroll Lock is on, the screen moves one line up or down when you need to connect an external keypad. Num Lock (Fn-F11) When Num Lock is on, the embedded ...
User Guide
Page 32
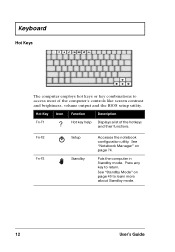
Keyboard Hot Keys The computer employs hot keys or key combinations to access most of the hotkeys and their functions. See "Standby Mode" on page 74. Hot Key Icon Function Description Fn-F1 Hot key help Displays a list of the computer's controls like screen contrast and brightness, volume output and the BIOS setup utility. See "Notebook Manager" on page 40 to return. Press any key to learn more about Standby mode. 12 User's Guide Puts the computer in Standby mode. Fn-F2 Fn-F3 Setup Standby Accesses the notebook configuration utility.
Keyboard Hot Keys The computer employs hot keys or key combinations to access most of the hotkeys and their functions. See "Standby Mode" on page 74. Hot Key Icon Function Description Fn-F1 Hot key help Displays a list of the computer's controls like screen contrast and brightness, volume output and the BIOS setup utility. See "Notebook Manager" on page 40 to return. Press any key to learn more about Standby mode. 12 User's Guide Puts the computer in Standby mode. Fn-F2 Fn-F3 Setup Standby Accesses the notebook configuration utility.
User Guide
Page 33
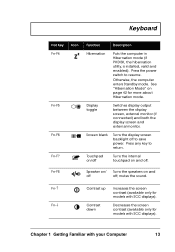
...page 42 for models with SCC displays). Press any key to resume. Fn-F8 Speaker on/ Turns the speakers on and off. Decreases the screen contrast (available only for more about Hibernation mode. Otherwise, the computer enters Standby mode. Chapter 1 Getting Familiar with SCC displays). Touchpad on/...off off to save power. Press the power switch to return. Display toggle Switches display output between the display screen, external monitor (if connected) and both the display screen and external monitor. mutes the sound. Keyboard Hot Key Fn-F4 Icon Fn-F5 Fn-F6 Fn-F7 ...
...page 42 for models with SCC displays). Press any key to resume. Fn-F8 Speaker on/ Turns the speakers on and off. Decreases the screen contrast (available only for more about Hibernation mode. Otherwise, the computer enters Standby mode. Chapter 1 Getting Familiar with SCC displays). Touchpad on/...off off to save power. Press the power switch to return. Display toggle Switches display output between the display screen, external monitor (if connected) and both the display screen and external monitor. mutes the sound. Keyboard Hot Key Fn-F4 Icon Fn-F5 Fn-F6 Fn-F7 ...
User Guide
Page 34
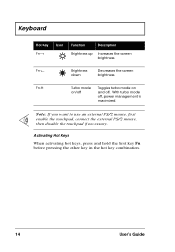
With turbo mode off . Fn-← Brightness down Decreases the screen brightness. Keyboard Hot Key Fn-→ Icon Function Description Brightness up Increases the screen brightness. Note: If you want to use an external PS/2 mouse, first enable the touchpad, connect the external PS/2 mouse, then disable the touchpad if necessary. Fn-H Turbo mode on/off Toggles turbo mode on and off , power management is maximized. Activating Hot Keys When activating hot keys, press and hold the first key Fn before pressing the other key in the hot key combination. 14 User's Guide
With turbo mode off . Fn-← Brightness down Decreases the screen brightness. Keyboard Hot Key Fn-→ Icon Function Description Brightness up Increases the screen brightness. Note: If you want to use an external PS/2 mouse, first enable the touchpad, connect the external PS/2 mouse, then disable the touchpad if necessary. Fn-H Turbo mode on/off Toggles turbo mode on and off , power management is maximized. Activating Hot Keys When activating hot keys, press and hold the first key Fn before pressing the other key in the hot key combination. 14 User's Guide
User Guide
Page 48
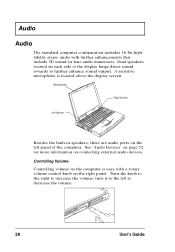
Controlling Volume Controlling volume on the computer is located above the display screen. turn it to the left panel of the display hinge direct sound towards to further enhance sound output. Turn the knob to the right to ...
Controlling Volume Controlling volume on the computer is located above the display screen. turn it to the left panel of the display hinge direct sound towards to further enhance sound output. Turn the knob to the right to ...
User Guide
Page 52
... a Lithium-Ion battery pack which does not have an extra fully-charged battery pack available as backup. The battery will come in the Power Management screen of Nickel Cadmium (NiCd) batteries. See page 93 and page 80 respectively. 2. u Battery-low Warning When the battery charge level becomes low, the computer gives...
... a Lithium-Ion battery pack which does not have an extra fully-charged battery pack available as backup. The battery will come in the Power Management screen of Nickel Cadmium (NiCd) batteries. See page 93 and page 80 respectively. 2. u Battery-low Warning When the battery charge level becomes low, the computer gives...

User Guide
Page 60
... returns to normal once the computer accesses it automatically adjusts the LCD backlight to a brighter level. Heuristic Power Management Power Management Modes Display Standby Mode Screen activity is reduced to a minimum. If these devices. Peripheral Standby Modes The peripheral connections in Standby mode. These include audio, serial ports, floppy drive and...
... returns to normal once the computer accesses it automatically adjusts the LCD backlight to a brighter level. Heuristic Power Management Power Management Modes Display Standby Mode Screen activity is reduced to a minimum. If these devices. Peripheral Standby Modes The peripheral connections in Standby mode. These include audio, serial ports, floppy drive and...
User Guide
Page 86
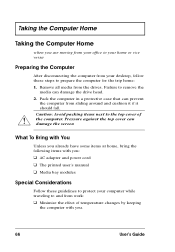
... of the computer. Pressure against the top cover can damage the drive head. 2. Caution: Avoid packing items next to remove the media can damage the screen What To Bring with You Unless you already have some items at home, bring the following items with you : u AC adapter and power cord u The...
... of the computer. Pressure against the top cover can damage the drive head. 2. Caution: Avoid packing items next to remove the media can damage the screen What To Bring with You Unless you already have some items at home, bring the following items with you : u AC adapter and power cord u The...
User Guide
Page 87
u Changes in an environment with a temperature between outside and room temperature. Allow the computer to return to room temperature, and inspect the screen for condensation before turning on your computer at home, it may be worthwhile purchasing a second AC adapter for use your Computer 67 If possible, leave ...
u Changes in an environment with a temperature between outside and room temperature. Allow the computer to return to room temperature, and inspect the screen for condensation before turning on your computer at home, it may be worthwhile purchasing a second AC adapter for use your Computer 67 If possible, leave ...
User Guide
Page 94
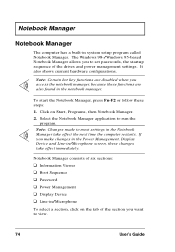
... and Line-in the Notebook Manager take effect immediately. Note: Changes made to view. 74 User's Guide If you want to most settings in /Microphone screen, these changes take effect the next time the computer restarts. It also shows current hardware configurations. Note: Certain hot key functions are disabled when you...
... and Line-in the Notebook Manager take effect immediately. Note: Changes made to view. 74 User's Guide If you want to most settings in /Microphone screen, these changes take effect the next time the computer restarts. It also shows current hardware configurations. Note: Certain hot key functions are disabled when you...
User Guide
Page 96
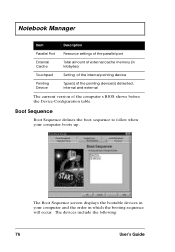
The devices include the following: 76 User's Guide The Boot Sequence screen displays the bootable devices in your computer boots up. Notebook Manager Item Description Parallel Port External Cache Resource settings of the parallel port Total amount ...
The devices include the following: 76 User's Guide The Boot Sequence screen displays the bootable devices in your computer boots up. Notebook Manager Item Description Parallel Port External Cache Resource settings of the parallel port Total amount ...
User Guide
Page 101
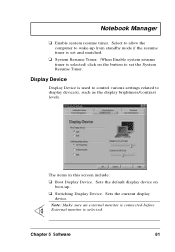
The items in this screen include: u Boot Display Device. u Switching Display Device. Sets the current display device. Notebook Manager u Enable system resume timer. Display Device Display Device is set the ...
The items in this screen include: u Boot Display Device. u Switching Display Device. Sets the current display device. Notebook Manager u Enable system resume timer. Display Device Display Device is set the ...
User Guide
Page 102
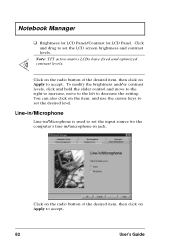
...-matrix LCDs have fixed and optimized contrast levels. Click on the radio button of the desired item, then click on Apply to set the LCD screen brightness and contrast levels. Click and drag to accept. Click on the radio button of the desired item, then click on Apply to set the...
...-matrix LCDs have fixed and optimized contrast levels. Click on the radio button of the desired item, then click on Apply to set the LCD screen brightness and contrast levels. Click and drag to accept. Click on the radio button of the desired item, then click on Apply to set the...
User Guide
Page 103
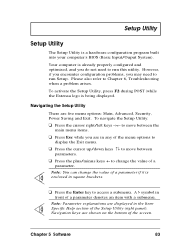
... Exit menu. u Press the plus/minus keys +- Chapter 5 Software 83 To activate the Setup Utility, press F2 during POST (while the Extensa logo is enclosed in any of the screen. Navigation keys are five menu options: Main, Advanced, Security, Power Saving and Exit. However, if you encounter configuration problems, you may need...
... Exit menu. u Press the plus/minus keys +- Chapter 5 Software 83 To activate the Setup Utility, press F2 during POST (while the Extensa logo is enclosed in any of the screen. Navigation keys are five menu options: Main, Advanced, Security, Power Saving and Exit. However, if you encounter configuration problems, you may need...
User Guide
Page 104
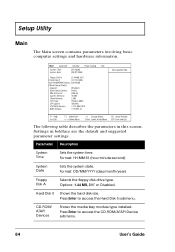
... (hour:minute:second) System Date Sets the system date. Press Enter to access the CD-ROM/ATAPI Device submenu. 84 User's Guide Settings in this screen. The following table describes the parameters in boldface are the default and suggested parameter settings. Setup Utility Main The Main...
... (hour:minute:second) System Date Sets the system date. Press Enter to access the CD-ROM/ATAPI Device submenu. 84 User's Guide Settings in this screen. The following table describes the parameters in boldface are the default and suggested parameter settings. Setup Utility Main The Main...
User Guide
Page 106
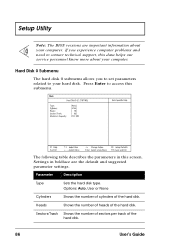
.... Sectors/Track Shows the number of sectors per track of the hard disk. 86 User's Guide Settings in this submenu. Press Enter to access this screen. Setup Utility Note: The BIOS versions are the default and suggested parameter settings.
.... Sectors/Track Shows the number of sectors per track of the hard disk. 86 User's Guide Settings in this submenu. Press Enter to access this screen. Setup Utility Note: The BIOS versions are the default and suggested parameter settings.
User Guide
Page 107
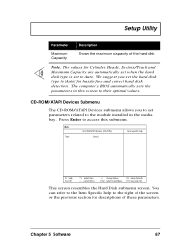
... help to their optimal values. We suggest you to set parameters related to access this screen to the right of the screen or the previous section for descriptions of the hard disk. This screen resembles the Hard Disk submenu screen. Note: The values for hassle-free and correct hard disk detection. Press Enter to...
... help to their optimal values. We suggest you to set parameters related to access this screen to the right of the screen or the previous section for descriptions of the hard disk. This screen resembles the Hard Disk submenu screen. Note: The values for hassle-free and correct hard disk detection. Press Enter to...
User Guide
Page 108
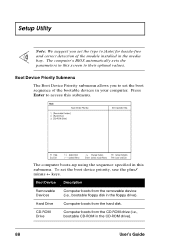
...-ROM Drive Computer boots from the removable device (i.e., bootable floppy disk in the media bay. The computer boots-up using the sequence specified in this screen to [Auto] for hassle-free and correct detection of the bootable devices in your computer. Setup Utility Note: We suggest you to access this submenu...
...-ROM Drive Computer boots from the removable device (i.e., bootable floppy disk in the media bay. The computer boots-up using the sequence specified in this screen to [Auto] for hassle-free and correct detection of the bootable devices in your computer. Setup Utility Note: We suggest you to access this submenu...
User Guide
Page 109
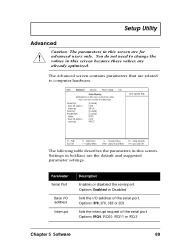
... request of the serial port. You do not need to computer hardware. The following table describes the parameters in this screen. Options: IRQ4, IRQ10, IRQ11 or IRQ 3 Chapter 5 Software 89 The Advanced screen contains parameters that are for advanced users only. Options: Enabled or Disabled Sets the I /O address Interrupt Description Enables or...
... request of the serial port. You do not need to computer hardware. The following table describes the parameters in this screen. Options: IRQ4, IRQ10, IRQ11 or IRQ 3 Chapter 5 Software 89 The Advanced screen contains parameters that are for advanced users only. Options: Enabled or Disabled Sets the I /O address Interrupt Description Enables or...

