
User Guide
Page 2
..., or otherwise, without obligation to the information in this manual. The serial number and model number are the property of Acer Inc., developed with respect to the case. Printed in Taiwan Extensa 700/710 Series Notebook Computer User's Guide Part No.: 49.47A01.001 Original Issue: April 1998 First Revision: May 1998 Second...
..., or otherwise, without obligation to the information in this manual. The serial number and model number are the property of Acer Inc., developed with respect to the case. Printed in Taiwan Extensa 700/710 Series Notebook Computer User's Guide Part No.: 49.47A01.001 Original Issue: April 1998 First Revision: May 1998 Second...
User Guide
Page 3
Table of Contents Notices v Preface xiii Connecting the Computer xiv Getting Help Online xvii Support Information xviii Care and Maintenance xix Chapter 1 Getting Familiar with your Computer 1 Features 3 Display 5 Indicators 7 Keyboard 9 Touchpad 16 Storage 18 Ports 21 Audio 28 Securing your Computer 29 Chapter 2 Operating on Battery Power 31 Battery Pack 32 Heuristic Power Management 39 Chapter 3 Peripherals and Options 45 External Monitor 46 External Keyboard 47 External Keypad 48 External Pointing Device 49 Printer 51 Audio Devices 52 Mini Docking Station 53 PC ...
Table of Contents Notices v Preface xiii Connecting the Computer xiv Getting Help Online xvii Support Information xviii Care and Maintenance xix Chapter 1 Getting Familiar with your Computer 1 Features 3 Display 5 Indicators 7 Keyboard 9 Touchpad 16 Storage 18 Ports 21 Audio 28 Securing your Computer 29 Chapter 2 Operating on Battery Power 31 Battery Pack 32 Heuristic Power Management 39 Chapter 3 Peripherals and Options 45 External Monitor 46 External Keyboard 47 External Keypad 48 External Pointing Device 49 Printer 51 Audio Devices 52 Mini Docking Station 53 PC ...
User Guide
Page 4
Table of Contents Traveling Internationally with the Computer 69 Chapter 5 Software 71 System Software 72 PhDISK 73 Notebook Manager 74 Setup Utility 83 Chapter 6 Troubleshooting 97 Frequently-Asked Questions 98 Error Messages 103 Appendix A Specifications 107 Index 111 iv
Table of Contents Traveling Internationally with the Computer 69 Chapter 5 Software 71 System Software 72 PhDISK 73 Notebook Manager 74 Setup Utility 83 Chapter 6 Troubleshooting 97 Frequently-Asked Questions 98 Error Messages 103 Appendix A Specifications 107 Index 111 iv
User Guide
Page 5
These limits are designed to provide reasonable protection against harmful interference in a particular installation. If this equipment. Notice: Peripheral Devices Only peripherals (input/output devices, terminals, printers, etc.) certified to comply with the instructions, may be attached to this device does cause harmful interference to radio or television reception, which the receiver is no guarantee that to which can radiate radio frequency energy and, if not installed and used in interference to correct the interference by turning the device off and on a circuit different...
These limits are designed to provide reasonable protection against harmful interference in a particular installation. If this equipment. Notice: Peripheral Devices Only peripherals (input/output devices, terminals, printers, etc.) certified to comply with the instructions, may be attached to this device does cause harmful interference to radio or television reception, which the receiver is no guarantee that to which can radiate radio frequency energy and, if not installed and used in interference to correct the interference by turning the device off and on a circuit different...
User Guide
Page 6
Notices Caution Changes or modifications not expressly approved by the manufacturer could void the user's authority, which is subject to operate this device must accept any interference received, including interference that may cause undesired operation. Notice: Canadian Users This Class B digital apparatus meets all requirements of the FCC Rules. Remarque à l'intention des utilisateurs canadiens Cet appareil numérique de la classe B respected toutes les exigences du Règlement sur le matériel brouilleur du Canada. Operation is granted by the Federal ...
Notices Caution Changes or modifications not expressly approved by the manufacturer could void the user's authority, which is subject to operate this device must accept any interference received, including interference that may cause undesired operation. Notice: Canadian Users This Class B digital apparatus meets all requirements of the FCC Rules. Remarque à l'intention des utilisateurs canadiens Cet appareil numérique de la classe B respected toutes les exigences du Règlement sur le matériel brouilleur du Canada. Operation is granted by the Federal ...
User Guide
Page 7
Do not place this product on the cord. 9. This product should never be blocked by placing the product on the product. 3. Do not locate this product from the type of power available, consult your dealer or local power company. 8. Also, make sure that the total rating of the product and to ensure reliable operation of all warnings and instructions marked on a bed, sofa, rug, or other similar surface. Follow all products plugged into the extension cord does not exceed the extension cord ampere rating. Unplug this product where persons will walk on an unstable cart, stand, ...
Do not place this product on the cord. 9. This product should never be blocked by placing the product on the product. 3. Do not locate this product from the type of power available, consult your dealer or local power company. 8. Also, make sure that the total rating of the product and to ensure reliable operation of all warnings and instructions marked on a bed, sofa, rug, or other similar surface. Follow all products plugged into the extension cord does not exceed the extension cord ampere rating. Unplug this product where persons will walk on an unstable cart, stand, ...

User Guide
Page 8
Adjust only those controls that could result in fire. If the product exhibits a distinct change in damage and will often require extensive work by a qualified technician to restore the product to normal condition. e. Batteries may present a risk of fire or explosion. If liquid has been spilled into this product through cabinet slots as the product's battery we recommend. If the product has been dropped or the cabinet has been damaged f. Keep them in a fire or electric shock. If the product does not operate normally when the operating instructions are covered by the...
Adjust only those controls that could result in fire. If the product exhibits a distinct change in damage and will often require extensive work by a qualified technician to restore the product to normal condition. e. Batteries may present a risk of fire or explosion. If liquid has been spilled into this product through cabinet slots as the product's battery we recommend. If the product has been dropped or the cabinet has been damaged f. Keep them in a fire or electric shock. If the product does not operate normally when the operating instructions are covered by the...
User Guide
Page 9
ix It should be a detachable type: UL listed/CSA certified, type SPT-2, rated 7A 125V minimum, VDE approved or its equivalent. Notices 15.Use only the proper type of power supply cord set (provided in your accessories box) for this unit. Maximum length is 15 feet (4.6 meters).
ix It should be a detachable type: UL listed/CSA certified, type SPT-2, rated 7A 125V minimum, VDE approved or its equivalent. Notices 15.Use only the proper type of power supply cord set (provided in your accessories box) for this unit. Maximum length is 15 feet (4.6 meters).

User Guide
Page 12
This model has been tested both by Acer's internal test labs and NSTL using NSTL's YMARK2000 certification test. These tests certify that this model will successfully make the year 2000 transition. Notices Year 2000 Compliance Statement The Extensa 700 series notebook computer is Year 2000compliant and carries the "NSTL Hardware Tested Year 2000 Compliant" logo. For more details, check the Acer Year 2000 Resource Center at http://www.acer.com/year2000 xii
This model has been tested both by Acer's internal test labs and NSTL using NSTL's YMARK2000 certification test. These tests certify that this model will successfully make the year 2000 transition. Notices Year 2000 Compliance Statement The Extensa 700 series notebook computer is Year 2000compliant and carries the "NSTL Hardware Tested Year 2000 Compliant" logo. For more details, check the Acer Year 2000 Resource Center at http://www.acer.com/year2000 xii
User Guide
Page 13
...proper care, your computer will provide you have about the day-to get your computer. Preface This manual describes features of your Extensa computer. Use the Just for the first time. instructions that are available with years of the programs shipped with your computer to... -day operation of the Extensa 700/710 Series notebook computers. The Extensa series computers incorporate such features as CardBus, PCI-based 16-bit stereo audio, Fast Infrared, internal pointing device, Universal...
...proper care, your computer will provide you have about the day-to get your computer. Preface This manual describes features of your Extensa computer. Use the Just for the first time. instructions that are available with years of the programs shipped with your computer to... -day operation of the Extensa 700/710 Series notebook computers. The Extensa series computers incorporate such features as CardBus, PCI-based 16-bit stereo audio, Fast Infrared, internal pointing device, Universal...
User Guide
Page 14
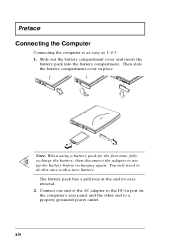
Slide out the battery compartment cover and insert the battery pack into the battery compartment. You only need to a properly grounded power outlet. The battery pack has a pull loop at the end for the first time, fully recharge the battery, then disconnect the adapter to the DC-in place. Note: When using a battery pack for easy removal. 2. xiv Preface Connecting the Computer Connecting the computer is as easy as 1-2-3. 1. Connect one end of the AC adapter to use up the battery before recharging again. Then slide the battery compartment cover in port on the computer's rear ...
Slide out the battery compartment cover and insert the battery pack into the battery compartment. You only need to a properly grounded power outlet. The battery pack has a pull loop at the end for the first time, fully recharge the battery, then disconnect the adapter to the DC-in place. Note: When using a battery pack for easy removal. 2. xiv Preface Connecting the Computer Connecting the computer is as easy as 1-2-3. 1. Connect one end of the AC adapter to use up the battery before recharging again. Then slide the battery compartment cover in port on the computer's rear ...
User Guide
Page 15
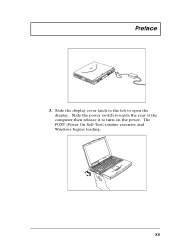
Preface 3. xv Slide the display cover latch to the left to turn on the power. The POST (Power On Self-Test) routine executes and Windows begins loading. Slide the power switch towards the rear of the computer then release it to open the display.
Preface 3. xv Slide the display cover latch to the left to turn on the power. The POST (Power On Self-Test) routine executes and Windows begins loading. Slide the power switch towards the rear of the computer then release it to open the display.
User Guide
Page 16
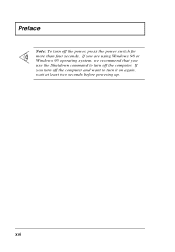
xvi Preface Note: To turn off the computer. If you are using Windows 98 or Windows 95 operating system, we recommend that you turn off the computer and want to turn it on again, wait at least two seconds before powering up. If you use the Shutdown command to turn off the power, press the power switch for more than four seconds.
xvi Preface Note: To turn off the computer. If you are using Windows 98 or Windows 95 operating system, we recommend that you turn off the computer and want to turn it on again, wait at least two seconds before powering up. If you use the Shutdown command to turn off the power, press the power switch for more than four seconds.
User Guide
Page 17
... online documentation: 1. Clear illustrations help . To provide you are connected to the Internet and have World Wide Web access, visit our home page (http://www.acer.com/) and get the latest information about the computer, so read it thoroughly. Press the Windows logo button or Click on...
... online documentation: 1. Clear illustrations help . To provide you are connected to the Internet and have World Wide Web access, visit our home page (http://www.acer.com/) and get the latest information about the computer, so read it thoroughly. Press the Windows logo button or Click on...
User Guide
Page 18
... on hand, especially when you are traveling in contact with your computer. Note: Always have World Wide Web access, visit our home page (http:// www.acer.com/) and get in for assistance. xviii An ITW passport comes with our offices worldwide.
... on hand, especially when you are traveling in contact with your computer. Note: Always have World Wide Web access, visit our home page (http:// www.acer.com/) and get in for assistance. xviii An ITW passport comes with our offices worldwide.

User Guide
Page 19
u Do not subject the computer to heavy shock and vibration. u Do not subject the computer to magnetic fields. u Do not expose the computer to rain or moisture. Carefully route the power cord and any liquid on the computer. u When unplugging the power cord, do not pull on the cord itself but pull on uneven surfaces. u Do not step on the power cord or place heavy objects on top of the computer to temperatures below 0ºC (32ºF) or above 50ºC (122ºF). u Do not spill water or any cables away from personal traffic. u Never place the computer on the plug....
u Do not subject the computer to heavy shock and vibration. u Do not subject the computer to magnetic fields. u Do not expose the computer to rain or moisture. Carefully route the power cord and any liquid on the computer. u When unplugging the power cord, do not pull on the cord itself but pull on uneven surfaces. u Do not step on the power cord or place heavy objects on top of the computer to temperatures below 0ºC (32ºF) or above 50ºC (122ºF). u Do not spill water or any cables away from personal traffic. u Never place the computer on the plug....
User Guide
Page 20
u Do not tamper with water. Do not use liquid or aerosol cleaners. xx Taking Care of your Battery Pack Here are using an extension cord. Use a soft cloth moistened with batteries. Cleaning and Servicing When cleaning the computer, follow these steps: 1. Disconnect the AC adapter. 3. u The computer does not operate normally. Preface u The total ampere ratings of the equipment plugged in should not exceed the fuse rating. Turn the power off the computer and remove the battery pack. 2. Recycle if at all equipment plugged into the product. Power off before removing or ...
u Do not tamper with water. Do not use liquid or aerosol cleaners. xx Taking Care of your Battery Pack Here are using an extension cord. Use a soft cloth moistened with batteries. Cleaning and Servicing When cleaning the computer, follow these steps: 1. Disconnect the AC adapter. 3. u The computer does not operate normally. Preface u The total ampere ratings of the equipment plugged in should not exceed the fuse rating. Turn the power off the computer and remove the battery pack. 2. Recycle if at all equipment plugged into the product. Power off before removing or ...
User Guide
Page 21
Work with unmatched productivity and reliability with a unique style and ergonomic design. Contents Features 3 Display 5 Indicators 7 Keyboard 9 Special Keys 9 Lock Keys 9 Embedded Numeric Keypad 10 Windows 98/Windows 95 Keys 11 Hot Keys 12 Keyboard Ergonomics 15 Touchpad 16 Touchpad Basics 16 Storage 18 Hard Disk 18 Floppy Drive 18 Media Bay 18 Ports 21 Left Ports 21 S-Video 22 Fast Infrared 22 Rear Ports 23 Universal Serial Bus 22 Right Ports 25 Fax/Data Modem 24 PC Card Slots 25 Bottom Port 27 Audio 28 1 1 Getting Familiar with your Computer This computer ...
Work with unmatched productivity and reliability with a unique style and ergonomic design. Contents Features 3 Display 5 Indicators 7 Keyboard 9 Special Keys 9 Lock Keys 9 Embedded Numeric Keypad 10 Windows 98/Windows 95 Keys 11 Hot Keys 12 Keyboard Ergonomics 15 Touchpad 16 Touchpad Basics 16 Storage 18 Hard Disk 18 Floppy Drive 18 Media Bay 18 Ports 21 Left Ports 21 S-Video 22 Fast Infrared 22 Rear Ports 23 Universal Serial Bus 22 Right Ports 25 Fax/Data Modem 24 PC Card Slots 25 Bottom Port 27 Audio 28 1 1 Getting Familiar with your Computer This computer ...

User Guide
Page 22
Securing your Computer 29 Security Notch 29 Passwords 29 2 User's Guide
Securing your Computer 29 Security Notch 29 Passwords 29 2 User's Guide

User Guide
Page 23
Here are just a few of its many features: Performance u Intel Pentium® II processor or Intel Pentium® processor with MMX™ technology u 64-bit main memory and external (L2) cache memory u Large LCD display and PCI local bus video with 128-bit graphics acceleration u Internal removable CD-ROM drive (media bay) u Internal 3.5-inch floppy drive u High-capacity, Enhanced-IDE removable hard disk u Lithium-Ion battery pack u Heuristic power management system with standby and hibernation power saving modes Multimedia u PCI-based 16-bit high-fidelity stereo audio with your Computer 3 ...
Here are just a few of its many features: Performance u Intel Pentium® II processor or Intel Pentium® processor with MMX™ technology u 64-bit main memory and external (L2) cache memory u Large LCD display and PCI local bus video with 128-bit graphics acceleration u Internal removable CD-ROM drive (media bay) u Internal 3.5-inch floppy drive u High-capacity, Enhanced-IDE removable hard disk u Lithium-Ion battery pack u Heuristic power management system with standby and hibernation power saving modes Multimedia u PCI-based 16-bit high-fidelity stereo audio with your Computer 3 ...