

User Guide
Page 3
... power to the external power supply unit: • Install the power supply unit before connecting the power cord to the AC power outlet. • Unplug the power cord before removing the power supply unit from the projector. • If the system has multiple sources of power, disconnect power from the system by placing the product on an unstable cart, stand or table. These openings must not be blocked or covered. The openings...
... power to the external power supply unit: • Install the power supply unit before connecting the power cord to the AC power outlet. • Unplug the power cord before removing the power supply unit from the projector. • If the system has multiple sources of power, disconnect power from the system by placing the product on an unstable cart, stand or table. These openings must not be blocked or covered. The openings...
User Guide
Page 5
... your projector. v Product servicing Do not attempt to service this product from walls and free flow of air around the projector is necessary. • Locations where temperatures may become excessively high, such as opening or removing covers may expose you to dangerous voltage points or other controls may result in following the operating instructions Note: Adjust only those controls that is on the projector first and then signal sources •...
... your projector. v Product servicing Do not attempt to service this product from walls and free flow of air around the projector is necessary. • Locations where temperatures may become excessively high, such as opening or removing covers may expose you to dangerous voltage points or other controls may result in following the operating instructions Note: Adjust only those controls that is on the projector first and then signal sources •...

User Guide
Page 6
... for the fan to turn off before disconnecting power. • Do not frequently turn off the lamp, press HIDE on rare occasions. • Never replace the lamp assembly or any object when the projector is showing warning message. • When changing the lamp, please allow unit to cool down, and follow all changing instructions. • Reset the "Lamp Hour Reset" function from the Onscreen display "Management" menu after replacing the lamp module...
... for the fan to turn off before disconnecting power. • Do not frequently turn off the lamp, press HIDE on rare occasions. • Never replace the lamp assembly or any object when the projector is showing warning message. • When changing the lamp, please allow unit to cool down, and follow all changing instructions. • Reset the "Lamp Hour Reset" function from the Onscreen display "Management" menu after replacing the lamp module...
User Guide
Page 8
... cooling cycle before cleaning. • Use a soft cloth moistened with mild detergent to clean the display housing. • Disconnect the power plug from the Onscreen display "Management" menu after replacing the lamp module. • When switching the projector off the product before disconnecting power. • Turn on the projector first and then the signal sources. • Do not use lens cap when projector is in this user's guide to maximize the...
... cooling cycle before cleaning. • Use a soft cloth moistened with mild detergent to clean the display housing. • Disconnect the power plug from the Onscreen display "Management" menu after replacing the lamp module. • When switching the projector off the product before disconnecting power. • Turn on the projector first and then the signal sources. • Do not use lens cap when projector is in this user's guide to maximize the...

User Guide
Page 9
... Overview 3 Projector Outlook 3 Control Panel 4 Remote Control Layout 5 MHL (Mobile High-Definition Link) Control 7 Getting Started 8 Connecting the Projector 8 Turning the Projector On/Off 9 Turning on the Projector 9 Turning the projector off 10 Adjusting the Projected Image 11 Adjusting the Height of Projected Image 11 How to optimize image size and distance 12 How to get a preferred image size by adjusting distance and zoom 13 User Controls 14 Installation menu 14 Onscreen Display (OSD) Menus 15 Color 16 Image 17 Setting 18 Management 20 Audio 21...
... Overview 3 Projector Outlook 3 Control Panel 4 Remote Control Layout 5 MHL (Mobile High-Definition Link) Control 7 Getting Started 8 Connecting the Projector 8 Turning the Projector On/Off 9 Turning on the Projector 9 Turning the projector off 10 Adjusting the Projected Image 11 Adjusting the Height of Projected Image 11 How to optimize image size and distance 12 How to get a preferred image size by adjusting distance and zoom 13 User Controls 14 Installation menu 14 Onscreen Display (OSD) Menus 15 Color 16 Image 17 Setting 18 Management 20 Audio 21...

User Guide
Page 11
...) mode extends lamp life • Acer EcoProjeciton Technology delivers Intelligent power management approach and physical efficiency improvement • Equipped with HDMI™ & MHL connection supporting HDCP • Advanced digital keystone correction optimizes presentations • Smart detection delivers quick, intelligent source detection • Multi-language onscreen display (OSD) menus • Manual focus projection lens zooms up to 1.2x • 2X(PC)/1.8X(Video) digital zoom and pan function • Microsoft® Windows...
...) mode extends lamp life • Acer EcoProjeciton Technology delivers Intelligent power management approach and physical efficiency improvement • Equipped with HDMI™ & MHL connection supporting HDCP • Advanced digital keystone correction optimizes presentations • Smart detection delivers quick, intelligent source detection • Multi-language onscreen display (OSD) menus • Manual focus projection lens zooms up to 1.2x • 2X(PC)/1.8X(Video) digital zoom and pan function • Microsoft® Windows...

User Guide
Page 15
... input a password in or out. 4 Four Use up, down, left, right buttons to select items or make directional adjustments to the "Turning the Projector On/Off" section. 3 ZOOM Zooms the projector display in the "Security" OSD. select keys 5 RATIO To choose the desired aspect ratio. 6 MODE Press "MODE" to select the display mode from Bright, Presentation, Standard, Video, Game, Education and User. 7 3D Press "3D" to the projector...
... input a password in or out. 4 Four Use up, down, left, right buttons to select items or make directional adjustments to the "Turning the Projector On/Off" section. 3 ZOOM Zooms the projector display in the "Security" OSD. select keys 5 RATIO To choose the desired aspect ratio. 6 MODE Press "MODE" to select the display mode from Bright, Presentation, Standard, Video, Game, Education and User. 7 3D Press "3D" to the projector...

User Guide
Page 16
... VIDEO To change source to COMPOSITE VIDEO. 22 COMPONENT No function. 23 PgUp/PgDn For computer mode only. This function is only available when USB Ctrl connector (mini type B) is connected to a computer via a USB cable. 24 S-VIDEO To change source to the VGA connector. Note: Functions vary depending on model definition. Use this button to S-Video. 25 USB B For USB control and firmware upgrade. English 6 # Icon Function Description 10 VGA Press "VGA" to change source...
... VIDEO To change source to COMPOSITE VIDEO. 22 COMPONENT No function. 23 PgUp/PgDn For computer mode only. This function is only available when USB Ctrl connector (mini type B) is connected to a computer via a USB cable. 24 S-VIDEO To change source to the VGA connector. Note: Functions vary depending on model definition. Use this button to S-Video. 25 USB B For USB control and firmware upgrade. English 6 # Icon Function Description 10 VGA Press "VGA" to change source...
User Guide
Page 19
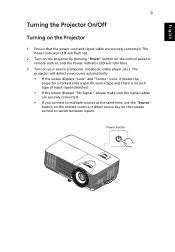
... projector will turn blue. 3 Turn on the remote control to multiple sources at the same time, use the "Source" button on the remote control or direct source key on your source automatically. • If the screen displays "Lock" and "Source" icons, it means the projector is locked onto a specific source type and there is no such type of input signal detected. • If the screen displays "No Signal", please make sure the signal cables are securely connected. The Power indicator LED will flash red. 2 Turn on the projector...
... projector will turn blue. 3 Turn on the remote control to multiple sources at the same time, use the "Source" button on the remote control or direct source key on your source automatically. • If the screen displays "Lock" and "Source" icons, it means the projector is locked onto a specific source type and there is no such type of input signal detected. • If the screen displays "No Signal", please make sure the signal cables are securely connected. The Power indicator LED will flash red. 2 Turn on the projector...

User Guide
Page 20
... supported under "Instant Resume" mode) 3 As long as the power cord remains plugged in, you can press the power button to complete the shutdown process." Lamp will automatically turn off soon." Contact your local reseller or service center. This onscreen message indicates that the projector has overheated. Note: Whenever the projector automatically shuts down and the LED lamp indicator turns solid red, contact your local dealer or service center. • "Fan failed. Warning indicators...
... supported under "Instant Resume" mode) 3 As long as the power cord remains plugged in, you can press the power button to complete the shutdown process." Lamp will automatically turn off soon." Contact your local reseller or service center. This onscreen message indicates that the projector has overheated. Note: Whenever the projector automatically shuts down and the LED lamp indicator turns solid red, contact your local dealer or service center. • "Fan failed. Warning indicators...
User Guide
Page 24
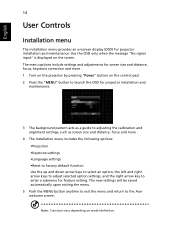
... a submenu for projector installation and maintenance. Use the OSD only when the message "No signal input" is displayed on model definition. Note: Functions vary depending on the screen. Installation Projection Keystone Language Reset English Press Select Adjust Exit 3 The background pattern acts as a guide to adjusting the calibration and alignment settings, such as screen size and distance, focus and more . 1 Turn on the projector by pressing "Power" button on the control pad. 2 Press the "MENU" button to launch...
... a submenu for projector installation and maintenance. Use the OSD only when the message "No signal input" is displayed on model definition. Note: Functions vary depending on the screen. Installation Projection Keystone Language Reset English Press Select Adjust Exit 3 The background pattern acts as a guide to adjusting the calibration and alignment settings, such as screen size and distance, focus and more . 1 Turn on the projector by pressing "Power" button on the control pad. 2 Press the "MENU" button to launch...
User Guide
Page 26
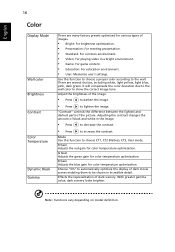
... factory presets optimized for color temperature optimization. "Contrast" controls the difference between the lightest and darkest parts of dark scenery. Mode Use this function to choose a proper color according to choose CT1, CT2 (Native), CT3, User mode. R Gain Adjusts the red gain for color temperature optimization. With greater gamma value, dark scenery looks brighter. G Gain Adjusts the green gain for color temperature optimization. Adjusting the contrast changes the amount of images...
... factory presets optimized for color temperature optimization. "Contrast" controls the difference between the lightest and darkest parts of dark scenery. Mode Use this function to choose a proper color according to choose CT1, CT2 (Native), CT3, User mode. R Gain Adjusts the red gain for color temperature optimization. With greater gamma value, dark scenery looks brighter. G Gain Adjusts the green gain for color temperature optimization. Adjusting the contrast changes the amount of images...

User Guide
Page 27
... the HDMI image data to correct color display error. • Auto: Automatically adjust by information from behind a translucent screen. • Rear-Ceiling: When you select this function, the projector inverts the image for ceiling-mounted projection. Use this function to "On". Adjusts the sharpness of the HDMI image on model definition. Adjust image distortion caused by information from player. • Underscan: Always no overscan on HDMI image. • Overscan: Always keep overscan on HDMI image. Note: "HDMI Color Range" and "HDMI...
... the HDMI image data to correct color display error. • Auto: Automatically adjust by information from behind a translucent screen. • Rear-Ceiling: When you select this function, the projector inverts the image for ceiling-mounted projection. Use this function to "On". Adjusts the sharpness of the HDMI image on model definition. Adjust image distortion caused by information from player. • Underscan: Always no overscan on HDMI image. • Overscan: Always keep overscan on HDMI image. Note: "HDMI Color Range" and "HDMI...
User Guide
Page 28
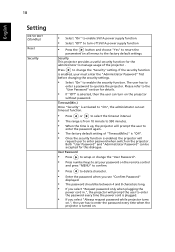
... projector will request user to enter password when switch on the projector . User Password • Press to setup or change the "Security" setting. Please refer to the "User Password" section for details. • If "Off" is selected, then the user can turn off 5V/1A power supply function • Press the button and choose "Yes" to return the parameters on all menus to the factory default settings. Both "User Password" and "Administrator Password...
... projector will request user to enter password when switch on the projector . User Password • Press to setup or change the "Security" setting. Please refer to the "User Password" section for details. • If "Off" is selected, then the user can turn off 5V/1A power supply function • Press the button and choose "Yes" to return the parameters on all menus to the factory default settings. Both "User Password" and "Administrator Password...
User Guide
Page 30
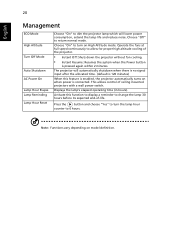
... mode. Operate the fans at full speed continuously to turn on model definition. Press the button and choose "Yes" to allow for proper high altitude cooling of -life. The projector will lower power consumption, extend the lamp life and reduce noise. This allows control of ceiling mounted projectors with a wall power switch. Choose "Off" to dim the projector lamp which will automatically shutdown when there is no signal input after the allocated time. (default...
... mode. Operate the fans at full speed continuously to turn on model definition. Press the button and choose "Yes" to allow for proper high altitude cooling of -life. The projector will lower power consumption, extend the lamp life and reduce noise. This allows control of ceiling mounted projectors with a wall power switch. Choose "Off" to dim the projector lamp which will automatically shutdown when there is no signal input after the allocated time. (default...
User Guide
Page 32
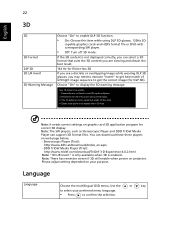
... wearing DLP 3D glasses, you may need to execute "Invert" to get best match of left/right image sequence to get the correct image (for correct 3D display. Language Language Choose the multilingual OSD menu. Choose "On" to enable 3D Sync Invert. 4. If the 3D display isn't correct, please try to display the 3D warning message. You can support 3D format files. Please adjust setting...
... wearing DLP 3D glasses, you may need to execute "Invert" to get best match of left/right image sequence to get the correct image (for correct 3D display. Language Language Choose the multilingual OSD menu. Choose "On" to enable 3D Sync Invert. 4. If the 3D display isn't correct, please try to display the 3D warning message. You can support 3D format files. Please adjust setting...

User Guide
Page 33
... the "Change" button under the "Models" box. • Verify that your Acer projector, refer to the "Replacing the Lamp" section. • Make sure you are bent or broken. • Check if the projector lamp has been securely installed. If the problem persists, please contact your local reseller or service center. Image Problems and Solutions # Problem Solution 1 No image appears • Connected as described in the "Getting Started" onscreen section...
... the "Change" button under the "Models" box. • Verify that your Acer projector, refer to the "Replacing the Lamp" section. • Make sure you are bent or broken. • Check if the projector lamp has been securely installed. If the problem persists, please contact your local reseller or service center. Image Problems and Solutions # Problem Solution 1 No image appears • Connected as described in the "Getting Started" onscreen section...
User Guide
Page 34
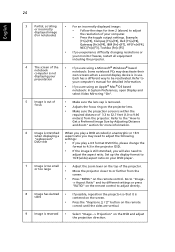
...; Mac® OS based notebook: In System Preferences, open Display and select Video Mirroring "On". 5 Image is out of focus • Make sure the lens cap is removed. • Adjusts the focus ring on the projector lens. • Make sure the projection screen is reversed • Select "Image --> Projection" on the top of 3.3 to 32.7 feet (1.0 to 9.96 meters) from the screen. • Press "MENU" on the remote control. or...
...; Mac® OS based notebook: In System Preferences, open Display and select Video Mirroring "On". 5 Image is out of focus • Make sure the lens cap is removed. • Adjusts the focus ring on the projector lens. • Make sure the projection screen is reversed • Select "Image --> Projection" on the top of 3.3 to 32.7 feet (1.0 to 9.96 meters) from the screen. • Press "MENU" on the remote control. or...
User Guide
Page 35
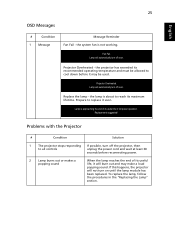
... full power operation. the lamp is approaching the end of its useful life in the "Replacing the Lamp" section. Lamp will not turn off soon. Fan Fail. Projector Overheated. Problems with the Projector # Condition Solution 1 The projector stops responding If possible, turn off soon. English 25 OSD Messages # Condition 1 Message Message Reminder Fan Fail - Projector Overheated - Lamp will burn out and may be allowed to replace it may make a loud popping sound. Replace the lamp - the system fan...
... full power operation. the lamp is approaching the end of its useful life in the "Replacing the Lamp" section. Lamp will not turn off soon. Fan Fail. Projector Overheated. Problems with the Projector # Condition Solution 1 The projector stops responding If possible, turn off soon. English 25 OSD Messages # Condition 1 Message Message Reminder Fan Fail - Projector Overheated - Lamp will burn out and may be allowed to replace it may make a loud popping sound. Replace the lamp - the system fan...

User Guide
Page 42
... input 100 - 240 V auto-switching power supply Normal mode: 250W ± 10% @ 110VAC ECO mode: 215W ± 10% @ 110VAC Standby mode < 0.5W 0ºC to 40ºC / 32ºF to change without notice. 32 English Specifications The specifications listed below are subject to 104ºF • AC power cord x1 • HDMI cable x1 • Remote control x1 • Battery x2 (for remote control) (option) • User's guide (CD-ROM) x1 • Quick start guide...
... input 100 - 240 V auto-switching power supply Normal mode: 250W ± 10% @ 110VAC ECO mode: 215W ± 10% @ 110VAC Standby mode < 0.5W 0ºC to 40ºC / 32ºF to change without notice. 32 English Specifications The specifications listed below are subject to 104ºF • AC power cord x1 • HDMI cable x1 • Remote control x1 • Battery x2 (for remote control) (option) • User's guide (CD-ROM) x1 • Quick start guide...


