Service Guide
Page 4
...turning the equipment off , a small amount of electrical current still flows through the monitor. This equipment generates, uses, and can be noted in a particular installation. Call eMachines Customer Care for help. Dangerous high voltages are designed to provide reasonable protection against ... there is made, it and allow anything to -date information available on . ■ When the monitor is damaged. ■ The system performance changes. For Emachine -AUTHORIZED SERVICE PROVIDERS, your regional offices or the responsible personnel/channel to avoid eating and drinking near ...
...turning the equipment off , a small amount of electrical current still flows through the monitor. This equipment generates, uses, and can be noted in a particular installation. Call eMachines Customer Care for help. Dangerous high voltages are designed to provide reasonable protection against ... there is made, it and allow anything to -date information available on . ■ When the monitor is damaged. ■ The system performance changes. For Emachine -AUTHORIZED SERVICE PROVIDERS, your regional offices or the responsible personnel/channel to avoid eating and drinking near ...
Service Guide
Page 5
... of 0.01% or less such as a safety feature. This plug will not be easily accessible. Never spill liquids on the monitor cabinet. z The LCD screen has effective pixels of the time. It may remain after switching the image, when the same image is provided. Do not.... In this case, the screen is equipped with a three-pronged grounded plug, a plug with LCD monitor and do not indicate a problem. Refer servicing to service the monitor yourself; z The monitor is recovered slowly by the manufacturer or sold with UL listed computers which have an electrician install the...
... of 0.01% or less such as a safety feature. This plug will not be easily accessible. Never spill liquids on the monitor cabinet. z The LCD screen has effective pixels of the time. It may remain after switching the image, when the same image is provided. Do not.... In this case, the screen is equipped with a three-pronged grounded plug, a plug with LCD monitor and do not indicate a problem. Refer servicing to service the monitor yourself; z The monitor is recovered slowly by the manufacturer or sold with UL listed computers which have an electrician install the...
Service Guide
Page 6
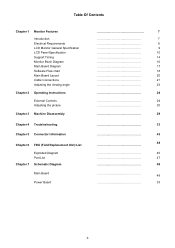
Table Of Contents Chapter 1 Monitor Features Introduction Electrical Requirements LCD Monitor General Specification LCD Panel Specification Support Timing Monitor Block Diagram Main Board Diagram Software Flow chart Main Board Layout Cable Connections Adjusting the viewing angle Chapter 2 Operating Instructions External Controls Adjusting the picture ...
Table Of Contents Chapter 1 Monitor Features Introduction Electrical Requirements LCD Monitor General Specification LCD Panel Specification Support Timing Monitor Block Diagram Main Board Diagram Software Flow chart Main Board Layout Cable Connections Adjusting the viewing angle Chapter 2 Operating Instructions External Controls Adjusting the picture ...

Service Guide
Page 7
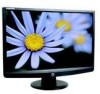
...latest LCD technology to provide a performance oriented product with OSD control to general 15-pin D-sub VGA connector and 24-pin DVI connector, also supports VESA DPMS power management and plug & play function. This monitor can be directly connected to drive a pair of E191W &(E181H...comparing to the traditional CRT monitor, it consumes less power and gets less weight in addition MTBF target is a build-in stereo audio amplifier with no radiation. Monitor Features Chapter 1 Introduction Scope This specification defines the requirements for the 19" MICROPROCESSOR based Multi-mode supported...
...latest LCD technology to provide a performance oriented product with OSD control to general 15-pin D-sub VGA connector and 24-pin DVI connector, also supports VESA DPMS power management and plug & play function. This monitor can be directly connected to drive a pair of E191W &(E181H...comparing to the traditional CRT monitor, it consumes less power and gets less weight in addition MTBF target is a build-in stereo audio amplifier with no radiation. Monitor Features Chapter 1 Introduction Scope This specification defines the requirements for the 19" MICROPROCESSOR based Multi-mode supported...
Service Guide
Page 8
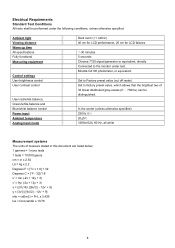
Ambient light Viewing distance Warm up time All specifications Fully functional Measuring equipment Control settings User brightness control User contrast control User red/white balance, Green/white balance and Blue/white balance control Power input Ambient temperature Analog input mode : Dark room ( Electrical Requirements Standard Test Conditions All tests shall be performed under the following conditions, unless otherwise specified.
Ambient light Viewing distance Warm up time All specifications Fully functional Measuring equipment Control settings User brightness control User contrast control User red/white balance, Green/white balance and Blue/white balance control Power input Ambient temperature Analog input mode : Dark room ( Electrical Requirements Standard Test Conditions All tests shall be performed under the following conditions, unless otherwise specified.
Service Guide
Page 16
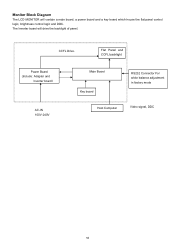
The Inverter board will contain a main board, a power board and a key board which house the flat panel control logic, brightness control logic and DDC. CCFL Drive. Flat Panel and CCFL backlight Power Board (Include: Adapter and Inverter board) AC-IN 100V-240V Main Board Key board RS232 Connector For white balance adjustment in factory mode Host Computer Video signal, DDC 16 Monitor Block Diagram The LCD MONITOR will drive the backlight of panel.
The Inverter board will contain a main board, a power board and a key board which house the flat panel control logic, brightness control logic and DDC. CCFL Drive. Flat Panel and CCFL backlight Power Board (Include: Adapter and Inverter board) AC-IN 100V-240V Main Board Key board RS232 Connector For white balance adjustment in factory mode Host Computer Video signal, DDC 16 Monitor Block Diagram The LCD MONITOR will drive the backlight of panel.
Service Guide
Page 23
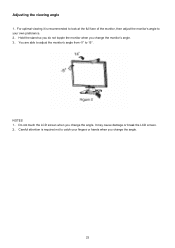
It may cause damage or break the LCD screen. 2、 Careful attention is recommended to look at the full face of the monitor, then adjust the monitor's angle to 15°. NOTES 1、 Do not touch the LCD screen when you change the angle. Adjusting the viewing angle 1、For optimal viewing it is required not to catch your own preference. 2、 Hold the stand so you do not topple the monitor when you change the monitor's angle. 3、 You are able to adjust the monitor's angle from -5° to your fingers or hands when you change the angle. 23
It may cause damage or break the LCD screen. 2、 Careful attention is recommended to look at the full face of the monitor, then adjust the monitor's angle to 15°. NOTES 1、 Do not touch the LCD screen when you change the angle. Adjusting the viewing angle 1、For optimal viewing it is required not to catch your own preference. 2、 Hold the stand so you do not topple the monitor when you change the monitor's angle. 3、 You are able to adjust the monitor's angle from -5° to your fingers or hands when you change the angle. 23
Service Guide
Page 24
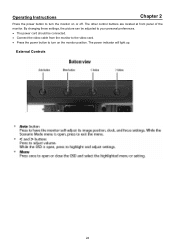
The other control buttons are located at front panel of the monitor. By changing these settings, the picture can be adjusted to your personal preferences. • The power cord should be connected. • Connect the video cable from the monitor to the video card. • Press the power button to turn on or off. External Controls 24 Operating Instructions Chapter 2 Press the power button to turn the monitor on the monitor position. The power indicator will light up.
The other control buttons are located at front panel of the monitor. By changing these settings, the picture can be adjusted to your personal preferences. • The power cord should be connected. • Connect the video cable from the monitor to the video card. • Press the power button to turn on or off. External Controls 24 Operating Instructions Chapter 2 Press the power button to turn the monitor on the monitor position. The power indicator will light up.
Service Guide
Page 27
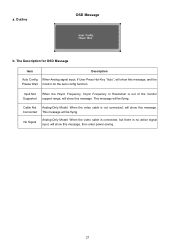
... Auto Config When Analog signal input, if User Press Hot-Key "Auto", will be flying. This message will show this message, and the Please Wait monitor do the auto config function. No Signal Analog-Only Model: When the video cable is connected, but there is out of the... monitor support range, will show this message, then enter power saving. 27 a. Input Not Supported When the Hsync Frequency, Vsync Frequency or Resolution is no active ...
... Auto Config When Analog signal input, if User Press Hot-Key "Auto", will be flying. This message will show this message, and the Please Wait monitor do the auto config function. No Signal Analog-Only Model: When the video cable is connected, but there is out of the... monitor support range, will show this message, then enter power saving. 27 a. Input Not Supported When the Hsync Frequency, Vsync Frequency or Resolution is no active ...
Service Guide
Page 28
... Supplied with units intended for the power cord shall be non-functional if there is UL listed and CSA labeled. This reduces the monitor's internal power supply consumption. The DDC2B is the wallet plug with a molded-on the I²C protocol. The other end terminates... bi-directional data channel based on type connector body, rated 10A, 250V, having standard CEE-22 female configuration. This monitor meets the Green monitor standards as set consisting of DDC used, communicate additional information about its display capabilities. Using The Right Power Cord The accessory...
... Supplied with units intended for the power cord shall be non-functional if there is UL listed and CSA labeled. This reduces the monitor's internal power supply consumption. The DDC2B is the wallet plug with a molded-on the I²C protocol. The other end terminates... bi-directional data channel based on type connector body, rated 10A, 250V, having standard CEE-22 female configuration. This monitor meets the Green monitor standards as set consisting of DDC used, communicate additional information about its display capabilities. Using The Right Power Cord The accessory...
Service Guide
Page 29
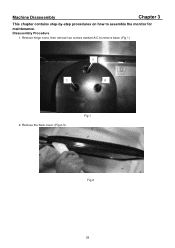
Remove the back cover. (Fig 2-3) Fig 1 Fig 2 29 Machine Disassembly Chapter 3 This chapter contains step-by-step procedures on how to remove base. (Fig 1) A C B 2. Disassembly Procedure 1. Remove hinge cover, then remove two screws marked A-C to assemble the monitor for maintenance.
Remove the back cover. (Fig 2-3) Fig 1 Fig 2 29 Machine Disassembly Chapter 3 This chapter contains step-by-step procedures on how to remove base. (Fig 1) A C B 2. Disassembly Procedure 1. Remove hinge cover, then remove two screws marked A-C to assemble the monitor for maintenance.

Service Guide
Page 32
Remove the screws marked in red and the wire connect with power board to remove the boards. (Fig 10,11) Fig 10 6. 4. The monitor disassembly completely. (Fig 12) Fig 11 Fig 12 32
Remove the screws marked in red and the wire connect with power board to remove the boards. (Fig 10,11) Fig 10 6. 4. The monitor disassembly completely. (Fig 12) Fig 11 Fig 12 32
Service Guide
Page 43
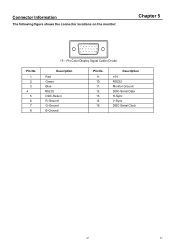
Pin Color Display Signal Cable (D-sub) Description Red Green Blue RS232 DDC-Return R-Ground G-Ground B-Ground Pin No. 9. 10. 11. 12. 13. 14. 15. Description +5V RS232 Monitor Ground DDC-Serial Data H-Sync V-Sync DDC-Serial Clock 43 43 Connector Information The following figure shows the connector locations on the monitor: Chapter 5 Pin No. 1. 2. 3. 4. 5. 6. 7. 8. 1 5 6 10 11 15 15 -
Pin Color Display Signal Cable (D-sub) Description Red Green Blue RS232 DDC-Return R-Ground G-Ground B-Ground Pin No. 9. 10. 11. 12. 13. 14. 15. Description +5V RS232 Monitor Ground DDC-Serial Data H-Sync V-Sync DDC-Serial Clock 43 43 Connector Information The following figure shows the connector locations on the monitor: Chapter 5 Pin No. 1. 2. 3. 4. 5. 6. 7. 8. 1 5 6 10 11 15 15 -


