
User Manual
Page 2
... companies. All correspondence concerning your computer. Acer LCD Monitor User's Guide Original Issue: 08 /2015 Changes may be incorporated in any form or by any person of Acer Incorporated. Record the model number, serial number, purchase date and place of purchase information in this publication without the prior written permission of such revisions or changes. Acer LCD Monitor User's Guide Model number Serial number Date of purchase Place of this publication...
... companies. All correspondence concerning your computer. Acer LCD Monitor User's Guide Original Issue: 08 /2015 Changes may be incorporated in any form or by any person of Acer Incorporated. Record the model number, serial number, purchase date and place of purchase information in this publication without the prior written permission of such revisions or changes. Acer LCD Monitor User's Guide Model number Serial number Date of purchase Place of this publication...

User Manual
Page 3
... the power supplies. Information for your monitor Please carefully follow these instructions carefully. Keep this case, the screen is attached to its base before connecting the power cord to the AC power outlet. • Make sure both the LCD monitor and the computer are normal with the LCD monitor and do not indicate a problem. • Due to the nature of the fluorescent light, the screen may remain after switching the image...
... the power supplies. Information for your monitor Please carefully follow these instructions carefully. Keep this case, the screen is attached to its base before connecting the power cord to the AC power outlet. • Make sure both the LCD monitor and the computer are normal with the LCD monitor and do not indicate a problem. • Due to the nature of the fluorescent light, the screen may remain after switching the image...
User Manual
Page 4
...setting the volume level, do not place the product on the marking label. Warnings • Do not use it after your dealer or local power company. • Do not allow anything to rest on an unstable cart, stand or table. Do not locate this product, make sure that the total When you plug the power cord into is used... operator as they may touch dangerous voltage points or short-out parts that could be seriously damaged. • Slots and openings are not sure of the type of any kind onto or into this product on the power cord. Using electrical power • This product ...
...setting the volume level, do not place the product on the marking label. Warnings • Do not use it after your dealer or local power company. • Do not allow anything to rest on an unstable cart, stand or table. Do not locate this product, make sure that the total When you plug the power cord into is used... operator as they may touch dangerous voltage points or short-out parts that could be seriously damaged. • Slots and openings are not sure of the type of any kind onto or into this product on the power cord. Using electrical power • This product ...

User Manual
Page 5
... with a three-wire grounded plug. If power strips are used, the load should not exceed 80% of the power strip's input rating. • This product's power cord is properly grounded before inserting the power cord plug. Make sure the power outlet is equipped with the supplied power supply cord set , make sure that the new power cord meets the following the operating instructions Warning! If you to replace the power cord set . The grounding pin is...
... with a three-wire grounded plug. If power strips are used, the load should not exceed 80% of the power strip's input rating. • This product's power cord is properly grounded before inserting the power cord plug. Make sure the power outlet is equipped with the supplied power supply cord set , make sure that the new power cord meets the following the operating instructions Warning! If you to replace the power cord set . The grounding pin is...

User Manual
Page 6
... use of our other controls may contain small parts. vi Note: Adjust only those controls that are covered by a qualified technician to restore the product to normal condition. Potentially explosive atmospheres include areas where you would normally be advised to reduce the environmental impact of our business and strive to identify and provide the best working procedures to turn...
... use of our other controls may contain small parts. vi Note: Adjust only those controls that are covered by a qualified technician to restore the product to normal condition. Potentially explosive atmospheres include areas where you would normally be advised to reduce the environmental impact of our business and strive to identify and provide the best working procedures to turn...

User Manual
Page 8
... comfort zone by pushing the power button. Long work periods, bad posture, poor work habits, stress, inadequate working in one fixed posture • avoid slouching forward and/or leaning backward • stand up and walk around regularly to computer use . The following symptoms may ... from Sleep mode by adjusting the viewing angle of the monitor, using a footrest, or raising your sitting height to carpal tunnel syndrome, tendonitis, tenosynovitis or other factors greatly increase the risk of a computer. Observe the following section provides tips for comfortable use . Users are ...
... comfort zone by pushing the power button. Long work periods, bad posture, poor work habits, stress, inadequate working in one fixed posture • avoid slouching forward and/or leaning backward • stand up and walk around regularly to computer use . The following symptoms may ... from Sleep mode by adjusting the viewing angle of the monitor, using a footrest, or raising your sitting height to carpal tunnel syndrome, tendonitis, tenosynovitis or other factors greatly increase the risk of a computer. Observe the following section provides tips for comfortable use . Users are ...

User Manual
Page 9
.... • Blink frequently to make your eyes. Developing good work habits to keep your eyes from the monitor and focusing on how to a comfortable level for extended periods of your vision Long viewing hours, wearing incorrect glasses or contact lenses, glare, excessive room lighting, poorly focused screens, very small typefaces and low-contrast displays could stress your computer use more relaxing...
.... • Blink frequently to make your eyes. Developing good work habits to keep your eyes from the monitor and focusing on how to a comfortable level for extended periods of your vision Long viewing hours, wearing incorrect glasses or contact lenses, glare, excessive room lighting, poorly focused screens, very small typefaces and low-contrast displays could stress your computer use more relaxing...
User Manual
Page 12
... information vi IT equipment recycling information vi Disposal instructions vii LCD pixel statement vii Tips and information for comfortable use viii Federal Communications Commission Declaration of Conformity xi Unpacking 1 Attaching/removing the base 2 Screen position adjustment 2 Connecting the power cord 5 Power saving 5 Display Data Channel (DDC) 5 Connector pin assignment 6 Standard timing table 8 Installation 9 User controls 10 How to adjust a setting 11 Acer eColor Management 12 User 13 Troubleshooting 15 HDMI mode 15 DVI mode 16 DP mode 16
... information vi IT equipment recycling information vi Disposal instructions vii LCD pixel statement vii Tips and information for comfortable use viii Federal Communications Commission Declaration of Conformity xi Unpacking 1 Attaching/removing the base 2 Screen position adjustment 2 Connecting the power cord 5 Power saving 5 Display Data Channel (DDC) 5 Connector pin assignment 6 Standard timing table 8 Installation 9 User controls 10 How to adjust a setting 11 Acer eColor Management 12 User 13 Troubleshooting 15 HDMI mode 15 DVI mode 16 DP mode 16

User Manual
Page 13
LCD monitor Quick start guide DP cable (Option) C B 2 4 1 H Q K HDMI Cable (Optional) DVI cable (Option) AC power cord Audio Cable (Option) MHL cable (Optional) MHL English 1 Unpacking Please check that the following items are present when you unpack the box, and save the packing materials in case you need to ship or transport the monitor in the future.
LCD monitor Quick start guide DP cable (Option) C B 2 4 1 H Q K HDMI Cable (Optional) DVI cable (Option) AC power cord Audio Cable (Option) MHL cable (Optional) MHL English 1 Unpacking Please check that the following items are present when you unpack the box, and save the packing materials in case you need to ship or transport the monitor in the future.

User Manual
Page 14
English 2 ATTACHING/REMOVING THE BASE Install: Align the base with the stand and push the base towards the top of the monitor, and then rotate the base clockwise. Tighten the screw clockwise. Remove: Reverse the steps to remove the base.
English 2 ATTACHING/REMOVING THE BASE Install: Align the base with the stand and push the base towards the top of the monitor, and then rotate the base clockwise. Tighten the screw clockwise. Remove: Reverse the steps to remove the base.

User Manual
Page 15
Only at the highest point can adjust the height of the monitor. 1 2 150mm • Tilt Please see the illustration below for the angle of the tilt range. English 3 SCREEN POSITION ADJUSTMENT In oder to optimize the best viewing position, you can adjust the height/tilt/ swivel/pivot of the monitor. • Height Adjustment After pressing the top of the monitor then you can 35 degrees of recline be offered for an example of elevation. 5o 35o
Only at the highest point can adjust the height of the monitor. 1 2 150mm • Tilt Please see the illustration below for the angle of the tilt range. English 3 SCREEN POSITION ADJUSTMENT In oder to optimize the best viewing position, you can adjust the height/tilt/ swivel/pivot of the monitor. • Height Adjustment After pressing the top of the monitor then you can 35 degrees of recline be offered for an example of elevation. 5o 35o
User Manual
Page 17
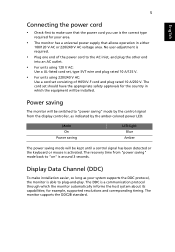
... using 120 V AC: Use a UL-listed cord set, type SVT wire and plug rated 10 A/125 V. • For units using 220/240 V AC: Use a cord set should have the appropriate safety approvals for example, supported resolutions and corresponding timing. 5 English Connecting the power cord • Check first to make installation easier, so long as indicated by the control signal from "power saving" mode back to "on" is around 3 seconds. The cord set consisting of H05VV-F cord and plug rated...
... using 120 V AC: Use a UL-listed cord set, type SVT wire and plug rated 10 A/125 V. • For units using 220/240 V AC: Use a cord set should have the appropriate safety approvals for example, supported resolutions and corresponding timing. 5 English Connecting the power cord • Check first to make installation easier, so long as indicated by the control signal from "power saving" mode back to "on" is around 3 seconds. The cord set consisting of H05VV-F cord and plug rated...
User Manual
Page 18
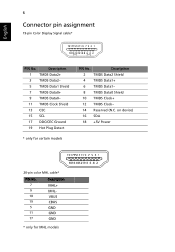
Description 2 TMDS Data2 Shield 4 TMDS Data1+ 6 TMDS Data1- 8 TMDS Data0 Shield 10 TMDS Clock+ 12 TMDS Clock- 14 Reserved (N.C. on device) 16 SDA 18 +5V Power English 6 Connector pin assignment 19-pin Color Display Signal cable* 1917151311 9 7 5 3 1 1816141210 8 6 4 2 PIN No. Description 1 TMDS Data2+ 3 TMDS Data2- 5 TMDS Data1 Shield 7 TMDS Data0+ 9 TMDS Data0- 11 TMDS Clock Shield 13 CEC 15 SCL 17 DDC/CEC Ground 19 Hot Plug Detect * only for certain models PIN No.
Description 2 TMDS Data2 Shield 4 TMDS Data1+ 6 TMDS Data1- 8 TMDS Data0 Shield 10 TMDS Clock+ 12 TMDS Clock- 14 Reserved (N.C. on device) 16 SDA 18 +5V Power English 6 Connector pin assignment 19-pin Color Display Signal cable* 1917151311 9 7 5 3 1 1816141210 8 6 4 2 PIN No. Description 1 TMDS Data2+ 3 TMDS Data2- 5 TMDS Data1 Shield 7 TMDS Data0+ 9 TMDS Data0- 11 TMDS Clock Shield 13 CEC 15 SCL 17 DDC/CEC Ground 19 Hot Plug Detect * only for certain models PIN No.
User Manual
Page 21
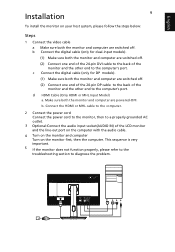
...'s port. c Connect the digital cable (only for dual-input models). (1) Make sure both the monitor and computer are switched off . b. Make sure both the monitor and computer are powered-OFF. Connect the HDMI or MHL cable to the computer. 2 Connect the power cord Connect the power cord to the monitor, then to a properly grounded AC outlet. 3 Optional:Connect the audio input socket(AUDIO IN) of the monitor and the other end to diagnose the problem. 2 English Installation 9 To install the monitor on...
...'s port. c Connect the digital cable (only for dual-input models). (1) Make sure both the monitor and computer are switched off . b. Make sure both the monitor and computer are powered-OFF. Connect the HDMI or MHL cable to the computer. 2 Connect the power cord Connect the power cord to the monitor, then to a properly grounded AC outlet. 3 Optional:Connect the audio input socket(AUDIO IN) of the monitor and the other end to diagnose the problem. 2 English Installation 9 To install the monitor on...
User Manual
Page 22
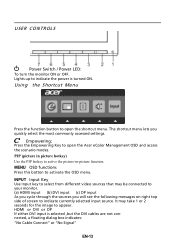
... button to indicate currently selected input source. INPUT Input Key Use Input key to select from different video sources that may take 1 or 2 seconds for the image to open the shortcut menu. Lights up to your monitor. (a) HDMI input (b) DVI input (c) DP input As you cycle through the sources you quickly select the most commonly accessed settings. Empowering: Press the Empowering Key to appear. HDMI or DVI or DP If either DVI input is turned ON. USER CONTROLS Power Switch / Power LED: To turn...
... button to indicate currently selected input source. INPUT Input Key Use Input key to select from different video sources that may take 1 or 2 seconds for the image to open the shortcut menu. Lights up to your monitor. (a) HDMI input (b) DVI input (c) DP input As you cycle through the sources you quickly select the most commonly accessed settings. Empowering: Press the Empowering Key to appear. HDMI or DVI or DP If either DVI input is turned ON. USER CONTROLS Power Switch / Power LED: To turn...
User Manual
Page 23
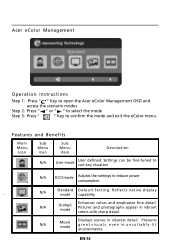
... mode Adjusts the settings to confirm the mode and exit the eColor menu. N/A Movie mode Displays scenes in vibrant colors with sharp detail. Pictures and photographs appear in clearest detail. Presents great visuals, even in unsuitably-lit environments. Features and Benefits Main Menu icon Sub Menu icon Sub Menu item Description N/A User mode User defined. Acer eColor Management Operation instructions Step 1: Press " " Key to open the Acer eColor Management OSD...
... mode Adjusts the settings to confirm the mode and exit the eColor menu. N/A Movie mode Displays scenes in vibrant colors with sharp detail. Pictures and photographs appear in clearest detail. Presents great visuals, even in unsuitably-lit environments. Features and Benefits Main Menu icon Sub Menu icon Sub Menu item Description N/A User mode User defined. Acer eColor Management Operation instructions Step 1: Press " " Key to open the Acer eColor Management OSD...
User Manual
Page 24
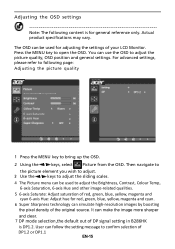
..., OSD position and general settings. You can be used for general reference only. User can simulate high-resolution images by boosting the pixel density of your LCD Monitor. Actual product specifications may vary. For advanced settings, please refer to following content is DP1.2. Then navigate to the picture element you wish to adjust. 3 Use the / keys to adjust the sliding scales. 4 The Picture menu can be used to adjust the Brightness, Contrast...
..., OSD position and general settings. You can be used for general reference only. User can simulate high-resolution images by boosting the pixel density of your LCD Monitor. Actual product specifications may vary. For advanced settings, please refer to following content is DP1.2. Then navigate to the picture element you wish to adjust. 3 Use the / keys to adjust the sliding scales. 4 The Picture menu can be used to adjust the Brightness, Contrast...

User Manual
Page 25
EN-16 Then navigate to the feature you wish to bring up the OSD. 2 Using the directional keys, select OSD from the on screen display. 8 Blue Light: filter out blue light by adjusting different Blue Light showing ratio - 80%, 70%, 60%, 50%, Adjusting the OSD position 1 Press the MENU key to adjust.
EN-16 Then navigate to the feature you wish to bring up the OSD. 2 Using the directional keys, select OSD from the on screen display. 8 Blue Light: filter out blue light by adjusting different Blue Light showing ratio - 80%, 70%, 60%, 50%, Adjusting the OSD position 1 Press the MENU key to adjust.
User Manual
Page 26
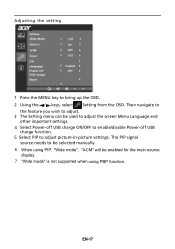
... signal source needs to adjust picture‐in‐picture settings. Then navigate to the feature you wish to adjust. 3 The Setting menu can be used to adjust the screen Menu Language and other important settings. 4 Select Power-off USB charge ON/OFF to enable/disable Power-off USB charge function. 5 Select PIP to be selected manually. 6 When using PIP, "Wide mode", "ACM" will be enabled for the main source display. 7 "Wide mode" is not supported when using PBP function. Adjusting the setting...
... signal source needs to adjust picture‐in‐picture settings. Then navigate to the feature you wish to adjust. 3 The Setting menu can be used to adjust the screen Menu Language and other important settings. 4 Select Power-off USB charge ON/OFF to enable/disable Power-off USB charge function. 5 Select PIP to be selected manually. 6 When using PIP, "Wide mode", "ACM" will be enabled for the main source display. 7 "Wide mode" is not supported when using PBP function. Adjusting the setting...
User Manual
Page 28
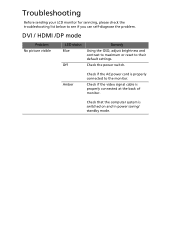
Check if the video signal cable is switched on and in power saving/ standby mode. Amber Check if the AC power cord is properly connected to see if you can self-diagnose the problem. Troubleshooting Before sending your LCD monitor for servicing, please check the troubleshooting list below to the monitor. Check that the computer system is properly connected at the back of monitor. DVI / HDMI /DP mode Problem No picture visible LED status Blue Off Remedy Using the OSD, adjust brightness and contrast to maximum or reset to their default settings. Check the power switch.
Check if the video signal cable is switched on and in power saving/ standby mode. Amber Check if the AC power cord is properly connected to see if you can self-diagnose the problem. Troubleshooting Before sending your LCD monitor for servicing, please check the troubleshooting list below to the monitor. Check that the computer system is properly connected at the back of monitor. DVI / HDMI /DP mode Problem No picture visible LED status Blue Off Remedy Using the OSD, adjust brightness and contrast to maximum or reset to their default settings. Check the power switch.

