Service Guide
Page 7
...11 Windows Keys 12 Hardware Specifications and Configurations 13 System Utilities 23 BIOS Setup Utility 23 Navigating the BIOS Utility 23 CMOS Setup Utility 24 Product Information 25 Standard CMOS Features 26 Advanced BIOS Features 27 Advanced Chipset Features 28 Integrated Peripherals 29 Power Management ...Features 30 PC Health 31 Frequency Voltage Control 32 BIOS Security Features 33 BIOS Flash Utilities 36 DOS Flash Utility 37 Win Flash Utility 38 Using DMI Tools 39 Machine Disassembly and ...
...11 Windows Keys 12 Hardware Specifications and Configurations 13 System Utilities 23 BIOS Setup Utility 23 Navigating the BIOS Utility 23 CMOS Setup Utility 24 Product Information 25 Standard CMOS Features 26 Advanced BIOS Features 27 Advanced Chipset Features 28 Integrated Peripherals 29 Power Management ...Features 30 PC Health 31 Frequency Voltage Control 32 BIOS Security Features 33 BIOS Flash Utilities 36 DOS Flash Utility 37 Win Flash Utility 38 Using DMI Tools 39 Machine Disassembly and ...

Service Guide
Page 9
Table of Contents Jumper and Connector Locations 175 Mainboard Top View 175 BIOS Recovery 176 FRU (Field Replaceable Unit) List 177 Exploded Diagrams 178 FRU List 180 Model Definition and Configuration 188 Test Compatible Components 190 Online Support Information 192 Index 193 IX
Table of Contents Jumper and Connector Locations 175 Mainboard Top View 175 BIOS Recovery 176 FRU (Field Replaceable Unit) List 177 Exploded Diagrams 178 FRU List 180 Model Definition and Configuration 188 Test Compatible Components 190 Online Support Information 192 Index 193 IX
Service Guide
Page 15
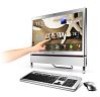
The exact configuration of your PC depends on the model purchased. Software • Productivity: • Acer Touch Suite • Adobe® Reader® • eSobi™ • Microsoft® Office 2007 Trial with Microsoft&#... McAfee® Internet Security Suite 2009 Trial9 • MyWinLocker® • Entertainment • Oberon TouchGames • Utilities • Acer eRecovery Management Security • • Kensington lock slot Hardware and BIOS passwords Dimensions and Weight • 570 (W) x 484.0 (H) x 84.6 (D) mm System Compliance • PC 2001 • ...
The exact configuration of your PC depends on the model purchased. Software • Productivity: • Acer Touch Suite • Adobe® Reader® • eSobi™ • Microsoft® Office 2007 Trial with Microsoft&#... McAfee® Internet Security Suite 2009 Trial9 • MyWinLocker® • Entertainment • Oberon TouchGames • Utilities • Acer eRecovery Management Security • • Kensington lock slot Hardware and BIOS passwords Dimensions and Weight • 570 (W) x 484.0 (H) x 84.6 (D) mm System Compliance • PC 2001 • ...
Service Guide
Page 24
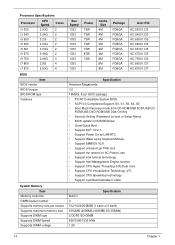
.... ROM/USB-DVD ROM/USB Disk-On-Key • Security Setting (Password on boot or Setup Menu). • BIOS update in 2 512/1024/2048MB (1 bank or 2 bank) 8192MB (4096MB+4096MB SO-DIMMs) 2 DDR3 SO-DIMM... 2 3.33G 2 3.46G 2 i5 750 i7 860 i7 870 2.66G 4 2.8G 4 2.93G 4 BIOS Item BIOS vendor BIOS Version BIOS ROM type Features System Memory Item Memory controller DIMM socket number Supports memory size per socket Supports maximum memory size...4M 4M 4M 8M 8M 8M Package FCBGA FCBGA FCBGA FCBGA FCBGA FCBGA FCBGA FCBGA FCBGA Acer P/N KC.53001.CI3 KC.54001.CI3 KC.65001.CI5 KC.66001.CI5 KC.66101....
.... ROM/USB-DVD ROM/USB Disk-On-Key • Security Setting (Password on boot or Setup Menu). • BIOS update in 2 512/1024/2048MB (1 bank or 2 bank) 8192MB (4096MB+4096MB SO-DIMMs) 2 DDR3 SO-DIMM... 2 3.33G 2 3.46G 2 i5 750 i7 860 i7 870 2.66G 4 2.8G 4 2.93G 4 BIOS Item BIOS vendor BIOS Version BIOS ROM type Features System Memory Item Memory controller DIMM socket number Supports memory size per socket Supports maximum memory size...4M 4M 4M 8M 8M 8M Package FCBGA FCBGA FCBGA FCBGA FCBGA FCBGA FCBGA FCBGA FCBGA Acer P/N KC.53001.CI3 KC.54001.CI3 KC.65001.CI5 KC.66001.CI5 KC.66101....
Service Guide
Page 33
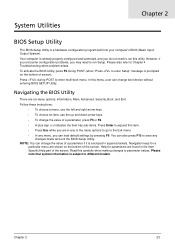
..." message is prompted on the bottom of the screen. Help for a particular menu are in the Item Specific Help part of the screen. Navigating the BIOS Utility There are found in any of a parameter, press F5 or F6. • A plus sign (+) indicates the item has sub-items. Press Enter to... left and right arrow keys. • To choose an item, use the up and down arrow keys. • To change boot device without entering BIOS SETUP Utility. Read this utility. Please also refer to expand this menu, user can load default settings by pressing F9. Your computer is enclosed in...
..." message is prompted on the bottom of the screen. Help for a particular menu are in the Item Specific Help part of the screen. Navigating the BIOS Utility There are found in any of a parameter, press F5 or F6. • A plus sign (+) indicates the item has sub-items. Press Enter to... left and right arrow keys. • To choose an item, use the up and down arrow keys. • To change boot device without entering BIOS SETUP Utility. Read this utility. Please also refer to expand this menu, user can load default settings by pressing F9. Your computer is enclosed in...
Service Guide
Page 34
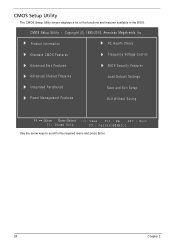
... (C) 1985-2010, American Megatrends Inc. Product Information PC Health Status Standard CMOS Features Frequency Voltage Control Advanced Bios Features BIOS Security Features Advanced Chipset Features Load Default Settings Integrated Peripherals Save and Exit Setup Power Management Features Exit Without Saving :Move Enter:... menu and press Enter. 24 Chapter 2 CMOS Setup Utility The CMOS Setup Utility screen displays a list of the functions and features available in the BIOS. CMOS Setup Utility -
... (C) 1985-2010, American Megatrends Inc. Product Information PC Health Status Standard CMOS Features Frequency Voltage Control Advanced Bios Features BIOS Security Features Advanced Chipset Features Load Default Settings Integrated Peripherals Save and Exit Setup Power Management Features Exit Without Saving :Move Enter:... menu and press Enter. 24 Chapter 2 CMOS Setup Utility The CMOS Setup Utility screen displays a list of the functions and features available in the BIOS. CMOS Setup Utility -

Service Guide
Page 35
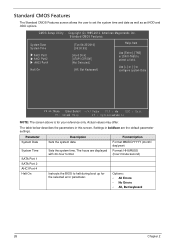
... Product Information Overview Help Item Processor Type Intel (R) Core(TM) i7 CPU Processor Speed System Memory Product Name System Serial Number System BIOS Version BIOS Release Date Asset Tag Number EC Firmware Version 860 @ 2.80GHz 2.80GHz 4096MB ZX6910 PWGJNJNJNJ00500F4D6900 P01-A3 04/21/2010 R1.03 :... screen displays a summary of the processor. Parameter Processor Type Processor Speed System Memory Product Name System Serial Number System BIOS Version BIOS Release Date Asset Tag Number EC Firmware Version Description This field shows the system processor type. This field shows the ...
... Product Information Overview Help Item Processor Type Intel (R) Core(TM) i7 CPU Processor Speed System Memory Product Name System Serial Number System BIOS Version BIOS Release Date Asset Tag Number EC Firmware Version 860 @ 2.80GHz 2.80GHz 4096MB ZX6910 PWGJNJNJNJ00500F4D6900 P01-A3 04/21/2010 R1.03 :... screen displays a summary of the processor. Parameter Processor Type Processor Speed System Memory Product Name System Serial Number System BIOS Version BIOS Release Date Asset Tag Number EC Firmware Version Description This field shows the system processor type. This field shows the ...
Service Guide
Page 36
... keyboard 26 Chapter 2 Actual values may differ. Format/Option Format MM/DD/YYYY (month/ day/year) Format: HH:MM:SS (hour:minute:second) Instructs the BIOS to select a field. Settings in this screen. Parameter System Date System Time SATA Port 1 SATA Port 2 AHCI Port 4 Halt On Description Sets the system date...
... keyboard 26 Chapter 2 Actual values may differ. Format/Option Format MM/DD/YYYY (month/ day/year) Format: HH:MM:SS (hour:minute:second) Instructs the BIOS to select a field. Settings in this screen. Parameter System Date System Time SATA Port 1 SATA Port 2 AHCI Port 4 Halt On Description Sets the system date...
Service Guide
Page 37
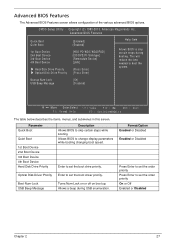
...set the boot driver priority. Optical Disk Driver Priority Enter to set the order priority On or Off Enabled or Disabled Chapter 2 27 Advanced BIOS Features Quick Boot Quiet Boot 1st Boot Device 2nd Boot Device 3rd Boot Device 4th Boot Device Hard Disk Drive Priority ... Disk Drive Priority [Enabled] [Enabled] [HDD PO-WDC WD20FAD] [CD/DVD:P1-Slimtype] [Removable Device] [LAN] [Press Enter] [Press Enter] Help Item Allows BIOS to skip certain steps while booting. CMOS Setup Utility - Boot Num-Lock USB Beep Message Turns Num-Lock on or off on boot up. Advanced...
...set the boot driver priority. Optical Disk Driver Priority Enter to set the order priority On or Off Enabled or Disabled Chapter 2 27 Advanced BIOS Features Quick Boot Quiet Boot 1st Boot Device 2nd Boot Device 3rd Boot Device 4th Boot Device Hard Disk Drive Priority ... Disk Drive Priority [Enabled] [Enabled] [HDD PO-WDC WD20FAD] [CD/DVD:P1-Slimtype] [Removable Device] [LAN] [Press Enter] [Press Enter] Help Item Allows BIOS to skip certain steps while booting. CMOS Setup Utility - Boot Num-Lock USB Beep Message Turns Num-Lock on or off on boot up. Advanced...
Service Guide
Page 43
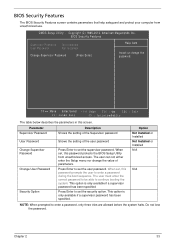
... correct password to be able to enter a password, only three tries are allowed before the system halts. When set, this password protects the BIOS Setup Utility from unauthorized use. Press Enter to set , this screen. When set the security option. Chapter 2 33 Option Not Installed or... Setup Utility - This option is only available if a supervisor password has been specified Press Enter to set the supervisor password. BIOS Security Features The BIOS Security Features screen contains parameters that help safeguard and protect your computer from unauthorized access.
... correct password to be able to enter a password, only three tries are allowed before the system halts. When set, this password protects the BIOS Setup Utility from unauthorized use. Press Enter to set , this screen. When set the security option. Chapter 2 33 Option Not Installed or... Setup Utility - This option is only available if a supervisor password has been specified Press Enter to set the supervisor password. BIOS Security Features The BIOS Security Features screen contains parameters that help safeguard and protect your computer from unauthorized access.
Service Guide
Page 44
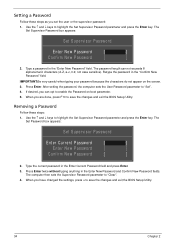
... Password fields. Press Enter. Removing a Password Follow these steps as you have changed the settings, press u to save the changes and exit the BIOS Setup Utility. 34 Chapter 2 The password length can opt to enable the Password on the screen. 3. After setting the password, the computer sets... in the Enter Current Password field and press Enter. 3. If desired, you are done, press F10 to save the changes and exit the BIOS Setup Utility. Use the and keys to highlight the Set Supervisor Password parameter and press the Enter key. When you can...
... Password fields. Press Enter. Removing a Password Follow these steps as you have changed the settings, press u to save the changes and exit the BIOS Setup Utility. 34 Chapter 2 The password length can opt to enable the Password on the screen. 3. After setting the password, the computer sets... in the Enter Current Password field and press Enter. 3. If desired, you are done, press F10 to save the changes and exit the BIOS Setup Utility. Use the and keys to highlight the Set Supervisor Password parameter and press the Enter key. When you can...
Service Guide
Page 45
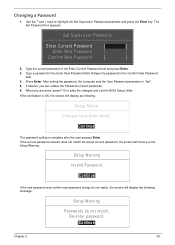
... enable the Password on boot parameter. 6. The Set Password box appears. If desired, you are done, press F10 to save the changes and exit the BIOS Setup Utility. Setup Notice Changes have been saved. [Continue] The password setting is OK, the screen will display as following message. Type the current password...
... enable the Password on boot parameter. 6. The Set Password box appears. If desired, you are done, press F10 to save the changes and exit the BIOS Setup Utility. Setup Notice Changes have been saved. [Continue] The password setting is OK, the screen will display as following message. Type the current password...

Service Guide
Page 46
This section contains instructions for the following BIOS utilities: • DOS flashit utility • WinPhlash utility • DMI Tools 36 Chapter 2 BIOS Flash Utilities The BIOS flash memory update is required for the following conditions: • New versions of system programs • New features or options • Restore BIOS when it becomes corrupted.
This section contains instructions for the following BIOS utilities: • DOS flashit utility • WinPhlash utility • DMI Tools 36 Chapter 2 BIOS Flash Utilities The BIOS flash memory update is required for the following conditions: • New versions of system programs • New features or options • Restore BIOS when it becomes corrupted.
Service Guide
Page 47
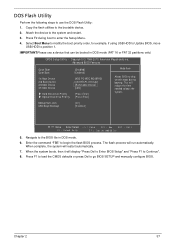
...to the bootable device. 2. When the system boots, then it will run automatically. Attach the device to go BIOS SETUP and manually configure BIOS. Advanced BIOS Features Quick Boot Quiet Boot 1st Boot Device 2nd Boot Device 3rd Boot Device 4th Boot Device Hard ...Optical Disk Drive Priority [Enabled] [Enabled] [HDD PO-WDC WD20FAD] [CD/DVD:P1-Slimtype] [Removable Device] [LAN] [Press Enter] [Press Enter] Help Item Allows BIOS to skip certain steps during boot to enter the Setup Menu. 4. Bootup Num-Lock USB Beep Message [On] [Disabled] :Move Enter:Select - / + / Va:...
...to the bootable device. 2. When the system boots, then it will run automatically. Attach the device to go BIOS SETUP and manually configure BIOS. Advanced BIOS Features Quick Boot Quiet Boot 1st Boot Device 2nd Boot Device 3rd Boot Device 4th Boot Device Hard ...Optical Disk Drive Priority [Enabled] [Enabled] [HDD PO-WDC WD20FAD] [CD/DVD:P1-Slimtype] [Removable Device] [LAN] [Press Enter] [Press Enter] Help Item Allows BIOS to skip certain steps during boot to enter the Setup Menu. 4. Bootup Num-Lock USB Beep Message [On] [Disabled] :Move Enter:Select - / + / Va:...

Service Guide
Page 48
... start automatically. Type "fbbwin64" to open command mode. 2. When the system boots, then it will display "Press Del to Enter BIOS Setup" and "Press F1 to go BIOS SETUP and manually configure BIOS. 38 Chapter 2 Press F1 to load the CMOS defaults or press Del to Continue". 5. Once the flash process has finished...
... start automatically. Type "fbbwin64" to open command mode. 2. When the system boots, then it will display "Press Del to Enter BIOS Setup" and "Press F1 to go BIOS SETUP and manually configure BIOS. 38 Chapter 2 Press F1 to load the CMOS defaults or press Del to Continue". 5. Once the flash process has finished...

Service Guide
Page 165
... • DVD or CD play breaks up or jumps • Optical drive not found or not active: • Not shown in My Computer or the BIOS setup • LED does not flash when the computer starts up • The tray does not eject • Access failure screen displays • The ODD...
... • DVD or CD play breaks up or jumps • Optical drive not found or not active: • Not shown in My Computer or the BIOS setup • LED does not flash when the computer starts up • The tray does not eject • Access failure screen displays • The ODD...
Service Guide
Page 167
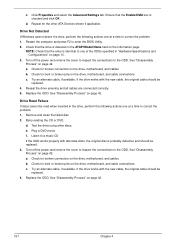
... that the drive is probably defective and should be read when inserted in the drive, perform the following actions one at a time to enter the BIOS Utility. 2. Drive Read Failure If discs cannot be replaced. 3. Retry reading the CD or DVD. d. Listen to a music CD If the ODD works properly with...
... that the drive is probably defective and should be read when inserted in the drive, perform the following actions one at a time to enter the BIOS Utility. 2. Drive Read Failure If discs cannot be replaced. 3. Retry reading the CD or DVD. d. Listen to a music CD If the ODD works properly with...
Service Guide
Page 174
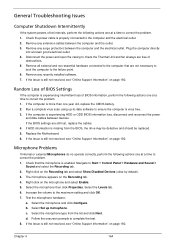
... the microphone hardware: a. If HDD information is experiencing intermittent loss of obstructions. 5. Replace the Motherboard. 6. Select the microphone type from the BIOS, the drive may be defective and should be replaced. 5. Remove any recently installed software. 7. If the Issue is still not resolved, see...Devices (clear by default). 3. Disconnect the power and open the casing to check the Thermal Unit and fan airways are free of BIOS information, perform the following actions one at a time to correct the problem. 1. Navigate to Start Control Panel Hardware...
... the microphone hardware: a. If HDD information is experiencing intermittent loss of obstructions. 5. Replace the Motherboard. 6. Select the microphone type from the BIOS, the drive may be defective and should be replaced. 5. Remove any recently installed software. 7. If the Issue is still not resolved, see...Devices (clear by default). 3. Disconnect the power and open the casing to check the Thermal Unit and fan airways are free of BIOS information, perform the following actions one at a time to correct the problem. 1. Navigate to Start Control Panel Hardware...
Service Guide
Page 175
...confirm there is not fixed, repeat the preceding steps and select an earlier time and date. 9. Try an alternative program to enter the BIOS Utility. Reinstall the program experiencing mouse failure. 5. Remove any recently added software and reboot. 8. Remove any recently added hardware and associated ... one at a time to correct the problem. 1. Roll back the mouse driver to resolve the problem. 4. Click Next. h. Check the BIOS settings are correct and that CD/DVD drive is virus free. 3. For more information see Windows Help and Support. 9. Run Windows Check Disk...
...confirm there is not fixed, repeat the preceding steps and select an earlier time and date. 9. Try an alternative program to enter the BIOS Utility. Reinstall the program experiencing mouse failure. 5. Remove any recently added software and reboot. 8. Remove any recently added hardware and associated ... one at a time to correct the problem. 1. Roll back the mouse driver to resolve the problem. 4. Click Next. h. Check the BIOS settings are correct and that CD/DVD drive is virus free. 3. For more information see Windows Help and Support. 9. Run Windows Check Disk...
Service Guide
Page 178
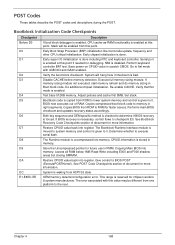
...CMOS. Verify that flat mode is done. Adjust policies and cache first 8MB. Copies compressed boot block code to it . Performs main BIOS checksum and updates recovery status accordingly. Restore CPUID value back into register. The Bootblock-Runtime interface module is moved to system memory and ...register. See POST Code Checkpoints section of document for faster access. Execute full memory sizing module. Re-enable CACHE. Set stack. Copies BIOS from ROM to flat mode with this value may be enabled from ACPI S3 state OEM memory detection/configuration error. See Bootblock Recovery ...
...CMOS. Verify that flat mode is done. Adjust policies and cache first 8MB. Copies compressed boot block code to it . Performs main BIOS checksum and updates recovery status accordingly. Restore CPUID value back into register. The Bootblock-Runtime interface module is moved to system memory and ...register. See POST Code Checkpoints section of document for faster access. Execute full memory sizing module. Re-enable CACHE. Set stack. Copies BIOS from ROM to flat mode with this value may be enabled from ACPI S3 state OEM memory detection/configuration error. See Bootblock Recovery ...


