User Manual
Page 3
... 18 Playing to another device 54 Your Acer notebook tour 19 Power management 55 Screen view 20 Acer Green Instant On 55 Keyboard view 22 Saving power 56 Front view 23 Left view 24 Battery pack 59 Right view 25 Battery pack characteristics 59 Information on USB 3.0 ...25 Charging the battery 59 Base view 26 Optimizing battery life 61 Checking the battery level 61 Touchpad 27 Battery-...
... 18 Playing to another device 54 Your Acer notebook tour 19 Power management 55 Screen view 20 Acer Green Instant On 55 Keyboard view 22 Saving power 56 Front view 23 Left view 24 Battery pack 59 Right view 25 Battery pack characteristics 59 Information on USB 3.0 ...25 Charging the battery 59 Base view 26 Optimizing battery life 61 Checking the battery level 61 Touchpad 27 Battery-...
User Manual
Page 7
..., particularly when AC power is present. These openings must not be seriously damaged. - Never spill liquid of internal components and to prevent battery leakage, do not come in contact with exposed skin can cause discomfort or burn. Your device and its enhancements may get hot. Product... installation unless proper ventilation is damaged, cut or frayed. The power cord or plug is provided. - Do not place this product from lithium battery pack. - The surface temperature of small children. - The openings should never be blocked by placing the product on an unstable cart, stand ...
..., particularly when AC power is present. These openings must not be seriously damaged. - Never spill liquid of internal components and to prevent battery leakage, do not come in contact with exposed skin can cause discomfort or burn. Your device and its enhancements may get hot. Product... installation unless proper ventilation is damaged, cut or frayed. The power cord or plug is provided. - Do not place this product from lithium battery pack. - The surface temperature of small children. - The openings should never be blocked by placing the product on an unstable cart, stand ...
User Manual
Page 8
... in a pressurized container, and do not expose it to prolong the lifetime of other controls may cause the battery to qualified service personnel. Use only the approved batteries, and recharge your product in or near a heat source, in a high temperature location, in strong direct ...a qualified technician to restore the product to rain or water. - Do not use any charger or battery that are covered by the operating instructions, since improper adjustment of the battery, charging will eventually wear out. The full performance of times, but it in performance, indicating a...
... in a pressurized container, and do not expose it to prolong the lifetime of other controls may cause the battery to qualified service personnel. Use only the approved batteries, and recharge your product in or near a heat source, in a high temperature location, in strong direct ...a qualified technician to restore the product to rain or water. - Do not use any charger or battery that are covered by the operating instructions, since improper adjustment of the battery, charging will eventually wear out. The full performance of times, but it in performance, indicating a...
User Manual
Page 9
... in temperatures well below freezing. This device meets RF exposure guidelines when used batteries. To successfully transmit data files or messages, this device requires a good quality connection to www.acer.com for battery shipping documents. - Parts of the device are not limited to the ear... with a hot or cold battery may be reduced if the battery is available. Battery performance is fully charged. Follow local regulations when ...
... in temperatures well below freezing. This device meets RF exposure guidelines when used batteries. To successfully transmit data files or messages, this device requires a good quality connection to www.acer.com for battery shipping documents. - Parts of the device are not limited to the ear... with a hot or cold battery may be reduced if the battery is available. Battery performance is fully charged. Follow local regulations when ...
User Manual
Page 21
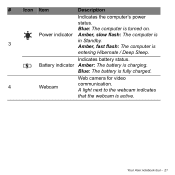
Indicates battery status. Blue: The battery is 3 in Standby. Power indicator Amber, slow flash: The computer is fully charged. Your Acer notebook tour - 21 Amber, fast flash: The computer is turned on. Blue: The computer is entering Hibernate / Deep Sleep. A light next to the webcam indicates that the webcam is charging. # Icon Item Description Indicates the computer's power status. Web camera for video 4 Webcam communication. Battery indicator Amber: The battery is active.
Indicates battery status. Blue: The battery is 3 in Standby. Power indicator Amber, slow flash: The computer is fully charged. Your Acer notebook tour - 21 Amber, fast flash: The computer is turned on. Blue: The computer is entering Hibernate / Deep Sleep. A light next to the webcam indicates that the webcam is charging. # Icon Item Description Indicates the computer's power status. Web camera for video 4 Webcam communication. Battery indicator Amber: The battery is active.
User Manual
Page 24
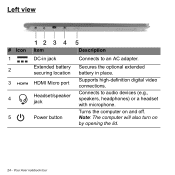
Note: The computer will also turn on and off. Extended battery securing location HDMI Micro port Headset/speaker jack Power button Secures the optional extended battery in jack Connects to audio devices (e.g., speakers, headphones) or a headset with microphone. Your Acer notebook tour Connects to an AC adapter. Supports high-definition digital video connections. Turns the computer on by opening the lid. 24 - Left view # Icon 1 2 3 4 5 12 3 4 5 Item Description DC-in place.
Note: The computer will also turn on and off. Extended battery securing location HDMI Micro port Headset/speaker jack Power button Secures the optional extended battery in jack Connects to audio devices (e.g., speakers, headphones) or a headset with microphone. Your Acer notebook tour Connects to an AC adapter. Supports high-definition digital video connections. Turns the computer on by opening the lid. 24 - Left view # Icon 1 2 3 4 5 12 3 4 5 Item Description DC-in place.
User Manual
Page 26
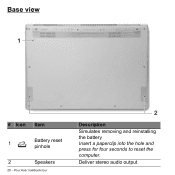
Deliver stereo audio output. Base view 1 # Icon Item 1 Battery reset pinhole 2 Speakers 26 - Your Acer notebook tour 2 Description Simulates removing and reinstalling the battery Insert a paperclip into the hole and press for four seconds to reset the computer.
Deliver stereo audio output. Base view 1 # Icon Item 1 Battery reset pinhole 2 Speakers 26 - Your Acer notebook tour 2 Description Simulates removing and reinstalling the battery Insert a paperclip into the hole and press for four seconds to reset the computer.
User Manual
Page 55
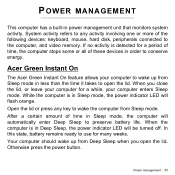
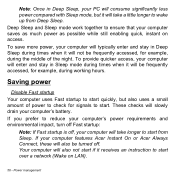
... press any activity involving one or more of time in order to wake the computer from Sleep mode. In this state, battery remains ready to preserve battery life. Power management - 55 After a certain amount of the following devices: keyboard, mouse, hard disk, peripherals connected to... open the lid. Acer Green Instant On The Acer Green Instant On feature allows your computer for many weeks. Otherwise press the power button....
... press any activity involving one or more of time in order to wake the computer from Sleep mode. In this state, battery remains ready to preserve battery life. Power management - 55 After a certain amount of the following devices: keyboard, mouse, hard disk, peripherals connected to... open the lid. Acer Green Instant On The Acer Green Instant On feature allows your computer for many weeks. Otherwise press the power button....
User Manual
Page 56
Your computer will slowly drain your computer's battery. If your computer features Acer Instant On or Acer Always Connect, these will also be frequently accessed, for example, during working hours. Power management These checks will also not start if it will not ...
Your computer will slowly drain your computer's battery. If your computer features Acer Instant On or Acer Always Connect, these will also be frequently accessed, for example, during working hours. Power management These checks will also not start if it will not ...
User Manual
Page 59
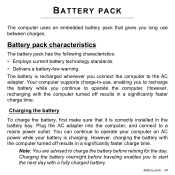
... your computer on AC power while your battery is correctly installed in -use between charges. Battery pack - 59 BATTERY PACK The computer uses an embedded battery pack that it is charging. Charging the battery To charge the battery, first make sure that gives you to... long use , enabling you to recharge the battery while you connect the computer to a mains power outlet. Battery pack characteristics The battery pack has the following characteristics: • Employs current battery technology standards. • Delivers a battery-low warning. However, recharging with the computer ...
... your computer on AC power while your battery is correctly installed in -use between charges. Battery pack - 59 BATTERY PACK The computer uses an embedded battery pack that it is charging. Charging the battery To charge the battery, first make sure that gives you to... long use , enabling you to recharge the battery while you connect the computer to a mains power outlet. Battery pack characteristics The battery pack has the following characteristics: • Employs current battery technology standards. • Delivers a battery-low warning. However, recharging with the computer ...
User Manual
Page 60
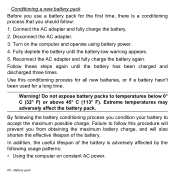
... 45° C (113° F). In addition, the useful lifespan of the battery. Connect the AC adapter and fully charge the battery. 2. Warning! Fully deplete the battery until the battery has been charged and discharged three times. Battery pack Extreme temperatures may adversely affect the battery pack. By following usage patterns: • Using the computer on the...
... 45° C (113° F). In addition, the useful lifespan of the battery. Connect the AC adapter and fully charge the battery. 2. Warning! Fully deplete the battery until the battery has been charged and discharged three times. Battery pack Extreme temperatures may adversely affect the battery pack. By following usage patterns: • Using the computer on the...
User Manual
Page 61
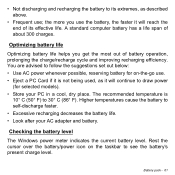
...below: • Use AC power whenever possible, reserving battery for selected models). • Store your AC adapter and battery. Checking the battery level The Windows power meter indicates the current battery level. Rest the cursor over the battery/power icon on -the-go use. • Eject...50° F) to self-discharge faster. • Excessive recharging decreases the battery life. • Look after your PC in a cool, dry place. Optimizing battery life Optimizing battery life helps you use ; Higher temperatures cause the battery to 30° C (86° F). the more you get the...
...below: • Use AC power whenever possible, reserving battery for selected models). • Store your AC adapter and battery. Checking the battery level The Windows power meter indicates the current battery level. Rest the cursor over the battery/power icon on -the-go use. • Eject...50° F) to self-discharge faster. • Excessive recharging decreases the battery life. • Look after your PC in a cool, dry place. Optimizing battery life Optimizing battery life helps you use ; Higher temperatures cause the battery to 30° C (86° F). the more you get the...
User Manual
Page 62
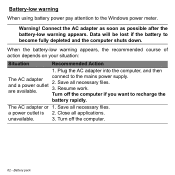
...Connect the AC adapter as soon as possible after the battery-low warning appears. Resume work. Data will be lost if the battery to recharge the battery rapidly. Turn off the computer. 62 - Battery pack When the battery-low warning appears, the recommended course of action depends ...on your situation: Situation Recommended Action 1. Save all necessary files. a power outlet is 2. Battery-low warning When using battery power pay attention to the mains power supply. 2. connect to the Windows power meter. The AC adapter or 1. Save all...
...Connect the AC adapter as soon as possible after the battery-low warning appears. Resume work. Data will be lost if the battery to recharge the battery rapidly. Turn off the computer. 62 - Battery pack When the battery-low warning appears, the recommended course of action depends ...on your situation: Situation Recommended Action 1. Save all necessary files. a power outlet is 2. Battery-low warning When using battery power pay attention to the mains power supply. 2. connect to the Windows power meter. The AC adapter or 1. Save all...
User Manual
Page 64
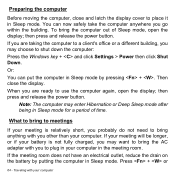
... shut down the computer: Press the Windows key + and click Settings > Power then click Shut Down. If your meeting will be longer, or if your battery is relatively short, you other than your computer. You can put the computer in Sleep mode by putting the computer in Sleep mode. Then close... anywhere you to use the computer again, open the display; If the meeting room does not have an electrical outlet, reduce the drain on the battery by pressing + . Press + or 64 - Traveling with you go within the building. To bring to place it in Sleep mode.
... shut down the computer: Press the Windows key + and click Settings > Power then click Shut Down. If your meeting will be longer, or if your battery is relatively short, you other than your computer. You can put the computer in Sleep mode by putting the computer in Sleep mode. Then close... anywhere you to use the computer again, open the display; If the meeting room does not have an electrical outlet, reduce the drain on the battery by pressing + . Press + or 64 - Traveling with you go within the building. To bring to place it in Sleep mode.
User Manual
Page 67
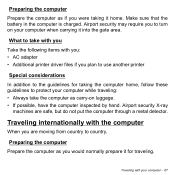
... security may require you are safe, but do not put the computer through a metal detector. Traveling internationally with your computer - 67 Make sure that the battery in the computer is charged. Airport security X-ray machines are moving from country to country. Preparing the computer Prepare the computer as if you were...
... security may require you are safe, but do not put the computer through a metal detector. Traveling internationally with your computer - 67 Make sure that the battery in the computer is charged. Airport security X-ray machines are moving from country to country. Preparing the computer Prepare the computer as if you were...
User Manual
Page 86
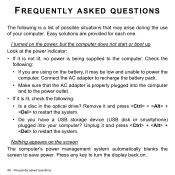
.... Frequently asked questions Remove it and press + + to save power. Connect the AC adapter to recharge the battery pack. • Make sure that may be low and unable to restart the system. I turned on the battery, it and press + + to power the computer. FREQUENTLY ASKED QUESTIONS The following is a list of your...
.... Frequently asked questions Remove it and press + + to save power. Connect the AC adapter to recharge the battery pack. • Make sure that may be low and unable to restart the system. I turned on the battery, it and press + + to power the computer. FREQUENTLY ASKED QUESTIONS The following is a list of your...
User Manual
Page 97
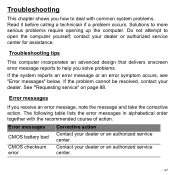
...; Solutions to help you solve problems. If the system reports an error message or an error symptom occurs, see "Error messages" below. Error messages CMOS battery bad CMOS checksum error Corrective action Contact your dealer. Troubleshooting tips This computer incorporates an advanced design that delivers onscreen error message reports to more...
...; Solutions to help you solve problems. If the system reports an error message or an error symptom occurs, see "Error messages" below. Error messages CMOS battery bad CMOS checksum error Corrective action Contact your dealer. Troubleshooting tips This computer incorporates an advanced design that delivers onscreen error message reports to more...
Acer S7-391 Notebook Service Guide
Page 5
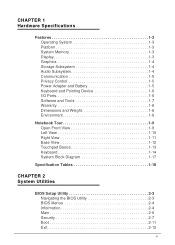
CHAPTER 1 Hardware Specifications Features 1-3 Operating System 1-3 Platform 1-3 System Memory 1-3 Display 1-3 Graphics 1-4 Storage Subsystem 1-4 Audio Subsystem 1-4 Communication 1-5 Privacy Control 1-5 Power Adapter and Battery 1-5 Keyboard and Pointing Device 1-6 I/O Ports 1-6 Software and Tools 1-7 Warranty 1-8 Dimensions and Weight 1-8 Environment 1-8 Notebook Tour 1-9 Open Front View 1-9 Left View 1-10 Right View 1-11 Base ...
CHAPTER 1 Hardware Specifications Features 1-3 Operating System 1-3 Platform 1-3 System Memory 1-3 Display 1-3 Graphics 1-4 Storage Subsystem 1-4 Audio Subsystem 1-4 Communication 1-5 Privacy Control 1-5 Power Adapter and Battery 1-5 Keyboard and Pointing Device 1-6 I/O Ports 1-6 Software and Tools 1-7 Warranty 1-8 Dimensions and Weight 1-8 Environment 1-8 Notebook Tour 1-9 Open Front View 1-9 Left View 1-10 Right View 1-11 Base ...
Acer S7-391 Notebook Service Guide
Page 6
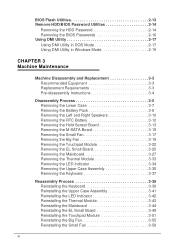
... Machine Disassembly and Replacement 3-3 Recommended Equipment 3-3 Replacement Requirements 3-3 Pre-disassembly Instructions 3-4 Disassembly Process 3-5 Removing the Lower Case 3-7 Removing the Battery Pack 3-8 Removing the Left and Right Speakers 3-10 Removing the RTC Battery 3-12 Removing the Hold Sensor Board 3-13 Removing the M-SATA Board 3-15 Removing the Small Fan 3-17 Removing the Big...
... Machine Disassembly and Replacement 3-3 Recommended Equipment 3-3 Replacement Requirements 3-3 Pre-disassembly Instructions 3-4 Disassembly Process 3-5 Removing the Lower Case 3-7 Removing the Battery Pack 3-8 Removing the Left and Right Speakers 3-10 Removing the RTC Battery 3-12 Removing the Hold Sensor Board 3-13 Removing the M-SATA Board 3-15 Removing the Small Fan 3-17 Removing the Big...
Acer S7-391 Notebook Service Guide
Page 7
Reinstalling the M-SATA Board 3-60 Reinstalling the Hold Sensor Board 3-62 Reinstalling the RTC Battery 3-64 Reinstalling the Left and Right Speakers 3-65 Reinstalling the Battery Pack 3-67 Reinstalling the Lower Case 3-69 CHAPTER 4 Troubleshooting Introduction 4-3 General Information 4-3 Power On Issues 4-4 No Display Issues 4-5 LCD Failure 4-7 Keyboard Failure 4-8 Touchpad Failure 4-9 Internal ...
Reinstalling the M-SATA Board 3-60 Reinstalling the Hold Sensor Board 3-62 Reinstalling the RTC Battery 3-64 Reinstalling the Left and Right Speakers 3-65 Reinstalling the Battery Pack 3-67 Reinstalling the Lower Case 3-69 CHAPTER 4 Troubleshooting Introduction 4-3 General Information 4-3 Power On Issues 4-4 No Display Issues 4-5 LCD Failure 4-7 Keyboard Failure 4-8 Touchpad Failure 4-9 Internal ...


